QT实现串口通信
一.Qt串口通信
Qt提供了两个关于串口通信的C++类,分别是QSerialPort和QSerialPortInfo。
QSerialPort类提供了操作串口的各种接口。
QSerialPortInfo是一个辅助类,可以提供计算机中可用的串口的各种信息。
QSerialPortInfo Class用于提供外部串行端口的信息。
使用静态函数生成一个QSerialPortInfo对象的列表。列表中的每个QSerialPortInfo对象存储着单个串行端口的信息,可以查询端口名称,系统位置,描述和制造商。QSerialPortInfo类也可作为QSerialPort类中setPort()方法的输入参数。
二.代码实现
1.在头文件中引入 QtSerialPort 类的两个头文件(必须引入)
#include <QtSerialPort/QSerialPort> // 提供访问串口的功能
#include <QtSerialPort/QSerialPortInfo> // 提供系统中存在的串口信息
2.在工程文件中添加以下代码
# 引入串口工程类型,pro文件添加
QT += serialport
3.代码
#include "mainwindow.h"
#include "ui_mainwindow.h"
#include <QDebug>
MainWindow::MainWindow(QWidget *parent) :
QMainWindow(parent),
ui(new Ui::MainWindow)
{
ui->setupUi(this);
//查找可用的串口
foreach(const QSerialPortInfo &info, QSerialPortInfo::availablePorts())
{
qDebug() << "Port Name:" << info.portName();
QSerialPort serial;
serial.setPort(info);
if(serial.open(QIODevice::ReadWrite))
{
ui->PortBox->addItem(serial.portName());
serial.close();
}
}
//设置波特率下拉菜单默认项
ui->BaudBox->setCurrentIndex(7);
//关闭发送按钮的使能
ui->sendButton->setEnabled(false);
}
MainWindow::~MainWindow()
{
delete ui;
}
//清空接受窗口
void MainWindow::on_clearButton_clicked()
{
ui->textEdit->clear();
}
//发送数据
void MainWindow::on_sendButton_clicked()
{
serial->write(ui->textEdit_2->toPlainText().toLatin1());
}
//读取接收到的数据
void MainWindow::Read_Data()
{
QByteArray buf;
buf = serial->readAll();
qDebug() << buf;
if(!buf.isEmpty())
{
QString str = ui->textEdit->toPlainText();
str+=tr(buf);
ui->textEdit->clear();
ui->textEdit->append(str);
}
buf.clear();
}
void MainWindow::on_openButton_clicked()
{
if(ui->openButton->text()==tr("打开串口"))
{
serial = new QSerialPort;
//设置串口名
serial->setPortName(ui->PortBox->currentText());
//打开串口
serial->open(QIODevice::ReadWrite);
//设置波特率
serial->setBaudRate(ui->BaudBox->currentText().toInt());
//设置数据位数
switch(ui->BitNumBox->currentIndex())
{
case 8: serial->setDataBits(QSerialPort::Data8); break;
default: break;
}
//设置奇偶校验
switch(ui->ParityBox->currentIndex())
{
case 0: serial->setParity(QSerialPort::NoParity); break;
default: break;
}
//设置停止位
switch(ui->StopBox->currentIndex())
{
case 1: serial->setStopBits(QSerialPort::OneStop); break;
case 2: serial->setStopBits(QSerialPort::TwoStop); break;
default: break;
}
//设置流控制
serial->setFlowControl(QSerialPort::NoFlowControl);
//关闭设置菜单使能
ui->PortBox->setEnabled(false);
ui->BaudBox->setEnabled(false);
ui->BitNumBox->setEnabled(false);
ui->ParityBox->setEnabled(false);
ui->StopBox->setEnabled(false);
ui->openButton->setText(tr("关闭串口"));
ui->sendButton->setEnabled(true);
//连接信号槽
QObject::connect(serial, &QSerialPort::readyRead, this, &MainWindow::Read_Data);
}
else
{
//关闭串口
serial->clear();
serial->close();
serial->deleteLater();
//恢复设置使能
ui->PortBox->setEnabled(true);
ui->BaudBox->setEnabled(true);
ui->BitNumBox->setEnabled(true);
ui->ParityBox->setEnabled(true);
ui->StopBox->setEnabled(true);
ui->openButton->setText(tr("打开串口"));
ui->sendButton->setEnabled(false);
}
}
void MainWindow::on_pushButton_clicked()
{
//刷新可用的串口
ui->PortBox->clear();
foreach(const QSerialPortInfo &info, QSerialPortInfo::availablePorts())
{
QSerialPort serial;
serial.setPort(info);
if(serial.open(QIODevice::ReadWrite))
{
ui->PortBox->addItem(serial.portName());
serial.close();
}
}
}
4.运行界面

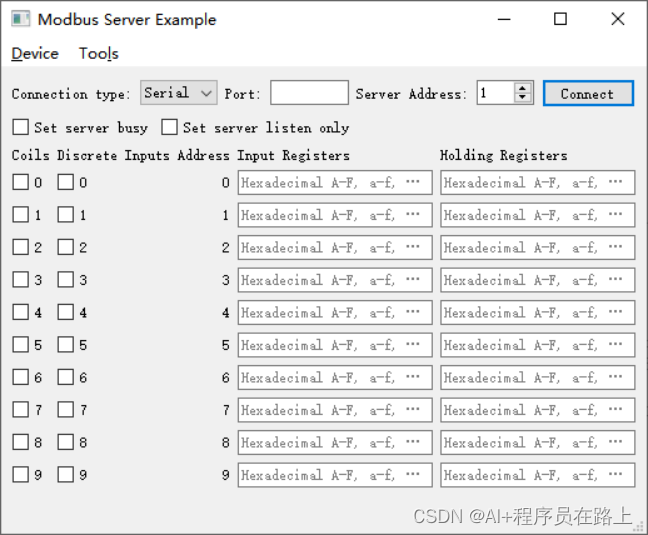
5.modbus 项目工程示例
代码可以在博客资源内下载:https://download.csdn.net/download/xieliru/88850765
(1)client界面

(2)Server界面