使用 Ant Design 的 Upload 组件实现图片
文章目录
- 使用 Ant Design 的 Upload 组件实现图片
- Upload组件
- itemRender
- 自定义上传列表项的渲染方式
- 修改图片名
- 上传
- 图片上传链接中添加 Bearer Token 的请求头
- onPreview={handlePreview}
- 上传成功后,如何隐藏上传列表
使用 Ant Design 的 Upload 组件实现图片
Upload组件
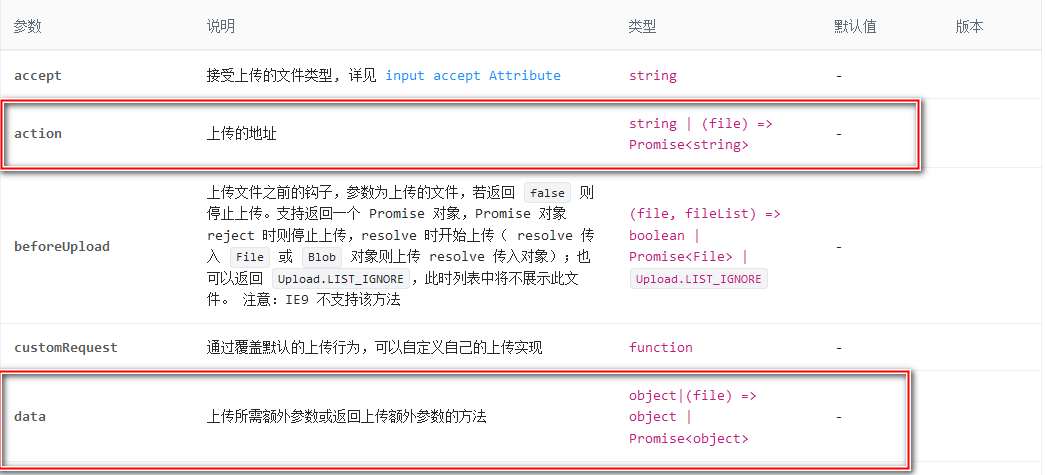
官方: https://4x.ant.design/components/upload-cn/
Upload上传
文件选择上传和拖拽上传控件。
何时使用#
上传是将信息(网页、文字、图片、视频等)通过网页或者上传工具发布到远程服务器上的过程。
- 当需要上传一个或一些文件时。
- 当需要展现上传的进度时。
- 当需要使用拖拽交互时。
itemRender
itemRender 是 Upload 组件的一个配置项,用于自定义上传列表项的渲染方式。
该配置项接受一个回调函数,函数的参数包括:
originNode:原始的上传列表项节点,即默认的上传列表项。
file:当前的文件对象,包含文件的信息,例如 uid、name、status、url 等属性。
fileList:当前的文件列表,是一个对象数组。
actions:包含三个函数的对象,用于执行下载、预览和删除等操作。
回调函数需要返回一个 React 组件,作为自定义的上传列表项的节点。
通过使用 itemRender 配置项,您可以根据自己的需求和设计,自定义上传列表项的样式和功能。例如,您可以添加额外的操作按钮、显示文件的描述信息、调整上传列表项的布局等。
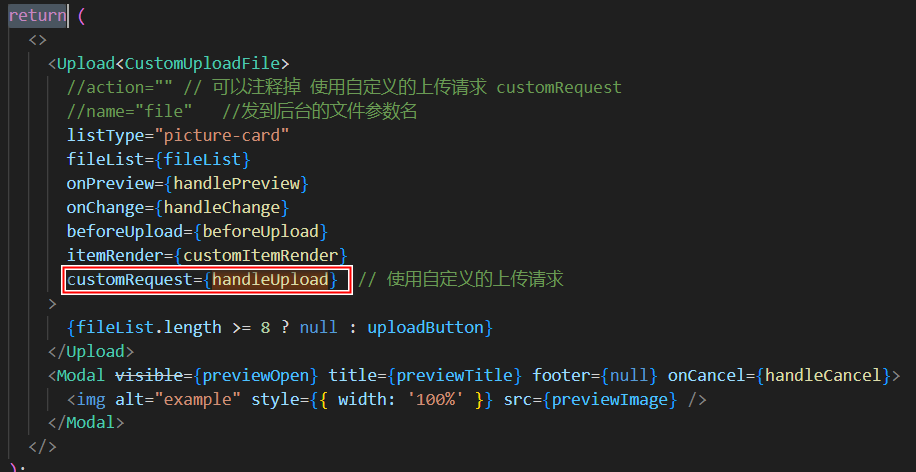
customItemRender 函数接收 originNode、file、fileList 和 actions 参数,根据这些参数自定义了一个上传列表项的渲染。渲染结果是一个带有文件名、描述信息和操作按钮的自定义上传列表项。
import { PlusOutlined } from '@ant-design/icons';
import { Modal, Upload, Button, message } from 'antd';
import type { RcFile, UploadProps } from 'antd/es/upload';
import type { UploadFile } from 'antd/es/upload/interface';
import React, { useState } from 'react';const getBase64 = (file: RcFile): Promise<string> =>new Promise((resolve, reject) => {const reader = new FileReader();reader.readAsDataURL(file);reader.onload = () => resolve(reader.result as string);reader.onerror = (error) => reject(error);});const App: React.FC = () => {const [previewOpen, setPreviewOpen] = useState(false);const [previewImage, setPreviewImage] = useState('');const [previewTitle, setPreviewTitle] = useState('');const [fileList, setFileList] = useState<UploadFile[]>([{uid: '-1',name: 'image1.png',status: 'done',url: 'https://zos.alipayobjects.com/rmsportal/jkjgkEfvpUPVyRjUImniVslZfWPnJuuZ.png',description: '这是第一张图片',},{uid: '-2',name: 'image2.png',status: 'done',url: 'https://zos.alipayobjects.com/rmsportal/jkjgkEfvpUPVyRjUImniVslZfWPnJuuZ.png',description: '这是第二张图片',},// 添加更多的图片项...]);const handleCancel = () => setPreviewOpen(false);const handlePreview = async (file: UploadFile) => {if (!file.url && !file.preview) {file.preview = await getBase64(file.originFileObj as RcFile);}setPreviewImage(file.url || (file.preview as string));setPreviewOpen(true);setPreviewTitle(file.name || file.url!.substring(file.url!.lastIndexOf('/') + 1));};const handleChange: UploadProps['onChange'] = ({ fileList: newFileList }) =>setFileList(newFileList);const handleEditDescription = (fileUid: string, newDescription: string) => {const updatedFileList = fileList.map((file) => {if (file.uid === fileUid) {return {...file,description: newDescription,};}return file;});setFileList(updatedFileList);};const beforeUpload = (file: RcFile) => {const isJpgOrPng = file.type === 'image/jpeg' || file.type === 'image/png';if (!isJpgOrPng) {message.error('只支持上传 JPG/PNG 格式的图片!');}const isLt2M = file.size / 1024 / 1024 < 2;if (!isLt2M) {message.error('图片大小不能超过 2MB!');}return isJpgOrPng && isLt2M;};const uploadButton = (<div><PlusOutlined /><div style={{ marginTop: 8 }}>Upload</div></div>);return (<><Uploadaction="https://www.mocky.io/v2/5cc8019d300000980a055e76"listType="picture-card"fileList={fileList}onPreview={handlePreview}onChange={handleChange}beforeUpload={beforeUpload}>{fileList.length >= 8 ? null : uploadButton}</Upload><Modal open={previewOpen} title={previewTitle} footer={null} onCancel={handleCancel}><img alt="example" style={{ width: '100%' }} src={previewImage} /></Modal></>);
};export default App;
报错:Type ‘{ uid: string; name: string; status: “done”; url: string; description: string; }’ is not assignable to type ‘UploadFile’.
Object literal may only specify known properties, and ‘description’ does not exist in type ‘UploadFile’.ts(2322)
(property) description: string
报错提示显示 description 字段在类型 UploadFile 中不存在。这是因为 UploadFile 类型并没有定义 description 字段。
为了解决这个问题,您可以创建一个新的类型,扩展自 UploadFile,并添加 description 字段。
interface CustomUploadFile extends UploadFile {
description: string;
}
将 fileList 的类型更改为 CustomUploadFile[],并相应地更新 fileList 的初始值:
const [fileList, setFileList] = useState<CustomUploadFile[]>([
{
uid: ‘-1’,
name: ‘image1.png’,
status: ‘done’,
url: ‘https://zos.alipayobjects.com/rmsportal/jkjgkEfvpUPVyRjUImniVslZfWPnJuuZ.png’,
description: ‘这是第一张图片’,
},
{
uid: ‘-2’,
name: ‘image2.png’,
status: ‘done’,
url: ‘https://zos.alipayobjects.com/rmsportal/jkjgkEfvpUPVyRjUImniVslZfWPnJuuZ.png’,
description: ‘这是第二张图片’,
},
// 添加更多的图片项…
]);
在这段代码中,我添加了一个新的类型 CustomUploadFile,扩展自 UploadFile 并添加了 description 字段。然后,将 fileList 的类型更改为 CustomUploadFile[]。同时,我更新了相关的函数声明和事件处理函数,以适应新的类型。
自定义上传列表项的渲染方式
react源码中:
export type ItemRender<T = any> = (originNode: React.ReactElement, file: UploadFile, fileList: Array<UploadFile>, actions: {
download: () => void;
preview: () => void;
remove: () => void;
}) => React.ReactNode;
列表项的 只有下载、预览、删除
修改图片名
每个上传文件项下方添加了一个输入框,用于编辑文件名。当输入框的值发生变化时,会调用 handleEditDescription 函数来更新文件列表中对应文件项的名称。
我们将 listType 属性设置为 “text”,以显示文件名。然后,通过 itemRender 属性来自定义上传列表项的渲染方式。
将 listType 属性设置为 “text”,以显示文件名。然后,通过 itemRender 属性来自定义上传列表项的渲染方式。
同时,您需要添加一个名为 customItemRender 的函数来定义自定义的上传列表项渲染逻辑。请注意,此函数应该放在 App 组件外部。
上传
这里,我们使用action实现,后台action要怎么实现呢?
这里要前端注意几个参数:
name 发到后台的文件参数名 string file
请确保前端和后端的字段名一致,以正确处理文件上传。
图片上传链接中添加 Bearer Token 的请求头
图片上传链接使用的是Bearer Token,怎么添加header?
可以使用 headers 属性来设置上传请求的头部信息
const handleUpload = async (options: any) => {const { file, onSuccess, onError } = options;const formData = new FormData();formData.append('file', file);try {let token = localStorage.getItem('token');if (null === token) {token = '';}const response = await axios.post('/api/v1/imageManage/upload', formData, {headers: {Authorization: `Bearer ${token}`, // 替换为您的 Bearer Token},});onSuccess(response.data);} catch (error) {onError(error);}};
然后,在返回组件中,使用customRequest属性
如果在上传完成后,前端无法看到刚才上传图片的缩略图?
可以检查以下几个方面:
-
确保上传完成后,后端返回的响应数据中包含了正确的文件信息,如文件的 URL 或其他必要的信息。您可以在 handleUpload 函数中的 onSuccess 回调中打印 response.data,确保返回的数据包含了正确的文件信息。
-
确保 fileList 状态中的每个文件对象包含了正确的 url 字段。您可以在 handleUpload 函数中的 onSuccess 回调中,通过修改 fileList 状态,更新上传成功的文件对象的 url 字段,以确保正确显示缩略图。
总结:在自定义上传请求中,您需要在上传成功后,手动更新文件对象的 url 属性或其他属性,以便正确展示上传后的图片。在 handleUpload 函数中,您可以通过调用 onSuccess 回调并传递正确的数据来更新文件对象。
确保在 handleUpload 函数中,根据实际情况更新文件对象的属性,例如 thumbUrl、url 或其他需要展示图片的属性,并在调用 onSuccess 回调时将更新后的文件对象传递给它。
最后发现问题出在我的返回结果上:
{"data": {"description": "","name": "111.jpg","status": "done","url": "/api/v1/imageManage/download?filename=111.jpg"},"errorCode": 0,"msg": "upload successful!"
}
注意:返回回的 url 字段上。url 字段的值是一个下载图片的 URL,而不是直接指向图片资源的 URL。 意思就是 需要一个完整 URL路径(包括http头的那种!!!)
为了在前端正确显示图片,您需要将下载 URL 转换为直接指向图片资源的 URL。您可以在后端代码中进行相应的处理,将 url 字段的值转换为直接指向图片资源的 URL。
onPreview={handlePreview}
它的作用是在点击预览按钮时,展示图片的预览
export interface UploadFile<T = any> {uid: string;size?: number;name: string;fileName?: string;lastModified?: number;lastModifiedDate?: Date;url?: string;status?: UploadFileStatus;percent?: number;thumbUrl?: string;crossOrigin?: React.ImgHTMLAttributes<HTMLImageElement>['crossOrigin'];originFileObj?: RcFile;response?: T;error?: any;linkProps?: any;type?: string;xhr?: T;preview?: string;
}
上传图片返回 data下的字段属性,要是 继承 UploadFile类的这些属性,Ant Design 的 Upload 组件才可以识别使用
上传成功后,如何隐藏上传列表
可以在上传成功后设置一个状态变量,然后在组件中根据该状态变量来控制上传列表的显示与隐藏。
const CustomImageUpload: React.FC<CustomUploadProps> = ({ onUploadSuccess }) => {const [showUploadList, setShowUploadList] = useState(true);const handleUpload = async (options: any) => {// 上传图片的逻辑...// ...// 上传成功后调用回调函数刷新列表onUploadSuccess();// 隐藏上传列表setShowUploadList(false);};// ...return (<><Upload// ...showUploadList={showUploadList} // 根据状态变量控制上传列表的显示与隐藏>{/* ... */}</Upload></>);
};