Unity入门精要02---纹理
纹理和材质不可分割
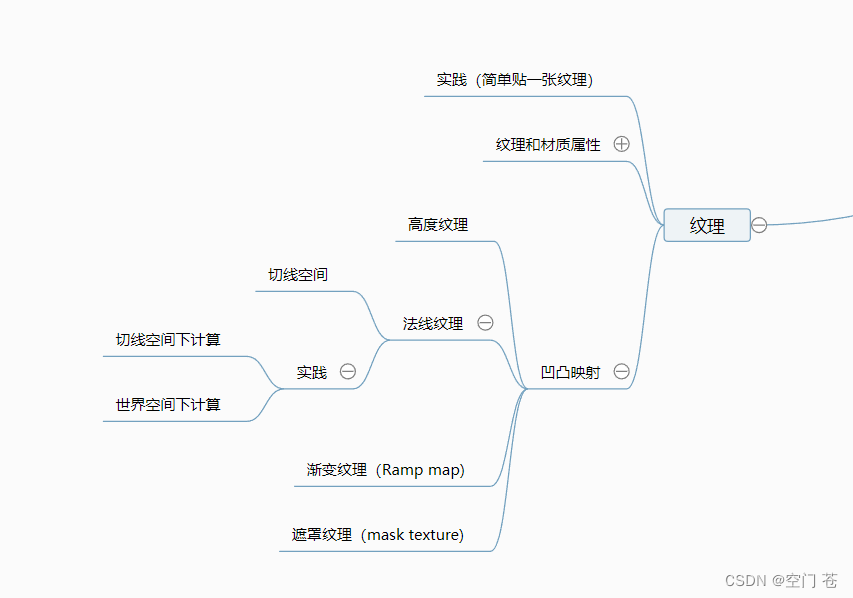
本节知识结构
实践:简单贴一张纹理到模型上
首先在属性处添加相关属性
Properties {_Color ("Color Tint", Color) = (1, 1, 1, 1)_MainTex ("Main Tex", 2D) = "white" {}//加入纹理_Specular ("Specular", Color) = (1, 1, 1, 1)_Gloss ("Gloss", Range(8.0, 256)) = 20}然后在SubShader处引用
fixed4 _Color;sampler2D _MainTex;float4 _MainTex_ST;fixed4 _Specular;float _Gloss;其中 纹理名_ST用来储存UV的缩放和偏移
这里UV的缩放和偏移可以自己更改数值
未更改前效果如下


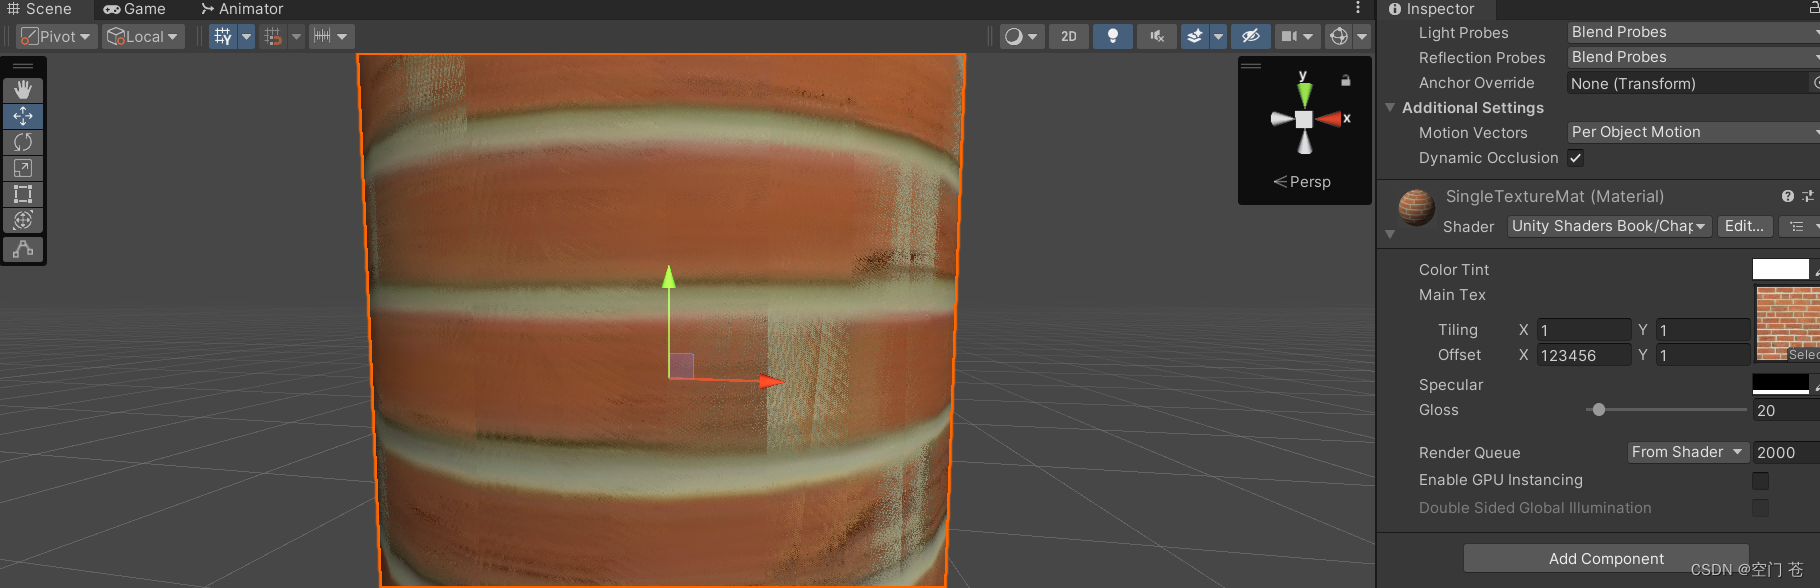
稍微有点恶心(
然后定义输入输出结构体
struct a2v {float4 vertex : POSITION;float3 normal : NORMAL;float4 texcoord : TEXCOORD0;//获得纹理模型纹理的纹理坐标};struct v2f {float4 pos : SV_POSITION;float3 worldNormal : TEXCOORD0;float3 worldPos : TEXCOORD1;float2 uv : TEXCOORD2;//传递uv坐标};在顶点着色器中最重要的一条代码
o.uv = v.texcoord.xy * _MainTex_ST.xy + _MainTex_ST.zw;将纹理坐标(二维的)乘以纹理的缩放+纹理的平移值
用内置宏命令也行
o.uv = TRANSFORM_TEX(v.texcoord, _MainTex);在片元着色器中涉及纹理的最重要的一条代码
fixed3 albedo = tex2D(_MainTex, i.uv).rgb * _Color.rgb;根据模型的UV坐标获取该点在纹理上的像素的颜色并乘以环境光。
纹理的属性
·Texture Type,标记纹理的模式,可标记其为默认,法线贴图,GUI,2DSprite
目前对我来说较常用的就是默认,法线,光照烘焙贴图,阴影遮罩,以及单通道
标记的用处可能是为了让Unity能自动处理某些东西吧...

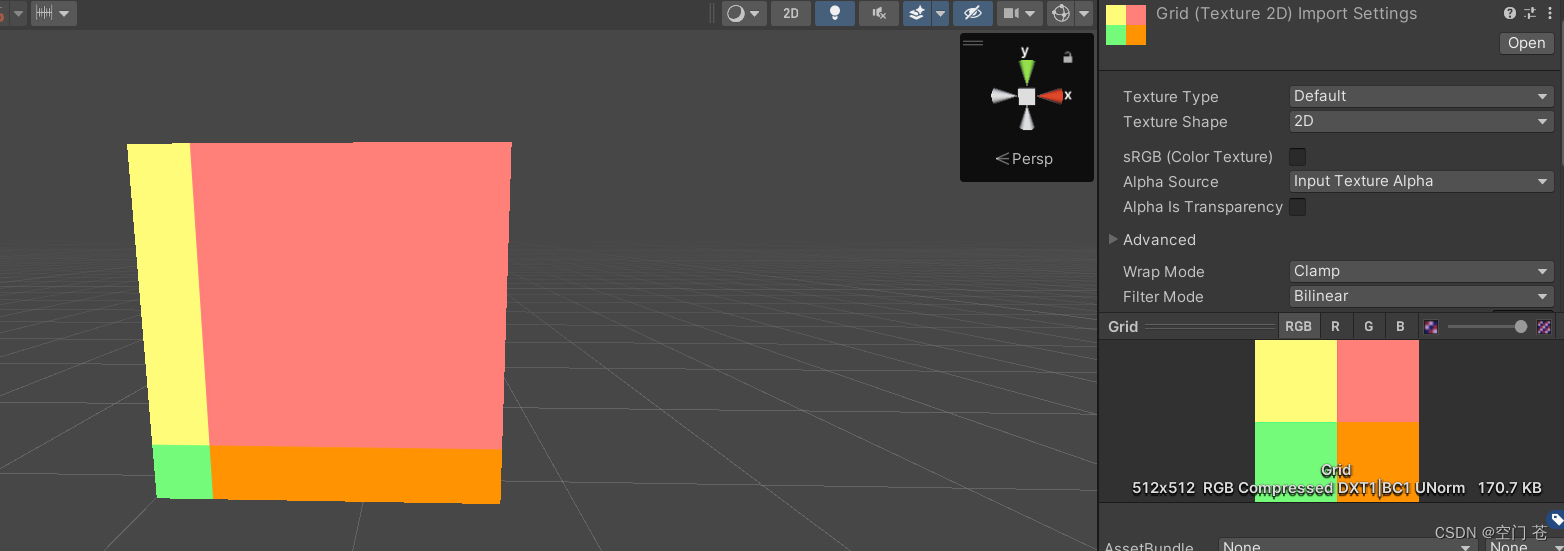
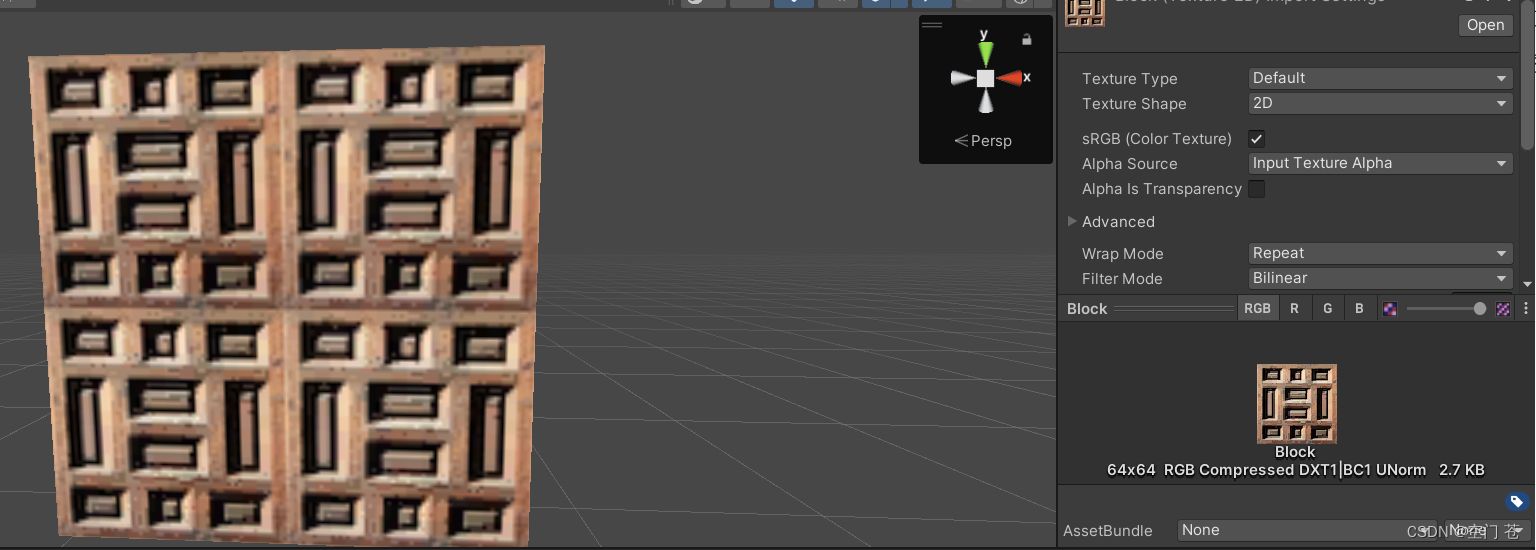
·Wrap Mode

它决定了当纹理坐标超过[0,1]范围后将如何被平铺。书中只讲了两种模式
1.Repeat,当纹理坐标超过了1,它的整数部分就会被舍弃,直接对小数部分进行采样,结果会不断重复

2. Clamp,超出部分会被截断,根据边界像素进行采样
·Filter Mode

Point,使用了最近邻滤波,在放大缩小时,采样像素数目只有一个,因此图像有种像素风格的效果。

Bilinear,使用了线性滤波,对每个像素会采样4个邻近像素,之后线性差值混合得到最终像素
看着好一点了。
Trilinear的滤波几乎和Biliear是一样的,只不过该选项会使用mipmap技术进行混合,如果一张纹理没有mipmap,那么其结果和Biliear。
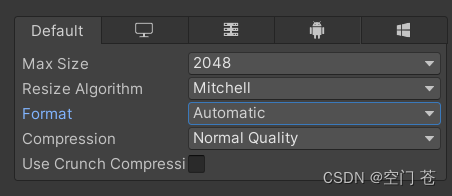
Max Size,不同平台的纹理尺寸和纹理质量是不同的,如果导入的纹理大小超过了Max,那么Unity会将其缩放为这个最大分辨率(尽量使用为2的幂的分辨率大小的纹理,否则影响空间和性能)。
Format,决定了Unity内部使用哪种格式来储存该纹理。有些不需要非常高精度的纹理就尽量使用压缩格式。

凹凸映射。
·高度纹理(感觉很少用)
优点是更加直观,缺点是计算跟复杂,因为还要由灰度图计算出法线贴图
·法线纹理
正常情况下法线纹理是蓝色的

这是因为,法线方向的分量范围为[-1,1]而像素的分量范围为[0,1]因此我们需要根据一个式子进行映射

该贴图记录了每个点在各自的切线空间中的法线扰动方向,因为每个点的空间都不同,同时法线大多指向屏幕外,根据映射关系,比如0,0,1的法线方向,映射后对于了RGB(0.5,0.5,1)浅蓝色。
还有一种情况,去掉了B通道的法线纹理

这样做的好处是可以减小储存空间,法线的B通道可以直接计算出来

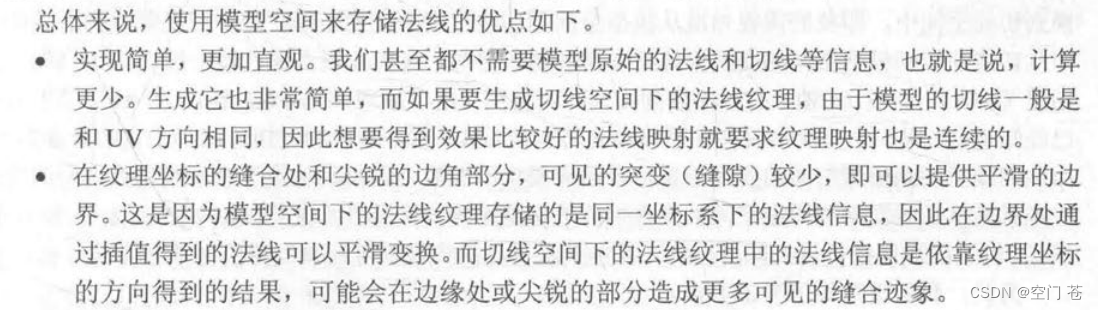
而对于世界空间下的法线纹理实在是太少用了。
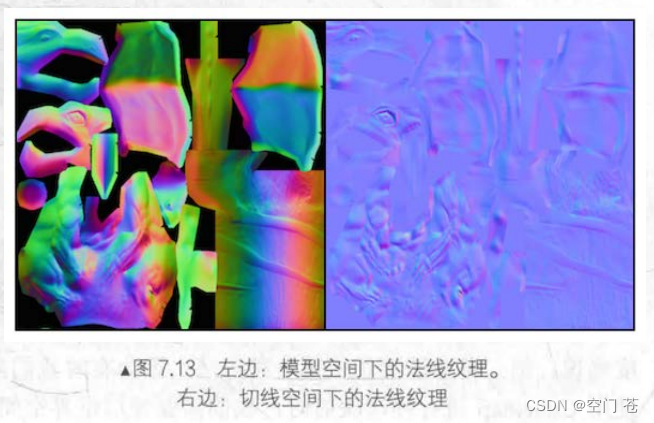
书中也比较了两者的优缺点
 贴法线纹理实践
·在将光照等信息传到切线空间下进行计算
v2f vert(a2v v) {v2f o;o.pos = UnityObjectToClipPos(v.vertex);o.uv.xy = v.texcoord.xy * _MainTex_ST.xy + _MainTex_ST.zw;o.uv.zw = v.texcoord.xy * _BumpMap_ST.xy + _BumpMap_ST.zw;float3 worldPos = mul(unity_ObjectToWorld, v.vertex).xyz; fixed3 worldNormal = UnityObjectToWorldNormal(v.normal); fixed3 worldTangent = UnityObjectToWorldDir(v.tangent.xyz); fixed3 worldBinormal = cross(worldNormal, worldTangent) * v.tangent.w; // Compute the matrix that transform directions from tangent space to world space// Put the world position in w component for optimizationo.TtoW0 = float4(worldTangent.x, worldBinormal.x, worldNormal.x, worldPos.x);o.TtoW1 = float4(worldTangent.y, worldBinormal.y, worldNormal.y, worldPos.y);o.TtoW2 = float4(worldTangent.z, worldBinormal.z, worldNormal.z, worldPos.z);return o;·
fixed4 frag(v2f i) : SV_Target {// Get the position in world space float3 worldPos = float3(i.TtoW0.w, i.TtoW1.w, i.TtoW2.w);// Compute the light and view dir in world spacefixed3 lightDir = normalize(UnityWorldSpaceLightDir(worldPos));fixed3 viewDir = normalize(UnityWorldSpaceViewDir(worldPos));// Get the normal in tangent spacefixed3 bump = UnpackNormal(tex2D(_BumpMap, i.uv.zw));bump.xy *= _BumpScale;bump.z = sqrt(1.0 - saturate(dot(bump.xy, bump.xy)));// Transform the narmal from tangent space to world spacebump = normalize(half3(dot(i.TtoW0.xyz, bump), dot(i.TtoW1.xyz, bump), dot(i.TtoW2.xyz, bump)));fixed3 albedo = tex2D(_MainTex, i.uv).rgb * _Color.rgb;fixed3 ambient = UNITY_LIGHTMODEL_AMBIENT.xyz * albedo;fixed3 diffuse = _LightColor0.rgb * albedo * max(0, dot(bump, lightDir));fixed3 halfDir = normalize(lightDir + viewDir);fixed3 specular = _LightColor0.rgb * _Specular.rgb * pow(max(0, dot(bump, halfDir)), _Gloss);return fixed4(ambient + diffuse + specular, 1.0);}·将切线空间下的法线纹理转换到世界空间下进行计算
v2f vert(a2v v) {v2f o;o.pos = UnityObjectToClipPos(v.vertex);o.uv.xy = v.texcoord.xy * _MainTex_ST.xy + _MainTex_ST.zw;o.uv.zw = v.texcoord.xy * _BumpMap_ST.xy + _BumpMap_ST.zw;////// Note that the code below can handle both uniform and non-uniform scales///// Construct a matrix that transforms a point/vector from tangent space to world spacefixed3 worldNormal = UnityObjectToWorldNormal(v.normal);  fixed3 worldTangent = UnityObjectToWorldDir(v.tangent.xyz);  fixed3 worldBinormal = cross(worldNormal, worldTangent) * v.tangent.w; /*float4x4 tangentToWorld = float4x4(worldTangent.x, worldBinormal.x, worldNormal.x, 0.0,worldTangent.y, worldBinormal.y, worldNormal.y, 0.0,worldTangent.z, worldBinormal.z, worldNormal.z, 0.0,0.0, 0.0, 0.0, 1.0);// The matrix that transforms from world space to tangent space is inverse of tangentToWorld
//实际上将法线从切线空间变换到世界空间应该是空间变换矩阵的转置矩阵的逆矩阵,因为切线副切线
//法线是正交的,因此直接用这三个坐标轴构成的矩阵作为变换矩阵是可行的float3x3 worldToTangent = inverse(tangentToWorld);*///wToT = the inverse of tToW = the transpose of tToW as long as tToW is an orthogonal matrix.float3x3 worldToTangent = float3x3(worldTangent, worldBinormal, worldNormal);// Transform the light and view dir from world space to tangent spaceo.lightDir = mul(worldToTangent, WorldSpaceLightDir(v.vertex));o.viewDir = mul(worldToTangent, WorldSpaceViewDir(v.vertex));////// Note that the code below can only handle uniform scales, not including non-uniform scales/// // Compute the binormal
//				float3 binormal = cross( normalize(v.normal), normalize(v.tangent.xyz) ) * v.tangent.w;
//				// Construct a matrix which transform vectors from object space to tangent space
//				float3x3 rotation = float3x3(v.tangent.xyz, binormal, v.normal);// Or just use the built-in macro
//				TANGENT_SPACE_ROTATION;
//
//				// Transform the light direction from object space to tangent space
//				o.lightDir = mul(rotation, normalize(ObjSpaceLightDir(v.vertex))).xyz;
//				// Transform the view direction from object space to tangent space
//				o.viewDir = mul(rotation, normalize(ObjSpaceViewDir(v.vertex))).xyz;return o;}
fixed4 frag(v2f i) : SV_Target { fixed3 tangentLightDir = normalize(i.lightDir);fixed3 tangentViewDir = normalize(i.viewDir);// Get the texel in the normal mapfixed4 packedNormal = tex2D(_BumpMap, i.uv.zw);fixed3 tangentNormal;// If the texture is not marked as "Normal map"
// tangentNormal.xy = (packedNormal.xy * 2 - 1) * _BumpScale;
// tangentNormal.z = sqrt(1.0 - saturate(dot(tangentNormal.xy, tangentNormal.xy)));// Or mark the texture as "Normal map", and use the built-in funcitontangentNormal = UnpackNormal(packedNormal);tangentNormal.xy *= _BumpScale;tangentNormal.z = sqrt(1.0 - saturate(dot(tangentNormal.xy, tangentNormal.xy)));//法线切线的z可以通过xy计算出来,因为我们方向进行了归一化,其模长为1fixed3 albedo = tex2D(_MainTex, i.uv).rgb * _Color.rgb;fixed3 ambient = UNITY_LIGHTMODEL_AMBIENT.xyz * albedo;fixed3 diffuse = _LightColor0.rgb * albedo * max(0, dot(tangentNormal, tangentLightDir));fixed3 halfDir = normalize(tangentLightDir + tangentViewDir);fixed3 specular = _LightColor0.rgb * _Specular.rgb * pow(max(0, dot(tangentNormal, halfDir)), _Gloss);return fixed4(ambient + diffuse + specular, 1.0);}
使用法线纹理时请将Texture Type设置为Normal map
设置后Unity会根据不同平台对纹理进行压缩。
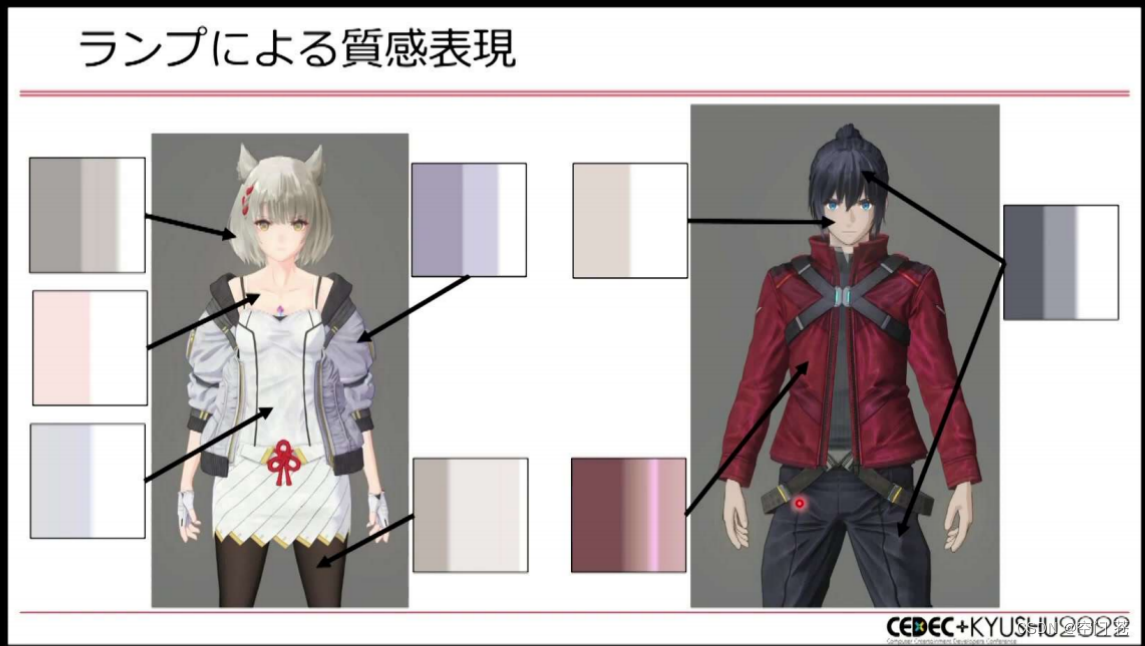
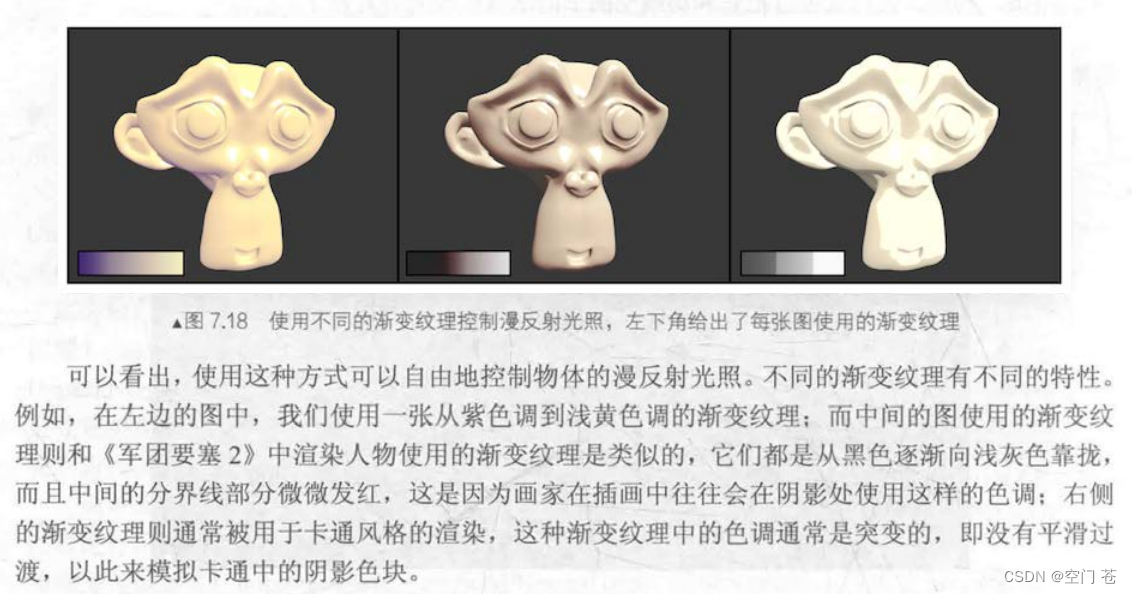
渐变纹理
在NPR中常用。这种纹理可以根据法线和光照方向的相对关系在纹理上进行采样进而控制光照和阴影的整体颜色风格,用来模拟NPR中的阴影色块。
属性中导入
Properties {_Color ("Color Tint", Color) = (1, 1, 1, 1)_RampTex ("Ramp Tex", 2D) = "white" {}_Specular ("Specular", Color) = (1, 1, 1, 1)_Gloss ("Gloss", Range(8.0, 256)) = 20} sampler2D _RampTex;float4 _RampTex_ST;顶点着色器得到UV坐标
o.uv = TRANSFORM_TEX(v.texcoord, _RampTex);片元着色器里利用漫反射光照信息构造一个二维坐标在Ramp里找对应的像素颜色。
fixed4 frag(v2f i) : SV_Target {fixed3 worldNormal = normalize(i.worldNormal);fixed3 worldLightDir = normalize(UnityWorldSpaceLightDir(i.worldPos));fixed3 ambient = UNITY_LIGHTMODEL_AMBIENT.xyz;// Use the texture to sample the diffuse colorfixed halfLambert  = 0.5 * dot(worldNormal, worldLightDir) + 0.5;fixed3 diffuseColor = tex2D(_RampTex, fixed2(halfLambert, halfLambert)).rgb*_Color.rgb;fixed3 diffuse = _LightColor0.rgb * diffuseColor;fixed3 viewDir = normalize(UnityWorldSpaceViewDir(i.worldPos));fixed3 halfDir = normalize(worldLightDir + viewDir);fixed3 specular = _LightColor0.rgb * _Specular.rgb * pow(max(0, dot(worldNormal, halfDir)), _Gloss);return fixed4(ambient + diffuse + specular, 1.0);
}
遮罩纹理。
遮罩纹理分为很多种,环境光遮罩,高光遮罩...
遮罩原理一句话概括就是源像素乘以遮罩像素。
本书详细讲了高光遮罩。
首先是属性
Properties {_Color ("Color Tint", Color) = (1, 1, 1, 1)_MainTex ("Main Tex", 2D) = "white" {}_BumpMap ("Normal Map", 2D) = "bump" {}_BumpScale("Bump Scale", Float) = 1.0_SpecularMask ("Specular Mask", 2D) = "white" {}_SpecularScale ("Specular Scale", Float) = 1.0_Specular ("Specular", Color) = (1, 1, 1, 1)_Gloss ("Gloss", Range(8.0, 256)) = 20}SubShader中引用属性
fixed4 _Color;
sampler2D _MainTex;
float4 _MainTex_ST;
sampler2D _BumpMap;
float _BumpScale;
sampler2D _SpecularMask;
float _SpecularScale;
fixed4 _Specular;
float _Gloss;
这里我们只定义了一个_MainTex_ST,我们修改主纹理的偏移和缩放就会同时影响三个纹理的采样。可以减少顶点着色器中使用的差值寄存器。当我们不需要对纹理进行缩放和平移的时候或者很多纹理可以使用同一种缩放和平移,换句话说多种纹理用来修饰同一种纹理的时候就可以这样做
v2f vert(a2v v) {v2f o;o.pos = UnityObjectToClipPos(v.vertex);o.uv.xy = v.texcoord.xy * _MainTex_ST.xy + _MainTex_ST.zw;TANGENT_SPACE_ROTATION;o.lightDir = mul(rotation, ObjSpaceLightDir(v.vertex)).xyz;o.viewDir = mul(rotation, ObjSpaceViewDir(v.vertex)).xyz;return o;
}
fixed4 frag(v2f i) : SV_Target {fixed3 tangentLightDir = normalize(i.lightDir);fixed3 tangentViewDir = normalize(i.viewDir);fixed3 tangentNormal = UnpackNormal(tex2D(_BumpMap, i.uv));tangentNormal.xy *= _BumpScale;tangentNormal.z = sqrt(1.0 - saturate(dot(tangentNormal.xy, tangentNormal.xy)));fixed3 albedo = tex2D(_MainTex, i.uv).rgb * _Color.rgb;fixed3 ambient = UNITY_LIGHTMODEL_AMBIENT.xyz * albedo;fixed3 diffuse = _LightColor0.rgb * albedo * max(0, dot(tangentNormal, =tangentLightDir));fixed3 halfDir = normalize(tangentLightDir + tangentViewDir);// Get the mask valuefixed specularMask = tex2D(_SpecularMask, i.uv).r * _SpecularScale;//不少游戏会将多种纹理(非颜色主纹理)放在多个通道中,因此使用的时候只需要取一个通道的值就可以了,但要知道每个通道具体的含义// Compute specular term with the specular maskfixed3 specular = _LightColor0.rgb * _Specular.rgb * pow(max(0, dot(tangentNormal, halfDir)), _Gloss) * specularMask;return fixed4(ambient + diffuse + specular, 1.0);
}