Modern C++ 一个例子学习条件变量
目录
问题程序
施魔法让BUG浮出水面
条件变量注意事项
修改程序
问题程序
今天无意中看到一篇帖子,关于条件变量的,不过仔细看看发现它并达不到原本的目的。
程序如下,读者可以先想想他的本意,以及有没有问题:
#include <iostream>
#include <thread>
#include <condition_variable>
#include <mutex>
#include <unistd.h>
using namespace std;
//全局条件变量
condition_variable cond;
mutex _mutex;
int count = 0;void fun1(){while(1){count++;unique_lock<mutex>lock(_mutex);if(count%5 == 0){cond.notify_one();}else{cout<<"this is fun1,count="<<count<<endl;}lock.unlock();sleep(1);}
}void fun2()
{while(1){unique_lock<mutex>lock(_mutex);cond.wait(lock);cout<<"this is fun2,count="<<count<<endl;lock.unlock();sleep(2);}
}int main()
{thread t1(fun1);thread t2(fun2);t1.join();t2.join();return 0;
}
OK,本意显然是:
- 从1开始打印整数
- 线程t1, 打印非5的倍数
- 线程t2, 打印5的倍数
编译执行,运行的还不错,符合预期,但这都是sleep的功劳。
施魔法让BUG浮出水面
把fun1中的sleep去掉,fun2中的sleep放到cond.wait(lock)后,它BUG的面目就暴露出来了:
void fun1(){while(1){count++;unique_lock<mutex>lock(_mutex);if(count%5 == 0){cond.notify_one();}else{cout<<"this is fun1,count="<<count<<endl;}lock.unlock();}
}void fun2()
{while(1){unique_lock<mutex>lock(_mutex);cond.wait(lock);sleep(2);cout<<"this is fun2,count="<<count<<endl;lock.unlock();}
}
[mzhai@lock]$ ./a.out
this is fun1,count=1
this is fun1,count=2
this is fun1,count=3
this is fun1,count=4
this is fun2,count=6
this is fun1,count=6
this is fun1,count=7
this is fun1,count=8
this is fun1,count=9
this is fun1,count=11
this is fun1,count=12
this is fun1,count=13
this is fun1,count=14
this is fun1,count=16
this is fun1,count=17
this is fun1,count=18
this is fun1,count=19
this is fun1,count=21
多线程结果不能因随机加了几个sleep就不同,加sleep仅仅是模拟线程调度不大一样了。
再回过头来看看代码哪些地方有问题:
- cond.notify_one(); count是5的倍数时,t1会通过notify_one通知t2做事,但并不会阻止t1继续执行。想想一下如果t1执行的很快而t2一直没得到调度,则t1会打印1,2,3,4,6,7,8,9,11...
- cond.wait(lock); 可能会假唤醒,此时t1并没有通知它。
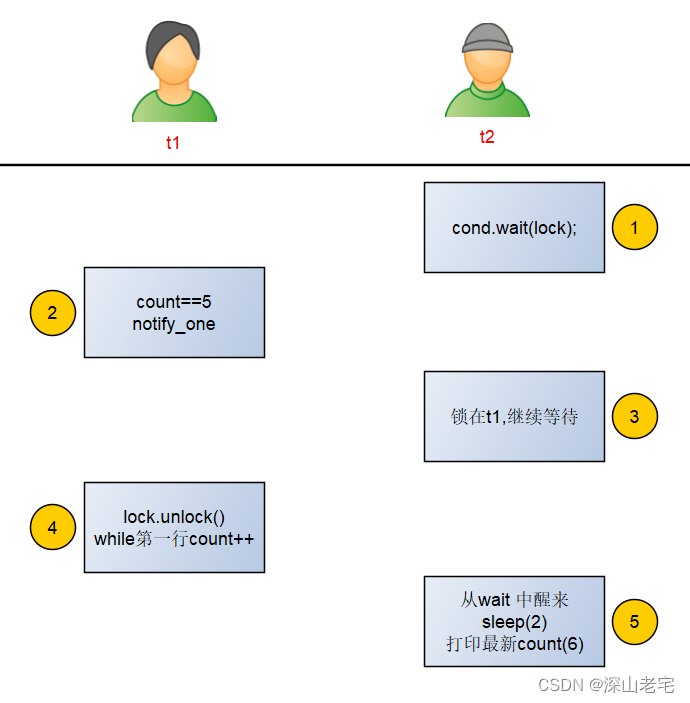
那“this is fun2,count=6” 是怎么回事哪?不应该是5吗?一种可能性是(可以通过GDB调试来模拟):
条件变量注意事项
- 条件变量不擅长单打独斗,一般要和flag变量与锁同时使用。
- notify对方线程并不代表调度让给了对方线程。
修改程序
说了那么多,怎么改哪?
这是一个典型的你等我我等你的例子,对于这个例子都是一方干完事情另一方才能继续,完全串休化的任务,直接写到一个线程里即可。如果说我为了练习线程同步技巧非要整两个线程,那也行,condition_variable官方文档上就有一个例子实现了main线程等待worker_thread完成任务:
#include <condition_variable>
#include <iostream>
#include <mutex>
#include <string>
#include <thread>std::mutex m;
std::condition_variable cv;
std::string data;
bool ready = false;
bool processed = false;void worker_thread()
{// Wait until main() sends datastd::unique_lock lk(m);cv.wait(lk, []{ return ready; });// after the wait, we own the lock.std::cout << "Worker thread is processing data\n";data += " after processing";// Send data back to main()processed = true;std::cout << "Worker thread signals data processing completed\n";// Manual unlocking is done before notifying, to avoid waking up// the waiting thread only to block again (see notify_one for details)lk.unlock();cv.notify_one();
}int main()
{std::thread worker(worker_thread);data = "Example data";// send data to the worker thread{std::lock_guard lk(m);ready = true;std::cout << "main() signals data ready for processing\n";}cv.notify_one();// wait for the worker{std::unique_lock lk(m);cv.wait(lk, []{ return processed; });}std::cout << "Back in main(), data = " << data << '\n';worker.join();
}
我们依样画葫芦:
#include <iostream>
#include <thread>
#include <condition_variable>
#include <mutex>
#include <unistd.h>
using namespace std;
//全局条件变量
condition_variable cond;
mutex _mutex;
bool ready = false;
bool processed = false;int count = 0;void fun1(){while(1){count++;unique_lock<mutex> lock1(_mutex);if(count%5 == 0){ready = true;processed = false;lock1.unlock();cond.notify_one();lock1.lock();cond.wait(lock1, []{ return processed; });}else{cout<<"this is fun1,count="<<count<<endl;}lock1.unlock();}
}void fun2()
{while(1){unique_lock<mutex> lock1(_mutex);cond.wait(lock1, []{ return ready; });cout<<"this is fun2,count="<<count<<endl;processed = true;ready = false;lock1.unlock();cond.notify_one();}
}int main()
{thread t1(fun1);thread t2(fun2);t1.join();t2.join();return 0;
}
结果符合预期,感兴趣的读者可以到处插入sleep测试一下。
啰嗦几句多线程程序的测试
多线程程序架构设计很重要,因为它很难测试,很难穷尽负面测试用例。几种可行的测试办法:
- 随机加sleep。需要改程序。参考上面。
- GDB调试。模拟和正常运行不同的调度策略。参考《GDB调试技巧实战--多线程&弱鸡条件变量-CSDN博客》
- strace、bpftrace、bcc把快速运行的程序降慢。目的是降低一个线程的速度,另一个保持原来的速度或者也降低。原来两者都是100迈前进,那一个100另一个50会不会出问题?或者10 20哪?组合就很多了。