混合图像python旗舰版
仔细看这个图像。然后后退几米再看。你看到了什么?
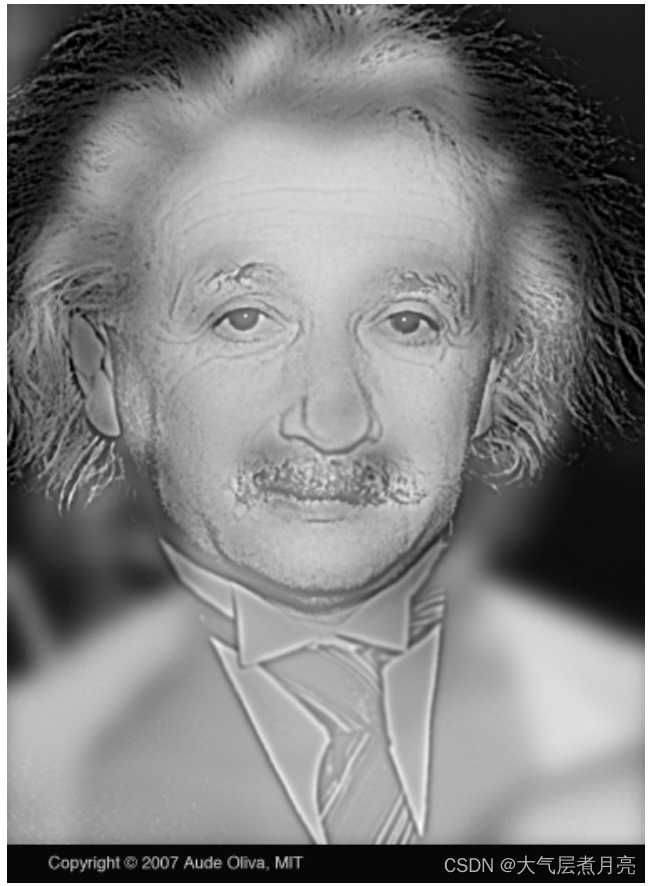
混合图像是指将一张图片的低频与另一张图片的高频相结合的图片。根据观看距离的不同,所得到的图像有两种解释。在上面的图片中,你可以看到阿尔伯特·爱因斯坦,一旦你离开屏幕或缩小观众的图像大小,他就变成了玛丽莲·梦露。这个概念是在2006年的论文中提出的。为了实现这一效果,您必须实现低通和高通滤波操作来应用于您选择的两幅图像,并线性组合过滤后的图像,得到具有所需的两种解释的混合图像,即最后将只有低频信息的图片和只有高频信息的图像叠加在一起。
对于图像的低频部分:可以理解为图像的“轮廓”,比如一幅画的线条等。
对于图像的高频部分:可以理解为图像的“细节”,比如一幅画的颜色搭配,颜色深度等。
值得一提的是:对图像做模糊处理后得到了图像的低频部分,对图像做锐化处理会让图像的高频信息更多。
实现过滤功能
步骤
您的目标是在hybrid.py中实现以下函数:
cross_correlation_2d:实现了你的过滤功能的核心;
convolve_2d:必须使用cross_correlation_2d功能;
gaussian_blur_kernel_2d:你在这里创建的高斯核,与convolve_2d配对,创建一个高斯模糊滤波器;
low_pass:从图像中删除细节,你的实现必须使用高斯模糊;
high_pass:保留很细的细节和删除低频,您的实现必须使用高斯模糊作为一个子例程。
注意,您必须从头开始实现所有的函数,只使用基本的矩阵操作,而任何来自NumPy、OpenCV、Scipy或类似包的任何过滤函数都是禁止的。功能,如填充,创建网格网格,等。被认为是基本的操作,如果您想快速编写代码并避免多个嵌套的Python循环,则是允许的。
生成混合图像
一旦在hybrid.py中实现了函数,使用提供的创建混合图像。然而,创建一个被我们的大脑很好地解释的混合图像的一个重要因素是对齐两个图像的显著特征。注意:如果您使用多个嵌套的Python循环来实现过滤操作,那么您的函数可能会非常慢。在更改参数后,您必须保持耐心,或者使用基本的矩阵功能来更加努力地优化代码。
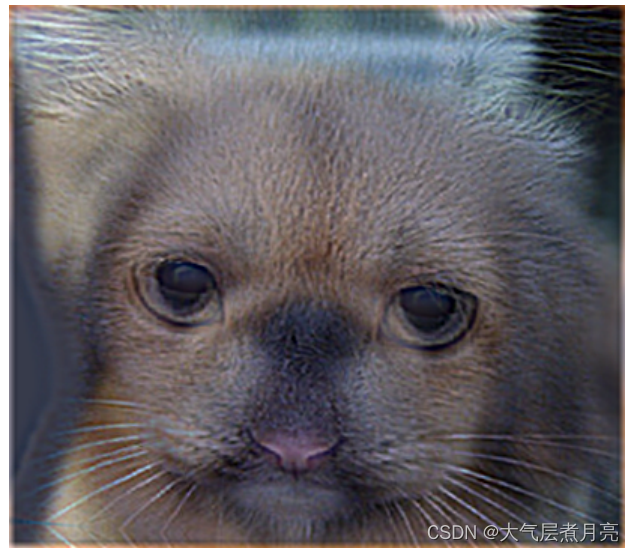
最终,你应该得到一张像下面这样的图片:
import cv2
import numpy as npdef cross_correlation_2d(img, kernel):'''Given a kernel of arbitrary m x n dimensions, with both m and n beingodd, compute the cross correlation of the given image with the givenkernel, such that the output is of the same dimensions as the image and thatyou assume the pixels out of the bounds of the image to be zero. Note thatyou need to apply the kernel to each channel separately, if the given imageis an RGB image.Inputs:img:    Either an RGB image (height x width x 3) or a grayscale image(height x width) as a numpy array.kernel: A 2D numpy array (m x n), with m and n both odd (but may not beequal).Output:Return an image of the same dimensions as the input image (same width,height and the number of color channels)'''# TODO-BLOCK-BEGIN# rotating kernel with 180 degreeskernel = np.rot90(kernel, 2)kernel_heigh = int(np.array(kernel).shape[0])kernel_width = int(np.array(kernel).shape[1])# set kernel matrix to random int matrixif ((kernel_heigh % 2 != 0) & (kernel_width % 2 != 0)):  # make sure that the scale of kernel is odd# the scale of resultconv_heigh = img.shape[0] - kernel.shape[0] + 1conv_width = img.shape[1] - kernel.shape[1] + 1conv = np.zeros((conv_heigh, conv_width))# convolvefor i in range(int(conv_heigh)):for j in range(int(conv_width )):result = (img[i:i + kernel_heigh, j:j + kernel_width] * kernel).sum()if(result<0):result = 0elif(result>255):result = 255conv[i][j] = resultreturn convelse: raise Exception('make sure that the scale of kernel is odd')# raise Exception("TODO in hybrid.py not implemented")# TODO-BLOCK-ENDdef convolve_2d(img, kernel):'''Use cross_correlation_2d() to carry out a 2D convolution.Inputs:img:    Either an RGB image (height x width x 3) or a grayscale image(height x width) as a numpy array.kernel: A 2D numpy array (m x n), with m and n both odd (but may not beequal).Output:Return an image of the same dimensions as the input image (same width,height and the number of color channels)'''# TODO-BLOCK-BEGIN# zero paddingkernel_half_row = int((kernel.shape[0]-1)/2)kernel_half_col = int((kernel.shape[1]-1)/2)# judge how many channelsif len(img.shape) == 3:img = np.pad(img, ((kernel_half_row, kernel_half_row), (kernel_half_col, kernel_half_col),(0, 0)), 'constant', constant_values=0)# if image.shape[2] == 3 or image.shape[2] == 4:# if style is png, there will be four channels, but we just need to use the first three# if the style is bmp or jpg, there will be three channelsimage_r = img[:, :, 0]image_g = img[:, :, 1]image_b = img[:, :, 2]result_r = cross_correlation_2d(image_r, kernel)result_g = cross_correlation_2d(image_g, kernel)result_b = cross_correlation_2d(image_b, kernel)result_picture = np.dstack([result_r, result_g, result_b])# if the picture is black and whiteelif len(img.shape) == 2:img = np.pad(img, ((kernel_half_row, kernel_half_row), (kernel_half_col, kernel_half_col)), 'constant', constant_values=0)result_picture = cross_correlation_2d(img, kernel)# returns the convolved image (of the same shape as the input image)return result_picture# raise Exception("TODO in hybrid.py not implemented")# TODO-BLOCK-ENDdef gaussian_blur_kernel_2d(sigma, height, width):'''Return a Gaussian blur kernel of the given dimensions and with the givensigma. Note that width and height are different.Input:sigma:  The parameter that controls the radius of the Gaussian blur.Note that, in our case, it is a circular Gaussian (symmetricacross height and width).width:  The width of the kernel.height: The height of the kernel.Output:Return a kernel of dimensions height x width such that convolving itwith an image results in a Gaussian-blurred image.'''# TODO-BLOCK-BEGINm,n = [(ss-1.)/2. for ss in (height, width)]y, x = np.ogrid[-m:m+1, -n:n+1]h = np.exp( - (x*x + y*y) / (2.*sigma*sigma))h[ h < np.finfo(h.dtype).eps*h.max()] = 0sumh = h.sum()if sumh != 0:h /= sumhreturn h# raise Exception("TODO in hybrid.py not implemented")# TODO-BLOCK-ENDdef low_pass(img, sigma, size):'''Filter the image as if its filtered with a low pass filter of the givensigma and a square kernel of the given size. A low pass filter supressesthe higher frequency components (finer details) of the image.Output:Return an image of the same dimensions as the input image (same width,height and the number of color channels)'''# TODO-BLOCK-BEGIN# make kernellow_kernel = gaussian_blur_kernel_2d(sigma, size, size)# convolve low-pass pictureslow_image = convolve_2d(img, low_kernel)return low_image# raise Exception("TODO in hybrid.py not implemented")# TODO-BLOCK-ENDdef high_pass(img, sigma, size):'''Filter the image as if its filtered with a high pass filter of the givensigma and a square kernel of the given size. A high pass filter suppressesthe lower frequency components (coarse details) of the image.Output:Return an image of the same dimensions as the input image (same width,height and the number of color channels)'''# TODO-BLOCK-BEGIN# make kernelhigh_kernel = gaussian_blur_kernel_2d(sigma, size, size)# make high-pass picturehigh_image = (img - convolve_2d(img, high_kernel))return high_image# raise Exception("TODO in hybrid.py not implemented")# TODO-BLOCK-ENDdef create_hybrid_image(img1, img2, sigma1, size1, high_low1, sigma2, size2,high_low2, mixin_ratio, scale_factor):'''This function adds two images to create a hybrid image, based onparameters specified by the user.'''high_low1 = high_low1.lower()high_low2 = high_low2.lower()if img1.dtype == np.uint8:img1 = img1.astype(np.float32) / 255.0img2 = img2.astype(np.float32) / 255.0if high_low1 == 'low':img1 = low_pass(img1, sigma1, size1)else:img1 = high_pass(img1, sigma1, size1)if high_low2 == 'low':img2 = low_pass(img2, sigma2, size2)else:img2 = high_pass(img2, sigma2, size2)img1 *=  (1 - mixin_ratio)img2 *= mixin_ratiocv2.imshow('img1', img1)cv2.imshow('img2', img2)cv2.imwrite('high_left.png', img1)cv2.imwrite('low_right.png', img2)hybrid_img = (img1 + img2) * scale_factorreturn (hybrid_img * 255).clip(0, 255).astype(np.uint8)if __name__ == "__main__":hybrid_image = create_hybrid_image(img1=cv2.imread(r'resources\cat.jpg'),img2=cv2.imread(r'resources\dog.jpg'),sigma1=7,size1=29,high_low1='high',sigma2=7.0,size2=29,high_low2='low',mixin_ratio=0.5,scale_factor=1)cv2.imshow('hybrid_image', hybrid_image)cv2.waitKey(0)cv2.imwrite('hybrid_image.png', hybrid_image)