spring-boot rabbitmq整合
文章请参考:Springboot 整合RabbitMq ,用心看完这一篇就够了
mven依赖
<dependencies><dependency><groupId>org.springframework.boot</groupId><artifactId>spring-boot-starter-amqp</artifactId></dependency><dependency><groupId>org.springframework.boot</groupId><artifactId>spring-boot-starter-web</artifactId></dependency><dependency><groupId>org.springframework.boot</groupId><artifactId>spring-boot-starter-test</artifactId><scope>test</scope><exclusions><exclusion><groupId>org.junit.vintage</groupId><artifactId>junit-vintage-engine</artifactId></exclusion></exclusions></dependency><dependency><groupId>org.springframework.amqp</groupId><artifactId>spring-rabbit-test</artifactId><scope>test</scope></dependency><dependency><groupId>org.apache.commons</groupId><artifactId>commons-lang3</artifactId></dependency><dependency><groupId>org.projectlombok</groupId><artifactId>lombok</artifactId></dependency></dependencies>
配置rabbitmq
配置生产者
spring:rabbitmq:host: localhostport: 5672username: rootpassword: rootvirtual-host: pers-xrb
配置queue
@Beanpublic Queue TestDirectQueue(){return new Queue("direct-queue",true);}
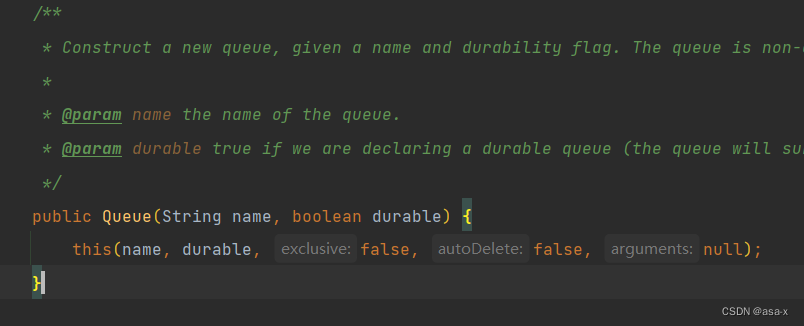
Queue的构造函数如下:
Queue(String name, boolean durable, boolean exclusive, boolean autoDelete, Map<String, Object> arguments)
Queue有如下几个属性:
- name-the name of the queue - must not be null; set to “” to have the broker generate the name.(不能为空,如果想让服务器自动生成的话,那么设置为"")
- durable- true if we are declaring a durable queue (the queue will survive a server restart)(是否持久化,如果想在服务器重启的时候仍然存在,那么设置为true,默认和推荐设置为true)
- exclusive-true if we are declaring an exclusive queue (the queue will only be used by the declarer’s connection) (排他性,默认也是false,只能被当前创建的连接使用,而且当连接关闭后队列即被删除。此参考优先级高于durable)
- autoDelete-true if the server should delete the queue when it is no longer in use(自动删除,当没有生产者或者消费者使用此队列,该队列会自动删除,默认是false)
所以通常的初始化构造函数是
配置exchange
@BeanDirectExchange TestDirectExchange() {return new DirectExchange("TestDirectExchange", true, false);}
绑定
@BeanBinding bindingDirect() {return BindingBuilder.bind(TestDirectQueue()).to(TestDirectExchange()).with("TestDirectRouting");}
配置触发器
@RestController("/rabbit-mq-sender")
public class SendMessageController {private final RabbitTemplate rabbitTemplate;public SendMessageController(RabbitTemplate rabbitTemplate) {this.rabbitTemplate = rabbitTemplate;}@GetMapping("/sendDirectMessage")public String sendDirectMessage() {String messageId = String.valueOf(UUID.randomUUID());String messageData = "test message, hello!";String createTime = LocalDateTime.now().format(DateTimeFormatter.ofPattern("yyyy-MM-dd HH:mm:ss"));Map<String, Object> map = new HashMap<>(3);map.put("messageId", messageId);map.put("messageData", messageData);map.put("createTime", createTime);//将消息携带绑定键值:TestDirectRouting 发送到交换机TestDirectExchangerabbitTemplate.convertAndSend("TestDirectExchange","TestDirectRouting", map);return "ok";}
}
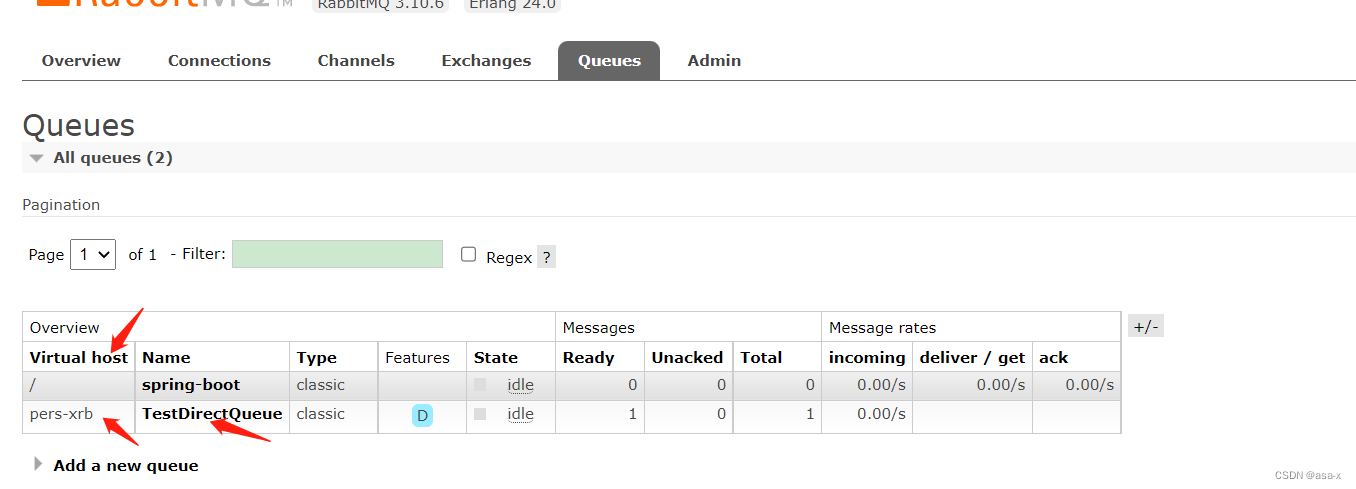
发送后,可以看到ui界面的信息
配置消费者
基本配置和配置生产者没有什么区别,除了这里需要配置的是监听器和指定监听器的处理器,声明消费者类为监听器@DirectReceiver,指定方法为处理器@RabbitHandler
@Service
@Slf4j
@RabbitListener(queues = "TestDirectQueue")     // 指定监听的队列
public class DirectReceiver {@RabbitHandlerpublic void process(Object testMessage) {try {TimeUnit.SECONDS.sleep(1);log.debug("DirectReceiver[TestDirectQueue]消费者收到消息  : " + testMessage.toString());} catch (InterruptedException e) {throw new RuntimeException(e);}}
}
启动服务器后,就可以直接监听和消费mq信息了,如果需要增加一个消费者,那么copy一个DirectReceiver实例,命名为DirectReceiver2就行了。默认的消费策略是轮询策略,这个方法待优化,很明显在现实开发过程中是不可能这么写的。
生产者的confirm和return机制
RabbitMq发消息的流程

从上面的图,我们可以看到一个mq发送的话,可能会出现如下几种情况
- 未找到交换机
- 找到交换机,但是未绑定queue
- 找到了queue,消息推送成功
confirm机制
confirm机制是对于生产者和服务器broker来说的。
生产者将信道设置成confirm模式,一旦信道进入confirm模式,所有在该信道上面发布的消息都会被指派一个唯一的ID(从1开始,单调递增),一旦消息被投递到所有匹配的队列之后,broker就会发送一个ACK给生产者(包含消息的唯一ID)

return机制
returnCallback 未投递到queue退回模式
confrim 模式只能保证消息到达 broker,不能保证消息准确投递到目标 queue 里。在有些业务场景下,我们需要保证消息一定要投递到目标 queue 里,此时就需要用到 return 退回模式。这里需要exchange触发无法查找queue的场景,也就是说exchange存在,但是queue不存在
配置confirm和return
- 修改yml配置
spring:rabbitmq:host: localhostport: 5672username: rootpassword: rootvirtual-host: pers-xrbpublisher-confirms: true #确认消息已发送到交换机(Exchange)publisher-returns: true #确认消息已发送到队列(Queue)
- 自定义rabbitMqTemplate
@Beanpublic RabbitTemplate rabbitTemplate(ConnectionFactory connectionFactory) {RabbitTemplate rabbitTemplate = new RabbitTemplate();rabbitTemplate.setConnectionFactory(connectionFactory);//设置开启Mandatory,才能触发回调函数,无论消息推送结果怎么样都强制调用回调函数rabbitTemplate.setMandatory(true);rabbitTemplate.addAfterReceivePostProcessors(message -> {byte[] body = message.getBody();log.info("received body is:{}", body);return message;});// set confirm callbackrabbitTemplate.setConfirmCallback((correlationData, isAck, cause) -> {System.out.println("ConfirmCallback: " + "相关数据:" + correlationData);System.out.println("ConfirmCallback: " + "确认情况:" + isAck);System.out.println("ConfirmCallback: " + "原因:" + cause);});// set return callbackrabbitTemplate.setReturnCallback((message, replyCode, replyText, exchange, routingKey) -> {System.out.println("ReturnCallback: " + "消息:" + message);System.out.println("ReturnCallback: " + "回应码:" + replyCode);System.out.println("ReturnCallback: " + "回应信息:" + replyText);System.out.println("ReturnCallback: " + "交换机:" + exchange);System.out.println("ReturnCallback: " + "路由键:" + routingKey);});return rabbitTemplate;}
- 增加触发接口
private static Map<String, Object> getMqMessage() {String messageId = String.valueOf(UUID.randomUUID());String messageData = "test message, hello!";String createTime = LocalDateTime.now().format(DateTimeFormatter.ofPattern("yyyy-MM-dd HH:mm:ss"));Map<String, Object> map = new HashMap<>(3);map.put("messageId", messageId);map.put("messageData", messageData);map.put("createTime", createTime);return map;}/*** 4.1 exchange and queue not exist*/@GetMapping("/sendNotExistExchangeMessage")public String sendNotExistExchangeMessage() {Map<String, Object> map = getMqMessage();//将消息携带绑定键值:TestDirectRouting 发送到交换机TestDirectExchangerabbitTemplate.convertAndSend("NotExistExchangeExchange","NotExistExchangeExchangeQueue", map);return "ok";}/*** 4.2 exchange exist but queue not exist*/@GetMapping("/sendNotExistQueueButExchangeMessage")public String sendNotExistQueueButExchangeMessage() {Map<String, Object> map = getMqMessage();//将消息携带绑定键值:TestDirectRouting 发送到交换机TestDirectExchangerabbitTemplate.convertAndSend("NotExistQueueButExchangeExchange","NotExistQueueButExchangeQueue", map);return "ok";}
- 测试
为了测试两种情形,我们分别为- 交换机exchange不存在
- 交换机存在但是队列不存在
- exchange和queue都存在
4.1 交换机exchange不存在
调用对应的接口 http://localhost:9876/rabbit-mq-sender/sendNotExistExchangeMessage
在日志台会出现如下信息:
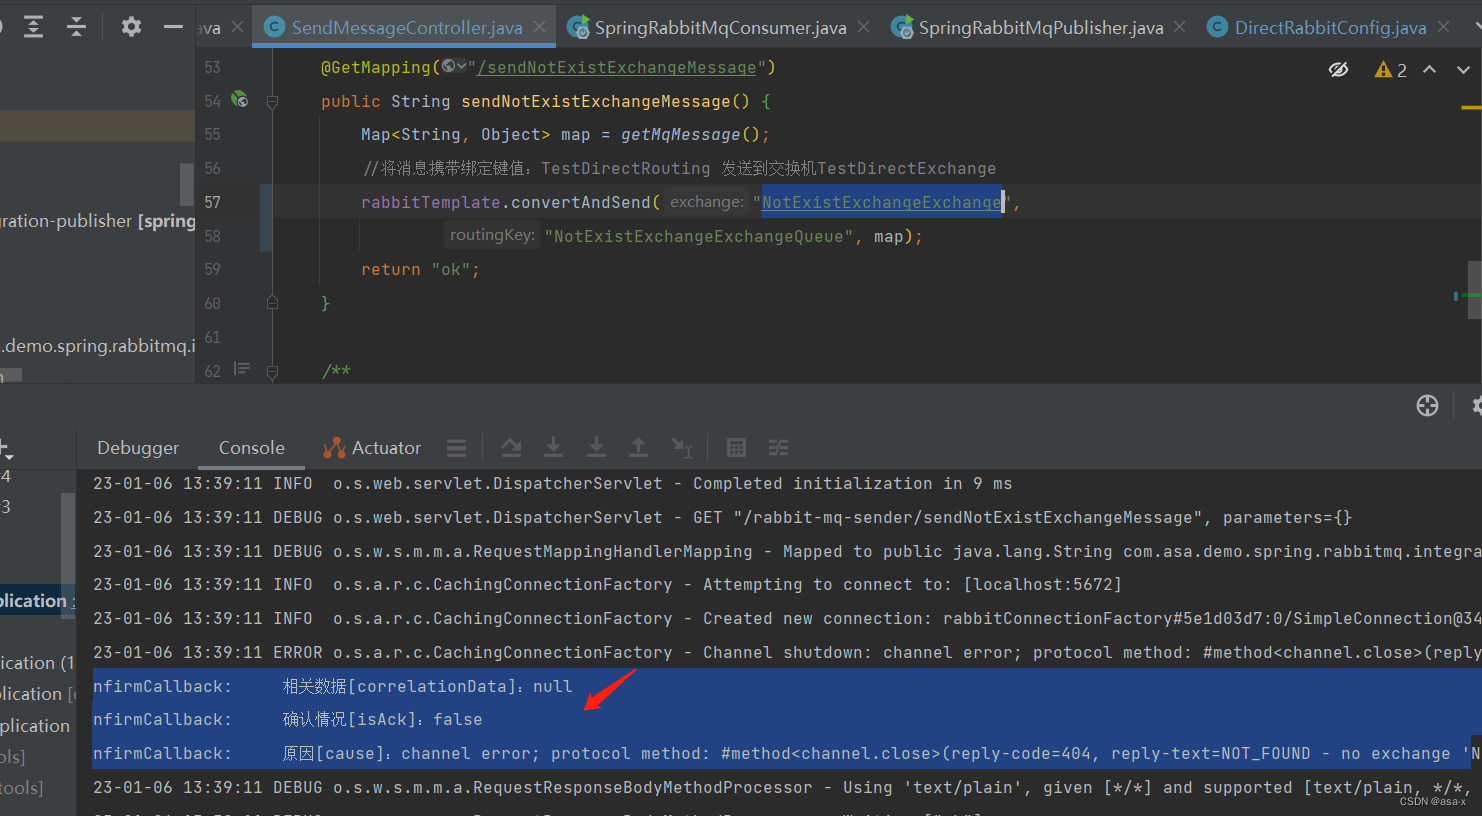
这个时候只会调用confirmcallback,confirmcallback会告诉你这个exchange是不存在的。
4.2,交换机存在但是queue不存在的场景,
我们调用对应的api接口
http://localhost:9876/rabbit-mq-sender/sendNotExistQueueButExchangeMessage
不过在这之前,我们需要先在声明一个exchange
/*** Direct交换机 起名:NotExistQueueButExchangeExchange*/@BeanDirectExchange NotExistQueueButExchange() {return new DirectExchange("NotExistQueueButExchangeExchange", true, false);}
查看日志台,信息如下:
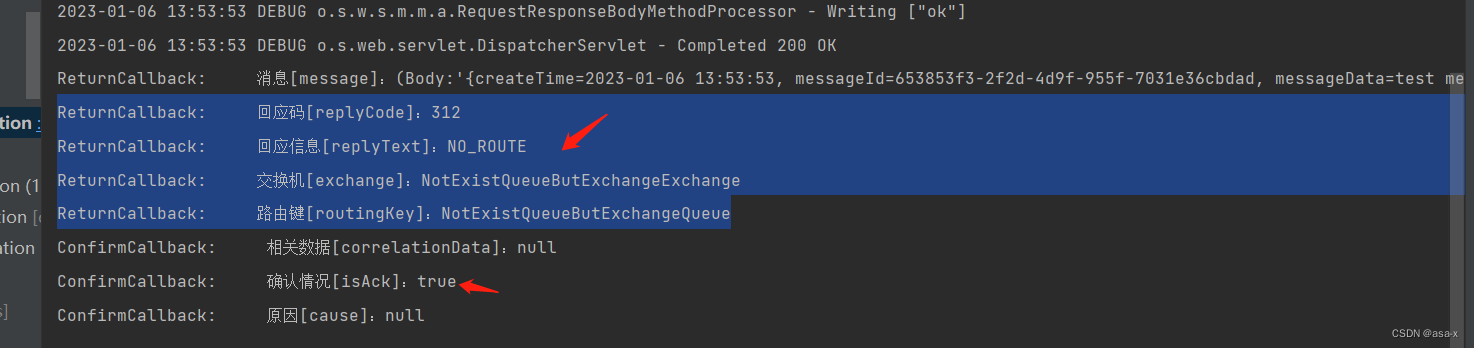
我们会发现,confirmcallback和returnCallback两个函数其实都是调用了的,在confirmcallback中,返回结果告诉了我们isAck是true的,但是returnCallback中告诉我们No_route,表示没有找到对应的路由
,在exchange的ui中,我们可以看到我们有两个exchange

4.3 那如果所有的都是正常的呢?[confirm|return]callback会返回什么呢?我们调用api测试下:
http://localhost:9876/rabbit-mq-sender/sendDirectMessage
日志台结果如下:

这个时候是只调用confirmCallback的
消费者接收到消息的消费确认机制
如果消费者消费后怎么告诉rabbitmq服务器呢?通常来说消费者消费后会返回一个信息给服务器表达了服务器已经接受并且告诉服务器消费结果和后续的处理,总结来说,消费者要告诉消费者如下消息
- 是否消费成功-这决定服务器是否要删除消息
- 如果消费失败,那么需要重新放回队列吗?
消费者接收的确认机制主要存在三种模式
- 自动确认,这也是默认的消息确认情况。 AcknowledgeMode.NONE
RabbitMQ成功将消息发出(即将消息成功写入TCP Socket)中立即认为本次投递已经被正确处理,不管消费者端是否成功处理本次投递。
所以这种情况如果消费端消费逻辑抛出异常,也就是消费端没有处理成功这条消息,那么就相当于丢失了消息。
一般这种情况我们都是使用try catch捕捉异常后,打印日志用于追踪数据,这样找出对应数据再做后续处理。
- 根据业务来处理,这个根据自己的业务需求来处理,不细说
- 手动确认, 这个比较关键,也是我们配置接收消息确认机制时,多数选择的模式。
消费者收到消息后,手动调用basic.ack/basic.nack/basic.reject后,RabbitMQ收到这些消息后,才认为本次投递成功,换句话说,这也是和业务做耦合的。
消费者收到消息后,手动调用对应的方法后,RabbitMQ收到这些消息后,才认为本次投递成功。手动确认分如下情况,消费成功和消费失败。
1. basicAck用于肯定确认
2. basicNack用于否认确定
3. basicReject 用于否认确认,但和basic.nack相比有一个限制,一次只能拒绝单条信息
basic.reject
basicReject 表示否认确认,
/*** Reject a message. Supply the deliveryTag from the {@link com.rabbitmq.client.AMQP.Basic.GetOk}* or {@link com.rabbitmq.client.AMQP.Basic.Deliver} method* containing the received message being rejected.* @see com.rabbitmq.client.AMQP.Basic.Reject* @param deliveryTag the tag from the received {@link com.rabbitmq.client.AMQP.Basic.GetOk} or {@link com.rabbitmq.client.AMQP.Basic.Deliver}* @param requeue true if the rejected message should be requeued rather than discarded/dead-lettered* @throws java.io.IOException if an error is encountered*/void basicReject(long deliveryTag, boolean requeue) throws IOException;
入参有两个
- deliveryTag-消息体发送标志,不细说
- requeue-是否重新放在队列中,次还会消费这消息。设置false,就是告诉服务器,我已经知道这条消息数据了,因为一些原因拒绝它,而且服务器也把这个消息丢掉就行。 下次不想再消费这条消息了。
使用拒绝后重新入列这个确认模式要谨慎,因为一般都是出现异常的时候,catch异常再拒绝入列,选择是否重入列。
但是如果使用不当会导致一些每次都被你重入列的消息一直消费-入列-消费-入列这样循环,会导致消息积压。
channel.basicNack
也是相当于设置不消费某条消息。
源码如下
/*** Reject one or several received messages.** Supply the <code>deliveryTag</code> from the {@link com.rabbitmq.client.AMQP.Basic.GetOk}* or {@link com.rabbitmq.client.AMQP.Basic.GetOk} method containing the message to be rejected.* @see com.rabbitmq.client.AMQP.Basic.Nack* @param deliveryTag the tag from the received {@link com.rabbitmq.client.AMQP.Basic.GetOk} or {@link com.rabbitmq.client.AMQP.Basic.Deliver}* @param multiple true to reject all messages up to and including* the supplied delivery tag; false to reject just the supplied* delivery tag.* @param requeue true if the rejected message(s) should be requeued rather* than discarded/dead-lettered* @throws java.io.IOException if an error is encountered*/void basicNack(long deliveryTag, boolean multiple, boolean requeue)throws IOException;
Reject one or several received messages,很显然是否认一个或多个接受到的消息体,重点是第二个参数:是指是否针对多条消息;如果是true,也就是说一次性针对当前通道的消息的tagID小于当前这条消息的,都拒绝确认。
同样使用不确认后重新入列这个确认模式要谨慎,因为这里也可能因为考虑不周出现消息一直被重新丢回去的情况,导致积压。
消费者消费机制case(在消费者项目里)
- 首先,我们需要设定一个通用的receiver,这个receiver是通用的receiver(之前的相关监听器可以先注释掉,以免造成多个同类型监听器都监听同一个队列。如果有的话)
public class MyAckMessageReceiver implements ChannelAwareMessageListener {@Overridepublic void onMessage(Message message, Channel channel) throws Exception {long deliveryTag = message.getMessageProperties().getDeliveryTag();String strictRequired = null;try {byte[] body = message.getBody();ObjectInputStream ois = new ObjectInputStream(new ByteArrayInputStream(body));Map<String, String> msgMap = (Map<String, String>) ois.readObject();String messageId = msgMap.get("messageId");String messageData = msgMap.get("messageData");String createTime = msgMap.get("createTime");strictRequired = msgMap.get("strictRequired");ois.close();System.out.println("  MyAckReceiver  messageId:" + messageId + "  messageData:" + messageData + "  createTime:" + createTime);System.out.println("消费的主题消息来自:" + message.getMessageProperties().getConsumerQueue());//第二个参数,手动确认可以被批处理,当该参数为 true 时,则可以一次性确认 delivery_tag 小于等于传入值的所有消息channel.basicAck(deliveryTag, true);} catch (IOException | ClassNotFoundException e) {boolean isRequeue = strictRequired != null && strictRequired.contains("1");channel.basicReject(deliveryTag, isRequeue);e.printStackTrace();}}
}
- 配置一个MessageListenerConfig,代码如下:
@Configuration
public class MessageListenerConfig {@BeanMyAckMessageReceiver messageReceiver() {return new MyAckMessageReceiver();}@Beanpublic SimpleMessageListenerContainer simpleMessageListenerContainer(CachingConnectionFactory connectionFactory,MyAckMessageReceiver myAckMessageReceiver) {SimpleMessageListenerContainer container = new SimpleMessageListenerContainer(connectionFactory);container.setConcurrentConsumers(1);container.setMaxConcurrentConsumers(1);container.setAcknowledgeMode(AcknowledgeMode.MANUAL); // RabbitMQ默认是自动确认,这里改为手动确认消息//设置一个队列container.setQueueNames("TestDirectQueue");//如果同时设置多个如下: 前提是队列都是必须已经创建存在的//  container.setQueueNames("TestDirectQueue","TestDirectQueue2","TestDirectQueue3");//另一种设置队列的方法,如果使用这种情况,那么要设置多个,就使用addQueues//container.setQueues(new Queue("TestDirectQueue",true));//container.addQueues(new Queue("TestDirectQueue2",true));//container.addQueues(new Queue("TestDirectQueue3",true));container.setMessageListener(myAckMessageReceiver);return container;}
在container中指定消息队列和对应的receiver处理器