【教程】自动检测和安装Python脚本依赖的第三方库
转载请注明出处:小锋学长生活大爆炸[xfxuezhang.cn]
背景说明
对于新python环境,要运行某个脚本,可能需要安装很多库,一般可以通过提供的requirements.txt来自动安装。但如果没有这个txt,那就得手动一个一个安装,非常的麻烦。
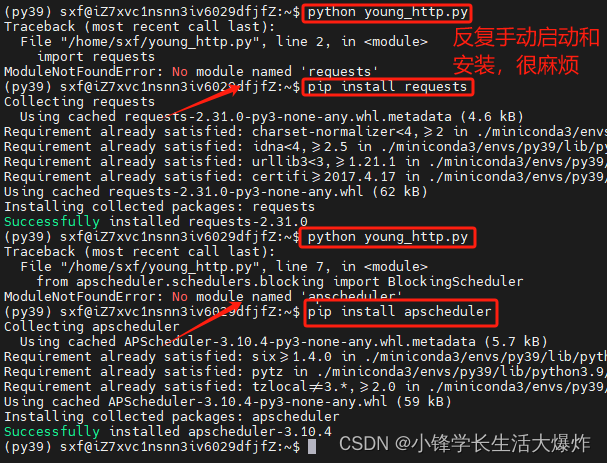
通过捕捉ImportError错误,实际上可以从错误消息中提取缺失的模块名称,而一旦确定了缺失的模块名称,就可以使用 pip 自动安装它们了。
参考脚本
autoDependencyInstaller.py
import argparse
import subprocess
import sys
import redef install_module(module_name, python_executable):try:subprocess.check_call([python_executable, "-m", "pip", "install", module_name])return Trueexcept subprocess.CalledProcessError:return Falsedef extract_imports(file_name):with open(file_name, 'r') as file:file_content = file.read()imports = re.findall(r'^(?:from\s+(\S+)|import\s+(\S+))(?:\s+|$)', file_content, re.MULTILINE)top_level_modules = {imp[0].split('.')[0] if imp[0] else imp[1].split('.')[0] for imp in imports}return list(top_level_modules)def check_module(module, python_executable):try:subprocess.check_call([python_executable, "-c", f"import {module}"])return Trueexcept subprocess.CalledProcessError:return Falsedef check_and_install_modules(modules, python_executable):for module in modules:if check_module(module, python_executable):print(f"模块 '{module}' 已存在.")else:print(f"尝试安装模块: {module}")if not install_module(module, python_executable):correct_name = input(f"安装 '{module}' 失败。请输入正确的包名,或按 Enter 跳过: ").strip()if correct_name:install_module(correct_name, python_executable)def main():parser = argparse.ArgumentParser(description="自动检测和安装 Python 脚本依赖.")parser.add_argument("script", help="要检查依赖的 Python 脚本文件名")parser.add_argument("-p", "--python-path", help="Python 解释器的路径(可选)", default=sys.executable)args = parser.parse_args()modules_to_check = extract_imports(args.script)check_and_install_modules(modules_to_check, args.python_path)if __name__ == "__main__":main()
参数第一项表示目标py文件。第二项表示要用道德python路径,如果没有给,则默认使用当前环境下的python
这个脚本只提取 Python 脚本中的 import 和 from ... import 语句,然后在当前脚本中尝试导入它们。这样做的好处是,不会执行原始脚本的其他部分,只会检查依赖项是否存在。如果遇到任何 ImportError,则可以安装相应的缺失模块。这种方法更加安全和高效,因为它避免了不必要的脚本执行。
使用示例
python autoDependencyInstaller.py <目标py文件> <目标python路径>比如:
python autoDependencyInstaller.py young_http.pypython autoDependencyInstaller.py young_http.py -p /home/sxf/miniconda3/envs/py39/bin/python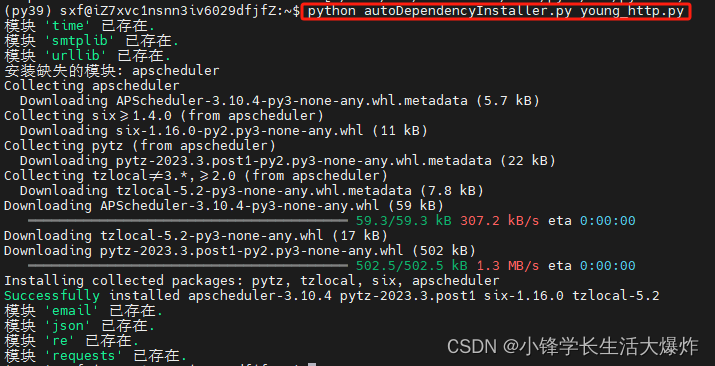
进阶使用
把这个脚本打包:
pip install pyinstaller
pyinstaller -F -w autoDependencyInstaller.py
生成的二进制文件在dist目录下,所以就可以非常方便的使用了:
./dist/autoDependencyInstaller young_http.py -p /home/sxf/miniconda3/envs/py39/bin/python
注意:对于打包的文件,必须提供-p,不然用的是二进制文件自己的环境,会出问题。
或者可以直接这样,用$(which python):
./dist/autoDependencyInstaller young_http.py -p $(which python)更进阶使用
把这个文件放到系统目录下,就不用每次都找了:
sudo mv dist/autoDependencyInstaller /usr/sbin/以后就可以直接用了:
autoDependencyInstaller young_http.py -p /home/sxf/miniconda3/envs/py39/bin/python