【源码】车牌检测+QT界面+附带数据库
目录
- 1、基本介绍
- 2、基本环境
- 3、核心代码
- 3.1、车牌识别
- 3.2、车牌定位
- 3.3、车牌坐标矫正
- 4、界面展示
- 4.1、主界面
- 4.2、车牌检测
- 4.3、查询功能
- 5、演示
- 6、链接
1、基本介绍
本项目采用tensorflow,opencv,pyside6和pymql编写,pyside6用来编写UI界面,进行界面展示;tensorflow用来训练模型检测字符和车牌定位;使用opencv进行边缘检测,获取车牌区域的边缘坐标和最小外接矩形4个端点坐标,再从车牌的边缘坐标中计算出和最小外接矩形4个端点,最近的点即为平行四边形车牌的四个端点,从而实现车牌的定位和矫正;pysql主要用来实现基本的数据库读写插入功能。
2、基本环境
pyside6==6.5.0
tensorflow>=2.0.0
opencv-python==4.8.1.78
pymysql==1.0.3
3、核心代码
3.1、车牌识别
#车牌识别
def cnn_predict(cnn, Lic_img):characters = ["京", "沪", "津", "渝", "冀", "晋", "蒙", "辽", "吉", "黑", "苏", "浙", "皖", "闽", "赣", "鲁", "豫","鄂", "湘", "粤", "桂", "琼", "川", "贵", "云", "藏", "陕", "甘", "青", "宁", "新", "0", "1", "2","3", "4", "5", "6", "7", "8", "9", "A", "B", "C", "D", "E", "F", "G", "H", "J", "K", "L", "M","N", "P", "Q", "R", "S", "T", "U", "V", "W", "X", "Y", "Z"]Lic_pred = []for lic in Lic_img:lic_pred = cnn.predict(lic.reshape(1, 80, 240, 3))lic_pred = np.array(lic_pred).reshape(7, 65)if len(lic_pred[lic_pred >= 0.8]) >= 4:chars = ''for arg in np.argmax(lic_pred, axis=1):  # 取每行中概率值最大的arg,将其转为字符chars += characters[arg]chars = chars[0:2] + '·' + chars[2:]Lic_pred.append((lic, chars))  # 将车牌和识别结果一并存入Lic_predreturn Lic_pred
3.2、车牌定位
#车牌定位
def unet_predict(unet, img_src_path):img_src = cv2.imdecode(np.fromfile(img_src_path, dtype=np.uint8), -1)# img_src=cv2.imread(img_src_path)if img_src.shape != (512, 512, 3):img_src = cv2.resize(img_src, dsize=(512, 512), interpolation=cv2.INTER_AREA)[:, :, :3]  # dsize=(宽度,高度),[:,:,:3]是防止图片为4通道图片,后续无法reshapeimg_src = img_src.reshape(1, 512, 512, 3)img_mask = unet.predict(img_src)  # 归一化除以255后进行预测img_src = img_src.reshape(512, 512, 3)  # 将原图reshape为3维img_mask = img_mask.reshape(512, 512, 3)  # 将预测后图片reshape为3维img_mask = img_mask / np.max(img_mask) * 255  # 归一化后乘以255img_mask[:, :, 2] = img_mask[:, :, 1] = img_mask[:, :, 0]  # 三个通道保持相同img_mask = img_mask.astype(np.uint8)  # 将img_mask类型转为int型return img_src, img_mask
3.3、车牌坐标矫正
def locate_and_correct(img_src, img_mask):"""该函数通过cv2对img_mask进行边缘检测,获取车牌区域的边缘坐标(存储在contours中)和最小外接矩形4个端点坐标,再从车牌的边缘坐标中计算出和最小外接矩形4个端点最近的点即为平行四边形车牌的四个端点,从而实现车牌的定位和矫正img_src: 原始图片img_mask: 通过u_net进行图像分隔得到的二值化图片,车牌区域呈现白色,背景区域为黑色定位且矫正后的车牌"""try: # contours1长度为0说明未检测到车牌contours, hierarchy = cv2.findContours(img_mask[:, :, 0], cv2.RETR_EXTERNAL, cv2.CHAIN_APPROX_SIMPLE)except:ret, contours, hierarchy = cv2.findContours(img_mask[:, :, 0], cv2.RETR_EXTERNAL, cv2.CHAIN_APPROX_SIMPLE)if not len(contours):# print("未检测到车牌")return [], []else:Lic_img = []img_src_copy = img_src.copy()for ii, cont in enumerate(contours):x, y, w, h = cv2.boundingRect(cont)img_cut_mask = img_mask[y:y + h, x:x + w]# contours中除了车牌区域可能会有宽或高都是1或者2这样的小噪点,# 而待选车牌区域的均值应较高,且宽和高不会非常小,因此通过以下条件进行筛选if np.mean(img_cut_mask) >= 75 and w > 15 and h > 15:rect = cv2.minAreaRect(cont) # 针对坐标点获取带方向角的最小外接矩形,中心点坐标,宽高,旋转角度box = cv2.boxPoints(rect).astype(np.int32) # 获取最小外接矩形四个顶点坐标cont = cont.reshape(-1, 2).tolist()# 由于转换矩阵的两组坐标位置需要一一对应,因此需要将最小外接矩形的坐标进行排序,最终排序为[左上,左下,右上,右下]box = sorted(box, key=lambda xy: xy[0]) # 先按照左右进行排序,分为左侧的坐标和右侧的坐标box_left, box_right = box[:2], box[2:] # 此时box的前2个是左侧的坐标,后2个是右侧的坐标box_left = sorted(box_left, key=lambda x: x[1]) # 再按照上下即y进行排序,此时box_left中为左上和左下两个端点坐标box_right = sorted(box_right, key=lambda x: x[1]) # 此时box_right中为右上和右下两个端点坐标box = np.array(box_left + box_right) # [左上,左下,右上,右下]# print(box)x0, y0 = box[0][0], box[0][1] # 这里的4个坐标即为最小外接矩形的四个坐标,接下来需获取平行(或不规则)四边形的坐标x1, y1 = box[1][0], box[1][1]x2, y2 = box[2][0], box[2][1]x3, y3 = box[3][0], box[3][1]def point_to_line_distance(X, Y):if x2 - x0:k_up = (y2 - y0) / (x2 - x0) # 斜率不为无穷大d_up = abs(k_up * X - Y + y2 - k_up * x2) / (k_up ** 2 + 1) ** 0.5else: # 斜率无穷大d_up = abs(X - x2)if x1 - x3:k_down = (y1 - y3) / (x1 - x3) # 斜率不为无穷大d_down = abs(k_down * X - Y + y1 - k_down * x1) / (k_down ** 2 + 1) ** 0.5else: # 斜率无穷大d_down = abs(X - x1)return d_up, d_downd0, d1, d2, d3 = np.inf, np.inf, np.inf, np.infl0, l1, l2, l3 = (x0, y0), (x1, y1), (x2, y2), (x3, y3)for each in cont: # 计算cont中的坐标与矩形四个坐标的距离以及到上下两条直线的距离,对距离和进行权重的添加,成功计算选出四边形的4个顶点坐标x, y = each[0], each[1]dis0 = (x - x0) ** 2 + (y - y0) ** 2dis1 = (x - x1) ** 2 + (y - y1) ** 2dis2 = (x - x2) ** 2 + (y - y2) ** 2dis3 = (x - x3) ** 2 + (y - y3) ** 2d_up, d_down = point_to_line_distance(x, y)weight = 0.975if weight * d_up + (1 - weight) * dis0 < d0: # 小于则更新d0 = weight * d_up + (1 - weight) * dis0l0 = (x, y)if weight * d_down + (1 - weight) * dis1 < d1:d1 = weight * d_down + (1 - weight) * dis1l1 = (x, y)if weight * d_up + (1 - weight) * dis2 < d2:d2 = weight * d_up + (1 - weight) * dis2l2 = (x, y)if weight * d_down + (1 - weight) * dis3 < d3:d3 = weight * d_down + (1 - weight) * dis3l3 = (x, y)p0 = np.float32([l0, l1, l2, l3]) # 左上角,左下角,右上角,右下角,p0和p1中的坐标顺序对应,以进行转换矩阵的形成p1 = np.float32([(0, 0), (0, 80), (240, 0), (240, 80)]) # 我们所需的长方形transform_mat = cv2.getPerspectiveTransform(p0, p1) # 构成转换矩阵lic = cv2.warpPerspective(img_src, transform_mat, (240, 80)) # 进行车牌矫正Lic_img.append(lic)cv2.drawContours(img_src_copy, [np.array([l0, l1, l3, l2])], -1, (0, 255, 0), 2)return img_src_copy, Lic_img
4、界面展示
4.1、主界面
主界面包括停车场容量和剩余容量显示和当前时间。

4.2、车牌检测
车牌检测与定位功能。

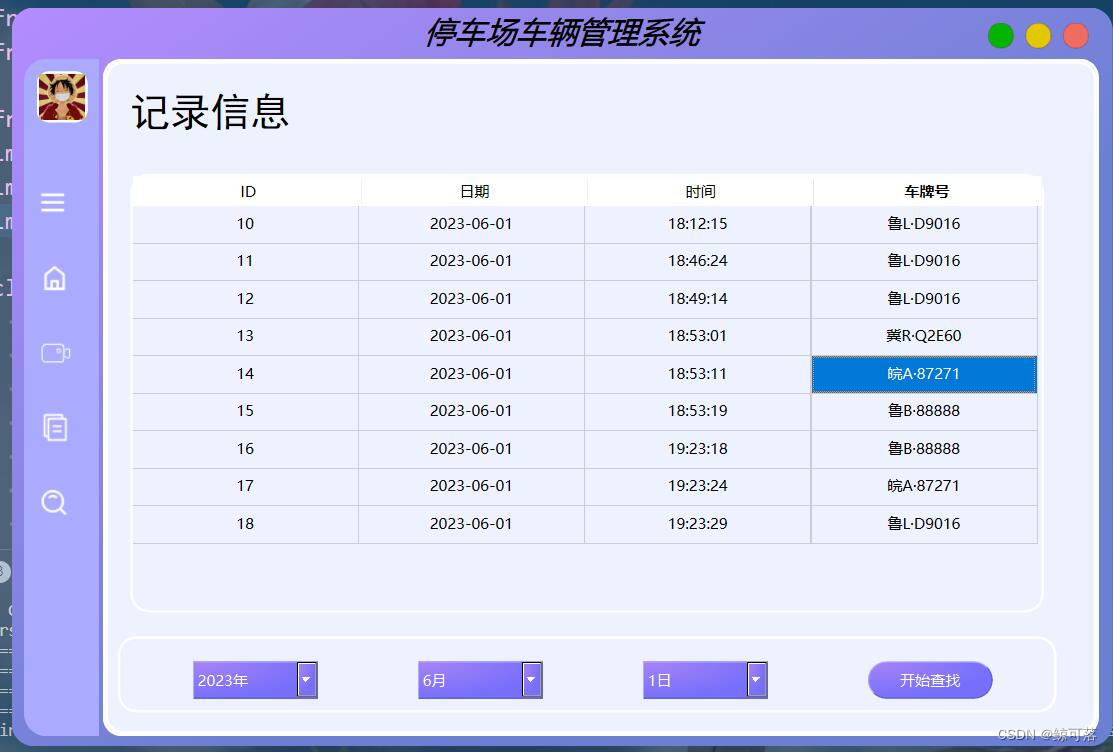
4.3、查询功能
按车牌查询。

所有信息记录查询
5、演示
6、链接
源码链接