unity 自由框选截图(两种方法,亲测有效)
提示:文章有错误的地方,还望诸位大神不吝指教!
文章目录
- 前言
- 一、第一种方法
- (1)简介GL
- (2) GL 用法:
- (3)具体代码
- 二、第二种方法
- 第一步:
- 第二步
- 第三步 代码
- 总结
前言
unity版本2019.3.7f1
本文提供两种截图方式,都是亲测可用。
第一种使用GL画线来实现
第二种使用Image来实现
总的逻辑都是一样的。
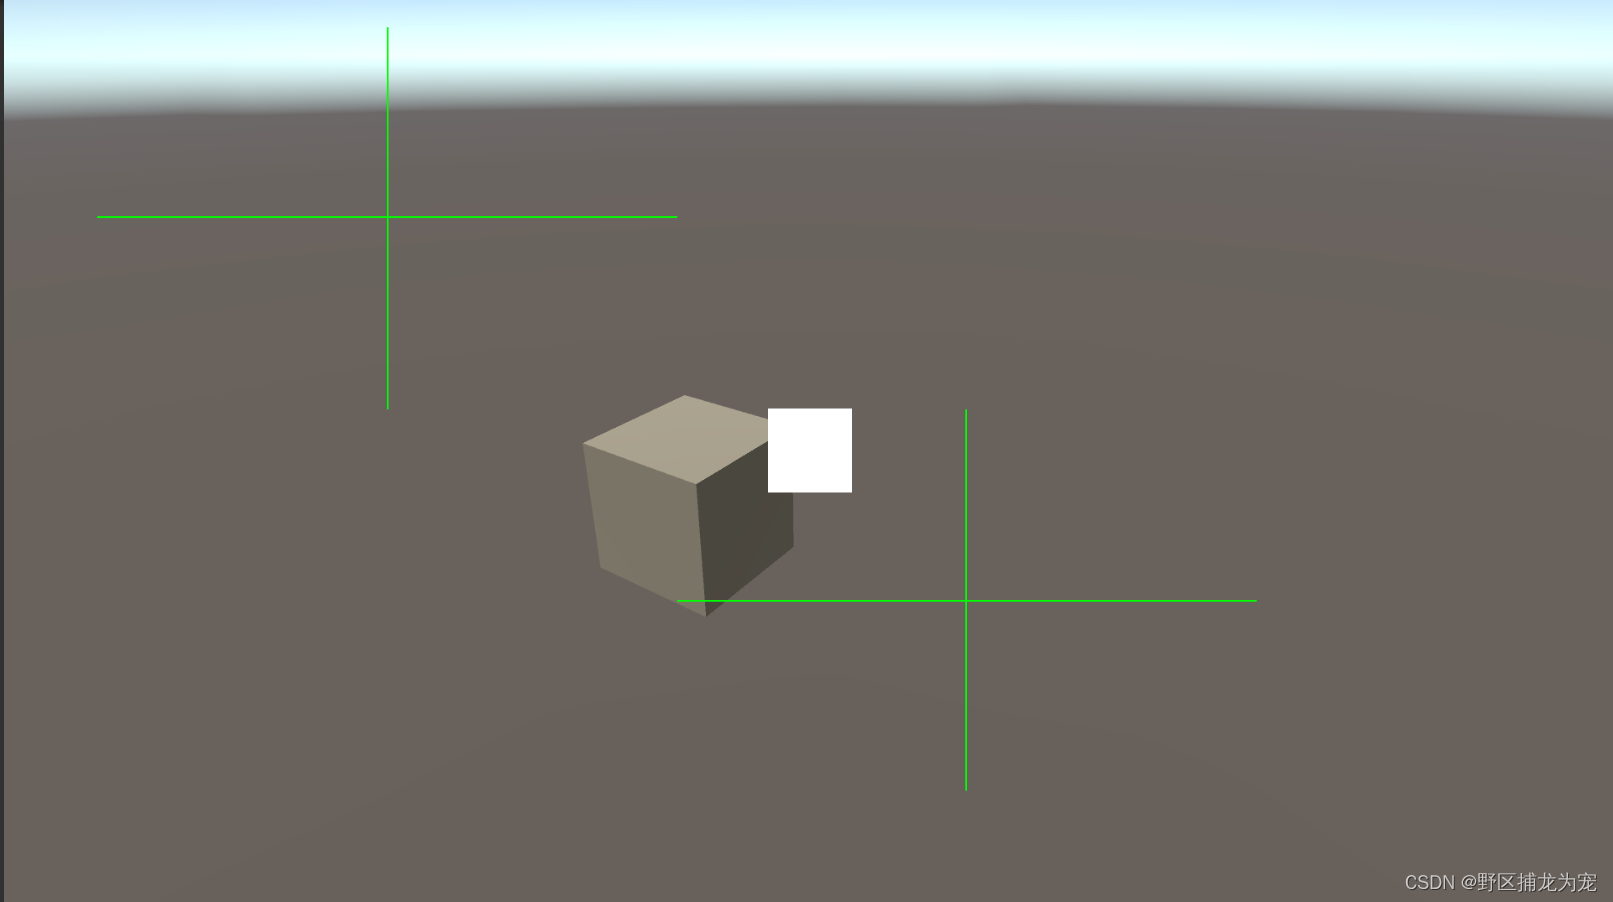
下面是两种方式的效果图:

提示:以下是本篇文章正文内容,下面案例可供参考
一、第一种方法
使用GL来画一个框,作为截图区域。
(1)简介GL
Graphics Library(简称 GL),包含一系列类似 OpenGL 的 Immediate 模式的渲染指令,比 Graphic.DrawMesh() 更高效。GL 是立即执行的,如果在Update() 方法里调用,它们将在相机渲染前执行,相机渲染前会清空屏幕,GL 渲染效果将无法看到。
(2) GL 用法:
在相机上挂脚本,并在 OnPostRender() 方法里执行(MonoBehaviour的生命周期)。GL 渲染的图像不需要 GameObject 承载,在 Hierarchy 窗口不会生成 GameObject 对象。
另外需要给一个Material 作为材质
(3)具体代码
记得挂载在相机上,并且给一个Material 。
/**********************************************************************文件信息文件名(File Name): SelectScreenshot.cs作者(Author): 野区捕龙为宠创建时间(CreateTime): #CREATETIME#**********************************************************************/
using System.Collections;
using System.Collections.Generic;
using UnityEngine;
using UnityEngine.UI;
using UnityEngine.EventSystems;
using System;
using System.IO;namespace Twq
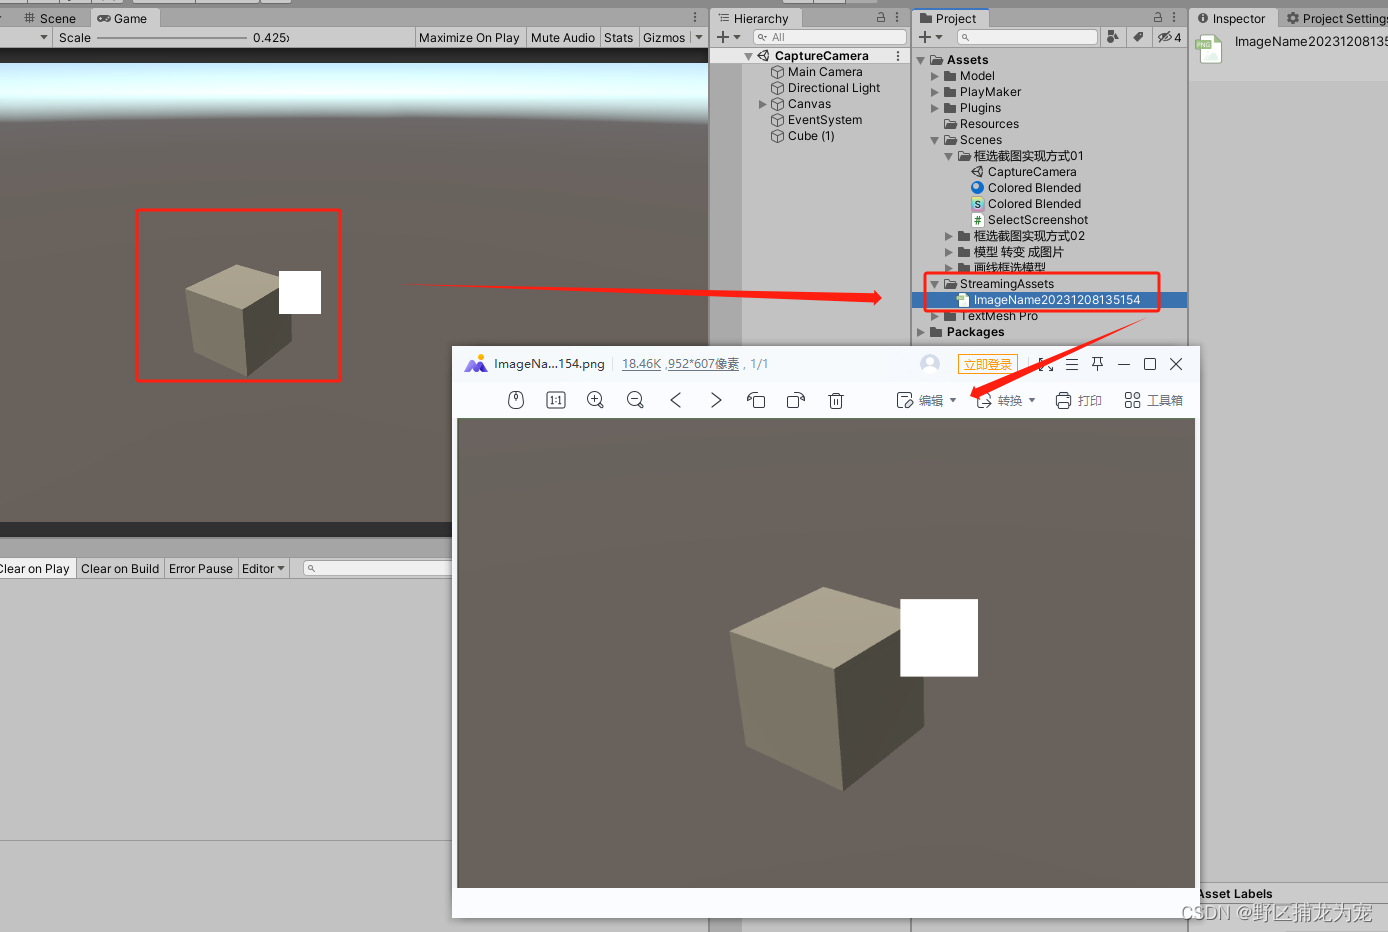
{public class SelectScreenshot : MonoBehaviour{private Color rColor = Color.green;private Vector3 start = Vector3.zero;private Vector3 end = Vector3.zero;public Material rMat;private bool drawFlag = false;private Rect rect;private Texture2D cutImage;// Use this for initialization void Start(){}// Update is called once per frame void Update(){if (Input.GetMouseButtonDown(0)){drawFlag = true;//如果鼠标左键按下 设置开始画线标志 start = Input.mousePosition;//记录按下位置 end = Input.mousePosition;//鼠标当前位置 }else if (Input.GetMouseButtonUp(0)){drawFlag = false;//如果鼠标左键放开 结束画线 }if (Input.GetKeyDown(KeyCode.M)){StartCoroutine(CutImage());}}//绘制框选 void OnPostRender(){//画线这种操作推荐在OnPostRender()里进行 而不是直接放在Update,所以需要标志来开启 if (drawFlag){end = Input.mousePosition;//鼠标当前位置 }GL.PushMatrix();//保存摄像机变换矩阵 if (!rMat)return;rMat.SetPass(0);GL.LoadPixelMatrix();//设置用屏幕坐标绘图 GL.Begin(GL.LINES);GL.Color(rColor);//设置方框的边框颜色 边框不透明 GL.Vertex3(start.x, start.y, 0);GL.Vertex3(end.x, start.y, 0);GL.Vertex3(end.x, start.y, 0);GL.Vertex3(end.x, end.y, 0);GL.Vertex3(end.x, end.y, 0);GL.Vertex3(start.x, end.y, 0);GL.Vertex3(start.x, end.y, 0);GL.Vertex3(start.x, start.y, 0);GL.End();GL.PopMatrix();//恢复摄像机投影矩阵 }IEnumerator CutImage(){string date = System.DateTime.Now.ToString("yyyyMMddHHmmss");//图片大小 cutImage = new Texture2D((int)(end.x - start.x), (int)(start.y - end.y), TextureFormat.RGB24, true);//坐标左下角为0 rect = new Rect((int)start.x, Screen.height - (int)(Screen.height - end.y), (int)(end.x - start.x), (int)(start.y - end.y));yield return new WaitForEndOfFrame();cutImage.ReadPixels(rect, 0, 0, true);cutImage.Apply();yield return cutImage;byte[] byt = cutImage.EncodeToPNG();//保存截图 File.WriteAllBytes(Application.streamingAssetsPath + "/ImageName" + date + ".png", byt);}}
}二、第二种方法
原理都差不多,第二种扩展性更好一些。
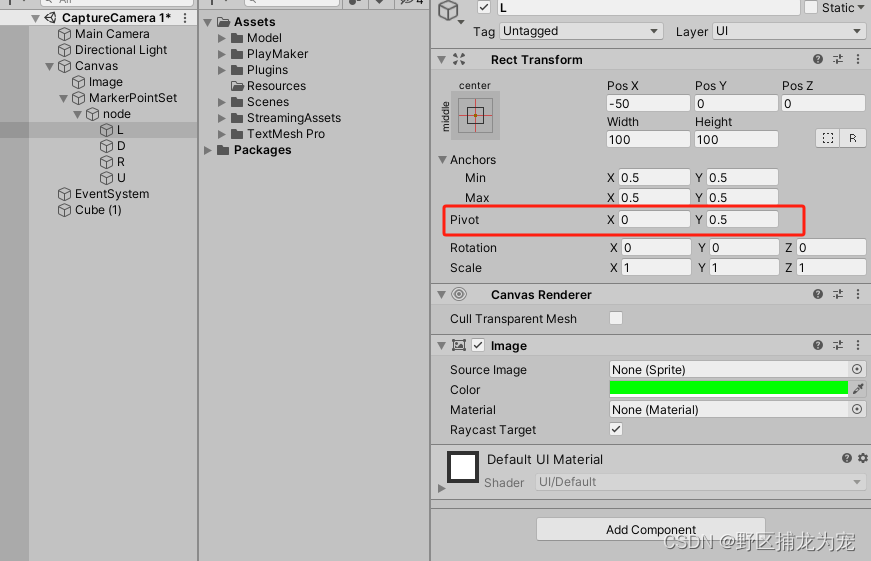
需要创建4个UI,来充当线框。并设置好Anchors。
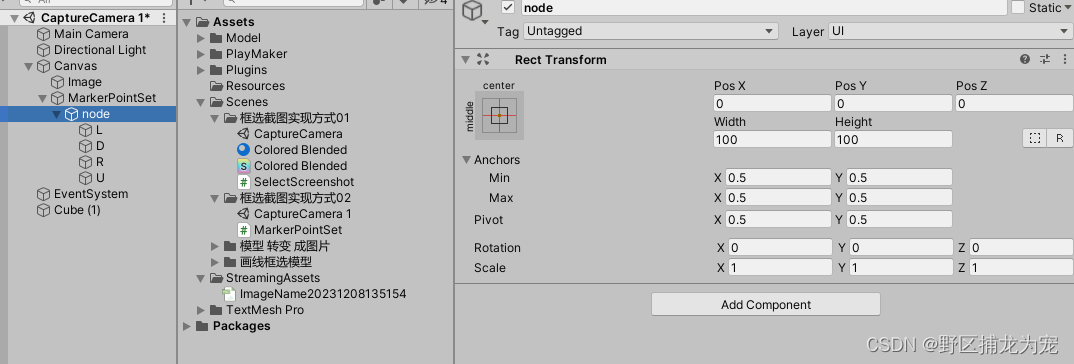
第一步:
创建一个父节点,以及子节点。如下图:
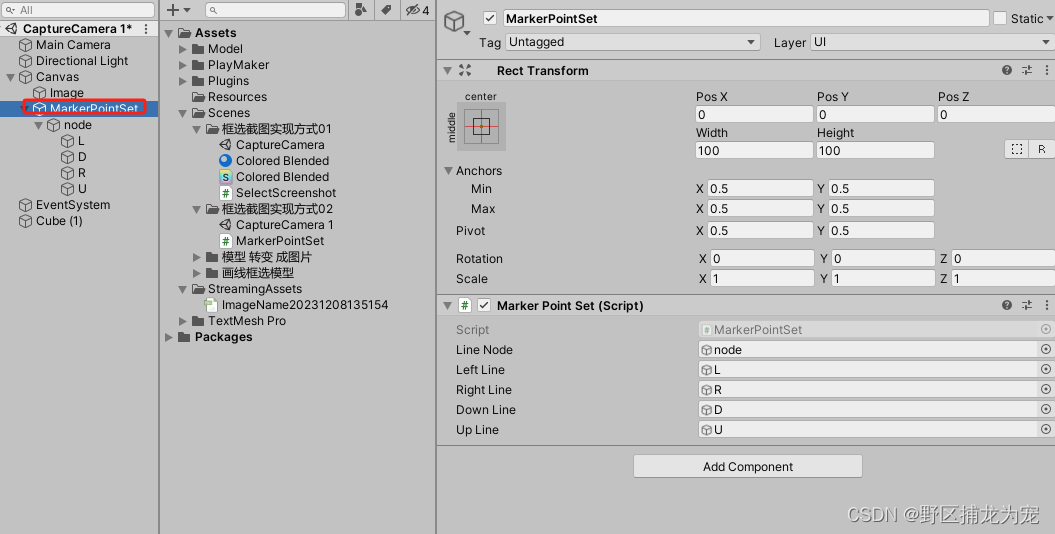
第二步
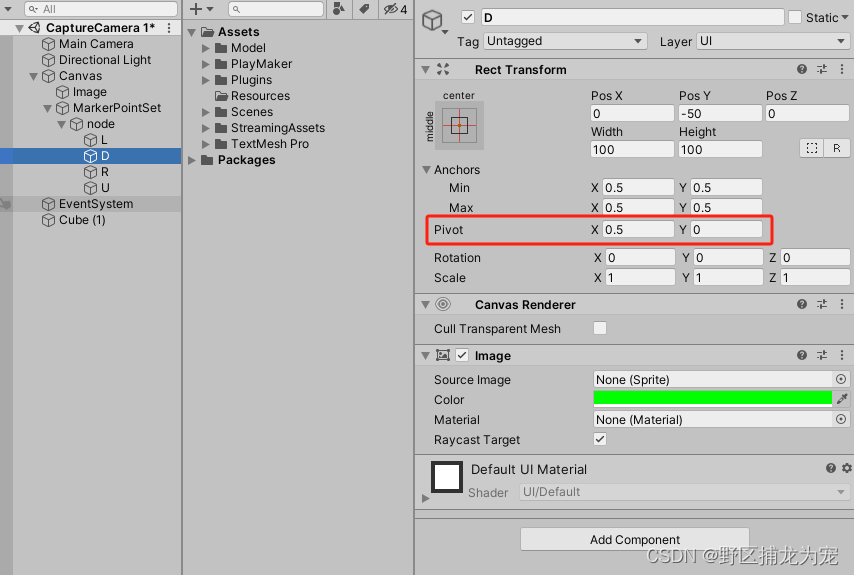
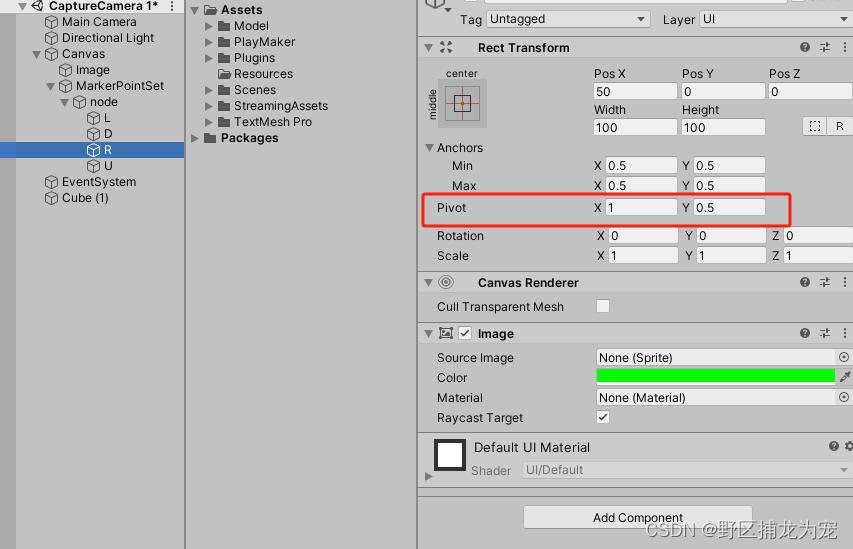
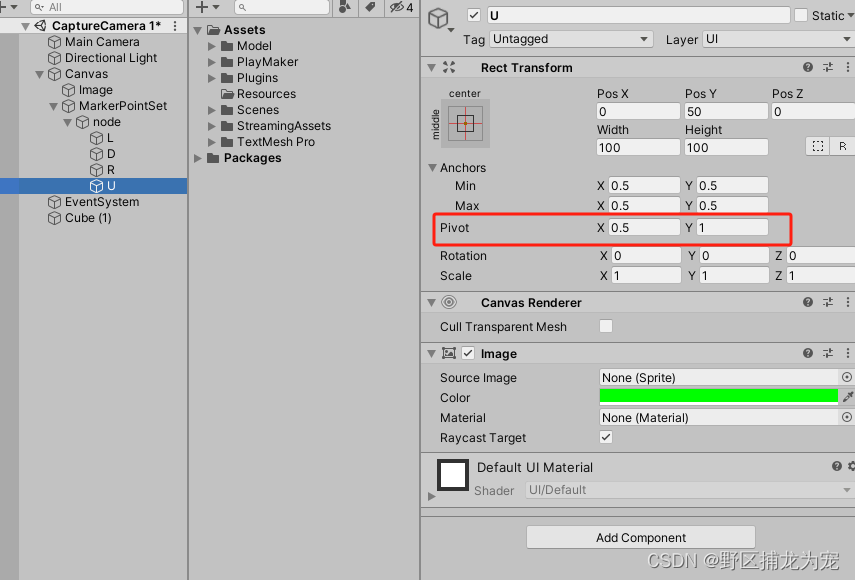
分别创建4个UI,充当4边线框,并设置每个边其Anchors。如下图:
第三步 代码
using System.Collections;
using System.Collections.Generic;
//using Unity.VisualScripting;
using UnityEngine;
using UnityEngine.UI;public class MarkerPointSet : MonoBehaviour
{private Vector3 m_Point;// private PointBase m_PointBase;private List<GameObject> m_Images = new List<GameObject>();List<Texture2D> m_AddListTexture = new List<Texture2D>();//private BaoGaoPoint m_BaoGaoPoint;private Texture2D m_screenShot;//画框截图public GameObject m_LineNode;public GameObject m_LeftLine;public GameObject m_RightLine;public GameObject m_DownLine;public GameObject m_UpLine;private Vector3 m_StartLine = Vector3.zero;private Vector3 m_EndLien = Vector3.zero;private bool m_IsScreens = false;private bool m_IsMouseEnd = false;void Start(){m_IsScreens = true;}private void Update(){if (m_IsScreens == true){m_EndLien = Input.mousePosition;if (Input.GetMouseButtonDown(0)){m_StartLine = Input.mousePosition;m_LineNode.gameObject.SetActive(true);m_IsMouseEnd = true;}else if(Input.GetMouseButtonUp(0)){if (m_IsMouseEnd == true){m_EndLien = Input.mousePosition;m_IsScreens = false;m_IsMouseEnd = false;//m_Buttons.SetActive(true);//m_Buttons.transform.position = Input.mousePosition;int _x = (int)m_StartLine.x;int _y = (int)m_StartLine.y;int _w = (int) (m_StartLine.x - m_EndLien.x);int _h = (int)(m_StartLine.y - m_EndLien.y);if (_w < 0){_w = Mathf.Abs(_w);}else{_x -= _w;}if (_h < 0){_h = Mathf.Abs(_h);}else{_y -= _h;}StartCoroutine(CaptureScreen(new Rect(_x,_y,_w,_h)));}}if (m_IsMouseEnd == true){UpdateLine();}}}private void UpdateLine(){m_LeftLine.transform.position = m_StartLine;m_DownLine.transform.position = m_StartLine;m_RightLine.transform.position = m_EndLien;m_UpLine.transform.position = m_EndLien;float _x = m_StartLine.x - m_EndLien.x;float _y = m_StartLine.y - m_EndLien.y;if (_x >=0){RectTransform _dtrans = m_DownLine.GetComponent<RectTransform>();_dtrans.sizeDelta = new Vector2(_x,2f);RectTransform _utrans = m_UpLine.GetComponent<RectTransform>();_utrans.sizeDelta = new Vector2(_x, 2f);_dtrans.localScale = new Vector3(-1f,1f,1f);_utrans.localScale = new Vector3(-1f, 1f, 1f);} else{_x = Mathf.Abs(_x);RectTransform _dtrans = m_DownLine.GetComponent<RectTransform>();_dtrans.sizeDelta = new Vector2(_x, 2f);RectTransform _utrans = m_UpLine.GetComponent<RectTransform>();_utrans.sizeDelta = new Vector2(_x, 2f);_dtrans.localScale = new Vector3(1f, 1f, 1f);_utrans.localScale = new Vector3(1f, 1f, 1f);}if (_y >= 0){RectTransform _dtrans = m_LeftLine.GetComponent<RectTransform>();_dtrans.sizeDelta = new Vector2(2f, _y);RectTransform _utrans = m_RightLine.GetComponent<RectTransform>();_utrans.sizeDelta = new Vector2(2f, _y);_dtrans.localScale = new Vector3(1f, -1f, 1f);_utrans.localScale = new Vector3(1f, -1f, 1f);}else{_y = Mathf.Abs(_y);RectTransform _dtrans = m_LeftLine.GetComponent<RectTransform>();_dtrans.sizeDelta = new Vector2(2f, _y);RectTransform _utrans = m_RightLine.GetComponent<RectTransform>();_utrans.sizeDelta = new Vector2(2f, _y);_dtrans.localScale = new Vector3(1f, 1f, 1f);_utrans.localScale = new Vector3(1f, 1f, 1f);}}private IEnumerator CaptureScreen(Rect rect){yield return new WaitForEndOfFrame();//不显示UI截图RenderTexture _rt = new RenderTexture(1920,1080,0);Camera.main.targetTexture = _rt;//传到主摄像机上Camera.main.Render();//渲染RenderTexture.active = _rt;m_screenShot = new Texture2D((int)rect.width, (int)rect.height, TextureFormat.RGB24, false);m_screenShot.ReadPixels(rect, 0, 0);m_screenShot.Apply();Camera.main.targetTexture = null;RenderTexture.active = null;Destroy(_rt);//m_Image.gameObject.SetActive(true);//m_Image.rectTransform.sizeDelta = new Vector2(m_screenShot.width, m_screenShot.height);//图片设置//m_Image.sprite = Sprite.Create(m_screenShot, new Rect(0, 0, m_screenShot.width, m_screenShot.height), Vector2.zero);yield break;}}
项目链接: link:
总结
好记性不如烂笔头