数据收集与处理(爬虫技术)
文章目录
- 1 前言
- 2 网络爬虫
- 2.1 构造自己的Scrapy爬虫
- 2.1.1 items.py
- 2.1.2 spiders子目录
- 2.1.3 pipelines.py
- 2.2 构造可接受参数的Scrapy爬虫
- 2.3 运行Scrapy爬虫
- 2.3.1 在命令行运行
- 2.3.2 在程序中调用
- 2.4 运行Scrapy的一些要点
- 3 大规模非结构化数据的存储与分析
- 4 全部代码
1 前言
- 介绍几种常见的数据收集、存储、组织以及分析的方法和工具
- 首先介绍如何构造自己的网络爬虫从网上抓取内容,并将其中按照一定结构组织的信息抽取出来
- 然后介绍如何使用ElasticSearch来有效地存储、组织和查询非结构化数据
- 最后简要介绍和使用Spark对大规模的非结构化数据进行初步分析的方法
2 网络爬虫
2.1 构造自己的Scrapy爬虫
-
在终端输入
scrapy startproject money163,会自动生成一个同名的子目录和一个scrapy.cfg配置文件 -
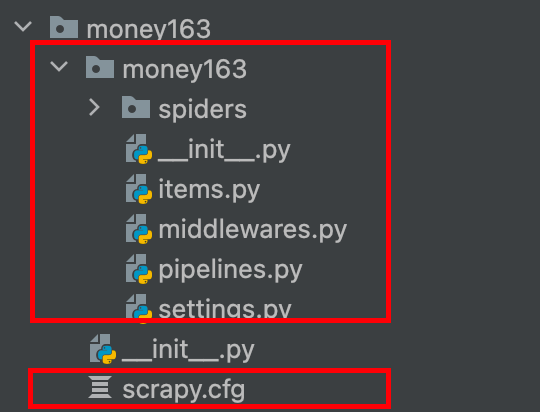
-
有两个init文件都是空白的,暂时不用管,将经历放在items.py、settings.py、pipelines.py和将要在spiders子目录下生成的爬虫程序上
-
基本结构建立起来之后,需要按照说明的步骤一次完成对内容抽取,爬虫目标和行为以及数据操作的定义,每一个定义都对应一个文件。
2.1.1 items.py
- 在这个文件里面定义需要抽取的内容,这基本上是通过定义一个继承于scrapy.Item的内容类来完成的,每一个内容都属于scrapy.Field(),定义非常简单,即内容名称 = scrapy.Field()
2.1.2 spiders子目录
- 在spiders子目录下新建一个python文件,假设命名为money_spider.py
- 这个文件比较复杂,可以继承不同的类来定义
- 首先使用Scrapy的CrawlSpider类,定义三个内容:一是爬虫的名字,二是目标网站,包括爬取模式和对返回链接的过滤等;三是返回的对象按照其结构抽取所需要的数据
- 在money_spider.py文件中输入以下代码,注意将Stock163换成money163
# encoding: utf-8
import scrapy
import re
from scrapy.selector import Selector
from stock163.items import Stock163Item
from scrapy.linkextractors import LinkExtractor
from scrapy.spiders import CrawlSpider, Ruleclass ExampleSpider(CrawlSpider):name = "stocknews" #爬虫的名字为 "stocknews"allowed_domains = ["money.163.com"]#设置允许爬取的域名def __init__(self, id='600000', page='0', *args, **kwargs):#初始化方法,设置了一些初始参数,包括 id(默认为 '600000')、page(默认为 '0'),以及其他可能传递的参数。# allowrule = "/%s/%s\d+/\d+/*" % (year, month)# allowrule = "/%s/%s%s/\d+/*" % (year, month, day) #这个规则匹配类似 "/2022/11/25/" 这样的日期结构allowrule = r"/\d+/\d+/\d+/*"# 定义了一个正则表达式,用于匹配新闻链接的规则。数字 数字 数字 任意字符self.counter = 0 # 初始化一个计数器,可能用于跟踪爬取的新闻数量。self.stock_id = id  # 保存股票IDself.start_urls = ['http://quotes.money.163.com/f10/gsxw_%s,%s.html' % (id, page)] # 设置初始爬取的URL,这里使用了 id 和 page 参数构造URL。ExampleSpider.rules = (Rule(LinkExtractor(allow=allowrule), callback="parse_news", follow=False),)# 定义了爬取规则。这里使用了 LinkExtractor 来提取链接,通过正则表达式 allow=allowrule 匹配链接规则,然后指定了回调函数为 parse_news# 最后设置 follow=False 表示不跟踪从当前链接提取的链接。# recompile the rulesuper(ExampleSpider, self).__init__(*args, **kwargs)# 调用父类(CrawlSpider)的初始化方法,确保爬虫的正确初始化。'''rules=Rule(LinkExtractor(allow=r"/\d+/\d+/\d+/*"),callback="parse_news", follow=True)'''# f = open("out.txt", "w")def printcn(suni):for i in suni:print(suni.encode('utf-8'))def parse_news(self, response):item = Stock163Item()item['news_thread'] = response.url.strip().split('/')[-1][:-5]#这行代码从响应的URL中提取新闻线程信息。它首先通过response.url获取当前页面的URL,然后使用strip()方法去除首尾的空格,接着使用split('/')方法根据斜杠切割URL为一个列表,最后通过[-1]#取列表的最后一个元素,即URL中最后一个斜杠后的部分。[: -5] 是为了去掉文件扩展名(假设是.html或类似的扩展名),剩下的部分就是新闻线程的信息,然后将其赋值给item对象的news_thread属性。self.get_thread(response,item)self.get_title(response, item)self.get_source(response, item)self.get_url(response, item)self.get_news_from(response, item)self.get_from_url(response, item)self.get_text(response, item)return item  ##############!!!!!!!!!!!!!!!!!!!!!!!!!!!!!!!!!remenber to Retrun Item after parsedef get_title(self, response, item):title = response.xpath("/html/head/title/text()").extract()if title:# print ('title:'+title[0][:-5].encode('utf-8'))item['news_title'] = title[0][:-5]def get_source(self, response, item):source = response.xpath("//div[@class='left']/text()").extract()if source:# print ('source'+source[0][:-5].encode('utf-8'))item['news_time'] = source[0][:-5]def get_news_from(self, response, item):news_from = response.xpath("//div[@class='left']/a/text()").extract()if news_from:# print 'from'+news_from[0].encode('utf-8')item['news_from'] = news_from[0]def get_from_url(self, response, item):from_url = response.xpath("//div[@class='left']/a/@href").extract()if from_url:# print ('url'+from_url[0].encode('utf-8')        )item['from_url'] = from_url[0]def get_text(self, response, item):news_body = response.xpath("//div[@id='endText']/p/text()").extract()if news_body:# for  entry in news_body:#     print (entry.encode('utf-8'))item['news_body'] = news_bodydef get_url(self, response, item):news_url = response.urlif news_url:print(news_url)item['news_url'] = news_url
2.1.3 pipelines.py
- 接着需要对所抽取的具体要素进行处理,要么显示在终端的窗口中,要么存入某个地方或者数据库中,现在我们假设将所抽取出来的要素构造成一个词典,以JSON文档的格式存为文本文件,每个页面单独存成一个文件。
- 这个时候需要定义一个类,这个类里面只有一个方法,process_item(self,item,spider)
# -*- coding: utf-8 -*-# Define your item pipelines here
#
# Don't forget to add your pipeline to the ITEM_PIPELINES setting
# See: http://doc.scrapy.org/en/latest/topics/item-pipeline.html
#encoding: utf-8
import os
def ParseFilePath(url, id):# user should change this folder pathoutfolder = "e:\\data\\FinTech\\News\\Stocks\\%s" % idcomponents = url.split("/")year = components[3]monthday=components[4]month = monthday[:2]day = monthday[2:]idx=components[5]page=idx+"_"+components[6]#folder = outfolder + "\\%s_%s_%s_" % (year, month, day)folder = outfolderif ((year=='') | ('keywords' in page)):filepath='xxx'else:filepath = folder + "\\%s_%s_%s_%s.txt" % (year, month, day, page) filepath=filepath.replace('?', '_')return(folder, filepath)class Stock163Pipeline(object):   def process_item(self, item, spider):if spider.name != "stocknews":  return itemif item.get("news_thread", None) is None: return itemurl = item['news_url']if 'keywords' in url:return itemfolder, filepath = ParseFilePath(url, spider.stock_id)spider.counter = spider.counter+1counterfilepath = folder+"\\counter.txt"#one a single machine will is virtually no risk of race-conditionif not os.path.exists(folder):os.makedirs(folder)        #print(filepath, counterfilepath)#print(spider.stats)fo = open(counterfilepath, "w", encoding="UTF-8")fo.write(str(spider.counter))fo.close()if (filepath!='xxx'):fo = open(filepath, 'w', encoding='utf-8')fo.write(str(dict(item)))fo.close()return None
2.2 构造可接受参数的Scrapy爬虫
- 这节内容主要介绍能改变起始网页的地址,从而使得同一个爬虫爬去不同的网站
- 修改来start_urls,同时也修改了allowed_domain,保证爬虫顺利进行,最后通过super方法执行这个类,来更新参数
`class ExampleSpider(CrawlSpider):name = "stocknews"def __init__(self, id='600000', page='0', *args, **kwargs): #allowrule = "/%s/%s\d+/\d+/*" % (year, month)allowrule = "/%s/%s%s/\d+/*" % (year, month, day) self.counter = 0self.stock_id = idself.start_urls = ['http://\%s' \% (site)]ExampleSpider.rules=(Rule(LinkExtractor(allow=allowrule), callback="parse_news", follow=False),)#recompile the rule `
2.3 运行Scrapy爬虫
- 一种是在命令行里面执行crawl命令,一种是在别的程序中调用Scrapy爬虫
- 命令行中是单线程,程序调用是多线程,一次可以同时爬取不同的网站,当然也可以通过twisted包里面的internet.defer方法来将每个爬虫串联起来,同时调用reactor来控制执行顺序
- Scrapy也可以在多台机器上部署分布式
2.3.1 在命令行运行
- 在命令行中非常简单,进入项目的主目录,即包含scrapy.cfg文件的那个目录,输入:scrapy crawl money163,这里的money163是在spider.py程序文件中使用“ name=“money163”定义的爬虫名字,crawl是让Scrapy爬虫开始爬去网页“scrapy craw money163 -a site = money.163.com/stock
2.3.2 在程序中调用
- 在别的程序里调用Scrapy爬虫可以使用不同的类,这里使用CrawlerProcess类,配合get_project_setting方法,就可以在项目目录中非常方面地使用别的程序运行自己的爬虫
-首先引入相应的模块和函数
from scrapy.crawler import CrawlerProcess
from scrapy.utils.project import get_project_settings
- 然后定义爬虫过程,在定义的过程中,先通过get_project_settings获取项目的信息,再传给所定义的爬虫过程
process = CrawlerProcess(get_project_settings()) - 定义好爬虫过程后,只需调用这个过程对象,包括传递参数,就能运行爬虫了,比如:
process.crawl('stocknews', id=stockid, page=str(page)) - 按照列表中的三个网址定义了三个爬虫,最后通过process.start来启动爬虫,因为使用了get_project_settings,这个python程序需要在项目所在目录下执行才能有效运行
for site in ['money.163.com', 'tech.163.com', 'money.163.com/stock']: process.crawl('myspider', site = site)
process.start()
2.4 运行Scrapy的一些要点
- 有些网站会对网络请求是否是网络爬虫进行识别,如果发现是网络爬虫,则会进行约束,比如限制流量甚至直接拒绝响应
- 因此需要合理设置setting.py和middleware文件里面的选项来实现
3 大规模非结构化数据的存储与分析
- 非结构化的数据是指没有定义结构的数据,一种典型的非结构化数据是文本,包括日期、数字、人名、事件等,这样的数据没有规则可循
- 比如数据挖掘、自然语言处理、文本分析等提供了不同方法从非结构化数据里找出模式,处理文本常用的技巧通常涉及到元数据或者词性标签手动标记
- 非结构化数据一般使用schema.org定义的类型和属性作为标记(比如JSON- LD)
- 当单个网页上有多种实体类型时,这些实体应该都被标记,例如视频schemma.org/VideoObject
4 全部代码
from keras.applications.vgg16 import VGG16
from keras.layers import Input,Flatten,Dense,Dropout
from keras.models import Model
from keras.optimizers import SGDfrom keras.datasets import mnistimport cv2
import h5py as h5py
import numpy as npmodel_vgg = VGG16(include_top=False,weights='imagenet',input_shape=(ishape,ishape,3))
model = Flatten(name='flatten')(model_vgg.output)
model = Dense(4096,activation='relu',name='fc1')(model)
model = Dense(4096,activation='relu',name='fc2')(model)
model = Dropout(0.5)(model)
model = Dense(10,activation='softmax')(model)
model_vgg_mnist = Model(model_vgg.input,model,name='vgg16')model_vgg_mnist.summary()model_vgg = VGG16(include_top=False,weights='imagenet',input_shape=(224,224,3))
for layer in model_vgg.layers:layer.trainable=False
model = Flatten()(model_vgg.output)
model = Dense(4096,activation='relu',name='fc1')(model)
model = Dense(4096,activation='relu',name='fc2')(model)
model = Dropout(0.5)(model)
model = Dense(10,activation='softmax',name='prediction')(model)
model_vgg_mnist_pretrain = Model(model_vgg.input,model,name='vgg16_pretrain')model_vgg_mnist_pretrain.summary()sgd = SGD(lr = 0.05,decay=1e-5)
model_vgg_mnist_pretrain.compile(loss='categorical_crossentropy',optimizer=sgd,metrics=['accuracy'])(x_train,y_train),(x_test,y_test) = mnist.load_data()
x_train = [cv2.cvtColor(cv2.resize(i,(ishape,ishape)),cv2.COLOR_GRAY2BGR) for i in x_train]
x_train = np.concatenate([arr[np.newaxis] for arr in x_train]).astype('float32')
x_test = [cv2.cvtColor(cv2.resize(i,(ishape,ishape)),cv2.COLOR_GRAY2BGR) for i in x_test]
x_test = np.concatenate([arr[np.newaxis] for arr in x_test]).astype('float32')x_test.shape
x_train.shapex_train /= 255
x_test /= 255np.where(x_train[0]!=0)def tran_y(y):y_ohe = np.zeros(10)y_ohe[y] = 1return y_ohey_train_ohe = np.array([tran_y(y_train[i]) for i in range(len(y_train))])
y_test_ohe = np.array([tran_y(y_test[i]) for i in range(len(y_test))])model_vgg_mnist_pretrain.fit(x_train,y_train_ohe,validation_data=(x_test,y_test_ohe),epochs=200,batch_size=128)