Nginx模块开发之http handler实现流量统计(2)
文章目录
- 一、概述
- 二、Nginx handler模块开发
- 2.1、代码实现
- 2.2、编写config文件
- 2.3、编译模块到Nginx源码中
- 2.4、修改conf文件
- 2.5、执行效果
- 总结
一、概述
上一篇【Nginx模块开发之http handler实现流量统计(1)】使用数组在单进程实现了IP的流量统计,这一篇将进行优化,使用红黑树的数据结构以及共享内存的方式实现进程间通信。
进程间通信的方式:
(1)进程在不同的机器中,使用网络进行通信。
(2)进程在同一个机器,并且进程间的关系是父子进程关系,可以使用共享内存。
(3)使用unix_sock,比如文件soket。在MySQL使用的就是这种进程通信方式。
(4)pipe,管道。
二、Nginx handler模块开发
2.1、代码实现
在重点地方添加了注释,主要是红黑树的添加和使用,以及共享内存的使用。
核心:
1.nginx获取请求。ngx_command_t中设置ngx_http_pagecount_set。
2.conf文件解析到模块的cmd时,初始化共享内存以及互斥锁。
3.红黑树的初始化。
4.组织网页时,需要遍历红黑树找到IP并做流量统计。
#include <ngx_http.h>
#include <ngx_config.h>
#include <ngx_core.h>#define ENABLE_RBTREE	1static char *ngx_http_pagecount_set(ngx_conf_t *cf, ngx_command_t *cmd, void *conf);
static ngx_int_t ngx_http_pagecount_handler(ngx_http_request_t *r);
static ngx_int_t ngx_http_pagecount_init(ngx_conf_t *cf);
static void  *ngx_http_pagecount_create_location_conf(ngx_conf_t *cf);
static ngx_int_t ngx_http_pagecount_shm_init (ngx_shm_zone_t *zone, void *data);
static void ngx_http_pagecount_rbtree_insert_value(ngx_rbtree_node_t *temp,ngx_rbtree_node_t *node, ngx_rbtree_node_t *sentinel);// 命令解析
static ngx_command_t count_commands[] = {{ngx_string("count"),NGX_HTTP_LOC_CONF | NGX_CONF_NOARGS,ngx_http_pagecount_set,//遇到模块命令时调用NGX_HTTP_LOC_CONF_OFFSET,0, NULL},ngx_null_command
};static ngx_http_module_t count_ctx = {NULL,ngx_http_pagecount_init,//初始化NULL,NULL,NULL,NULL,// conf文件解析到location时调用ngx_http_pagecount_create_location_conf,NULL,
};//ngx_http_count_module
ngx_module_t ngx_http_pagecount_module = {NGX_MODULE_V1,&count_ctx,count_commands,NGX_HTTP_MODULE,NULL,NULL,NULL,NULL,NULL,NULL,NULL,NGX_MODULE_V1_PADDING
};typedef struct {int count; //count
} ngx_http_pagecount_node_t;typedef struct {ngx_rbtree_t rbtree;ngx_rbtree_node_t sentinel;} ngx_http_pagecount_shm_t;// 共享内存结构体
typedef struct
{ssize_t shmsize;ngx_slab_pool_t *shpool;// 互斥锁ngx_http_pagecount_shm_t *sh;
} ngx_http_pagecount_conf_t;// 共享内存初始化
ngx_int_t ngx_http_pagecount_shm_init (ngx_shm_zone_t *zone, void *data) {ngx_http_pagecount_conf_t *conf;ngx_http_pagecount_conf_t *oconf = data;conf = (ngx_http_pagecount_conf_t*)zone->data;if (oconf) {conf->sh = oconf->sh;conf->shpool = oconf->shpool;return NGX_OK;}//printf("ngx_http_pagecount_shm_init 0000\n");// 初始化锁conf->shpool = (ngx_slab_pool_t*)zone->shm.addr;conf->sh = ngx_slab_alloc(conf->shpool, sizeof(ngx_http_pagecount_shm_t));if (conf->sh == NULL) {return NGX_ERROR;}conf->shpool->data = conf->sh;//printf("ngx_http_pagecount_shm_init 1111\n");// 共享内存创建完之后初始化红黑树,// 要提供插入函数ngx_rbtree_init(&conf->sh->rbtree, &conf->sh->sentinel, ngx_http_pagecount_rbtree_insert_value);return NGX_OK;}static char *ngx_http_pagecount_set(ngx_conf_t *cf, ngx_command_t *cmd, void *conf) {ngx_shm_zone_t *shm_zone;ngx_str_t name = ngx_string("pagecount_slab_shm");ngx_http_pagecount_conf_t *mconf = (ngx_http_pagecount_conf_t*)conf;ngx_http_core_loc_conf_t *corecf;//ngx_log_error(NGX_LOG_EMERG, cf->log, ngx_errno, "ngx_http_pagecount_set000");// 设置共享内存的大小mconf->shmsize = 1024*1024;shm_zone = ngx_shared_memory_add(cf, &name, mconf->shmsize, &ngx_http_pagecount_module);if (NULL == shm_zone) {return NGX_CONF_ERROR;}shm_zone->init = ngx_http_pagecount_shm_init;shm_zone->data = mconf;corecf = ngx_http_conf_get_module_loc_conf(cf, ngx_http_core_module);// 计数统计主函数corecf->handler = ngx_http_pagecount_handler;return NGX_CONF_OK;
}ngx_int_t   ngx_http_pagecount_init(ngx_conf_t *cf) {return NGX_OK;
}// conf文件解析到location时进入此函数。
// 此函数为模块创建所需要的结构体, 后面会使用。
void  *ngx_http_pagecount_create_location_conf(ngx_conf_t *cf) {ngx_http_pagecount_conf_t *conf;// 共享内存的结构体conf = ngx_palloc(cf->pool, sizeof(ngx_http_pagecount_conf_t));if (NULL == conf) {return NULL;}// 初始化共享内存的大小conf->shmsize = 0;//ngx_log_error(NGX_LOG_EMERG, cf->log, ngx_errno, "ngx_http_pagecount_create_location_conf");// init conf data// ... return conf;}// 红黑树的插入函数
static void
ngx_http_pagecount_rbtree_insert_value(ngx_rbtree_node_t *temp,ngx_rbtree_node_t *node, ngx_rbtree_node_t *sentinel)
{ngx_rbtree_node_t **p;//ngx_http_testslab_node_t *lrn, *lrnt;for (;;){if (node->key < temp->key){p = &temp->left;}else if (node->key > temp->key) {p = &temp->right;}else{return ;}// 没有找到,直接返回if (*p == sentinel){break;}temp = *p;}*p = node;node->parent = temp;node->left = sentinel;node->right = sentinel;ngx_rbt_red(node);
}// 查找IP和访问计数统计
static ngx_int_t ngx_http_pagecount_lookup(ngx_http_request_t *r, ngx_http_pagecount_conf_t *conf, ngx_uint_t key) {ngx_rbtree_node_t *node, *sentinel;node = conf->sh->rbtree.root;sentinel = conf->sh->rbtree.sentinel;ngx_log_error(NGX_LOG_EMERG, r->connection->log, ngx_errno, " ngx_http_pagecount_lookup 111 --> %x\n", key);while (node != sentinel) {if (key < node->key) {node = node->left;continue;} else if (key > node->key) {node = node->right;continue;} else { // key == nodenode->data ++;return NGX_OK;}}ngx_log_error(NGX_LOG_EMERG, r->connection->log, ngx_errno, " ngx_http_pagecount_lookup 222 --> %x\n", key);// insert rbtreenode = ngx_slab_alloc_locked(conf->shpool, sizeof(ngx_rbtree_node_t));if (NULL == node) {return NGX_ERROR;}node->key = key;node->data = 1;ngx_rbtree_insert(&conf->sh->rbtree, node);ngx_log_error(NGX_LOG_EMERG, r->connection->log, ngx_errno, " insert success\n");return NGX_OK;
}static int ngx_encode_http_page_rb(ngx_http_pagecount_conf_t *conf, char *html) {sprintf(html, "<h1>Source Insight </h1>");strcat(html, "<h2>");//ngx_rbtree_traversal(&ngx_pv_tree, ngx_pv_tree.root, ngx_http_count_rbtree_iterator, html);ngx_rbtree_node_t *node = ngx_rbtree_min(conf->sh->rbtree.root, conf->sh->rbtree.sentinel);do {char str[INET_ADDRSTRLEN] = {0};char buffer[128] = {0};sprintf(buffer, "req from : %s, count: %d <br/>",inet_ntop(AF_INET, &node->key, str, sizeof(str)), node->data);strcat(html, buffer);node = ngx_rbtree_next(&conf->sh->rbtree, node);} while (node);strcat(html, "</h2>");return NGX_OK;
}static ngx_int_t ngx_http_pagecount_handler(ngx_http_request_t *r) {u_char html[1024] = {0};int len = sizeof(html);ngx_rbtree_key_t key = 0;struct sockaddr_in *client_addr =  (struct sockaddr_in*)r->connection->sockaddr;ngx_http_pagecount_conf_t *conf = ngx_http_get_module_loc_conf(r, ngx_http_pagecount_module);key = (ngx_rbtree_key_t)client_addr->sin_addr.s_addr;ngx_log_error(NGX_LOG_EMERG, r->connection->log, ngx_errno, " ngx_http_pagecount_handler --> %x\n", key);ngx_shmtx_lock(&conf->shpool->mutex);ngx_http_pagecount_lookup(r, conf, key);	ngx_shmtx_unlock(&conf->shpool->mutex);ngx_encode_http_page_rb(conf, (char*)html);//headerr->headers_out.status = 200;ngx_str_set(&r->headers_out.content_type, "text/html");ngx_http_send_header(r);//bodyngx_buf_t *b = ngx_pcalloc(r->pool,  sizeof(ngx_buf_t));ngx_chain_t out;out.buf = b;out.next = NULL;b->pos = html;b->last = html+len;b->memory = 1;b->last_buf = 1;return ngx_http_output_filter(r, &out);}
2.2、编写config文件
创建:
touch config
内容:
ngx_addon_name=ngx_http_pagecount_module
HTTP_MODULES="$HTTP_MODULES ngx_http_pagecount_module"
NGX_ADDON_SRCS="$NGX_ADDON_SRCS $ngx_addon_dir/ngx_http_pagecount_module.c"
注意,config文件要和模块的代码在相同目录。
2.3、编译模块到Nginx源码中
(1)配置中添加模块:
./configure --prefix=/usr/local/nginx --with-http_realip_module --with-http_addition_module
--with-http_gzip_static_module --with-http_secure_link_module --with-http_stub_status_module
--with-stream --with-pcre=/home/fly/workspace/pcre-8.41 --with-zlib=/home/fly/workspace/zlib-1.2.11
--with-openssl=/home/fly/workspace/openssl-1.1.0g
--add-module=/mnt/hgfs/sourcecode_learning/nginx-module/ngx_http_pagecount_module
注意模块路径要正确。出现如下表示成功:
configuring additional modules
adding module in /mnt/hgfs/sourcecode_learning/nginx-module/ngx_http_pagecount_module+ ngx_http_pagecount_module was configured
creating objs/Makefile
(2)编译安装:
make && sudo make install
2.4、修改conf文件
编译安装完成后,conf文件添加count;
worker_processes 4;events {worker_connections 1024;
}http {upstream backend {server 192.168.7.146:8889;server 192.168.7.146:8890;}server {listen 8888;location / {proxy_pass http://backend;}}server {listen 8889;location / {count;}}server {listen 8890;}server {listen 8891;}}
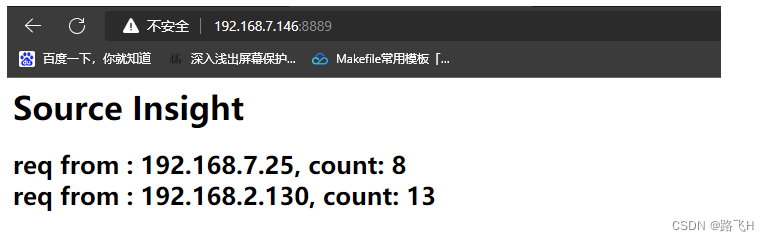
2.5、执行效果
关闭已启动的nginx:
sudo /usr/local/nginx/sbin/nginx -s stop
启动nginx:
sudo /usr/local/nginx/sbin/nginx -c /usr/local/nginx/conf/fly.conf
在网页输入IP和端口,执行效果如下:
总结
- 实现一个基于Nginx的IP统计或访问流量统计,可以借鉴以上代码;只要做一些业务上的修改就可以直接使用。可能需改动的地方就是红黑树的key、value的数据结构,以及ngx_encode_http_page_rb函数的业务代码,其他可以基本不用改动就可以二次开发。
- Nginx需要熟悉的数据结构:内存池、queue、list、array、shmem等。同时需要清楚Nginx的11个状态。
- 在实际应用中,需要掌握Nginx的conf文件配置(https的配置、负载均衡的配置、反向代理、CPU亲缘性配置等)以及模块开发(filter、handler等)。