YOLOv5 添加 OTA,并使用 coco、CrowdHuman数据集进行训练。
YOLO-OTA
- 第一步:拉取 YOLOv5 的代码
- 第二步:添加 ComputeLossOTA 函数
- 第二步:修改 train 和 val 中损失函数为 ComputeLossOTA 函数
- 1、在 train.py 中 首先添加 ComputeLossOTA 库。
- 2、在 train.py 修改初始化的损失函数
- 3、在 train.py 修改一些必要的参数
- 4、修改一下 parser 参数,方便控制是否使用 OTALOSS
- 5、在 val.py 中修改一些必要的参数
- 开始训练
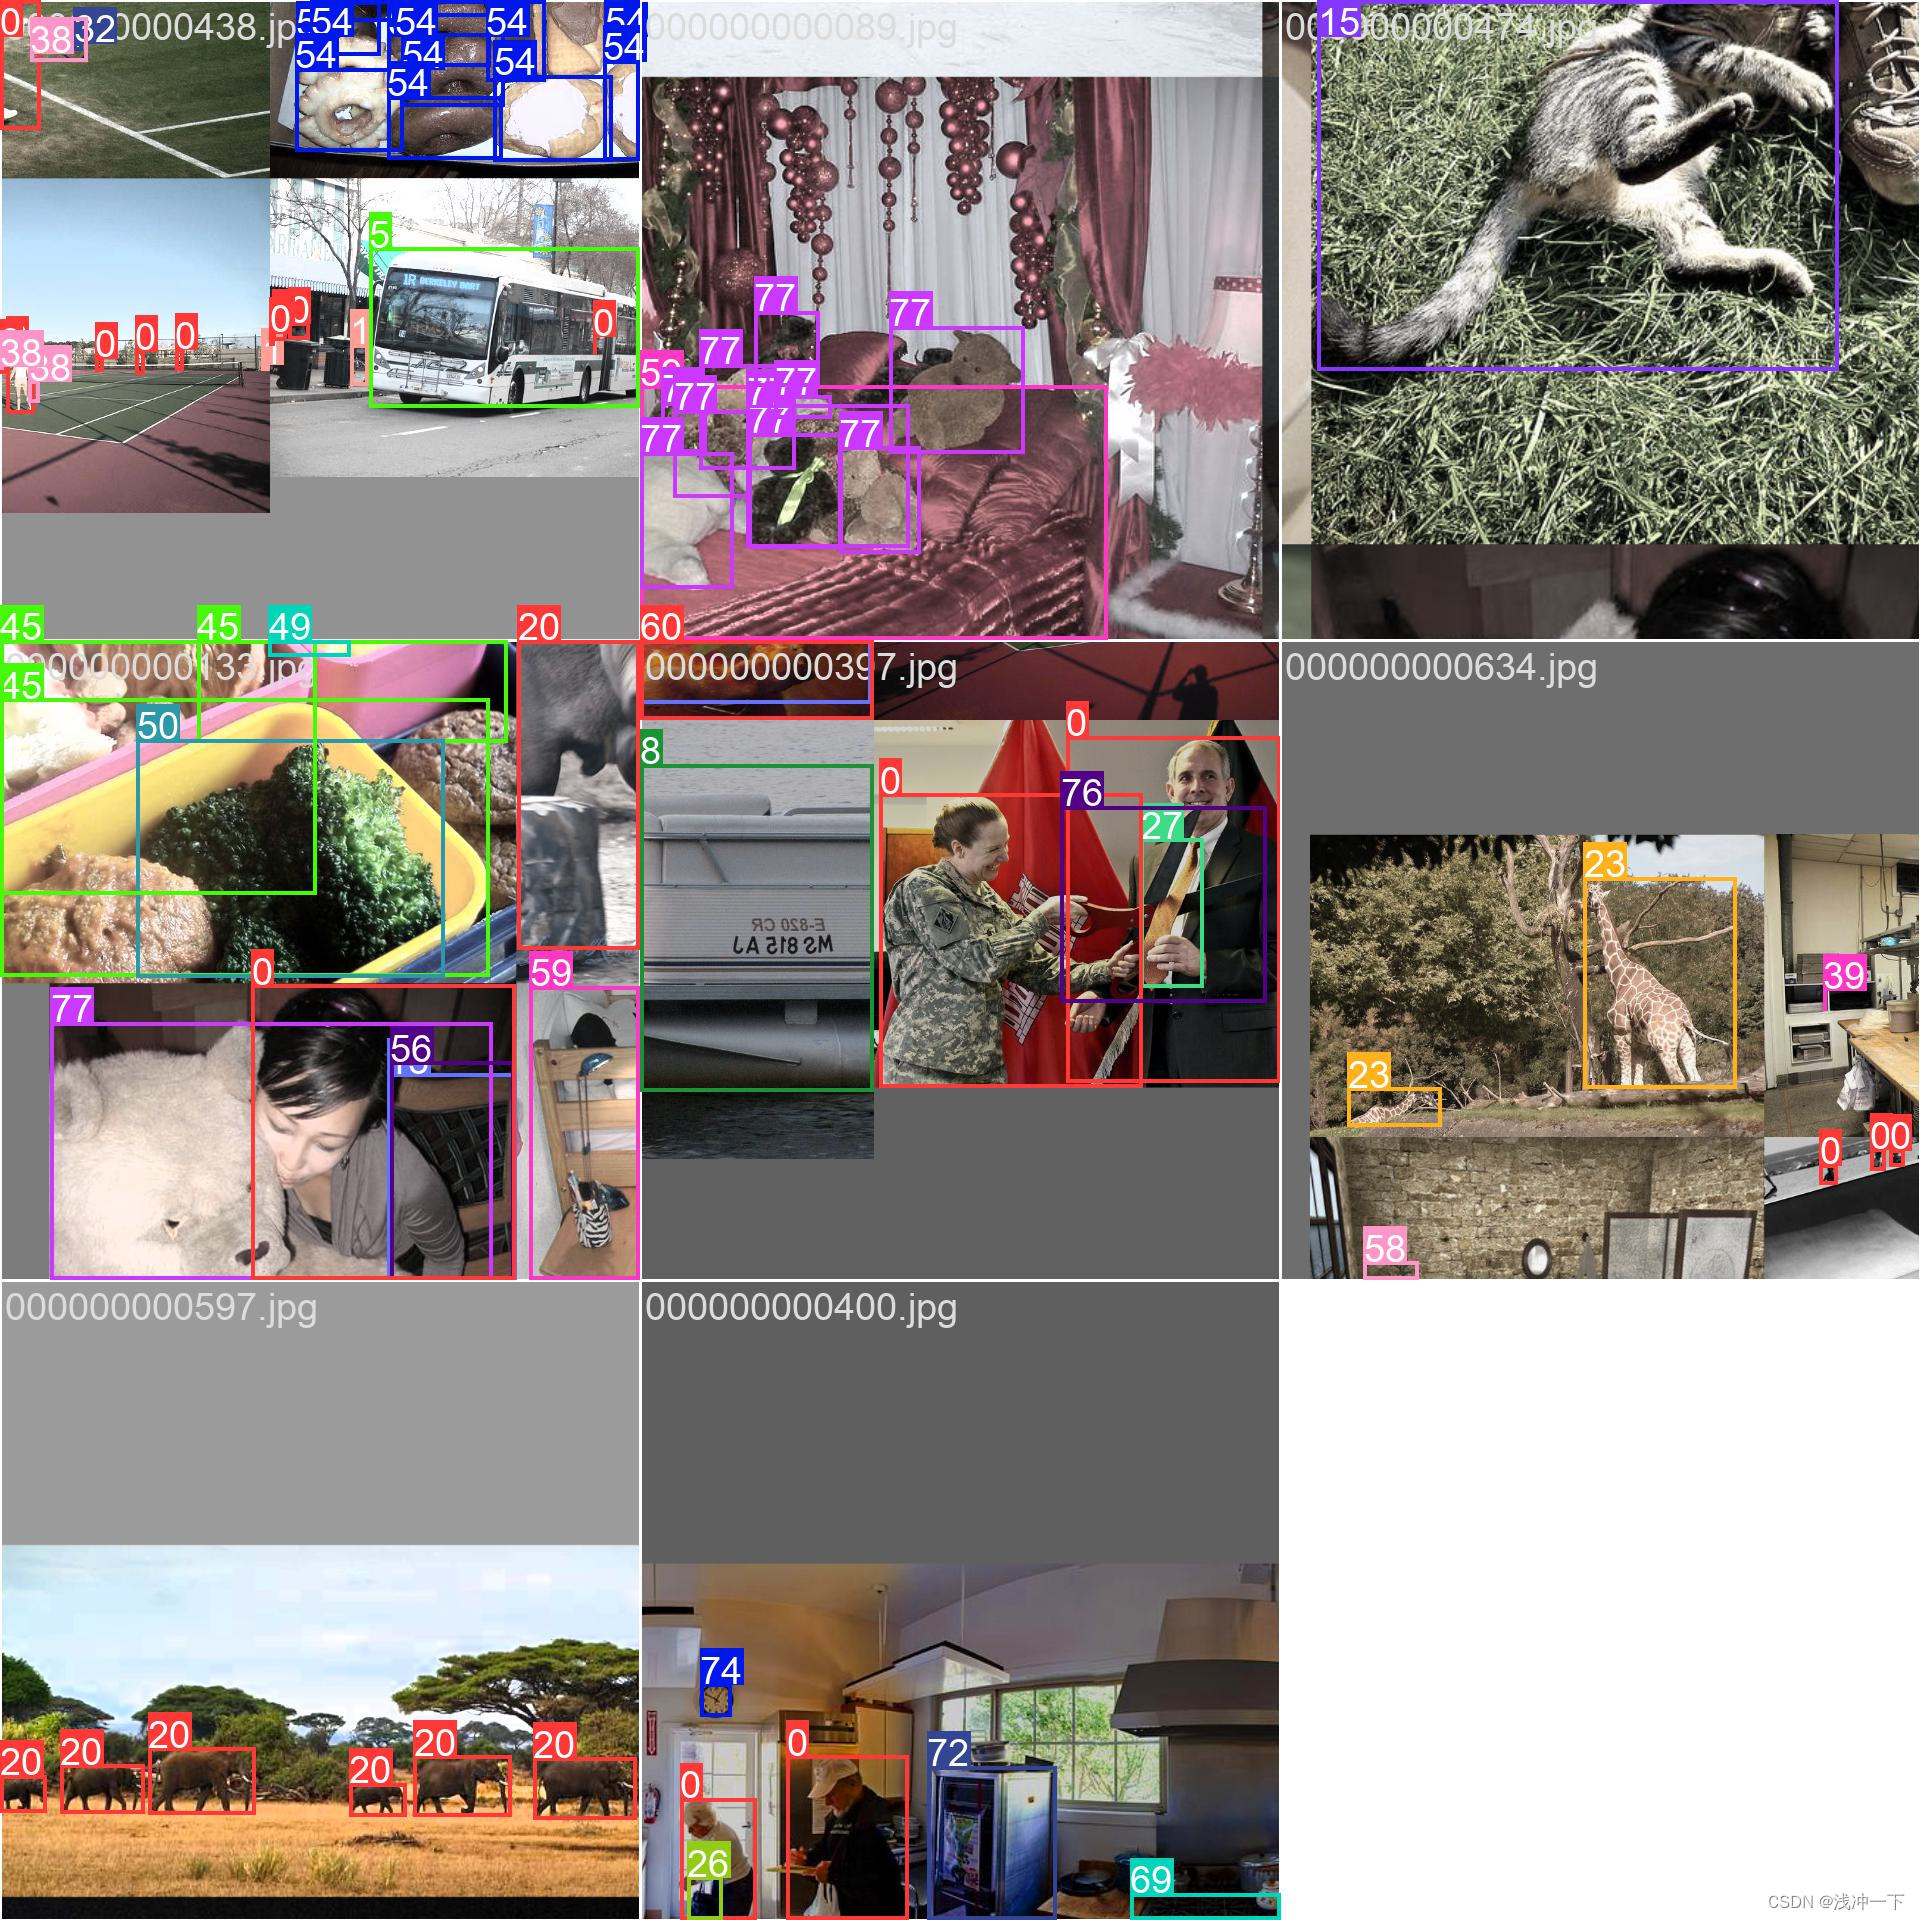
- 训练 coco128 数据集
- 训练 coco 数据集
- 训练 CrowdHuman 数据集
第一步:拉取 YOLOv5 的代码
git clone https://github.com/ultralytics/yolov5.git
第二步:添加 ComputeLossOTA 函数
打开 utils/loss.py 文件,向其中添加下面的部分:
import torch.nn.functional as F
from utils.metrics import box_iou
from utils.torch_utils import de_parallel
from utils.general import xywh2xyxyclass ComputeLossOTA:# Compute lossesdef __init__(self, model, autobalance=False):super(ComputeLossOTA, self).__init__()device = next(model.parameters()).device  # get model deviceh = model.hyp  # hyperparameters# Define criteriaBCEcls = nn.BCEWithLogitsLoss(pos_weight=torch.tensor([h['cls_pw']], device=device))BCEobj = nn.BCEWithLogitsLoss(pos_weight=torch.tensor([h['obj_pw']], device=device))# Class label smoothing https://arxiv.org/pdf/1902.04103.pdf eqn 3self.cp, self.cn = smooth_BCE(eps=h.get('label_smoothing', 0.0))  # positive, negative BCE targets# Focal lossg = h['fl_gamma']  # focal loss gammaif g > 0:BCEcls, BCEobj = FocalLoss(BCEcls, g), FocalLoss(BCEobj, g)det = de_parallel(model).model[-1]  # Detect() moduleself.balance = {3: [4.0, 1.0, 0.4]}.get(det.nl, [4.0, 1.0, 0.25, 0.06, .02])  # P3-P7self.ssi = list(det.stride).index(16) if autobalance else 0  # stride 16 indexself.BCEcls, self.BCEobj, self.gr, self.hyp, self.autobalance = BCEcls, BCEobj, 1.0, h, autobalancefor k in 'na', 'nc', 'nl', 'anchors', 'stride':setattr(self, k, getattr(det, k))def __call__(self, p, targets, imgs):  # predictions, targets, model   device = targets.devicelcls, lbox, lobj = torch.zeros(1, device=device), torch.zeros(1, device=device), torch.zeros(1, device=device)bs, as_, gjs, gis, targets, anchors = self.build_targets(p, targets, imgs)pre_gen_gains = [torch.tensor(pp.shape, device=device)[[3, 2, 3, 2]] for pp in p] # Lossesfor i, pi in enumerate(p):  # layer index, layer predictionsb, a, gj, gi = bs[i], as_[i], gjs[i], gis[i]  # image, anchor, gridy, gridxtobj = torch.zeros_like(pi[..., 0], device=device)  # target objn = b.shape[0]  # number of targetsif n:ps = pi[b, a, gj, gi]  # prediction subset corresponding to targets# Regressiongrid = torch.stack([gi, gj], dim=1)pxy = ps[:, :2].sigmoid() * 2. - 0.5#pxy = ps[:, :2].sigmoid() * 3. - 1.pwh = (ps[:, 2:4].sigmoid() * 2) ** 2 * anchors[i]pbox = torch.cat((pxy, pwh), 1)  # predicted boxselected_tbox = targets[i][:, 2:6] * pre_gen_gains[i]selected_tbox[:, :2] -= gridiou = bbox_iou(pbox, selected_tbox, CIoU=True)  # iou(prediction, target)if type(iou) is tuple:lbox += (iou[1].detach() * (1 - iou[0])).mean()iou = iou[0]else:lbox += (1.0 - iou).mean()  # iou loss# Objectnesstobj[b, a, gj, gi] = (1.0 - self.gr) + self.gr * iou.detach().clamp(0).type(tobj.dtype)  # iou ratio# Classificationselected_tcls = targets[i][:, 1].long()if self.nc > 1:  # cls loss (only if multiple classes)t = torch.full_like(ps[:, 5:], self.cn, device=device)  # targetst[range(n), selected_tcls] = self.cplcls += self.BCEcls(ps[:, 5:], t)  # BCE# Append targets to text file# with open('targets.txt', 'a') as file:#     [file.write('%11.5g ' * 4 % tuple(x) + '\n') for x in torch.cat((txy[i], twh[i]), 1)]obji = self.BCEobj(pi[..., 4], tobj)lobj += obji * self.balance[i]  # obj lossif self.autobalance:self.balance[i] = self.balance[i] * 0.9999 + 0.0001 / obji.detach().item()if self.autobalance:self.balance = [x / self.balance[self.ssi] for x in self.balance]lbox *= self.hyp['box']lobj *= self.hyp['obj']lcls *= self.hyp['cls']bs = tobj.shape[0]  # batch sizeloss = lbox + lobj + lclsreturn loss * bs, torch.cat((lbox, lobj, lcls)).detach()def build_targets(self, p, targets, imgs):indices, anch = self.find_3_positive(p, targets)device = torch.device(targets.device)matching_bs = [[] for pp in p]matching_as = [[] for pp in p]matching_gjs = [[] for pp in p]matching_gis = [[] for pp in p]matching_targets = [[] for pp in p]matching_anchs = [[] for pp in p]nl = len(p)    for batch_idx in range(p[0].shape[0]):b_idx = targets[:, 0]==batch_idxthis_target = targets[b_idx]if this_target.shape[0] == 0:continuetxywh = this_target[:, 2:6] * imgs[batch_idx].shape[1]txyxy = xywh2xyxy(txywh)pxyxys = []p_cls = []p_obj = []from_which_layer = []all_b = []all_a = []all_gj = []all_gi = []all_anch = []for i, pi in enumerate(p):b, a, gj, gi = indices[i]idx = (b == batch_idx)b, a, gj, gi = b[idx], a[idx], gj[idx], gi[idx]                all_b.append(b)all_a.append(a)all_gj.append(gj)all_gi.append(gi)all_anch.append(anch[i][idx])from_which_layer.append((torch.ones(size=(len(b),)) * i).to(device))fg_pred = pi[b, a, gj, gi]                p_obj.append(fg_pred[:, 4:5])p_cls.append(fg_pred[:, 5:])grid = torch.stack([gi, gj], dim=1)pxy = (fg_pred[:, :2].sigmoid() * 2. - 0.5 + grid) * self.stride[i] #/ 8.#pxy = (fg_pred[:, :2].sigmoid() * 3. - 1. + grid) * self.stride[i]pwh = (fg_pred[:, 2:4].sigmoid() * 2) ** 2 * anch[i][idx] * self.stride[i] #/ 8.pxywh = torch.cat([pxy, pwh], dim=-1)pxyxy = xywh2xyxy(pxywh)pxyxys.append(pxyxy)pxyxys = torch.cat(pxyxys, dim=0)if pxyxys.shape[0] == 0:continuep_obj = torch.cat(p_obj, dim=0)p_cls = torch.cat(p_cls, dim=0)from_which_layer = torch.cat(from_which_layer, dim=0)all_b = torch.cat(all_b, dim=0)all_a = torch.cat(all_a, dim=0)all_gj = torch.cat(all_gj, dim=0)all_gi = torch.cat(all_gi, dim=0)all_anch = torch.cat(all_anch, dim=0)pair_wise_iou = box_iou(txyxy, pxyxys)pair_wise_iou_loss = -torch.log(pair_wise_iou + 1e-8)top_k, _ = torch.topk(pair_wise_iou, min(10, pair_wise_iou.shape[1]), dim=1)dynamic_ks = torch.clamp(top_k.sum(1).int(), min=1)gt_cls_per_image = (F.one_hot(this_target[:, 1].to(torch.int64), self.nc).float().unsqueeze(1).repeat(1, pxyxys.shape[0], 1))num_gt = this_target.shape[0]cls_preds_ = (p_cls.float().unsqueeze(0).repeat(num_gt, 1, 1).sigmoid_()* p_obj.unsqueeze(0).repeat(num_gt, 1, 1).sigmoid_())y = cls_preds_.sqrt_()pair_wise_cls_loss = F.binary_cross_entropy_with_logits(torch.log(y/(1-y)) , gt_cls_per_image, reduction="none").sum(-1)del cls_preds_cost = (pair_wise_cls_loss+ 3.0 * pair_wise_iou_loss)matching_matrix = torch.zeros_like(cost, device=device)for gt_idx in range(num_gt):_, pos_idx = torch.topk(cost[gt_idx], k=dynamic_ks[gt_idx].item(), largest=False)matching_matrix[gt_idx][pos_idx] = 1.0del top_k, dynamic_ksanchor_matching_gt = matching_matrix.sum(0)if (anchor_matching_gt > 1).sum() > 0:_, cost_argmin = torch.min(cost[:, anchor_matching_gt > 1], dim=0)matching_matrix[:, anchor_matching_gt > 1] *= 0.0matching_matrix[cost_argmin, anchor_matching_gt > 1] = 1.0fg_mask_inboxes = (matching_matrix.sum(0) > 0.0).to(device)matched_gt_inds = matching_matrix[:, fg_mask_inboxes].argmax(0)from_which_layer = from_which_layer[fg_mask_inboxes]all_b = all_b[fg_mask_inboxes]all_a = all_a[fg_mask_inboxes]all_gj = all_gj[fg_mask_inboxes]all_gi = all_gi[fg_mask_inboxes]all_anch = all_anch[fg_mask_inboxes]this_target = this_target[matched_gt_inds]for i in range(nl):layer_idx = from_which_layer == imatching_bs[i].append(all_b[layer_idx])matching_as[i].append(all_a[layer_idx])matching_gjs[i].append(all_gj[layer_idx])matching_gis[i].append(all_gi[layer_idx])matching_targets[i].append(this_target[layer_idx])matching_anchs[i].append(all_anch[layer_idx])for i in range(nl):if matching_targets[i] != []:matching_bs[i] = torch.cat(matching_bs[i], dim=0)matching_as[i] = torch.cat(matching_as[i], dim=0)matching_gjs[i] = torch.cat(matching_gjs[i], dim=0)matching_gis[i] = torch.cat(matching_gis[i], dim=0)matching_targets[i] = torch.cat(matching_targets[i], dim=0)matching_anchs[i] = torch.cat(matching_anchs[i], dim=0)else:matching_bs[i] = torch.tensor([], device='cuda:0', dtype=torch.int64)matching_as[i] = torch.tensor([], device='cuda:0', dtype=torch.int64)matching_gjs[i] = torch.tensor([], device='cuda:0', dtype=torch.int64)matching_gis[i] = torch.tensor([], device='cuda:0', dtype=torch.int64)matching_targets[i] = torch.tensor([], device='cuda:0', dtype=torch.int64)matching_anchs[i] = torch.tensor([], device='cuda:0', dtype=torch.int64)return matching_bs, matching_as, matching_gjs, matching_gis, matching_targets, matching_anchs           def find_3_positive(self, p, targets):# Build targets for compute_loss(), input targets(image,class,x,y,w,h)na, nt = self.na, targets.shape[0]  # number of anchors, targetsindices, anch = [], []gain = torch.ones(7, device=targets.device).long()  # normalized to gridspace gainai = torch.arange(na, device=targets.device).float().view(na, 1).repeat(1, nt)  # same as .repeat_interleave(nt)targets = torch.cat((targets.repeat(na, 1, 1), ai[:, :, None]), 2)  # append anchor indicesg = 0.5  # biasoff = torch.tensor([[0, 0],[1, 0], [0, 1], [-1, 0], [0, -1],  # j,k,l,m# [1, 1], [1, -1], [-1, 1], [-1, -1],  # jk,jm,lk,lm], device=targets.device).float() * g  # offsetsfor i in range(self.nl):anchors = self.anchors[i]gain[2:6] = torch.tensor(p[i].shape)[[3, 2, 3, 2]]  # xyxy gain# Match targets to anchorst = targets * gainif nt:# Matchesr = t[:, :, 4:6] / anchors[:, None]  # wh ratioj = torch.max(r, 1. / r).max(2)[0] < self.hyp['anchor_t']  # compare# j = wh_iou(anchors, t[:, 4:6]) > model.hyp['iou_t']  # iou(3,n)=wh_iou(anchors(3,2), gwh(n,2))t = t[j]  # filter# Offsetsgxy = t[:, 2:4]  # grid xygxi = gain[[2, 3]] - gxy  # inversej, k = ((gxy % 1. < g) & (gxy > 1.)).Tl, m = ((gxi % 1. < g) & (gxi > 1.)).Tj = torch.stack((torch.ones_like(j), j, k, l, m))t = t.repeat((5, 1, 1))[j]offsets = (torch.zeros_like(gxy)[None] + off[:, None])[j]else:t = targets[0]offsets = 0# Defineb, c = t[:, :2].long().T  # image, classgxy = t[:, 2:4]  # grid xygwh = t[:, 4:6]  # grid whgij = (gxy - offsets).long()gi, gj = gij.T  # grid xy indices# Appenda = t[:, 6].long()  # anchor indicesindices.append((b, a, gj.clamp_(0, gain[3] - 1), gi.clamp_(0, gain[2] - 1)))  # image, anchor, grid indicesanch.append(anchors[a])  # anchorsreturn indices, anch
第二步:修改 train 和 val 中损失函数为 ComputeLossOTA 函数
1、在 train.py 中 首先添加 ComputeLossOTA 库。
# 63 行
from utils.loss import ComputeLoss, ComputeLossOTA
2、在 train.py 修改初始化的损失函数
# 263 行
if opt.losstype == "normloss":compute_loss = ComputeLoss(model)  # init loss class
elif opt.losstype == "otaloss":compute_loss = ComputeLossOTA(model)  # init loss class
3、在 train.py 修改一些必要的参数
因为 OTA 需要图片为收入,所以 ComputeLossOTA 和 ComputeLoss 相比,需要添加 imgs 为输入。
# 319 行
if opt.losstype == "normloss":loss, loss_items = compute_loss(pred, targets.to(device))  # loss scaled by batch_size
elif opt.losstype == "otaloss":loss, loss_items = compute_loss(pred, targets.to(device), imgs)  # loss scaled by batch_size
4、修改一下 parser 参数,方便控制是否使用 OTALOSS
parser.add_argument('--losstype', type=str, default="normloss", help='choose loss type: loss otaloss')
5、在 val.py 中修改一些必要的参数
# 212 行
# Loss
if compute_loss:# loss += compute_loss(train_out, targets)[1]  # box, obj, clsloss += compute_loss(train_out, targets, im)[1]  # box, obj, cls
开始训练
下载的话权重,去官网下载你需要的模型的权重。 如:yolov5s.pt
训练 coco128 数据集
Usage - Single-GPU training:$ python train.py --data coco128.yaml --weights yolov5s.pt --img 640  # from pretrained (recommended) $ python train.py --data coco128.yaml --weights '' --cfg yolov5s.yaml --img 640  # from scratch
# 使用 OTA $ python train.py --data coco128.yaml --weights yolov5s.pt -losstype otaloss  # from pretrained (recommended) -losstype otaloss$ python train.py --data coco128.yaml --weights '' --cfg yolov5s.yaml -losstype otaloss  # from scratchUsage - Multi-GPU DDP training:$ python -m torch.distributed.run --nproc_per_node 4 --master_port 1 train.py --data coco128.yaml --weights yolov5s.pt --img 640 --device 0,1,2,3
训练图片一个batch_size 如下:
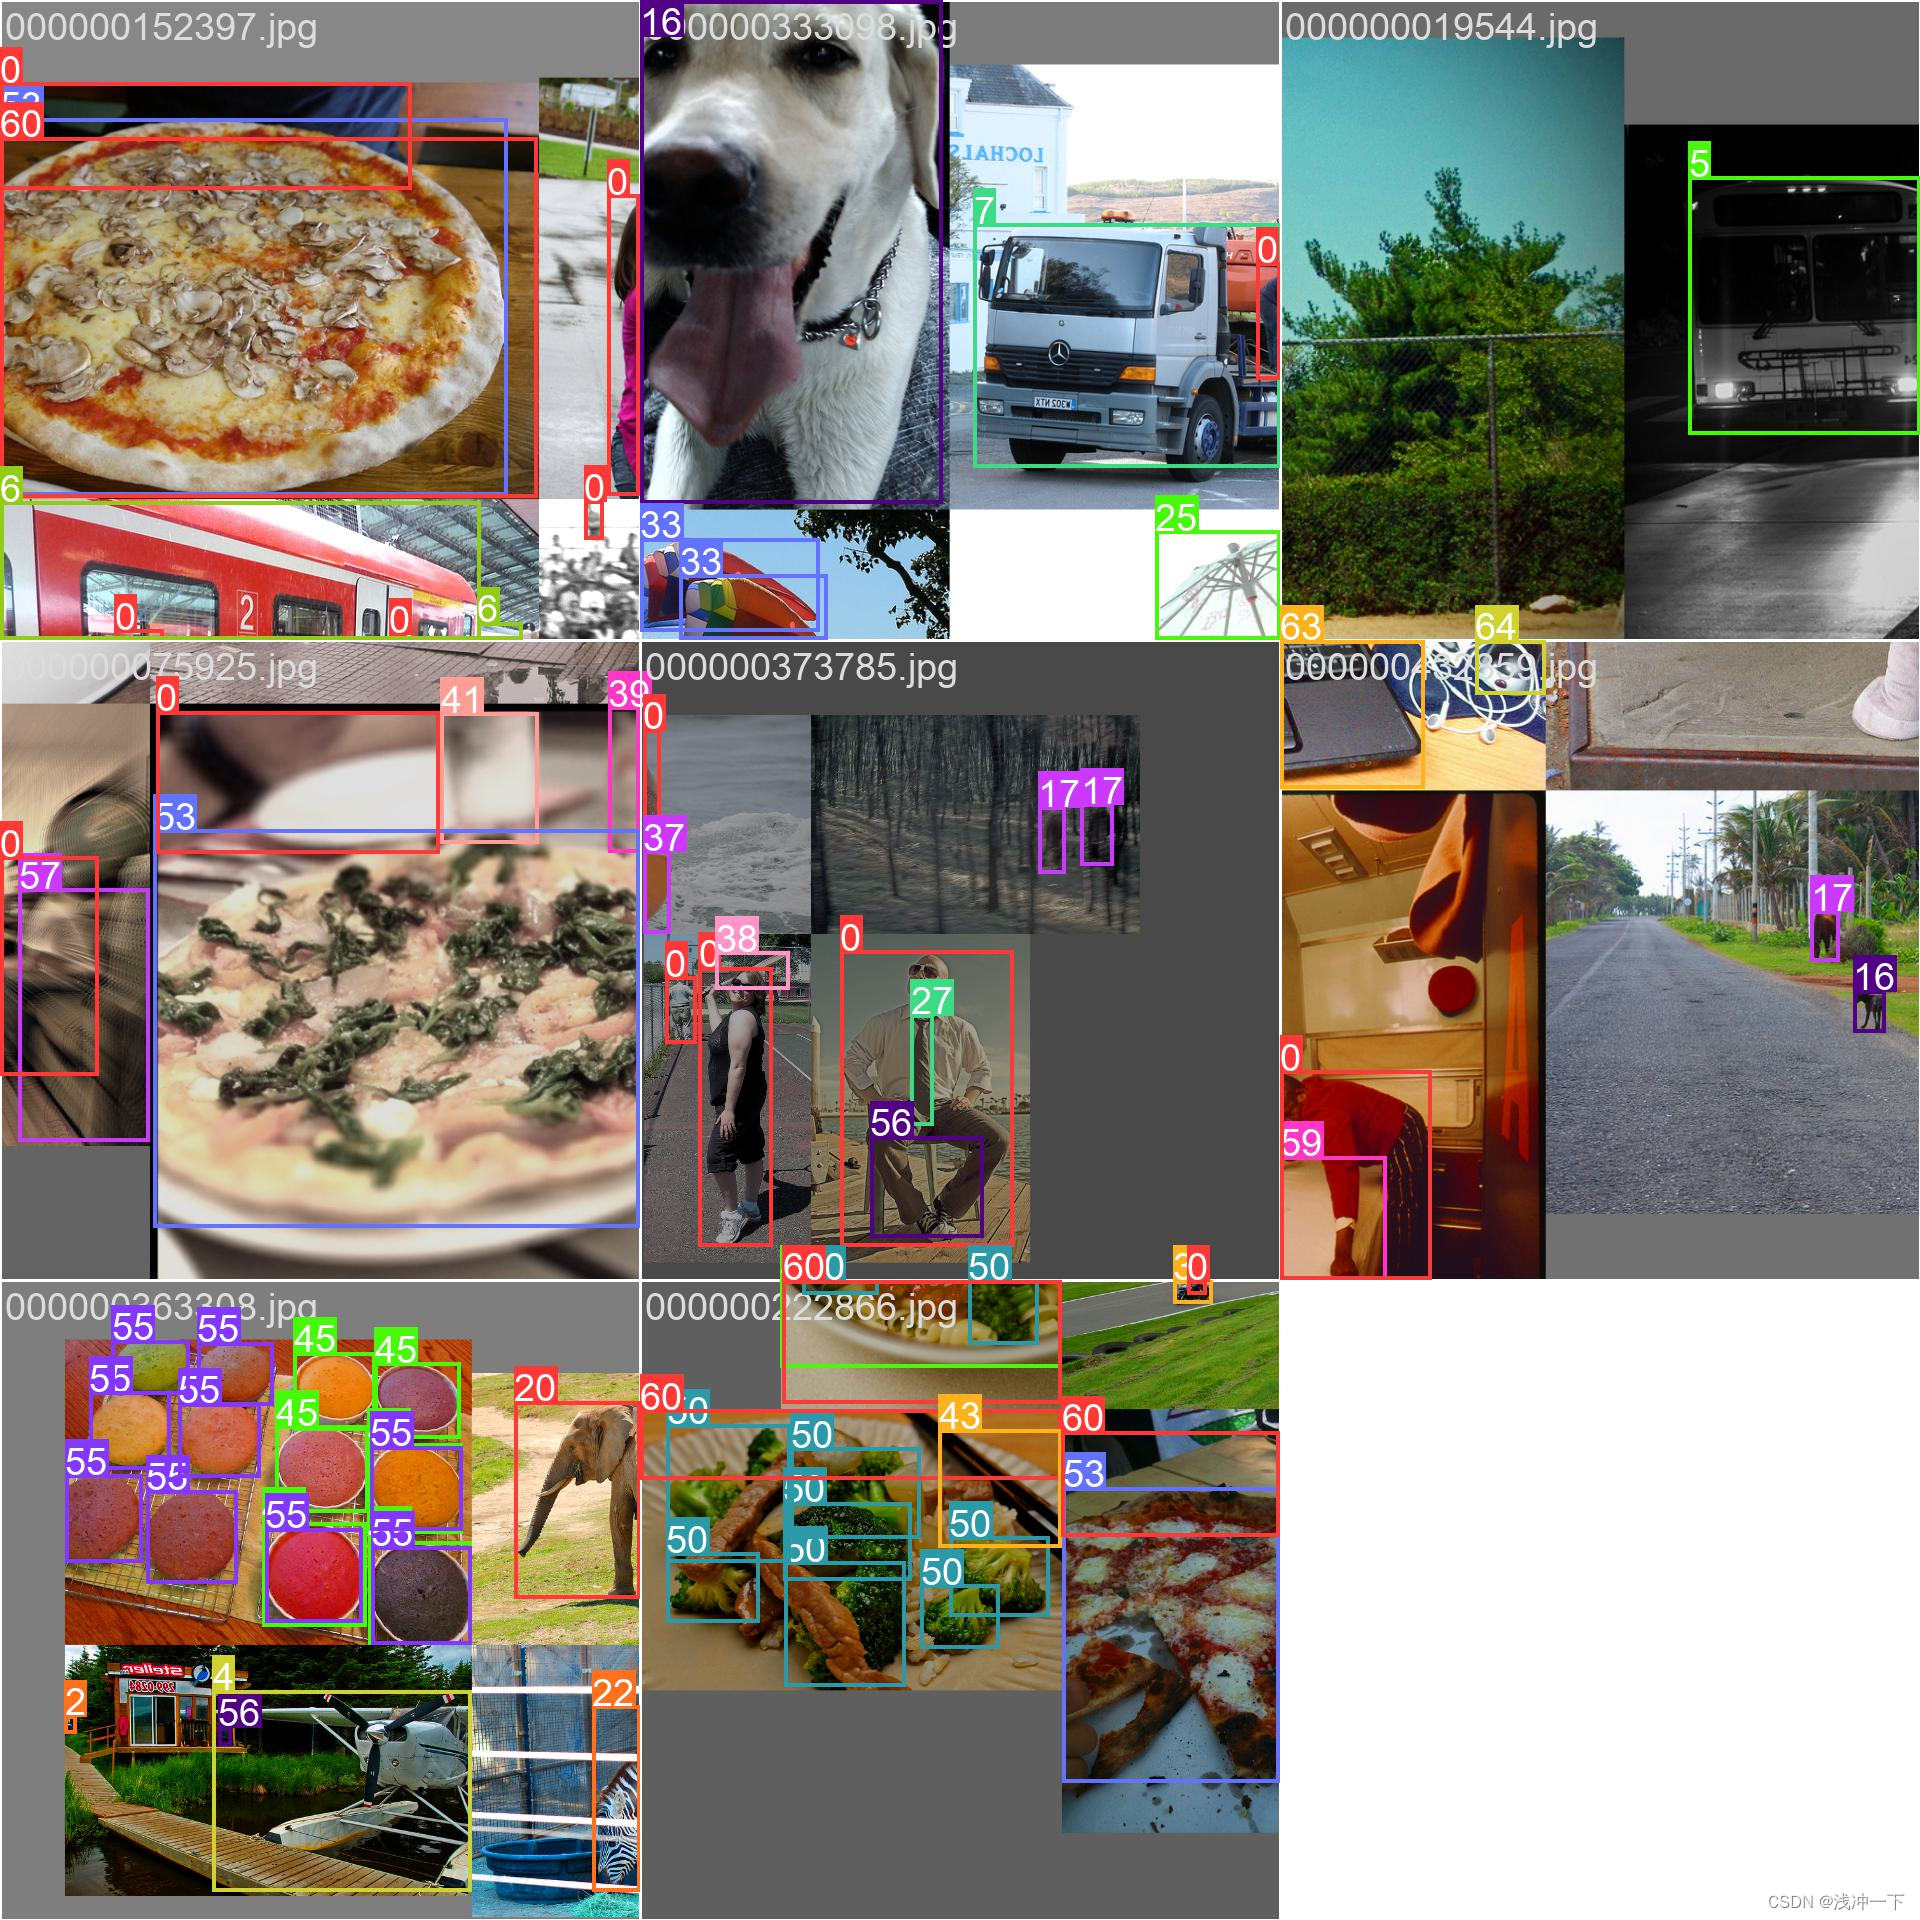
训练 coco 数据集
使用 coco 进行训练的命令如下:
Usage - Single-GPU training:$ python train.py --data coco.yaml --weights yolov5s.pt --img 640 # from pretrained (recommended)$ python train.py --data coco.yaml --weights '' --cfg yolov5s.yaml --img 640 # from scratchUsage - Multi-GPU DDP training:$ python -m torch.distributed.run --nproc_per_node 4 --master_port 1 train.py --data coco.yaml --weights yolov5s.pt --img 640 --device 0,1,2,3
没有下载 coco 的话,这个命令会自动下载。最好在coco数据集里面自己新建一个 coco.ymal,内容可填写如下:
# COCO 2017 dataset http://cocodataset.org# download command/URL (optional)
# download: bash ./scripts/get_coco.sh# train and val data as 1) directory: path/images/, 2) file: path/images.txt, or 3) list: [path1/images/, path2/images/]
train: /home/adr/Desktop/Code/Python/2D/datasets/coco/train2017.txt  # 118287 images
val: /home/adr/Desktop/Code/Python/2D/datasets/coco/val2017.txt  # 5000 images
test: /home/adr/Desktop/Code/Python/2D/datasets/coco/test-dev2017.txt  # 20288 of 40670 images, submit to https://competitions.codalab.org/competitions/20794# number of classes
nc: 80# class names
names: [ 'person', 'bicycle', 'car', 'motorcycle', 'airplane', 'bus', 'train', 'truck', 'boat', 'traffic light','fire hydrant', 'stop sign', 'parking meter', 'bench', 'bird', 'cat', 'dog', 'horse', 'sheep', 'cow','elephant', 'bear', 'zebra', 'giraffe', 'backpack', 'umbrella', 'handbag', 'tie', 'suitcase', 'frisbee','skis', 'snowboard', 'sports ball', 'kite', 'baseball bat', 'baseball glove', 'skateboard', 'surfboard','tennis racket', 'bottle', 'wine glass', 'cup', 'fork', 'knife', 'spoon', 'bowl', 'banana', 'apple','sandwich', 'orange', 'broccoli', 'carrot', 'hot dog', 'pizza', 'donut', 'cake', 'chair', 'couch','potted plant', 'bed', 'dining table', 'toilet', 'tv', 'laptop', 'mouse', 'remote', 'keyboard', 'cell phone','microwave', 'oven', 'toaster', 'sink', 'refrigerator', 'book', 'clock', 'vase', 'scissors', 'teddy bear','hair drier', 'toothbrush' ]
这样使用其他 yolo 版本训练的时候,只需要把这个 coco.yaml 的文件的绝对路径给它也行。
python train.py --data /home/adr/Desktop/Code/Python/2D/datasets/coco.yaml --weights '' --cfg yolov5s.yaml
训练图片一个batch_size 如下:
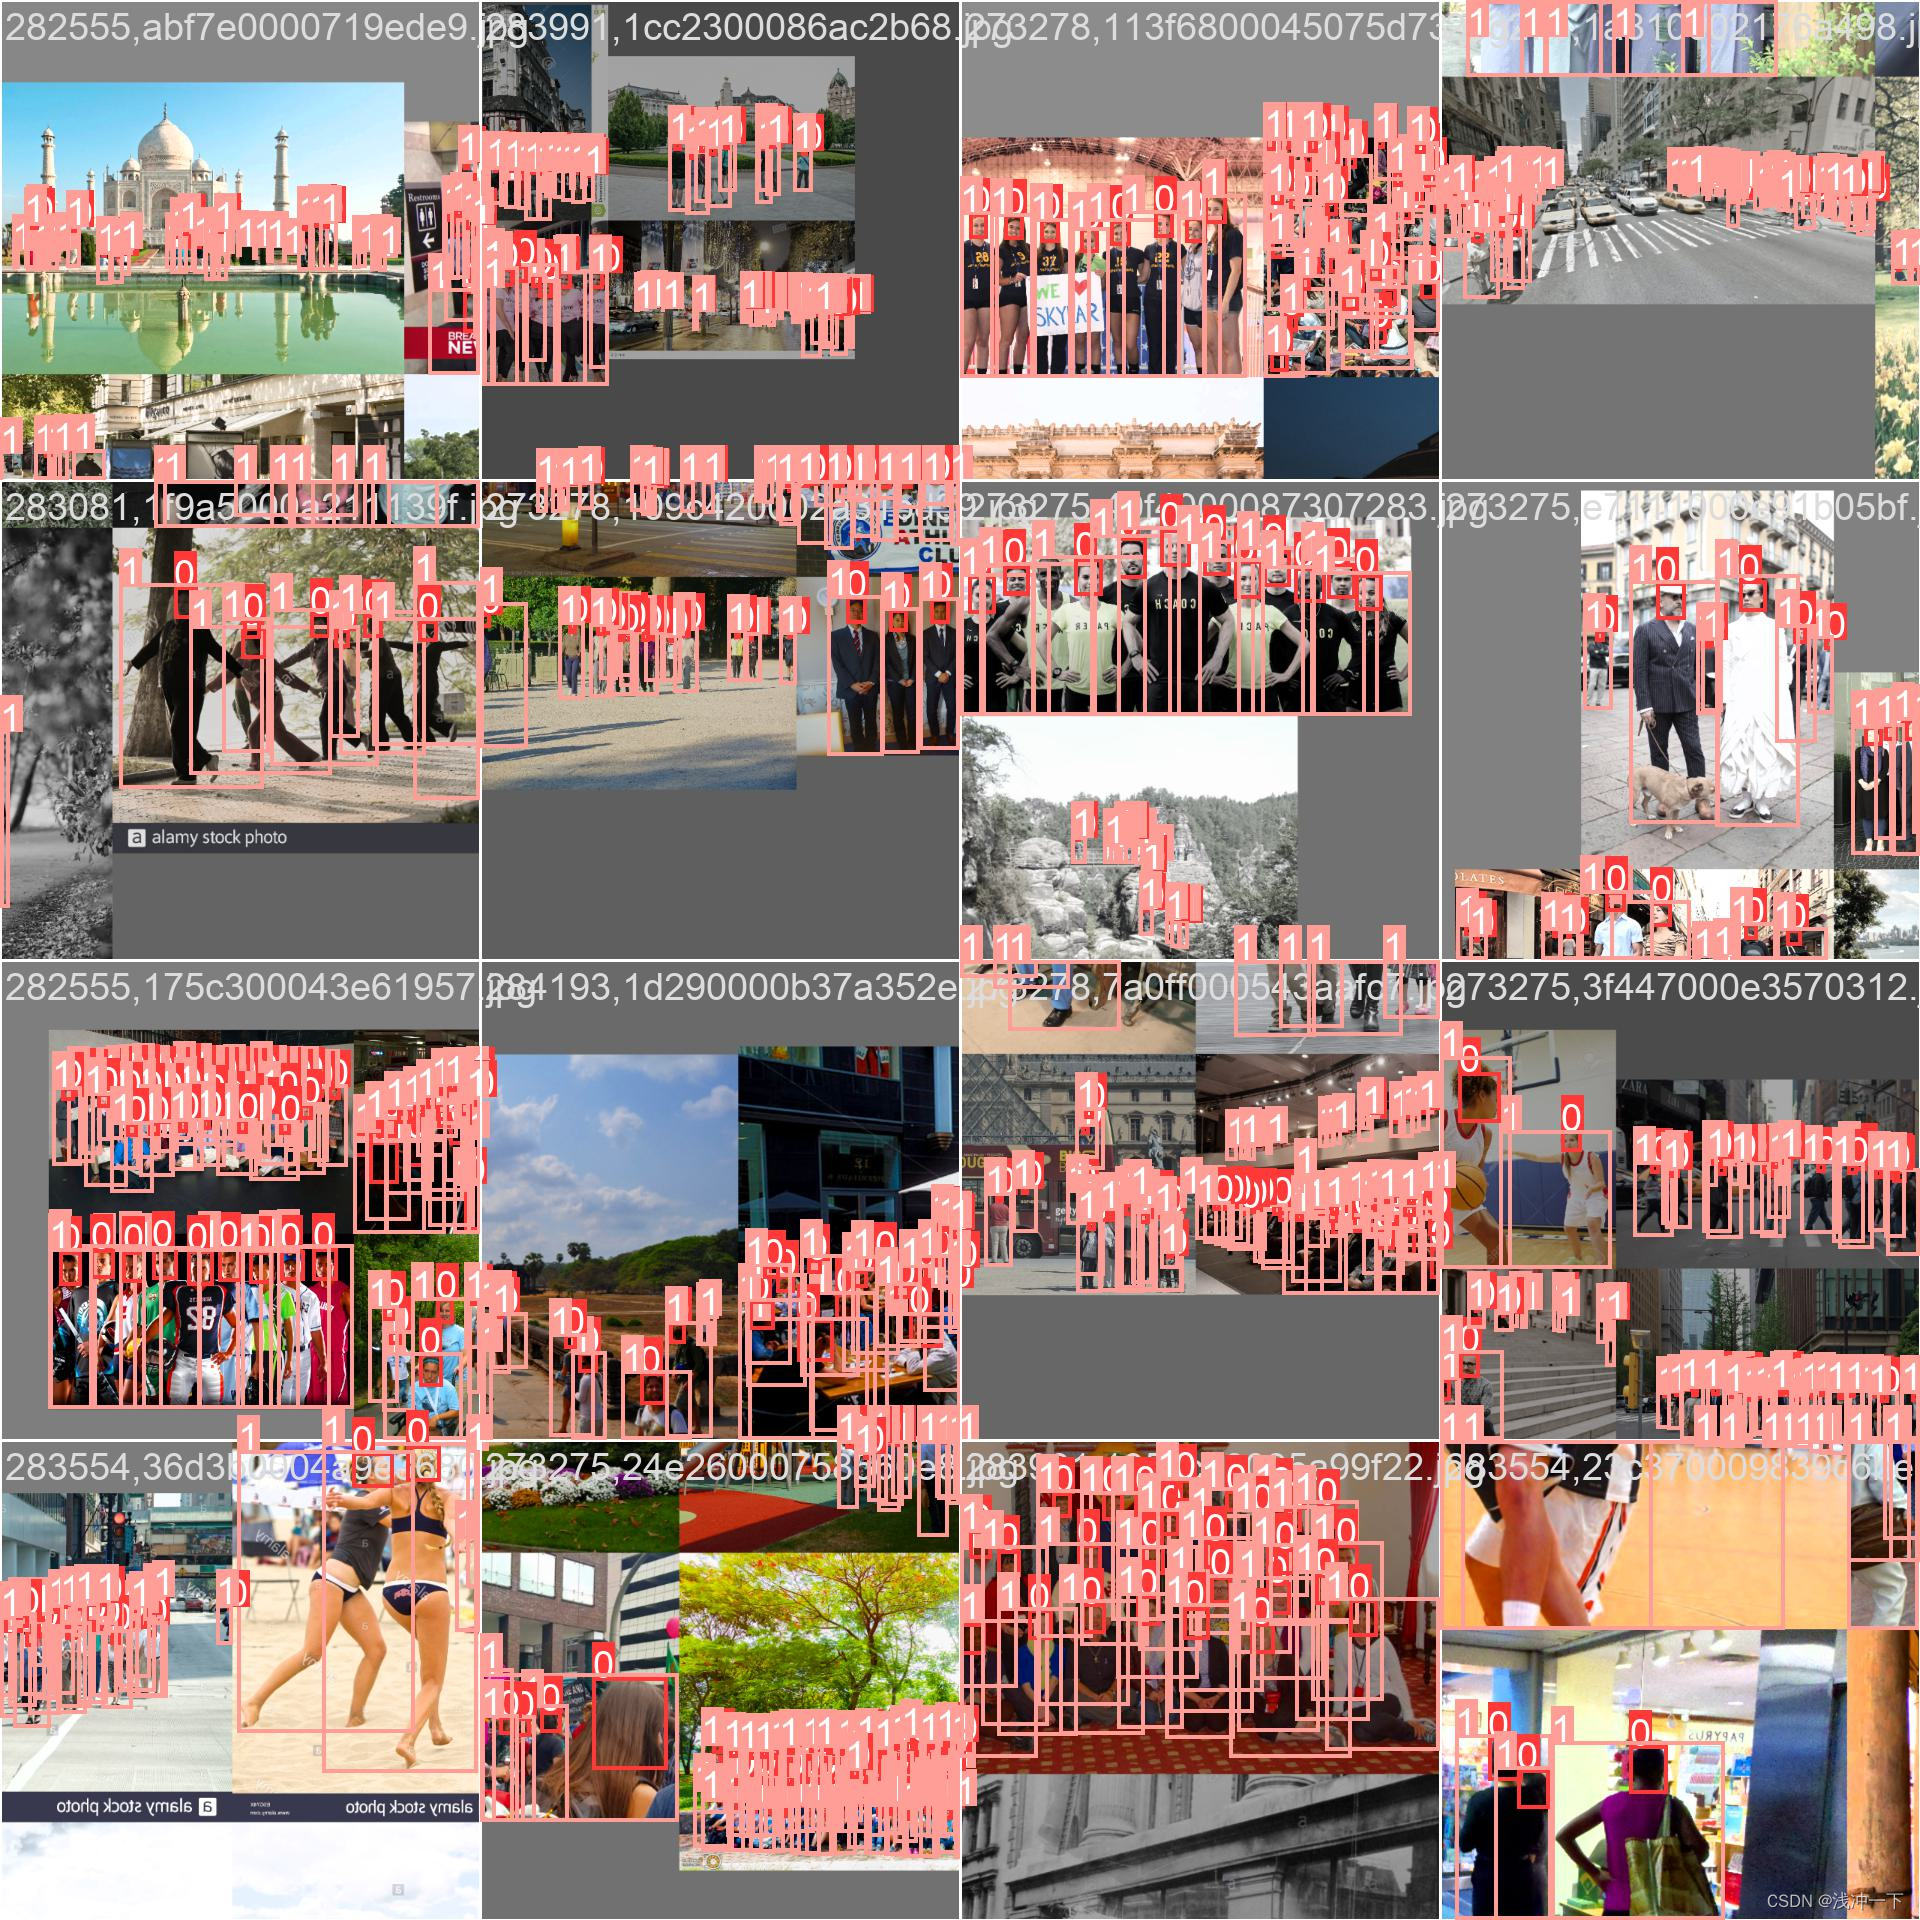
训练 CrowdHuman 数据集
1、下载 官网数据集下载
CrowdHuman dataset下载链接:https://www.crowdhuman.org/download.html
把里面链接都进行下载。然后按照步骤二给出的连接即可。
2、转化为 coco 数据集格式
可以根据下面仓库的步骤进行 : https://github.com/Shaohu-Li/YOLOv5-Tools
3、使用下面命令进行训练。
# 不使用预训练权重
python train.py --data /home/adr/datasets/CrowdHuman/crowdhuman.yaml --cfg yolov5s.yaml --img 640 --batch-size 32 --weights ''# 使用预训练权重
python train.py --data /home/adr/datasets/CrowdHuman/crowdhuman.yaml --cfg yolov5s.yaml --img 640 --batch-size 32 --weights yolov5s.pt
训练图片一个batch_size 如下:
本文参考 大神链接:
B 站: https://space.bilibili.com/286900343