【TensorFlow2 之014】在 TF 2.0 中实现 LeNet-5

一、说明
在这篇文章中,我们将展示如何在 TensorFlow 中实现像 \(LeNet-5\) 这样的基础卷积神经网络。LeNet-5 架构由 Yann LeCun 于 1998 年发明,是第一个卷积神经网络。
1.1 教程概述:
- 理论重述
- 在 TensorFlow 中的实现
1. 理论重述
\(LeNet-5 \) 的目标是识别手写数字。因此,它作为输入 \(32\times32\times1 \) 图像。它是灰度图像,因此通道数为 \(1 \)。下面我们可以看到该网络的架构。

LeNet-5架构
I. 最初的 MNIST 现在被认为太简单了。在过去的二十年里,许多研究人员针对原始 MNIST 提出了成功的解决方案。您可以在此处查看直接比较结果。
由于该网络主要是为 MNIST 数据集设计的,因此它的性能明显更好。通过微小的改变,它就可以在 Fashion MNIST 数据集上达到这种准确性。然而,在这篇文章中,我们将坚持网络的原始架构。
关于 LeNet-5 架构,您可以在此处阅读详细的理论文章。
让我们总结一下 LeNet-5 架构的各层。
| 图层类型 | 特征图 | 尺寸 | 内核大小 | 跨步 | 激活 |
|---|---|---|---|---|---|
| 图像 | 1 | 32×32 | – | – | – |
| 卷积 | 6 | 28×28 | 5×5 | 1 | 正值 |
| 平均池化 | 6 | 14×14 | 2×2 | 2 | – |
| 卷积 | 16 | 10×10 | 5×5 | 1 | 正值 |
| 平均池化 | 16 | 5×5 | 2×2 | 2 | – |
| 完全连接 | – | 120 | – | – | 正值 |
| 完全连接 | – | 84 | – | – | 正值 |
| 完全连接 | – | 10 | – | – | 软最大 |
二、TensorFlow中的实现
交互式 Colab 笔记本可在以下链接找到
在 Google Colab 中运行
为了练习,您可以尝试通过将Fashion_mnist替换为mnist、cifar10或其他来更改数据集。
让我们从导入所有必需的库开始。导入后,我们可以使用导入的模块来加载数据。load_data () 函数将自动下载数据并将其拆分为训练集和测试集。
import datetime
import numpy as np
import tensorflow as tf
import matplotlib.pyplot as pltfrom tensorflow.keras import Model
from tensorflow.keras.models import Sequential
from tensorflow.keras.losses import categorical_crossentropy
from tensorflow.keras.layers import Dense, Flatten, Conv2D, AveragePooling2Dfrom tensorflow.keras import datasets
from tensorflow.keras.utils import to_categorical#from __future__ import absolute_import, division, print_function, unicode_literals
# The data, split between train and test sets:
(x_train, y_train), (x_test, y_test) = datasets.fashion_mnist.load_data()Downloading data from https://storage.googleapis.com/tensorflow/tf-keras-datasets/train-labels-idx1-ubyte.gz
32768/29515 [=================================] - 0s 2us/step
Downloading data from https://storage.googleapis.com/tensorflow/tf-keras-datasets/train-images-idx3-ubyte.gz
26427392/26421880 [==============================] - 7s 0us/step
Downloading data from https://storage.googleapis.com/tensorflow/tf-keras-datasets/t10k-labels-idx1-ubyte.gz
8192/5148 [===============================================] - 0s 0us/step
Downloading data from https://storage.googleapis.com/tensorflow/tf-keras-datasets/t10k-images-idx3-ubyte.gz
4423680/4422102 [==============================] - 1s 0us/step我们可以检查新数据的形状,发现我们的图像是 28×28 像素,因此我们需要添加一个新轴,它将代表多个通道。此外,对标签进行 one-hot 编码和对输入图像进行归一化也很重要。
print('x_train shape:', x_train.shape)
print(x_train.shape[0], 'train samples')
print(x_test.shape[0], 'test samples')
print(x_train[0].shape, 'image shape')
x_train shape: (60000, 28, 28)
60000 train samples
10000 test samples
(28, 28) image shape
# Add a new axis
x_train = x_train[:, :, :, np.newaxis]
x_test = x_test[:, :, :, np.newaxis]print('x_train shape:', x_train.shape)
print(x_train.shape[0], 'train samples')
print(x_test.shape[0], 'test samples')
print(x_train[0].shape, 'image shape')
x_train shape: (60000, 28, 28, 1) 60000 train samples 10000 test samples (28, 28, 1) image shape
# Convert class vectors to binary class matrices.num_classes = 10
y_train = to_categorical(y_train, num_classes)
y_test = to_categorical(y_test, num_classes)
# Data normalization
x_train = x_train.astype('float32')
x_test = x_test.astype('float32')
x_train /= 255
x_test /= 255
现在,是时候开始使用 TensorFlow 2.0 来构建我们的卷积神经网络了。最简单的方法是使用 Sequential API。我们将其包装在一个名为LeNet的类中。输入是图像,输出是类概率向量。
在 tf.keras 中,顺序模型表示层的线性堆栈,在本例中它遵循网络架构。
# LeNet-5 model
class LeNet(Sequential):def __init__(self, input_shape, nb_classes):super().__init__()self.add(Conv2D(6, kernel_size=(5, 5), strides=(1, 1), activation='tanh', input_shape=input_shape, padding="same"))self.add(AveragePooling2D(pool_size=(2, 2), strides=(2, 2), padding='valid'))self.add(Conv2D(16, kernel_size=(5, 5), strides=(1, 1), activation='tanh', padding='valid'))self.add(AveragePooling2D(pool_size=(2, 2), strides=(2, 2), padding='valid'))self.add(Flatten())self.add(Dense(120, activation='tanh'))self.add(Dense(84, activation='tanh'))self.add(Dense(nb_classes, activation='softmax'))self.compile(optimizer='adam',loss=categorical_crossentropy,metrics=['accuracy'])
model = LeNet(x_train[0].shape, num_classes)
model.summary()Model: "le_net" _________________________________________________________________ Layer (type) Output Shape Param # ================================================================= conv2d (Conv2D) (None, 28, 28, 6) 156 _________________________________________________________________ average_pooling2d (AveragePo (None, 14, 14, 6) 0 _________________________________________________________________ conv2d_1 (Conv2D) (None, 10, 10, 16) 2416 _________________________________________________________________ average_pooling2d_1 (Average (None, 5, 5, 16) 0 _________________________________________________________________ flatten (Flatten) (None, 400) 0 _________________________________________________________________ dense (Dense) (None, 120) 48120 _________________________________________________________________ dense_1 (Dense) (None, 84) 10164 _________________________________________________________________ dense_2 (Dense) (None, 10) 850 ================================================================= Total params: 61,706 Trainable params: 61,706 Non-trainable params: 0
创建模型后,我们需要训练它的参数以使其强大。让我们训练给定数量的 epoch 模型。我们可以在TensorBoard中看到训练的进度。
# Place the logs in a timestamped subdirectory
# This allows to easy select different training runs
# In order not to overwrite some data, it is useful to have a name with a timestamp
log_dir="logs/fit/" + datetime.datetime.now().strftime("%Y%m%d-%H%M%S")
# Specify the callback object
tensorboard_callback = tf.keras.callbacks.TensorBoard(log_dir=log_dir, histogram_freq=1)# tf.keras.callback.TensorBoard ensures that logs are created and stored
# We need to pass callback object to the fit method
# The way to do this is by passing the list of callback objects, which is in our case just one
model.fit(x_train, y=y_train, epochs=20, validation_data=(x_test, y_test), callbacks=[tensorboard_callback],verbose=0)%tensorboard --logdir logs/fit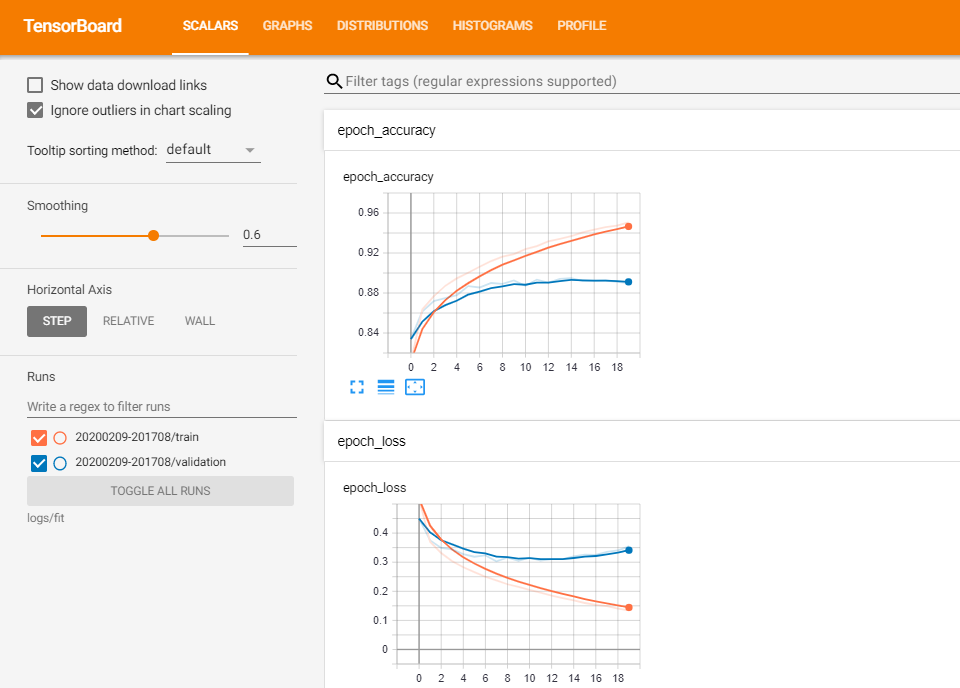
仅 20 个 epoch 就已经不错了。
之后,我们可以做出一些预测并将其可视化。使用predict_classes()函数,我们可以从网络中获取准确的类别而不是概率值。它与使用numpy.argmax()相同。我们将用红色显示错误的预测,用蓝色表示正确的预测。
class_names = ['T-shirt/top', 'Trouser', 'Pullover', 'Dress', 'Coat','Sandal', 'Shirt', 'Sneaker', 'Bag', 'Ankle boot']prediction_values = model.predict_classes(x_test)# set up the figure
fig = plt.figure(figsize=(15, 7))
fig.subplots_adjust(left=0, right=1, bottom=0, top=1, hspace=0.05, wspace=0.05)# plot the images: each image is 28x28 pixels
for i in range(50):ax = fig.add_subplot(5, 10, i + 1, xticks=[], yticks=[])ax.imshow(x_test[i,:].reshape((28,28)),cmap=plt.cm.gray_r, interpolation='nearest')if prediction_values[i] == np.argmax(y_test[i]):# label the image with the blue textax.text(0, 7, class_names[prediction_values[i]], color='blue')else:# label the image with the red textax.text(0, 7, class_names[prediction_values[i]], color='red')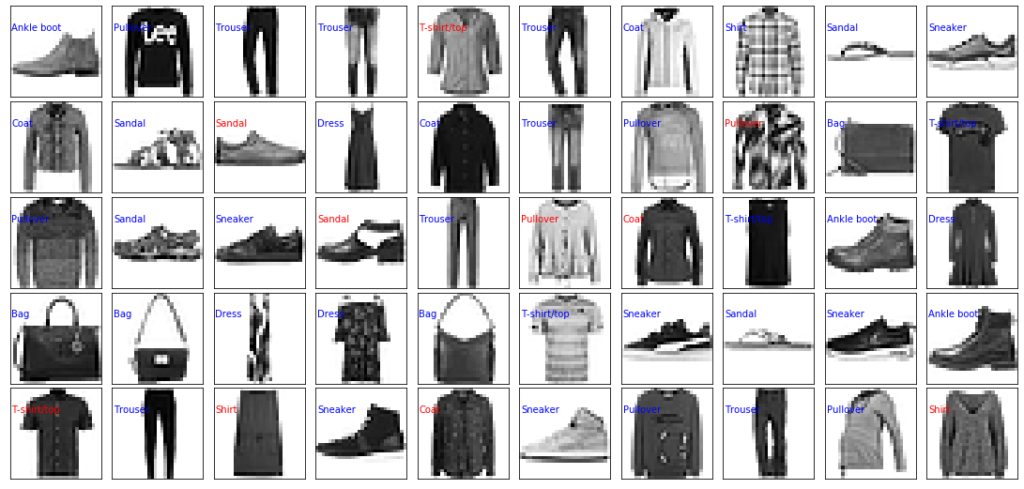
三、总结
所以,在这里我们学习了如何在 Tensorflow 2.0 中开发和训练 LeNet-5。在下 一篇文章中 ,我们将继续实现流行的卷积神经网络,并学习如何在 TensorFlow 2.0 中实现AlexNet 。