Java实现在线沟通功能
文章目录
- 1、介绍 和 特点
- 2、整合SpringBoot
- 2.1、导入依赖
- 2.2、websocket 配置类
- 2.3、消息处理类
- 2.4、启动服务
- 2.5、前端代码:张三
- 2.6、前端代码:李四
- 3、效果
- 4、小结
1、介绍 和 特点
t-io是基于JVM的网络编程框架,和netty属同类,所以netty能做的t-io都能做,考虑到t-io是从项目抽象出来的框架,所以t-io提供了更多的和业务相关的API,大体上t-io具有如下特点和能力
- 内置完备的监控和流控能力
- 内置半包粘包处理
- 一骑绝尘的资源管理能力
- 内置心跳检查和心跳发送能力
- 内置IP拉黑
- 一流性能和稳定性(第三方权威平台TFB提供性能测试和稳定性服务)
- 极其稳定的表现(很多用户还是停在t-io 1.x版本,就是因为太过稳定,不想变动)
- 内置慢攻击防御
- 唯一一个内置异步发送、阻塞发送、同步发送的网络框架
- 唯一内置集群分发消息的能力
- 独创的多端口资源共享能力(譬如一个端口是websocket协议,一个端口是私有的im协议,这两个端口的资源可以共享,这对协议适配极其有用)
- 独创协议适配转换能力(让基于websocket和基于socket的应用看起来像是同一个协议)
- 独一档的资源和业务绑定能力:绑定group、绑定userid、绑定token、绑定bsId,这些绑定几乎囊括了所有业务需求
2、整合SpringBoot
2.1、导入依赖
<!-- tio-websocket -->
<dependency><groupId>org.t-io</groupId><artifactId>tio-websocket-server</artifactId><version>3.5.9.v20200214-RELEASE</version>
</dependency>
注意:每个版本之前存在差异请查看官方文档
2.2、websocket 配置类
import com.asurplus.tio.websocket.handle.MyWsMsgHandler;
import org.springframework.beans.factory.annotation.Autowired;
import org.springframework.context.annotation.Bean;
import org.springframework.context.annotation.Configuration;
import org.tio.server.ServerTioConfig;
import org.tio.websocket.server.WsServerStarter;import java.io.IOException;/*** websocket 配置类*/
@Configuration
public class WebSocketConfig {/*** 注入消息处理器*/@Autowiredprivate MyWsMsgHandler myWsMsgHandler;/*** 启动类配置** @return* @throws IOException*/@Beanpublic WsServerStarter wsServerStarter() throws IOException {// 设置处理器WsServerStarter wsServerStarter = new WsServerStarter(6789, myWsMsgHandler);// 获取到ServerTioConfigServerTioConfig serverTioConfig = wsServerStarter.getServerTioConfig();// 设置心跳超时时间,默认:1000 * 120serverTioConfig.setHeartbeatTimeout(1000 * 120);// 启动wsServerStarter.start();return wsServerStarter;}
}
这里我们注入了 WsServerStarter 的 bean,这样在 SpringBoot 启动的时候,就能启动咱们的 websocket 服务
- 注明了 websocket 的服务端口为:6789
- 消息处理类为:myWsMsgHandler,在下一步我们将会去实现这个类
- 设置了心跳的超时时间为:120秒,默认值,可以不设置
2.3、消息处理类
package com.ying.tiiochat.config;import com.alibaba.fastjson.JSONObject;
import org.springframework.stereotype.Component;
import org.tio.core.ChannelContext;
import org.tio.core.Tio;
import org.tio.http.common.HttpRequest;
import org.tio.http.common.HttpResponse;
import org.tio.websocket.common.WsRequest;
import org.tio.websocket.common.WsResponse;
import org.tio.websocket.server.handler.IWsMsgHandler;/*** 消息处理类*/
@Component
public class MyWsMsgHandler implements IWsMsgHandler {/*** <li>对httpResponse参数进行补充并返回,如果返回null表示不想和对方建立连接,框架会断开连接,如果返回非null,框架会把这个对象发送给对方</li>* <li>注:请不要在这个方法中向对方发送任何消息,因为这个时候握手还没完成,发消息会导致协议交互失败。</li>* <li>对于大部分业务,该方法只需要一行代码:return httpResponse;</li>** @param httpRequest* @param httpResponse* @param channelContext* @return* @throws Exception*/@Overridepublic HttpResponse handshake(HttpRequest httpRequest, HttpResponse httpResponse, ChannelContext channelContext) throws Exception {// 可以在此做一些业务逻辑,返回null表示不想连接return httpResponse;}/*** 握手成功后触发该方法** @param httpRequest* @param httpResponse* @param channelContext* @throws Exception*/@Overridepublic void onAfterHandshaked(HttpRequest httpRequest, HttpResponse httpResponse, ChannelContext channelContext) throws Exception {// 拿到用户idString id = httpRequest.getParam("userId");// 绑定用户Tio.bindUser(channelContext, id);// 给用户发送消息JSONObject message = new JSONObject();message.put("msg", "连接成功...");message.put("sendName", "系统提醒");WsResponse wsResponse = WsResponse.fromText(message.toString(), "UTF-8");Tio.sendToUser(channelContext.tioConfig, id, wsResponse);}/*** <li>当收到Opcode.BINARY消息时,执行该方法。也就是说如何你的ws是基于BINARY传输的,就会走到这个方法</li>** @param wsRequest* @param bytes* @param channelContext* @return 可以是WsResponse、byte[]、ByteBuffer、String或null,如果是null,框架不会回消息* @throws Exception*/@Overridepublic Object onBytes(WsRequest wsRequest, byte[] bytes, ChannelContext channelContext) throws Exception {System.out.println("我走了onBytes");return null;}/*** 当收到Opcode.CLOSE时,执行该方法,业务层在该方法中一般不需要写什么逻辑,空着就好** @param wsRequest* @param bytes* @param channelContext* @return 可以是WsResponse、byte[]、ByteBuffer、String或null,如果是null,框架不会回消息* @throws Exception*/@Overridepublic Object onClose(WsRequest wsRequest, byte[] bytes, ChannelContext channelContext) throws Exception {// 关闭连接Tio.remove(channelContext, "WebSocket Close");return null;}/*** <li>当收到Opcode.TEXT消息时,执行该方法。也就是说如何你的ws是基于TEXT传输的,就会走到这个方法</li>** @param wsRequest* @param text* @param channelContext* @return 可以是WsResponse、byte[]、ByteBuffer、String或null,如果是null,框架不会回消息* @throws Exception*/@Overridepublic Object onText(WsRequest wsRequest, String text, ChannelContext channelContext) throws Exception {JSONObject message = JSONObject.parseObject(text);// 接收消息的用户IDString receiver = message.getString("receiver");// 发送消息者String sendName = message.getString("sendName");// 消息String msg = message.getString("msg");// 保存聊天记录到DB等业务逻辑...WsResponse wsResponse = WsResponse.fromText(message.toString(), "UTF-8");Tio.sendToUser(channelContext.tioConfig, receiver, wsResponse);JSONObject resp = new JSONObject();resp.put("sendName", "系统提醒");resp.put("msg", "发送成功");return resp.toString();}
}
我们实现了 IWsMsgHandler 接口,并重写了该接口的 5 个方法,这 5 个方法从 发送握手包,到消息收发,到断开连接等一系列过程
2.4、启动服务

启动成功后,可以看出 tio 的打印结果,我们可以看出服务端口为我们设置的 6789,我们便可以连接测试了
2.5、前端代码:张三
<!DOCTYPE html>
<html>
<head><meta charset="utf-8"><title>websocket通讯</title>
</head>
<script src="https://cdn.bootcss.com/jquery/3.3.1/jquery.js"></script>
<script type="text/javascript"><!--  连接-->var socket;var userName;// 连接function connect() {var socketUrl = "ws://localhost:6789/?userId=" + $('#sendName').val();if (socket != null) {socket.close();socket = null;}socket = new WebSocket(socketUrl);//打开事件socket.onopen = function () {console.log("开始建立链接....")};//关闭事件socket.onclose = function () {console.log("websocket已关闭");};//发生了错误事件socket.onerror = function () {console.log("websocket发生了错误");};/*** 接收消息* @param msg*/socket.onmessage = function (msg) {console.log(msg)var json = JSON.parse(msg.data);if (msg.msg != '连接成功') {$("#msgDiv").append('<p class="other" style="color:olivedrab;">' + json.sendName + ':'+json.msg+'</p>');}};}/*** 发送消息*/function sendMessage() {var msg = $("#msg").val();if (msg == '' || msg == null) {alert("消息内容不能为空");return;}var receiver = $("#receiver").val();if (receiver == '' || receiver == null) {alert("接收人不能为空");return;}var sendName = $("#sendName").val();if (sendName == '' || sendName == null) {alert("发送人不能为空");return;}var msgObj = {"receiver": receiver,"sendName": sendName,"msg": msg};$("#msgDiv").append('<p class="user" style="color: red">' + sendName + ':'+msg+'</p>');try{socket.send(JSON.stringify(msgObj));$("#msg").val('');}catch (e) {alert("服务器内部错误");}}
</script>
<body>
用户名:<input type="text" id="sendName" value="张三">
<input type="button" value="连接" onclick="connect()" ><br>
发送者:<input type="text" id="sender" value="张三" ><br>
接受者:<input type="text" id="receiver" value="李四"><br><br>
消  息:<textarea id="msg"></textarea><br><input type="button" value="发送" onclick="sendMessage()"><br><br>消息记录:<div id="msgDiv" style="border: 1px red solid;width: 400px;height: 200px"></div>
<br></body>
</html>
2.6、前端代码:李四
<!DOCTYPE html>
<html>
<head><meta charset="utf-8"><title>websocket通讯</title>
</head>
<script src="https://cdn.bootcss.com/jquery/3.3.1/jquery.js"></script>
<script type="text/javascript"><!--  连接-->var socket;var userName;// 连接function connect() {var socketUrl = "ws://localhost:6789/?userId=" + $('#sendName').val();if (socket != null) {socket.close();socket = null;}socket = new WebSocket(socketUrl);//打开事件socket.onopen = function () {console.log("开始建立链接....")};//关闭事件socket.onclose = function () {console.log("websocket已关闭");};//发生了错误事件socket.onerror = function () {console.log("websocket发生了错误");};/*** 接收消息* @param msg*/socket.onmessage = function (msg) {console.log(msg)var json = JSON.parse(msg.data);if (msg.msg != '连接成功') {$("#msgDiv").append('<p class="other" style="color:olivedrab;">' + json.sendName + ':'+json.msg+'</p>');}};}/*** 发送消息*/function sendMessage() {var msg = $("#msg").val();if (msg == '' || msg == null) {alert("消息内容不能为空");return;}var receiver = $("#receiver").val();if (receiver == '' || receiver == null) {alert("接收人不能为空");return;}var sendName = $("#sendName").val();if (sendName == '' || sendName == null) {alert("发送人不能为空");return;}var msgObj = {"receiver": receiver,"sendName": sendName,"msg": msg};$("#msgDiv").append('<p class="user" style="color: red">' + sendName + ':'+msg+'</p>');try{socket.send(JSON.stringify(msgObj));$("#msg").val('');}catch (e) {alert("服务器内部错误");}}
</script>
<body>
用户名:<input type="text" id="sendName" value="李四">
<input type="button" value="连接" onclick="connect()" ><br>
发送者:<input type="text" id="sender" value="李四" ><br>
接受者:<input type="text" id="receiver" value="张三"><br><br>
消  息:<textarea id="msg"></textarea><br><input type="button" value="发送" onclick="sendMessage()"><br><br>消息记录:<div id="msgDiv" style="border: 1px red solid;width: 400px;height: 200px"></div>
<br></body>
</html>
记得有两个HTML文件哦

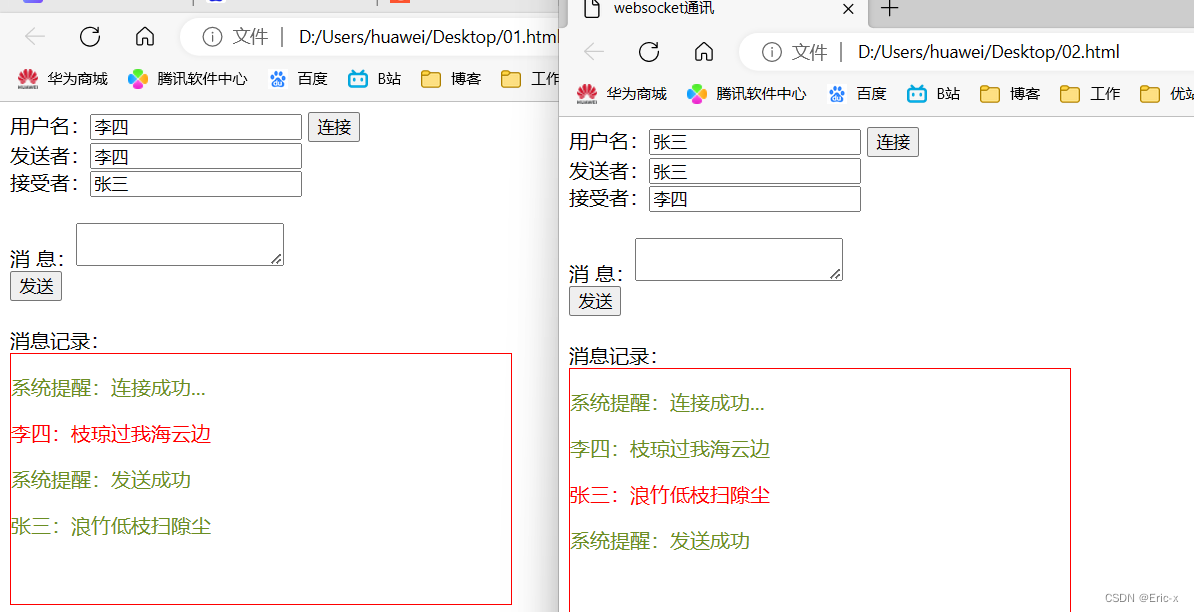
3、效果
4、小结
但在实际开发中,远没有一对一聊天这么简单,我们可能还需要聊天列表,历史聊天记录,客户列表、聊天室、多对多聊天(平台客服、商家客服、用户),包括 商品快捷方式,订单信息快捷方式,不过这些都是可以根据这个Demo的基础上做出来的。等有时间会根据这个Demo做一个具体的用例
原文:https://blog.csdn.net/weixin_46522803/article/details/126548065?spm=1001.2014.3001.5506