【THREE.JS学习(3)】使用THREEJS加载GeoJSON地图数据
本文接着系列文章(2)进行介绍,以VUE2为开发框架,该文涉及代码存放在HelloWorld.vue中。
相较于上一篇文章对div命名class等,该文简洁许多。
<template>
<div></div>
</template>
接着引入核心库
import * as THREE from "three"
import {OrbitControls} from "three/examples/jsm/controls/OrbitControls"
import * as d3 from "d3"
import Stats from "three/examples/jsm/libs/stats.module.js";
其中,{OrbitControls}为控制器,加载后可以通过鼠标来移动加载数据的方向、放缩等
Three.js中的坐标系是以单位为米(m)的坐标系,而在地理数据中,如Geojson使用的是经纬度作为坐标系,所以在使用、加载的过程中需要对数据进行坐标转换,才能够正确的显示地理数据。
而D3.js提供了投影函数能够将Geojson中的经纬度转换为目标格式的数据。
//安装D3.js
npm install d3
下面的代码展示了使用D3.js将经纬度数据转化为Three.js中的坐标系
//使用墨卡托投影
var projection = d3.geoMercator()//地图投影的中心位置.center([0, 0])//地图投影的偏移量.translate([0, 0]).scale(1);var path = d3.geoPath().projection(projection);var coords = [-122.4194, 37.7749]; // 经纬度坐标
var point = projection(coords); // 将经纬度转换为 Three.js 中的坐标系
{Stats}可以创建一个性能监测器,并将其显示在页面中。
stats 库是一个可以用于监测JavaScript性能的工具库。它可以跟踪帧率(FPS)、渲染时间和内存使用情况等信息。在开发过程中,这些信息可以帮助开发者了解应用程序的性能表现,并且有助于识别和优化潜在的性能瓶颈。
下面开始介绍如何加载
STEP 1 :{相机、场景、渲染器} 依旧是最重要的步骤
//将这样对环境初始化的步骤封装成一个函数initTHREE()
initTHREE(){this.scene = new THREE.Scene();this.camera = new THREE.PerspectiveCamera(90,window.innerHeight/window.innerWidth,0.1,1000)this.camera.position.set(0,0,100)this.camera.aspect = window.innerWidth / window.innerHeight;this.camera.updateProjectionMatrix();this.scene.add(this.camera)// 加入坐标轴// this.axesHelper = new THREE.AxesHelper(5);// this.scene.add(this.axesHelper)// 加载渲染器this.renderer = new THREE.WebGLRenderer({alpha:true})this.renderer.setSize(window.innerWidth,window.innerHeight)// 将渲染器添加到bodydocument.body.appendChild(this.renderer.domElement);// 初始化控制器 可以旋转this.controls = new OrbitControls(this.camera,this.renderer.domElement)// 创建地图对象this.map = new THREE.Object3D();this.directionalLight = new THREE.DirectionalLight(0xffffff,0.5)this.scene.add(this.directionalLight)this.light = new THREE.AmbientLight(0xffffff,0.5)this.scene.add(this.light)}
STEP 2:创建地理对象
和mapbox、cesium之类的webgis加载数据不同(原理差不多),不能直接加载json数据,然后直接显示,需要我们对Json数据进行解析,然后按照一定的方式来生成图像。
首先,加载文件
this.loader = new THREE.FileLoader();
this.loader.load('xxx.json',(data)=>{
})
接着,对加载的文件进行处理
//数据格式化
this.jsonData = JSON.parse(data)
//创建坐标系、获取数据对象
const projection1 = d3.geoMercator().center([0, 0]).translate([0, 0]).scale(1);
const features = this.jsonData.features;
//对features进行遍历
features.forEach((feature) => {// 单个省份 对象const province = new THREE.Object3D();// 地址province.properties = feature.properties.name;// 坐标数组const coordinates = feature.geometry.coordinates;const color = "#99ff99";if (feature.geometry.type === "MultiPolygon") {// 多个,多边形coordinates.forEach((coordinate) => {// coordinate 多边形数据coordinate.forEach((rows) => {//对坐标点数据进行处理const mesh = this.drawExtrudeMesh(rows, color, projection1);mesh.properties = feature.properties.name;province.add(mesh);});});}this.map.add(province);
});
坐标处理,构建平面,再通过ExtrudeGeometry拉伸高度
drawExtrudeMesh(polygon, color, projection){const shape = new THREE.Shape();polygon.forEach((row, i) => {const [x, y] = projection(row);if (i === 0) {// 创建起点,使用moveTo方法// 因为计算出来的y是反过来,所以要进行颠倒shape.moveTo(x, -y);}shape.lineTo(x, -y);});// 拉伸const geometry = new THREE.ExtrudeGeometry(shape, {depth: 5,bevelEnabled: true,});// 随机颜色const randomColor = (0.5 + Math.random() * 0.5) * 0xffffff;const material = new THREE.MeshBasicMaterial({color: randomColor,transparent: true,opacity: 0.5,});return new THREE.Mesh(geometry, material);
}
STEP 3:开始渲染
animate(){this.controls.update()this.stats.update()//const clock = new THREE.Clock();//this.deltaTime = clock.getDelta()requestAnimationFrame(this.animate)this.renderer.render(this.scene,this.camera)
},
加载结果
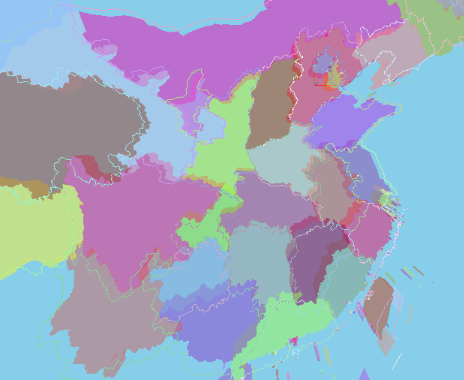
源码回头传到github上。