当前位置: 首页 > news >正文

Hadoop-Hbase

1. Hbase安装

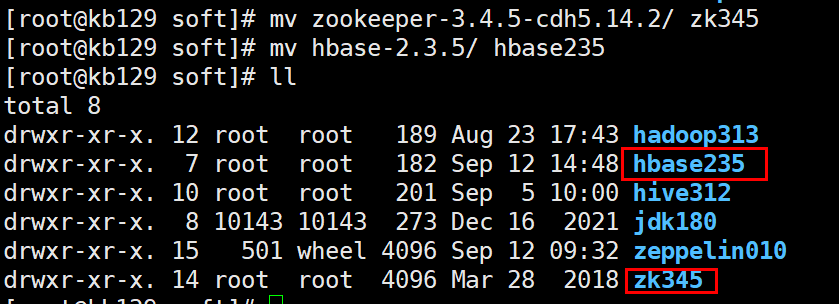
1.1  安装zookeeper、 hbase

解压至/opt/soft,并分别改名

配置环境变量并source生效

#ZK

export ZOOKEEPER_HOME=/opt/soft/zk345

export PATH=$ZOOKEEPER_HOME/bin:$PATH

#HBASE_HOME

export HBASE_HOME=/opt/soft/hbase235

export PATH=$HBASE_HOME/bin:$PATH

hbase235/conf目录下的

编辑hbase-env.sh:[root@kb129 conf]# vim ./hbase-env.sh

export JAVA_HOME=/opt/soft/jdk180

编辑hbase-site.xml

[root@kb129 conf]# vim ./hbase-site.xml

<property><name>hbase.rootdir</name><value>hdfs://192.168.142.129:9000/hbase</value></property><property><name>hbase.cluster.distributed</name><value>true</value></property><property><name>hbase.zookeeper.property.dataDir</name><value>/opt/soft/zk345/zkdata</value></property><property><name>hbase.zookeeper.property.clientPort</name><value>2181</value></property>

拷贝配置文件准备配置zookeeper

[root@kb129 conf]# pwd

/opt/soft/zk345/conf

[root@kb129 conf]# cp zoo_sample.cfg zoo.cfg

创建目录

[root@kb129 conf]# mkdir /opt/soft/zk345/logs

[root@kb129 conf]# mkdir /opt/soft/zk345/zkdata

编辑配置文件,增加目录指向

[root@kb129 conf]# vim  ./zoo.cfg

dataDir=/opt/soft/zk345/zkdatadataLogDir=/opt/soft/zk345/logsserver.0=192.168.142.129:2287:3387

追加节点id

[root@kb129 conf]# cd ../zkdata/

[root@kb129 zkdata]# echo "0">myid

启动zookeeper

[root@kb129 zkdata]# zkServer.sh start

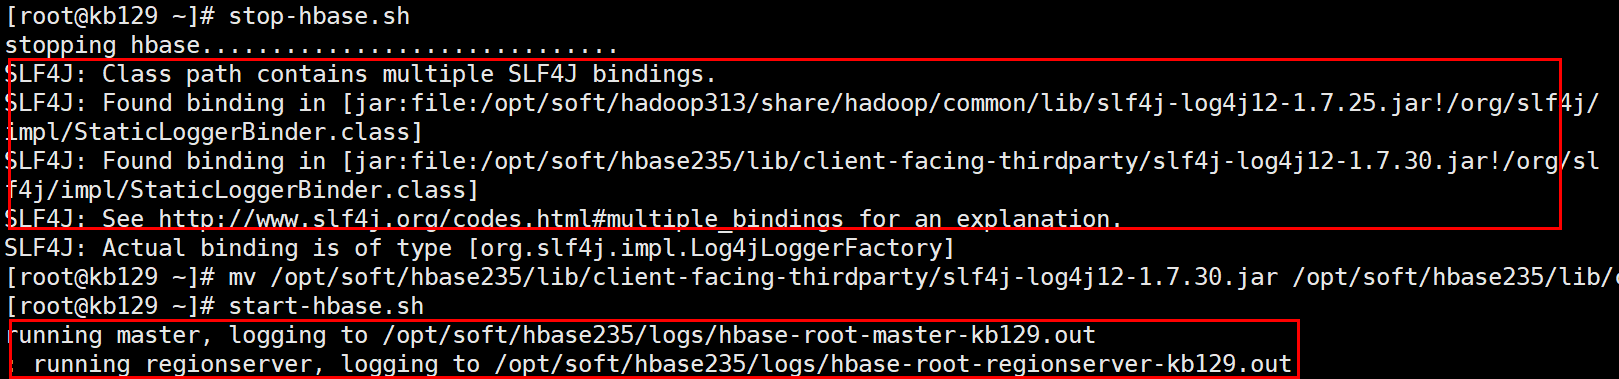
启动hbase

(启动前解决Hbase和hadoop中log4j的jar包冲突报错问题:将Hbase中的jar包改名就不会读取,解决掉冲突报错:mv /opt/soft/hbase235/lib/client-facing-thirdparty/slf4j-log4j12-1.7.30.jar /opt/soft/hbase235/lib/client-facing-thirdparty/slf4j-log4j12-1.7.30.jar.bak)

[root@kb129 zkdata]# start-hbase.sh

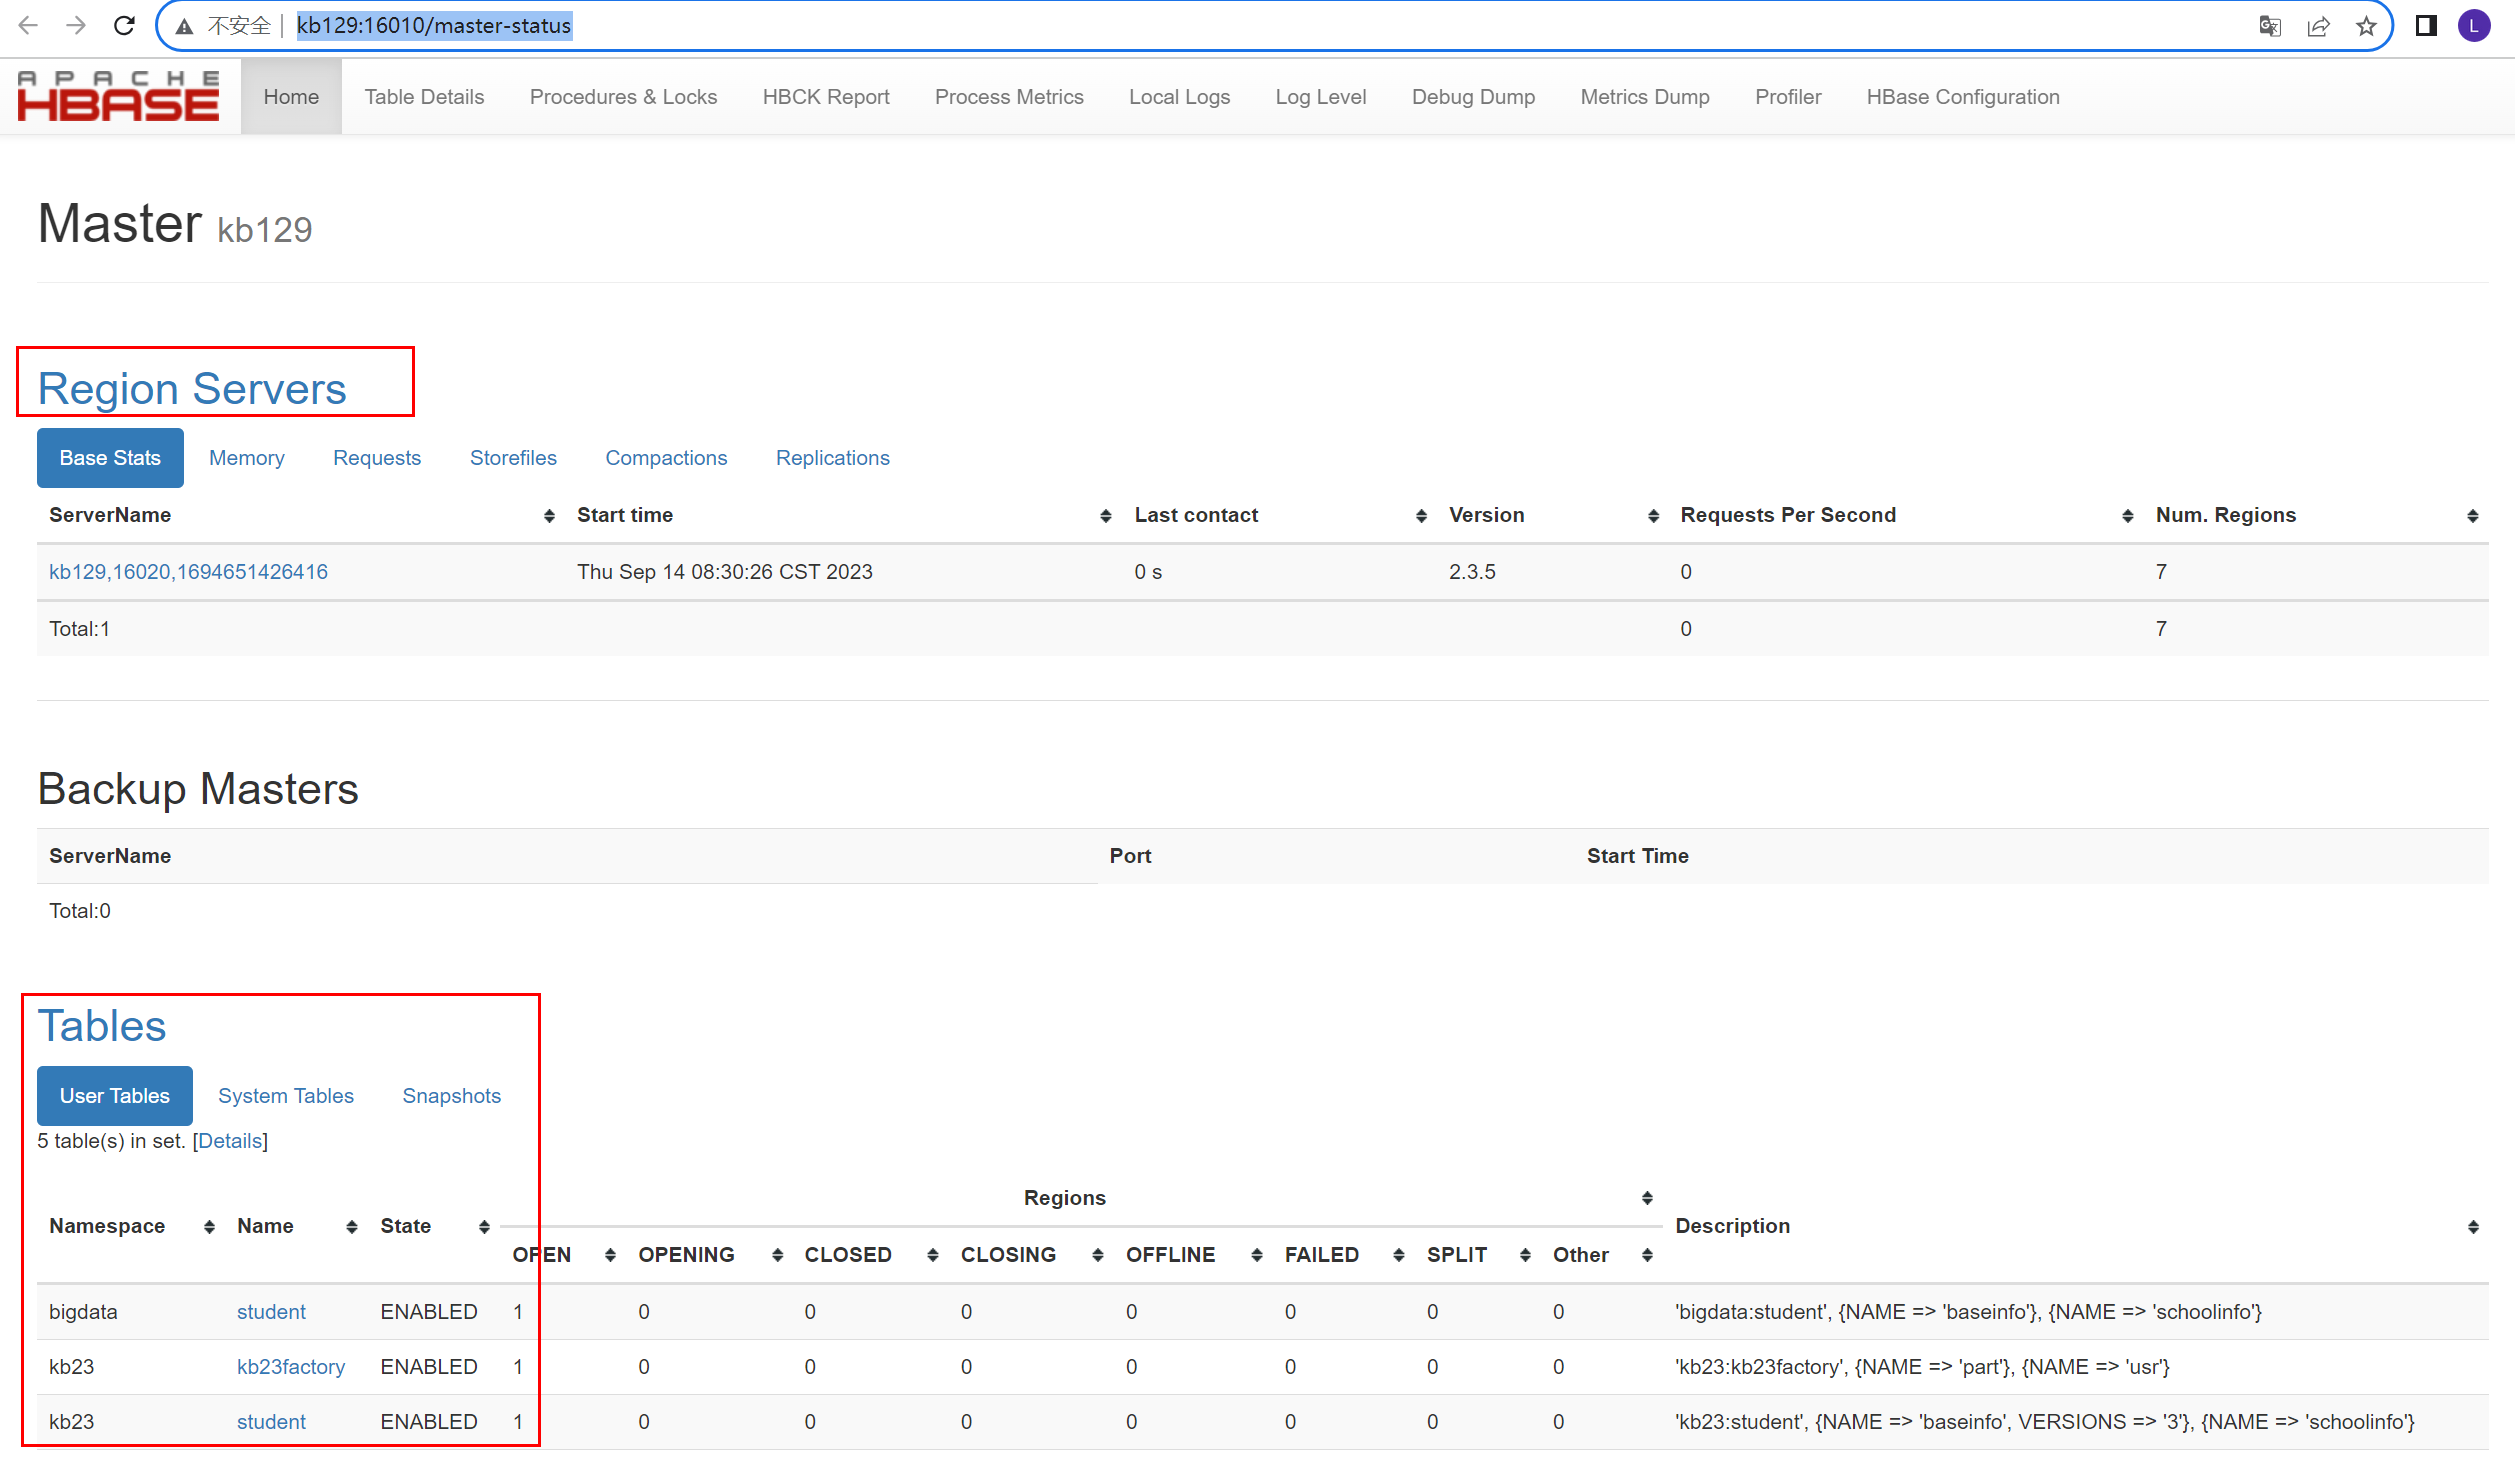
网页访问http://kb129:16010/

hbase宕机恢复操作(此操作会删除hbase中数据,慎用!!!)
(1)执行stop-hbase.sh关闭hbase进程,或通过kill杀死进程
(2)确保hadoop和zookeeper正常运行状态下,进入zookeeper客户端:zkCli.sh
(3)删除hbase:rmr /hbase,删除后:ls / ,查看是否已经删除
(4)进入hdfs系统,删除hbase指向目录/hbase
(5)执行start-hbase.sh,成功恢复hbase

2.Hbase shell相关操作

[root@kb129 conf]# hbase shell

创建命名空间

hbase(main):001:0> create_namespace 'kb23'

查看命名空间

hbase(main):001:0>list _namespace


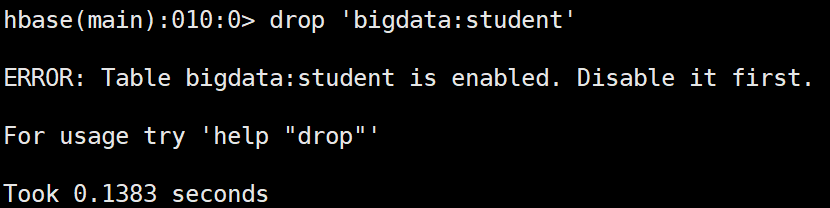
创建表

hbase(main):007:0> create 'bigdata:student','baseinfo','schoolinfo'

查看表

hbase(main):008:0> list_namespace_tables 'bigdata'

查看描述

hbase(main):009:0> desc 'bigdata:student'

删除表之前先禁用表

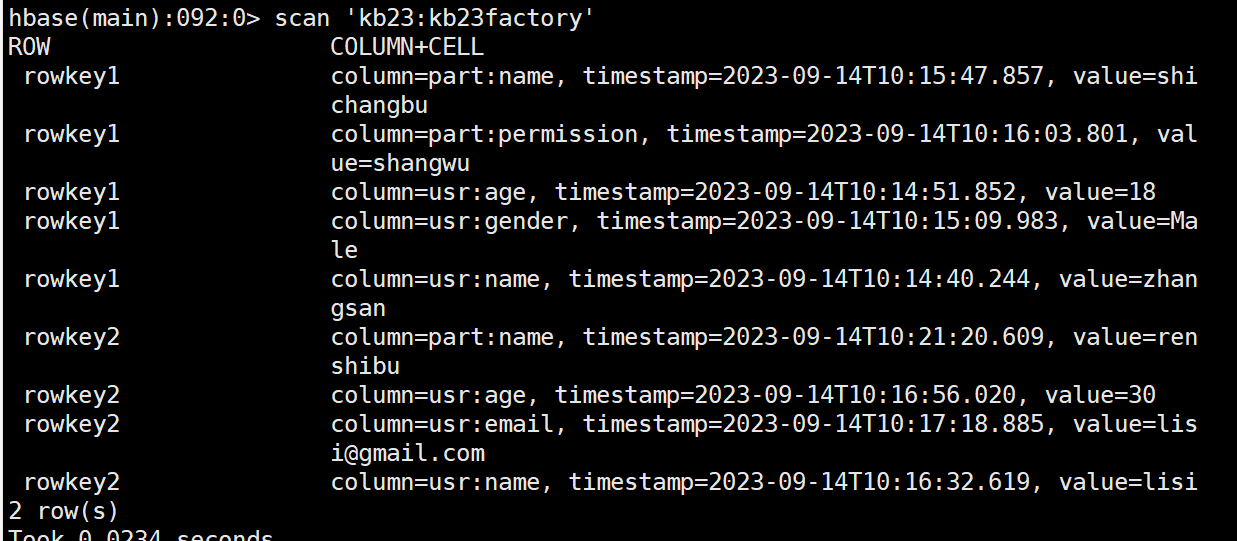
禁用表

hbase(main):011:0> disable 'bigdata:student'

查看是否禁用/启用

hbase(main):011:0> is_disabled/is_enabled 'bigdata:student'

启用表

hbase(main):011:0> enable 'bigdata:student'

插入数据(原有数据的话会覆盖)

hbase(main):006:0> put 'bigdata:student','rowkey1','baseinfo:name','tom'

查看指定rowkey的所有数据

hbase(main):008:0> get 'bigdata:student','rowkey1'

COLUMN                        CELL                                                                               

 baseinfo:age                 timestamp=2023-09-13T14:21:26.095, value=30                                        

 baseinfo:name                timestamp=2023-09-13T14:21:22.385, value=tom    

查看指定列族数据

hbase(main):011:0> get 'bigdata:student','rowkey1','baseinfo'

COLUMN                        CELL                                                                               

 baseinfo:age                 timestamp=2023-09-13T14:21:26.095, value=30                                        

 baseinfo:name                timestamp=2023-09-13T14:21:22.385, value=tom   

查看指定列族中某列数据

hbase(main):012:0> get 'bigdata:student','rowkey1','baseinfo:name'

COLUMN                        CELL                                                                               

 baseinfo:name                timestamp=2023-09-13T14:21:22.385, value=tom

添加列族

hbase(main):021:0> alter 'kb23:student','teacherinfo'

删除列族

hbase(main):023:0> alter 'kb23:student',{NAME=>'teacherinfo',METHOD=>'delete'}

更改版本个数(VERSIONS默认为1)

hbase(main):026:0> alter 'kb23:student',{NAME=>'baseinfo',VERSIONS=>3}

全表扫描

hbase(main):027:0> scan 'kb23:student'

删除指定列族中的列

hbase(main):055:0> delete 'kb23:student','rowkey2','baseinfo:name'

删除所有rowkey2信息

hbase(main):060:0> deleteall 'kb23:student','rowkey2'

查看不同版本信息

hbase(main):070:0> get 'kb23:student','rowkey1',COLUMN=>'baseinfo:name',VERSIONS=>3

查看范围内rowkey的数据(左闭右开)

hbase(main):094:0> scan 'kb23:student', {COLUMNS => 'baseinfo:name', STARTROW => 'rowkey',STOPROW=> 'rowkey3'}

查看时使用limit

hbase(main):096:0> scan 'kb23:student', {COLUMNS => 'baseinfo:name', STARTROW => 'rowkey',STOPROW=> 'rowkey3', VERSIONS=> 3, LIMIT=> 1}

过滤查找value包含11开头的信息(可查到多个版本)

hbase(main):099:0> scan 'kb23:student',FILTER=>"ValueFilter(=,'binary:11')"

过滤查找value包含andemen开头的信息(可查到多个版本)

hbase(main):102:0> scan 'kb23:student',FILTER=>"ValueFilter(=,'substring:andemen')"

过滤查找列名birth开头的信息(可查到多个版本)

hbase(main):104:0> scan 'kb23:student',FILTER=>"ColumnPrefixFilter('birth')"

多条件AND查询

hbase(main):110:0> scan 'kb23:student',FILTER=>"ColumnPrefixFilter('birth') AND ValueFilter(=,'substring:200')"

AND或OR查询

hbase(main):005:0>scan 'kb23:student',FILTER=>"ColumnPrefixFilter('birth') AND (ValueFilter(=,'substring:200')) OR ValueFilter(=,'substring:20')"

3.Hbase运行原理

3.1  HBase物理架构

1)StoreFile

保存实际数据的物理文件,StoreFile以Hfile的形式存储在HDFS上。每个Store会有一个或多个StoreFile(HFile),数据在每个StoreFile中都是有序的。

2)MemStore

写缓存,由于HFile中的数据要求是有序的,所以数据是先存储在MemStore中,排好序后,等到达刷写时机才会刷写到HFile,每次刷写都会形成一个新的HFile。

3)WAL

由于数据要经MemStore排序后才能刷写到HFile,但把数据保存在内存中会有很高的概率导致数据丢失,为了解决这个问题,数据会先写在一个叫做Write-Ahead logfile的文件中,然后再写入MemStore中。所以在系统出现故障的时候,数据可以通过这个日志文件重建。

4)BlockCache

读缓存,每次查询出的数据会缓存在BlockCache中,方便下次查询。

3.2  写流程

1)Client先访问zookeeper,获取hbase:meta表位于哪个Region Server。

2)访问对应的Region Server,获取hbase:meta表,根据写请求的namespace:table/rowkey,查询出目标数据位于哪个Region Server中的哪个Region中。并将该table的region信息以及meta表的位置信息缓存在客户端的meta cache,方便下次访问。

3)与目标Region Server进行通讯;

4)将数据顺序写入(追加)到WAL;

5)将数据写入对应的MemStore,数据会在MemStore进行排序;

6)向客户端发送ack;

7)等达到MemStore的刷写时机后,将数据刷写到HFile。

3.3  MemStore Flush

MemStore刷写时机:

1.当某个memstroe的大小达到了hbase.hregion.memstore.flush.size(默认值128M),其所在region的所有memstore都会刷写。

当memstore的大小达到了

hbase.hregion.memstore.flush.size(默认值128M)* hbase.hregion.memstore.block.multiplier(默认值4)时,会阻止继续往该memstore写数据。

2.当region server中memstore的总大小达到

java_heapsize*hbase.regionserver.global.memstore.size(默认值0.4)*hbase.regionserver.global.memstore.size.lower.limit(默认值0.95),

region会按照其所有memstore的大小顺序(由大到小)依次进行刷写。直到region server中所有memstore的总大小减小到上述值以下。

当region server中memstore的总大小达到

java_heapsize*hbase.regionserver.global.memstore.size(默认值0.4)时,会阻止继续往所有的memstore写数据。

3. 到达自动刷写的时间,也会触发memstore flush。自动刷新的时间间隔由该属性进行配置hbase.regionserver.optionalcacheflushinterval(默认1小时)。

4.当WAL文件的数量超过hbase.regionserver.max.logs,region会按照时间顺序依次进行刷写,直到WAL文件数量减小到hbase.regionserver.max.log以下(该属性名已经废弃,现无需手动设置,最大值为32)。

3.4  读流程

1)Client先访问zookeeper,获取hbase:meta表位于哪个Region Server。

2)访问对应的Region Server,获取hbase:meta表,根据读请求的namespace:table/rowkey,查询出目标数据位于哪个Region Server中的哪个Region中。并将该table的region信息以及meta表的位置信息缓存在客户端的meta cache,方便下次访问。

3)与目标Region Server进行通讯;

4)分别在MemStore和Store File(HFile)中查询目标数据,并将查到的所有数据进行合并。此处所有数据是指同一条数据的不同版本(time stamp)或者不同的类型(Put/Delete)。

5)将查询到的新的数据块(Block,HFile数据存储单元,默认大小为64KB)缓存到Block Cache。

6)将合并后的最终结果返回给客户端。

3.5  StoreFile Compaction

由于memstore每次刷写都会生成一个新的HFile,且同一个字段的不同版本(timestamp)和不同类型(Put/Delete)有可能会分布在不同的HFile中,因此查询时需要遍历所有的HFile。为了减少HFile的个数,以及清理掉过期和删除的数据,会进行StoreFile Compaction。

Compaction分为两种,分别是Minor Compaction和Major Compaction。Minor Compaction会将临近的若干个较小的HFile合并成一个较大的HFile,并清理掉部分过期和删除的数据。Major Compaction会将一个Store下的所有的HFile合并成一个大HFile,并且会清理掉所有过期和删除的数据。

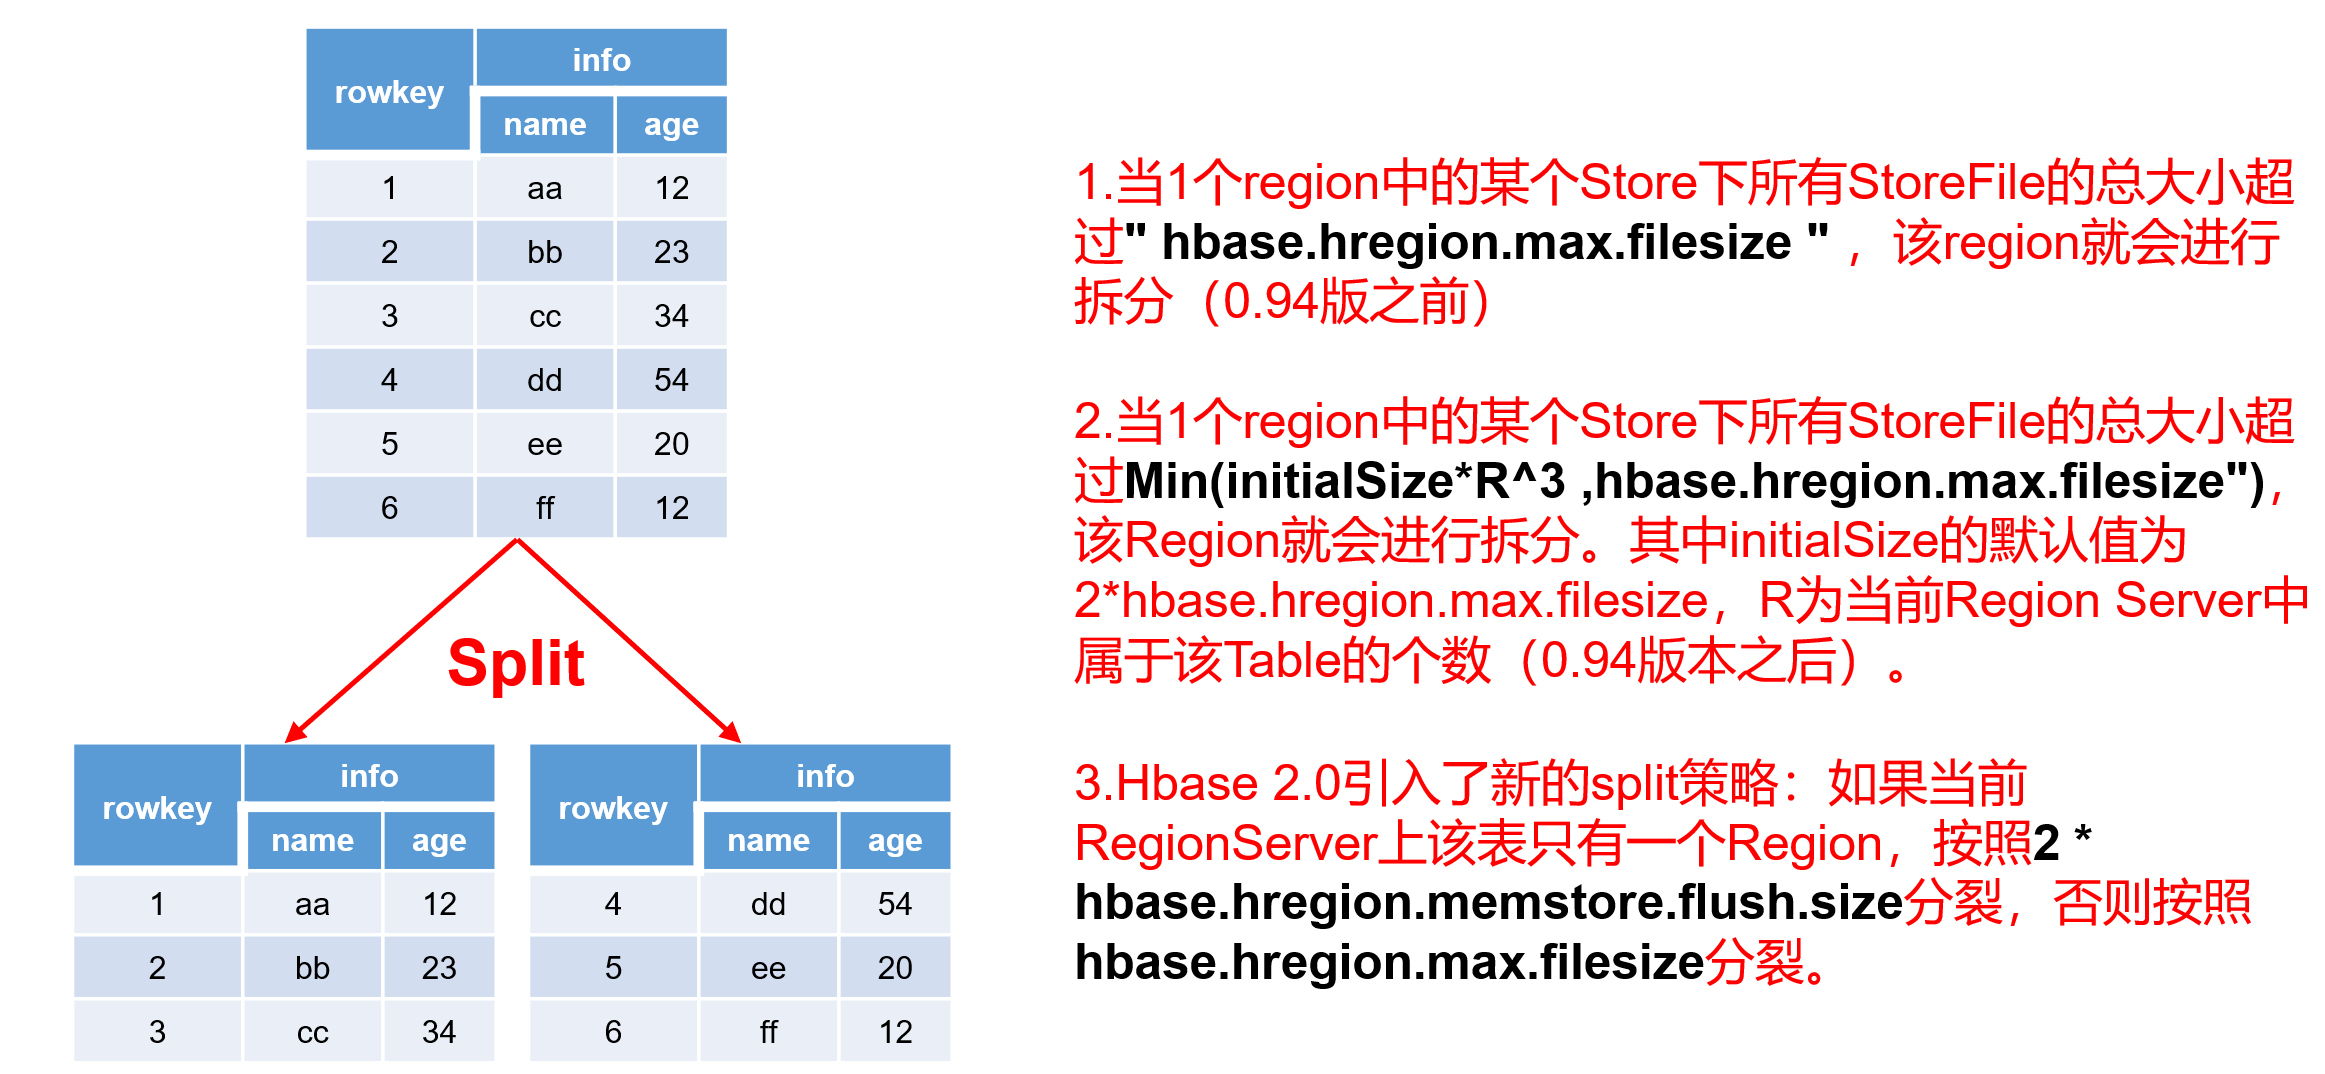
3.6  Region Split

默认情况下,每个Table起初只有一个Region,随着数据的不断写入,Region会自动进行拆分。刚拆分时,两个子Region都位于当前的Region Server,但处于负载均衡的考虑,HMaster有可能会将某个Region转移给其他的Region Server。

Region Split时机:

1.当1个region中的某个Store下所有StoreFile的总大小超过hbase.hregion.max.filesize (10G),该Region就会进行拆分(0.94版本之前)。

2.当1个region中的某个Store下所有StoreFile的总大小超过Min(initialSize*R^3 ,hbase.hregion.max.filesize"),该Region就会进行拆分。其中initialSize的默认值为2*hbase.hregion.memstore.flush.size,R为当前Region Server中属于该Table的Region个数(0.94版本之后)。

具体的切分策略为:

第一次split:1^3 * 256 = 256MB

第二次split:2^3 * 256 = 2048MB

第三次split:3^3 * 256 = 6912MB

第四次split:4^3 * 256 = 16384MB > 10GB,因此取较小的值10GB

后面每次split的size都是10GB了。

3.Hbase 2.0引入了新的split策略:如果当前RegionServer上该表只有一个Region,按照2 * hbase.hregion.memstore.flush.size分裂,否则按照hbase.hregion.max.filesize分裂。

4.hive映射hbase

hive中创建表格,关联hbase中的表

(1)

create external table student(id string,stuname string,birthdate string,age int,schoolname string,location string
)
stored by 'org.apache.hadoop.hive.hbase.HBaseStorageHandler' withserdeproperties
('hbase.columns.mapping'=':key,baseinfo:name,baseinfo:birthday,baseinfo:age,schoolinfo:name,schoolinfo:location')
tblproperties ('hbase.table.name'='kb23:student');select * from student;

(2)rowkey之间不同字段

create external table kb23factory(id string,usrname string,age string,gender string,email string,partname string,permission string)stored by 'org.apache.hadoop.hive.hbase.HBaseStorageHandler' withserdeproperties('hbase.columns.mapping'=':key,usr:name,usr:age,usr:gender,usr:email,part:name,part:permission')tblproperties ('hbase.table.name'='kb23:kb23factory');select * from kb23factory;

5.Hbase API

5.1   pom依赖

<dependency><groupId>org.apache.hbase</groupId><artifactId>hbase-client</artifactId><version>2.3.5</version>
</dependency>
<dependency><groupId>org.apache.hbase</groupId><artifactId>hbase-common</artifactId><version>2.3.5</version>
</dependency>

5.2  增删改查等具体操作

import org.apache.hadoop.conf.Configuration;
import org.apache.hadoop.hbase.HBaseConfiguration;
import org.apache.hadoop.hbase.HColumnDescriptor;
import org.apache.hadoop.hbase.HTableDescriptor;
import org.apache.hadoop.hbase.TableName;
import org.apache.hadoop.hbase.client.*;
import org.apache.hadoop.hbase.filter.BinaryComparator;
import org.apache.hadoop.hbase.filter.CompareFilter;
import org.apache.hadoop.hbase.filter.FamilyFilter;
import org.apache.hadoop.hbase.util.Bytes;
import org.junit.After;
import org.junit.Before;
import org.junit.Test;import java.io.IOException;
import java.util.ArrayList;/*** Unit test for simple App.*/
public class AppTest {private Connection connection = null;// 获取配置类private Configuration config = HBaseConfiguration.create();//创建连接@Beforepublic void init() throws IOException {// 给配置类添加配置config.set("hbase.zookeeper.quorum", "kb129");config.set("hbase.zookeeper.property.clientPort", "2181");// 获取连接connection = ConnectionFactory.createConnection(config);}//打印连接,测试连接@Testpublic void testConnection() throws IOException {System.out.println(connection);}//创建表@Testpublic void createTable() throws IOException {// 获取adminAdmin admin = connection.getAdmin();TableName tableName = TableName.valueOf("kb23:test2");/*HTableDescriptor desc = new HTableDescriptor(tableName);HColumnDescriptor family1 = new HColumnDescriptor("info");HColumnDescriptor family2 = new HColumnDescriptor("info2");desc.addFamily(family1);desc.addFamily(family2);*/// 获取descriptor的builderTableDescriptorBuilder tableDescriptorBuilder = TableDescriptorBuilder.newBuilder(tableName);// 添加列族ColumnFamilyDescriptor columnFamilyDescriptor1 = ColumnFamilyDescriptorBuilder.of("baseinfo");ColumnFamilyDescriptor columnFamilyDescriptor2 = ColumnFamilyDescriptorBuilder.of("schoolinfo");// 将单个列族的descriptor添加到builder中tableDescriptorBuilder.setColumnFamily(columnFamilyDescriptor1);tableDescriptorBuilder.setColumnFamily(columnFamilyDescriptor2);TableDescriptor descriptor = tableDescriptorBuilder.build();//创建表admin.createTable(descriptor);}//插入数据@Testpublic void putValue() throws IOException {// 1.获取tableTable table = connection.getTable(TableName.valueOf("kb23:test1"));// 2.创建Put对象Put put = new Put(Bytes.toBytes("liuxin"));// 3.添加put属性put.addColumn(Bytes.toBytes("info"), Bytes.toBytes("name"), Bytes.toBytes("刘鑫"));put.addColumn(Bytes.toBytes("info"), Bytes.toBytes("gender"), Bytes.toBytes("Male"));put.addColumn(Bytes.toBytes("info"), Bytes.toBytes("height"), Bytes.toBytes("180"));// 4.put数据table.put(put);// 5.关闭资源table.close();}//通过集合插入多条数据@Testpublic void putValueList() throws IOException {// 1.获取tableTable table = connection.getTable(TableName.valueOf("kb23:test1"));// 2.创建Put对象Put zs = new Put(Bytes.toBytes("zhangsan"));// 3.添加put属性zs.addColumn(Bytes.toBytes("info"), Bytes.toBytes("name"), Bytes.toBytes("张三"));zs.addColumn(Bytes.toBytes("info"), Bytes.toBytes("gender"), Bytes.toBytes("Female"));zs.addColumn(Bytes.toBytes("info"), Bytes.toBytes("height"), Bytes.toBytes("160"));Put ls = new Put(Bytes.toBytes("lisi"));// 3.添加put属性ls.addColumn(Bytes.toBytes("info"), Bytes.toBytes("name"), Bytes.toBytes("李四"));ls.addColumn(Bytes.toBytes("info"), Bytes.toBytes("gender"), Bytes.toBytes("Male"));ls.addColumn(Bytes.toBytes("info"), Bytes.toBytes("height"), Bytes.toBytes("180"));// 4.put数据ArrayList<Put> puts = new ArrayList<Put>();puts.add(zs);puts.add(ls);table.put(puts);// 5.关闭资源table.close();}@Testpublic void putValueMutator() throws IOException {BufferedMutatorParams bufferedMutatorParams = new BufferedMutatorParams(TableName.valueOf("kb23:test1 "));bufferedMutatorParams.setWriteBufferPeriodicFlushTimeoutMs(10000);//设置超时flush时间最大值bufferedMutatorParams.writeBufferSize(10*1024*1024);//设置缓存大小flushBufferedMutator bufferedMutator = connection.getBufferedMutator(bufferedMutatorParams) ;/*// 3.添加put属性Put zs = new Put(Bytes.toBytes("zhangsan"));zs.addColumn(Bytes.toBytes("info"), Bytes.toBytes("name"), Bytes.toBytes("张三"));zs.addColumn(Bytes.toBytes("info"), Bytes.toBytes("gender"), Bytes.toBytes("Female"));zs.addColumn(Bytes.toBytes("info"), Bytes.toBytes("height"), Bytes.toBytes("160"));Put ls = new Put(Bytes.toBytes("lisi"));// 3.添加put属性ls.addColumn(Bytes.toBytes("info"), Bytes.toBytes("name"), Bytes.toBytes("李四"));ls.addColumn(Bytes.toBytes("info"), Bytes.toBytes("gender"), Bytes.toBytes("Male"));ls.addColumn(Bytes.toBytes("info"), Bytes.toBytes("height"), Bytes.toBytes("180"));*/// 4.put数据ArrayList<Put> puts = new ArrayList<Put>();//puts.add(zs);//puts.add(ls);bufferedMutator.mutate(puts);}//删除数据@Testpublic void delete() throws IOException {// 1.获取tableTable table = connection.getTable(TableName.valueOf("kb23:test1"));//删除具体的列/*Delete delname = new Delete(Bytes.toBytes("lisi"));delname.addColumn(Bytes.toBytes("info"),Bytes.toBytes("name"));table.delete(delname);*///通过rowkey整个删除Delete lisi = new Delete(Bytes.toBytes("lisi"));table.delete(lisi);}//查询数据@Testpublic void getValue() throws IOException {// 1.获取tableTable table = connection.getTable(TableName.valueOf("kb23:test1"));// 2.获取Get对象Get zhangsan = new Get(Bytes.toBytes("zhangsan"));// 3. 获取resultResult result = table.get(zhangsan);byte[] name = result.getValue(Bytes.toBytes("info"), Bytes.toBytes("name"));byte[] gender = result.getValue(Bytes.toBytes("info"), Bytes.toBytes("gender"));byte[] height = result.getValue(Bytes.toBytes("info"), Bytes.toBytes("height"));System.out.println(Bytes.toString(name) + Bytes.toString(gender) + Bytes.toString(height));}//扫描数据@Testpublic void scanValue() throws IOException {// 1.获取tableTable table = connection.getTable(TableName.valueOf("kb23:test1"));// 2.创建Scan对象Scan scan = new Scan();// 3.扫描数据scan.addColumn(Bytes.toBytes("info"), Bytes.toBytes("name"));scan.addColumn(Bytes.toBytes("info"), Bytes.toBytes("gender"));scan.addColumn(Bytes.toBytes("info"), Bytes.toBytes("height"));ResultScanner scanner = table.getScanner(scan);// 4.获取结果for (Result result : scanner) {byte[] name = result.getValue(Bytes.toBytes("info"), Bytes.toBytes("name"));byte[] gender = result.getValue(Bytes.toBytes("info"), Bytes.toBytes("gender"));byte[] height = result.getValue(Bytes.toBytes("info"), Bytes.toBytes("height"));System.out.println(Bytes.toString(name) + Bytes.toString(gender) + Bytes.toString(height));}}//过滤器,查找数据@Testpublic void getFilterRowKey() throws IOException {TableName tableName = TableName.valueOf("kb23:student");Table table = connection.getTable(tableName);FamilyFilter familyFilter =new FamilyFilter(CompareFilter.CompareOp.EQUAL, new BinaryComparator(Bytes.toBytes("baseinfo")));Scan scan = new Scan();scan.setFilter(familyFilter);ResultScanner scanner = table.getScanner(scan);for (Result result : scanner) {byte[] name = result.getValue(Bytes.toBytes("baseinfo"), Bytes.toBytes("name"));byte[] age = result.getValue(Bytes.toBytes("baseinfo"), Bytes.toBytes("age"));byte[] birthday = result.getValue(Bytes.toBytes("baseinfo"), Bytes.toBytes("birthday"));System.out.println(Bytes.toString(name) + "\t" + Bytes.toString(age) + "\t" + Bytes.toString(birthday));System.out.println("----------------------");}}//关闭连接@Afterpublic void closeConnection() throws IOException {if (connection != null) {// 关闭连接connection.close();}}
}

5.3  写缓存  HBase客户端的批量写缓存BufferedMutator

HBase的每一个put操作实际上是一个RPC操作,将客户端的数据传输到服务器再返回结果,这只适用于小数据量的操作,如果数据量多的话,每次put都需要建立一次RPC的连接(TCP连接),而建立连接传输数据是需要时间的,因此减少RPC的调用可以提高数据传输的效率,减少建立连接的时间和IO消耗。

HBase的客户端API提供了写缓存区,put的数据一开始放在缓存区内,当数量到达指定的容量或者用户强制提交是才将数据一次性提交到HBase的服务器。这个缓冲区可以通过调用 HTable.setAutoFlush(false) 来开启。而新版HBbase的API中使用了BufferedMutator替换了老版的缓冲区,通过BufferedMutator对象提交的数据自动存放在缓冲区中。

BufferedMutator

通过获取 BufferedMutator 对象,并调用 mutator.mutate(List<Mutation> mutations) 方法来进行批量插入数据。可以使用 Put 类型的对象列表作为 mutations 参数进行插入。BufferedMutator 提供了自动管理缓冲区和写入操作的功能,可以提高插入数据的性能。

@Test
public void putValueMutator() throws IOException {BufferedMutatorParams bufferedMutatorParams = new BufferedMutatorParams(TableName.valueOf("kb23:test1 "));bufferedMutatorParams.setWriteBufferPeriodicFlushTimeoutMs(10000);//设置超时flush时间最大值bufferedMutatorParams.writeBufferSize(10*1024*1024);//设置缓存大小flushBufferedMutator bufferedMutator = connection.getBufferedMutator(bufferedMutatorParams) ;/*// 3.添加put属性Put zs = new Put(Bytes.toBytes("zhangsan"));zs.addColumn(Bytes.toBytes("info"), Bytes.toBytes("name"), Bytes.toBytes("张三"));zs.addColumn(Bytes.toBytes("info"), Bytes.toBytes("gender"), Bytes.toBytes("Female"));zs.addColumn(Bytes.toBytes("info"), Bytes.toBytes("height"), Bytes.toBytes("160"));Put ls = new Put(Bytes.toBytes("lisi"));// 3.添加put属性ls.addColumn(Bytes.toBytes("info"), Bytes.toBytes("name"), Bytes.toBytes("李四"));ls.addColumn(Bytes.toBytes("info"), Bytes.toBytes("gender"), Bytes.toBytes("Male"));ls.addColumn(Bytes.toBytes("info"), Bytes.toBytes("height"), Bytes.toBytes("180"));*/// 4.put数据ArrayList<Put> puts = new ArrayList<Put>();//puts.add(zs);//puts.add(ls);bufferedMutator.mutate(puts);
}

http://www.lryc.cn/news/169058.html

相关文章:

  • 关于不停机发布新版本程序的方式
  • MeterSphere压测,出现HttpHostConnectException
  • cherry-pick
  • opencv形状目标检测
  • k8s中无法获取到nginx-ingress的客户端真实ip地址x-forwarded-for
  • MySQL(4)索引实践(2)
  • Kafka【命令行操作】
  • springboot配置注入增强(二)属性注入的原理
  • Android 使用Camera1实现相机预览、拍照、录像
  • 2024字节跳动校招面试真题汇总及其解答(四)
  • 网页的快捷方式打开自动全屏--Chrome、Firefox 浏览器相关设置
  • LabVIEW使用ModbusTCP协议构建分布式测量系统
  • unity学习第1天
  • Spring Boot实现对文件进行压缩下载
  • Mac专用投屏工具AirServer 7 .27 for Mac中文免费激活版
  • LabVIEW使用巴特沃兹低通滤波器过滤噪声
  • 【Realtek sdk-3.4.14b】RTL8197FH-VG和RTL8812F自适应认证失败问题分析及修改
  • SpringBoot 的版本、打包、Maven
  • 不同类型程序的句柄研究
  • 【Godot】解决游戏中的孤立/孤儿节点及分析器性能问题的分析处理
  • 国家网络安全宣传周知识竞赛活动小程序界面分享
  • mysql的判断语句
  • ArcGIS Maps SDK for JavaScript系列之四:添加自定义底图
  • Learn Prompt-角色扮演
  • 《动手学深度学习 Pytorch版》 6.1 从全连接层到卷积
  • 六、数学建模之插值与拟合
  • 【项目经验】:elementui表格中数字汉字排序问题及字符串方法localeCompare()
  • Spring Boot的运行原理
  • xen-gic初始化流程
  • Docker从认识到实践再到底层原理(六-1)|Docker容器基本介绍+命令详解