Netty简易聊天室
文章目录
- 本文目的
- 参考说明
- 环境说明
- maven依赖
- 日志配置
- 单元测试
- 功能介绍
- 开发步骤
本文目的
- 通过一个简易的聊天室案例,讲述Netty的基本使用。同时分享案例代码。
- 项目中用到了log4j2,junit5,同时分享这些基础组件的使用。
- 项目中用到了awt,属于古董技术,只是用来做界面。非重点不用关注。
参考说明
本文内容主要来源于马士兵老师的视频教程(Java经典实战项目-坦克大战),结合了老师的讲课内容以及自己的实践做了一些补充。
环境说明
开发工具:idea2023,jdk:1.8,Maven:3.6.3
maven依赖
<?xml version="1.0" encoding="UTF-8"?>
<project xmlns="http://maven.apache.org/POM/4.0.0" xmlns:xsi="http://www.w3.org/2001/XMLSchema-instance"xsi:schemaLocation="http://maven.apache.org/POM/4.0.0 https://maven.apache.org/xsd/maven-4.0.0.xsd"><modelVersion>4.0.0</modelVersion><groupId>com.xxx</groupId><artifactId>xxx</artifactId><version>0.0.1-SNAPSHOT</version><name>xxx</name><properties><java.version>1.8</java.version></properties><dependencies><dependency><groupId>cn.hutool</groupId><artifactId>hutool-all</artifactId><version>5.8.21</version></dependency><dependency><groupId>org.projectlombok</groupId><artifactId>lombok</artifactId><version>1.18.28</version></dependency><!-- log4j2-slf4j-适配器 --><dependency><groupId>org.apache.logging.log4j</groupId><artifactId>log4j-slf4j-impl</artifactId><version>2.20.0</version></dependency><!-- log4j2 日志核心 --><dependency><groupId>org.apache.logging.log4j</groupId><artifactId>log4j-core</artifactId><version>2.20.0</version></dependency><dependency><groupId>io.netty</groupId><artifactId>netty-all</artifactId><version>4.1.96.Final</version></dependency><!-- 单元测试,Junit5 --><dependency><groupId>org.junit.jupiter</groupId><artifactId>junit-jupiter-engine</artifactId><version>5.9.3</version><scope>test</scope></dependency></dependencies><build><plugins><plugin><groupId>org.springframework.boot</groupId><artifactId>spring-boot-maven-plugin</artifactId></plugin></plugins></build></project>
日志配置
src/main/resources/log4j2.xml
<?xml version="1.0" encoding="UTF-8" ?>
<!-- log4j2配置文件 -->
<!-- monitorInterval="30" 自动加载配置文件的间隔时间,不低于10秒;生产环境中修改配置文件,是热更新,无需重启应用status="info" 日志框架本身的输出日志级别,可以修改为info, -->
<Configuration status="warn" monitorInterval="30"><!-- 集中配置属性,使用时通过:${LOG_HOME} --><properties><!-- 当前项目名称,供下方引用 --><property name="PROJECT_NAME" value="tank-battle"/><!-- 默认日志格式-包名自动缩减(同步异步通用) --><property name="LOG_PATTERN" value="%d{yyyy-MM-dd HH:mm:ss.SSS}|%-5level|%-5t|%logger{1.}: %msg%n"/><!-- 日志格式-打印代码的精确位置信息,类,方法,行。(建议同步使用)。异步如果打印位置信息,会有严重性能问题 --><property name="LOG_PATTERN_ALL" value="%d{yyyy-MM-dd HH:mm:ss.SSS}|%-5level|%-5t|%location: %msg%n"/><!-- 日志主目录。如果想把日志输出到tomcat底下时使用。 --><property name="LOG_HOME">${web:rootDir}/WEB-INF/logs</property></properties><!-- 日志打印输出方式 --><Appenders><Console name="STDOUT" target="SYSTEM_OUT"><PatternLayout charset="UTF-8" Pattern="${LOG_PATTERN}"/></Console><RollingFile name="FileLog" fileName="logs/${PROJECT_NAME}.log" filePattern="logs/${PROJECT_NAME}-%d_%i.log"><PatternLayout charset="UTF-8" Pattern="${LOG_PATTERN}"/><Policies><!-- 每天生成一个,同时如果超过10MB还会再生成 --><TimeBasedTriggeringPolicy/><SizeBasedTriggeringPolicy size="50 MB"/></Policies><DefaultRolloverStrategy max="99"/></RollingFile></Appenders><!-- 将代码路径与上面的日志打印关联起来 --><Loggers><!-- 当前项目日志 --><Logger name="com.sjj" level="INFO" additivity="false"><AppenderRef ref="STDOUT"/><AppenderRef ref="FileLog"/></Logger><!-- 第三方依赖项目日志 --><logger name="org.springframework" level="info"/><logger name="org.jboss.netty" level="warn"/><!--日志级别以及优先级排序: OFF > FATAL > ERROR > WARN > INFO > DEBUG > TRACE > ALL --><!-- 根节点日志,除了上面配置的之外的日志 --><Root level="WARN"><AppenderRef ref="STDOUT"/><AppenderRef ref="FileLog"/></Root></Loggers>
</Configuration>
单元测试
确认项目已加入Junit5依赖,就是如下这段。
<dependency><groupId>org.junit.jupiter</groupId><artifactId>junit-jupiter-engine</artifactId><version>5.9.3</version><scope>test</scope></dependency>
新建单元测试类的步骤。
- 在要创建单元测试的功能类上,依次点Code > generate > Test
- 然后在弹出的窗口中,选择Junit版本为5,测试类名,测试方法等。然后点确定。
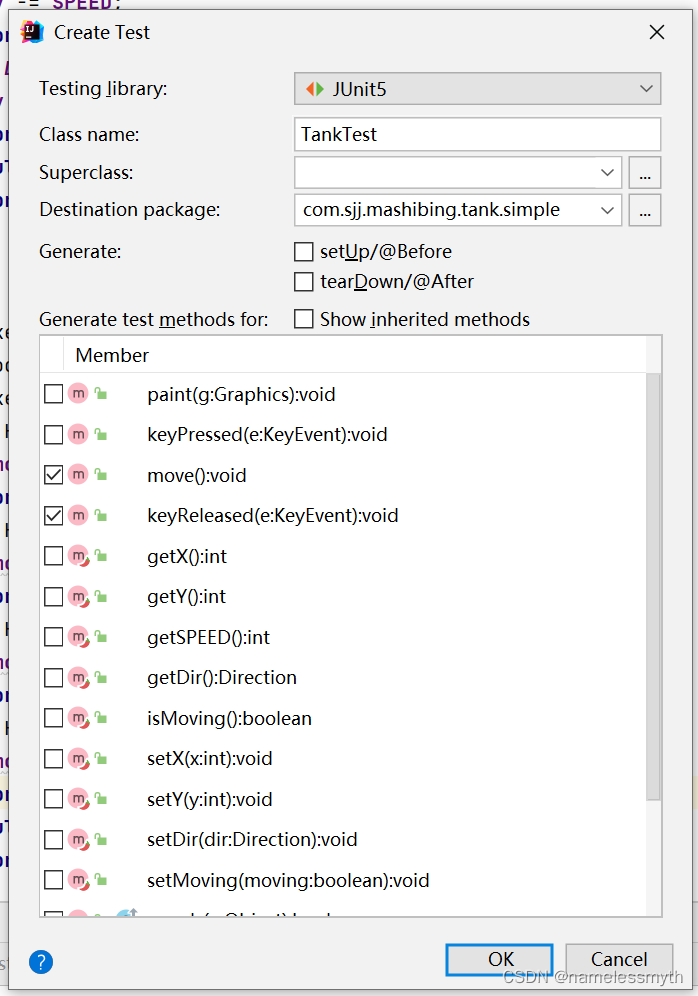
- IDEA会自动根据功能类的路径在test目录中创建相同路径但以Test结尾的测试类。并且会自动生成勾选方法的默认测试代码。
- 根据程序的输入和输出,编写单元测试代码。
- 点击方法左边的绿色三角形就可以执行单元测试用例了。
为什么要进行单元测试?
- 方法内部可以很复杂,如果靠肉眼观察,比较耗时间。单元测试可以根据入参和返回值测试方法是否达到要求。
- 代码是开发人员写的,最了解代码逻辑的还是开发人员。测试人员测试不到代码细节。
- 在一个大的功能中,可能会有很多方法,每个方法都要写Main方法来一个个测试比较复杂,而且也不知道测了哪些场景。
为什么有的公司不做单元测试。
- 代码业务可能比较简单,程序员读代码不是很费力。
- 写单元测试需要额外花时间,程序员工作比较忙,没时间写。
功能介绍
简易版聊天室程序。主要用于练习Netty的使用。聊天室功能如下:
- 聊天室支持多客户端,每个客户端都可以看到其他客户端的消息。
- 点击关闭按钮时,关闭当前客户端,同时在服务端的客户端列表中也删除。
- 系统UI非重点,一切从简。
开发步骤
-
首先写一个聊天室的界面(ChatFrame.java)
-
参考坦克大战的界面部分,设置好聊天室的长宽和坐标。
-
界面包含2个输入部分,中间文本域显示当前聊天室的所有聊天内容。底部文本框输入当前用户的聊天内容
-
聊天室窗口初始化时,需要与服务端建立连接。
-
当用户输入完聊天内容后回车,需要将聊天内容通过Netty客户端发送给服务端。
-
当用户关闭窗口时,关闭当前客户端,同时在服务端的客户端列表中也删除。
-
/*** 聊天室客户端-界面<br>** @author namelessmyth* @version 1.0* @date 2023/8/15*/
@Slf4j
public class ChatFrame extends Frame {public static final int GAME_WIDTH = ConfigUtil.getInt("chat.frame.width");public static final int GAME_HEIGHT = ConfigUtil.getInt("chat.frame.height");TextArea ta = new TextArea();TextField tf = new TextField();public static final ChatFrame INSTANCE = new ChatFrame();public static void main(String[] args) throws Exception {INSTANCE.setVisible(true);ChatClient.connect();}private ChatFrame() throws HeadlessException {//创建游戏的主Framethis.setTitle("chat room");this.setSize(GAME_WIDTH, GAME_HEIGHT);this.setLocation(800, 100);this.add(ta, BorderLayout.CENTER);this.add(tf, BorderLayout.SOUTH);tf.addActionListener(new ActionListener() {@Overridepublic void actionPerformed(ActionEvent e) {ChatClient.send(tf.getText());tf.setText("");}});this.addWindowListener(new WindowAdapter() {@Overridepublic void windowClosing(WindowEvent e) {ChatClient.close();System.exit(0);}});log.info("chat room Main frame initialization completed");}public void updateText(String text) {ta.setText(ta.getText() + Constants.LINE_SEPERATOR + text);}
}
-
-
编写Netty客户端与服务端进行消息通信(ChatClient.java)。
-
参考上面的描述,客户端需要实现如下方法。
- connect(),与服务端建立连接的方法
- send(),向服务端发送聊天消息的方法。
- channelRead,读取服务端信息更新客户端聊天内容方法
- 参考代码如下
-
@Slf4j
public class ChatClient {private static SocketChannel channel;/*** 与服务端建立连接的方法*/public static void connect() {EventLoopGroup group = new NioEventLoopGroup(1);try {Bootstrap b = new Bootstrap();b.group(group);b.channel(NioSocketChannel.class);b.handler(new ChannelInitializer<SocketChannel>() {@Overrideprotected void initChannel(SocketChannel ch) throws Exception {channel = ch;ch.pipeline().addLast(new MyClientHandler());}});ChannelFuture cf = b.connect("localhost", 8888).sync();//直到服务器被关闭,否则一直阻塞。cf.channel().closeFuture().sync();log.info("the chat client has been closed.");} catch (Exception e) {log.error("ChatClient.connect.Exception.", e);} finally {group.shutdownGracefully();}}/*** 向服务端发送聊天消息的方法* @param msg 聊天内容*/public static void send(String msg) {channel.writeAndFlush(Unpooled.copiedBuffer(msg.getBytes()));log.info("client.send().{}", msg);}/*** 关闭客户端方法,向服务端发送特定消息告知其删除本客户端。*/public static void close() {send("__88__");channel.close();}
}@Slf4j
class MyClientHandler extends ChannelInboundHandlerAdapter {/*** 读取服务端数据* @param msg 服务端数据*/@Overridepublic void channelRead(ChannelHandlerContext ctx, Object msg) throws Exception {ByteBuf buf = (ByteBuf) msg;String text = buf.toString(StandardCharsets.UTF_8);ChatFrame.INSTANCE.updateText(text);log.info("channelRead.msg:{}", text);}/*** 连接刚建立时的事件处理*/@Overridepublic void channelActive(ChannelHandlerContext ctx) throws Exception {log.info("connected to server.");}/*** 异常处理*/@Overridepublic void exceptionCaught(ChannelHandlerContext ctx, Throwable cause) throws Exception {log.error("chat client exceptionCaught:", cause);super.exceptionCaught(ctx, cause);}
}
-
-
聊天室服务端(ChatServer.java)。
-
服务端需要记录所有的客户端。(可能有多个)
-
当某个客户端发来消息之后,需要将消息转发给所有客户端。
-
当接收到特殊消息时(客户端关闭),需要将客户端从列表中移除。
-
@Slf4j public class ChatServer {static ChannelGroup clients = new DefaultChannelGroup(GlobalEventExecutor.INSTANCE);public static void main(String[] args) throws Exception {//总管线程组EventLoopGroup bossGroup = new NioEventLoopGroup(1);//接待员线程EventLoopGroup workerGroup = new NioEventLoopGroup(2);//服务器启动辅助类ServerBootstrap b = new ServerBootstrap();//放在第一位的是总管线程组,第二位的就是接待员线程组。b.group(bossGroup, workerGroup);//异步全双工b.channel(NioServerSocketChannel.class);//接收到客户端连接的处理,相当于BIO的acceptb.childHandler(new ChannelInitializer<SocketChannel>() {@Overrideprotected void initChannel(SocketChannel sc) throws Exception {log.info("a client connected:{}", sc);sc.pipeline().addLast(new MyChildHandler());}});b.bind(8888).sync();} }@Slf4j class MyChildHandler extends ChannelInboundHandlerAdapter {@Overridepublic void channelActive(ChannelHandlerContext ctx) throws Exception {ChatServer.clients.add(ctx.channel());}/*** 读取客户端通道内的数据* @param msg 客户端消息* @throws Exception*/@Overridepublic void channelRead(ChannelHandlerContext ctx, Object msg) throws Exception {ByteBuf buf = (ByteBuf) msg;String str = buf.toString(StandardCharsets.UTF_8);log.info("channelRead().input,string:{},buf:{}", str, buf);if (StrUtil.equalsIgnoreCase(str, "__88__")) {ChatServer.clients.remove(ctx.channel());ctx.close();log.info("The chat client has been closed:{}", ctx.channel());} else {ChatServer.clients.writeAndFlush(msg);log.info("ChatServer.clients.writeAndFlush:{}", msg);}}/*** 异常处理** @param ctx* @param cause* @throws Exception*/@Overridepublic void exceptionCaught(ChannelHandlerContext ctx, Throwable cause) throws Exception {log.error("exceptionCaught:", cause);ChatServer.clients.remove(ctx.channel());ctx.close();} } -
补充服务端关闭的处理(仅思路,未实现)。
- 通知客户端,服务器准备关闭。
- 拒绝新的连接接入
- 等待所有客户端都处理完成。
- 开始关闭流程,发送消息给客户端,客户端自动处理。
- 确认所有客户端断开。
- server保存现有的工作数据。
- 停止线程组
- 退出。
-
服务端UI
-
为了可以方便的看到所有客户端的连接情况和消息,以及后续进一步实现服务端的关闭效果考虑在服务端实现UI
-
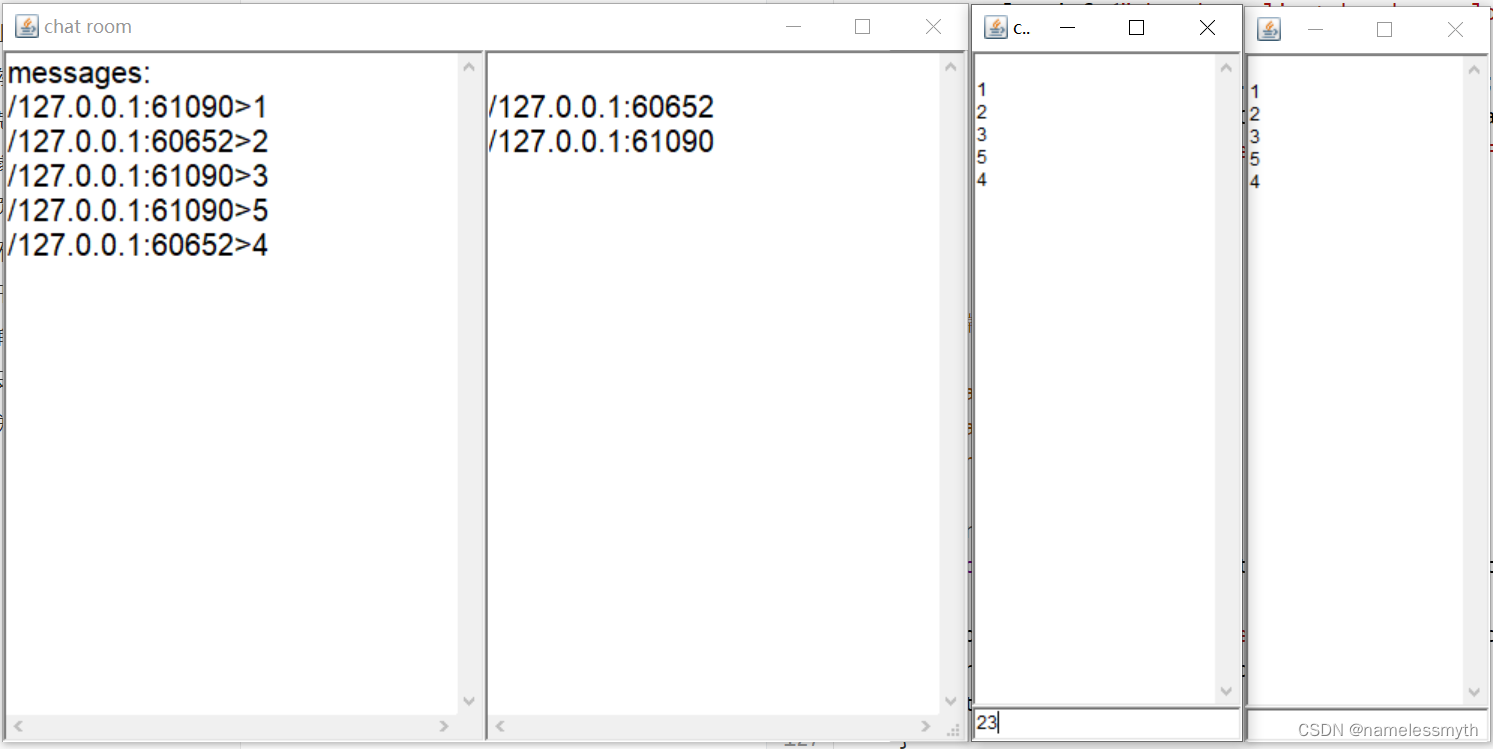
新增一个ServerFrame类,实现服务端UI,服务端左边显示消息,右边显示客户端的连接情况。
-
ServerFrame类初始化时自动启动服务端。服务端接收消息时打印到消息窗口中。
-
有客户端连上或者关闭时显示到右边的窗口中。
-
实现效果如下图
-
-
参考代码如下。(只需要修改服务端代码,客户端不变)
-
@Slf4j public class ServerFrame extends Frame {public static final int GAME_WIDTH = ConfigUtil.getInt("server.frame.width");public static final int GAME_HEIGHT = ConfigUtil.getInt("server.frame.height");TextArea tmsg = new TextArea("messages:");TextArea tclient = new TextArea("clients:");public static final ServerFrame INSTANCE = new ServerFrame();public static void main(String[] args) throws Exception {INSTANCE.setVisible(true);ChatServer.start();}private ServerFrame() throws HeadlessException {//创建游戏的主Framethis.setTitle("chat room");this.setSize(GAME_WIDTH, GAME_HEIGHT);this.setLocation(100, 100);tmsg.setFont(new Font("Calibri",Font.PLAIN,20));tclient.setFont(new Font("Calibri",Font.PLAIN,20));Panel p = new Panel(new GridLayout(1, 2));p.add(tmsg);p.add(tclient);this.add(p);this.addWindowListener(new WindowAdapter() {@Overridepublic void windowClosing(WindowEvent e) {System.exit(0);}});log.info("Server Main frame initialization completed");}public void updateMsg(String text) {tmsg.setText(tmsg.getText() + Constants.LINE_SEPERATOR + text);}public void updateClient(String text) {tclient.setText(tclient.getText() + Constants.LINE_SEPERATOR + text);} }@Slf4j public class ChatServer {static ChannelGroup clients = new DefaultChannelGroup(GlobalEventExecutor.INSTANCE);public static void start(){//总管线程组EventLoopGroup bossGroup = new NioEventLoopGroup(1);//接待员线程EventLoopGroup workerGroup = new NioEventLoopGroup(2);try {//服务器启动辅助类ServerBootstrap b = new ServerBootstrap();//放在第一位的是总管线程组,第二位的就是接待员线程组。b.group(bossGroup, workerGroup);//异步全双工b.channel(NioServerSocketChannel.class);//接收到客户端连接的处理,相当于BIO的acceptb.childHandler(new ChannelInitializer<SocketChannel>() {@Overrideprotected void initChannel(SocketChannel sc) throws Exception {log.info("a client connected:{}", sc);sc.pipeline().addLast(new MyChildHandler());}});log.info("chat server has been started");ChannelFuture cf = b.bind(8888).sync();cf.channel().closeFuture().sync();} catch (Exception e) {log.error("ChatServer.exception", e);} finally {bossGroup.shutdownGracefully();workerGroup.shutdownGracefully();log.info("chat server has been closed");}} }@Slf4j class MyChildHandler extends ChannelInboundHandlerAdapter {@Overridepublic void channelActive(ChannelHandlerContext ctx) throws Exception {ServerFrame.INSTANCE.updateClient("client connected:"+ctx.channel().remoteAddress());ChatServer.clients.add(ctx.channel());}/*** 读取客户端通道内的数据** @param msg 客户端消息* @throws Exception*/@Overridepublic void channelRead(ChannelHandlerContext ctx, Object msg) throws Exception {ByteBuf buf = (ByteBuf) msg;String str = buf.toString(StandardCharsets.UTF_8);log.info("channelRead().input,string:{},buf:{}", str, buf);if (StrUtil.equalsIgnoreCase(str, "__88__")) {ChatServer.clients.remove(ctx.channel());ctx.close();ServerFrame.INSTANCE.updateClient("client closed>"+ctx.channel().remoteAddress());log.info("The chat client has been closed:{}", ctx.channel());} else {ChatServer.clients.writeAndFlush(msg);ServerFrame.INSTANCE.updateMsg(ctx.channel().remoteAddress() + ">" + str);log.info("ChatServer.clients.writeAndFlush:{}", msg);}}/*** 异常处理** @param ctx* @param cause* @throws Exception*/@Overridepublic void exceptionCaught(ChannelHandlerContext ctx, Throwable cause) throws Exception {log.error("ChatServer.exceptionCaught:", cause);ChatServer.clients.remove(ctx.channel());ctx.close();} } -
启动顺序。先启动ServerFrame,然后启动ChatFrame,ChatFrame可以启动多个。
-
多个客户端发送消息都会在服务端显示。
-
-