概览
脚手架:
目录:

用例代码:
"""
测试登录到下单流程,需要先启动后端服务
"""test_data = {"查询SKU": {"skuName": "电子书"},"添加购物车": {"skuId": 123,"skuNum": 2},"下单": {"orderId": 222,"payAmount": "0.2"},"支付": {"skuId": 123,"price": 0.1,"skuNum": 2,"totalPrice": 0.2},
}
case_vars = dict()def test(http, login_headers, file_data):# 搜索商品url = file_data["domain"] + "/api/tasks/mock/searchSku"body = test_data["查询SKU"]response = http("get", url=url, headers=login_headers, params=body)assert response.status_code < 400case_vars["skuId"] = response.jsonpath("$.skuId")case_vars["skuPrice"] = response.jsonpath("$.price")# 添加购物车url = file_data["domain"] + "/api/tasks/mock/addCart"body = test_data["添加购物车"]body["skuId"] = case_vars["skuId"]response = http("post", url=url, headers=login_headers, json=body)assert response.status_code < 400case_vars["skuNum"] = response.jsonpath("$.skuNum")case_vars["totalPrice"] = response.jsonpath("$.totalPrice")# 下单url = file_data["domain"] + "/api/tasks/mock/order"body = test_data["下单"]body["skuId"] = case_vars["skuId"]body["price"] = case_vars["skuPrice"]body["skuNum"] = case_vars["skuNum"]body["totalPrice"] = case_vars["totalPrice"]response = http("post", url=url, headers=login_headers, json=body)assert response.status_code < 400case_vars["orderId"] = response.jsonpath("$.orderId")# 支付url = file_data["domain"] + "/api/tasks/mock/pay"body = test_data["支付"]body["orderId"] = case_vars["orderId"]response = http("post", url=url, headers=login_headers, json=body)assert response.status_code < 400assert response.jsonpath("$.success") == "true"
页面下载脚手架
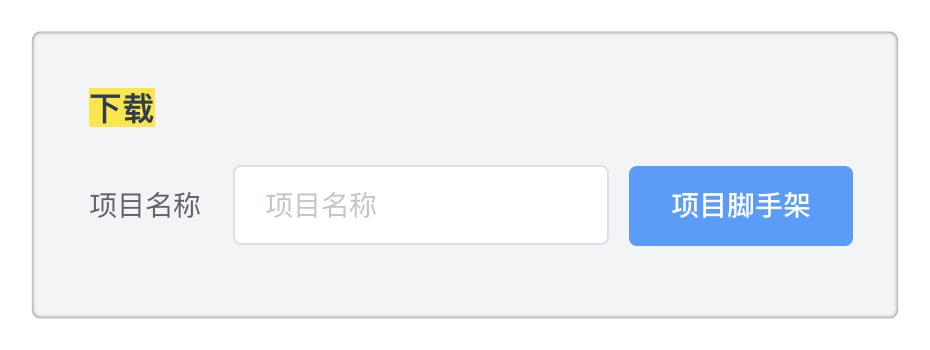
启动平台前后端服务后,从页面下载脚手架,平台会拉取开源项目tep-project最新代码,打成压缩包,生成下载文件,弹窗下载。
备注:tep startproject demo使用的已封版的1.0.0版本,新框架请访问开源项目tep-project,或者开源平台pytestx
精简目录
目录直观上非常精简,得益于去掉了环境变量、函数等目录,聚焦三大目录:
-
fixtures
-
resources
-
tests
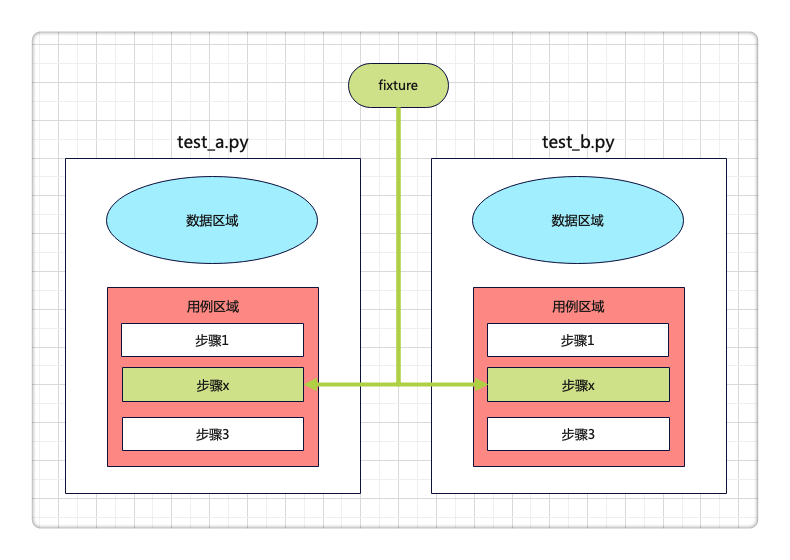
重度使用fixture
fixture原本只能在conftest定义,借助pytest插件扩展识别fixtures目录:
#!/usr/bin/python
# encoding=utf-8"""
@Author  :  dongfanger
@Date    :  8/14/2020 9:16 AM
@Desc    :  插件
"""
import osBASE_DIR = os.path.dirname(os.path.abspath(__file__))
RESOURCE_PATH = os.path.join(BASE_DIR, "resources")def fixture_paths():"""fixture路径,1、项目下的fixtures;2、tep下的fixture;:return:"""_fixtures_dir = os.path.join(BASE_DIR, "fixtures")paths = []# 项目下的fixturesfor root, _, files in os.walk(_fixtures_dir):for file in files:if file.startswith("fixture_") and file.endswith(".py"):full_path = os.path.join(root, file)import_path = full_path.replace(_fixtures_dir, "").replace("\\", ".")import_path = import_path.replace("/", ".").replace(".py", "")paths.append("fixtures" + import_path)return pathspytest_plugins = fixture_paths()  # +[其他插件]
conftest.py的fixture全部转移至fixtures目录定义。
公共函数消失,统统通过fixture来实现,依赖注入。
包括requests.request封装
#!/usr/bin/python
# encoding=utf-8import decimal
import json
import timeimport jsonpath
import pytest
import requests
import urllib3
from loguru import logger
from requests import Responseurllib3.disable_warnings(urllib3.exceptions.InsecureRequestWarning)class TepResponse(Response):"""二次封装requests.Response,添加额外方法"""def __init__(self, response):super().__init__()for k, v in response.__dict__.items():self.__dict__[k] = vdef jsonpath(self, expr):"""此处强制取第一个值,便于简单取值如果复杂取值,建议直接jsonpath原生用法"""return jsonpath.jsonpath(self.json(), expr)[0]@pytest.fixture(scope="session")
def http():def inner(method, url, **kwargs):template = """\nRequest URL: {}Request Method: {}Request Headers: {}Request Payload: {}Status Code: {}Response: {}Elapsed: {}"""start = time.process_time()response = requests.request(method, url, **kwargs)  # requests.request原生用法end = time.process_time()elapsed = str(decimal.Decimal("%.3f" % float(end - start))) + "s"headers = kwargs.get("headers", {})kwargs.pop("headers")payload = kwargslog = template.format(url, method, json.dumps(headers), json.dumps(payload), response.status_code,response.text,elapsed)logger.info(log)return TepResponse(response)return inner
只是名字换成了http:
http("post", url=url, headers=login_headers, json=body)因为request是fixture保留关键字。
数据分离
数据支持从文件读取,当然这也是一个fixture:
import json
import osimport pytest
import yamlfrom conftest import RESOURCE_PATHclass Resource:def __init__(self, path):self.path = pathdef get_data(self):file_type = self._get_file_type()if file_type in [".yml", ".yaml", ".YML", "YAML"]:return self._get_yaml_file_data()if file_type in [".json", ".JSON"]:return self._get_json_file_data()def _get_file_type(self):return os.path.splitext(self.path)[-1]def _get_yaml_file_data(self):with open(self.path, encoding="utf8") as f:return yaml.load(f.read(), Loader=yaml.FullLoader)def _get_json_file_data(self):with open(self.path, encoding="utf8") as f:return json.load(f)@pytest.fixture(scope="session")
def file_data():file_path = os.path.join(RESOURCE_PATH, "demo.yaml")return Resource(file_path).get_data()也可以放在用例文件中。为什么?“只改数据不动用例代码”,如果没有这种情况,请毫不犹豫将数据放到用例文件中,不要从excel、yaml读取数据,增加无意义的中间转换。从流量回放替代自动化的趋势来看,数据和用例作为整体来维护和运行,会越来越普遍。在使用低代码平台时,测试数据也是写在用例里面,只有少量的公共信息,会抽出来作为变量。测试技术在发展,只有符合当前实际使用需要的,才是最好的。
用例设计
约定大于配置:
-
数据区域、用例区域分离
-
用例由步骤组成
-
步骤分为前置条件、用例体、断言、数据提取
数据区域,接口入参、用例中间变量等:
test_data = {"查询SKU": {"skuName": "电子书"},"添加购物车": {"skuId": 123,"skuNum": 2},"下单": {"orderId": 222,"payAmount": "0.2"},"支付": {"skuId": 123,"price": 0.1,"skuNum": 2,"totalPrice": 0.2},
}
case_vars = dict()
用例定义,test函数,fixture引用:
def test(http, login_headers, file_data):步骤:
# 搜索商品
url = file_data["domain"] + "/api/tasks/mock/searchSku"
body = test_data["查询SKU"]response = http("get", url=url, headers=login_headers, params=body)
assert response.status_code < 400case_vars["skuId"] = response.jsonpath("$.skuId")
case_vars["skuPrice"] = response.jsonpath("$.price")每个用例文件单独可运行。不存在用例依赖,复用步骤封装为fixture,以依赖注入方式在各用例中复用。用例一定要解耦,这在任务调度时非常重要。
总结,重新定义目录,重新定义用例组织,重新定义fixture,减少过程代码,专注于用例编写,轻松上手pytest。
跟着pytestx学习接口自动化框架设计,更简单,更稳定,更高效。
https://github.com/dongfanger/pytestx
https://gitee.com/dongfanger/tep-project