前端基础(Vue的模块化开发)
目录
前言
响应式基础 ref reactive
学习成果展示
Vue项目搭建
总结
前言
前面学习了前端HMTL、CSS样式、JavaScript以及Vue框架的简单适用,接下来运用前面的基础继续学习Vue,运用前端模块化编程的思想。
响应式基础 ref reactive
关于ref和reactive,官方解释如下,另外一篇博客写得也很清楚
响应式基础 | Vue.js (vuejs.org)
谈谈Vue3中的ref和reactive_vue reactive_七公子77的博客-CSDN博客
学习成果展示
不用vue框架写一个table
<!DOCTYPE html>
<html lang="en">
<head><meta charset="UTF-8"><meta name="viewport" content="width=device-width, initial-scale=1.0"><title>测试用例管理平台</title><script src="https://unpkg.com/vue@3/dist/vue.global.js"></script>
</head><body><div calss="table" style="display: inline-block"><h2>测试用例</h2><button class="add-case-button" @click="isEdit=true">新增用例</button><table border="2"><col style="width: 100px; overflow: hidden; text-overflow: ellipsis" /><col style="width: 100px" /><col style="width: 100px" /><col style="width: 100px" /><col style="width: 100px" /><tr><th>用例名</th><th>步骤名</th><th>关键字</th><th>参数1</th><th>参数2</th><th>操作</th></tr><tr><td>参数正确登录成功</td><td>输入正确的参数登录成功</td><td>用户名 密码</td><td>用户名</td><td>密码</td><td><button>删除</button></td></tr><tr><td>参数错误登录失败</td><td>输入错误的参数登录失败</td><td>用户名 密码</td><td>用户名</td><td>密码</td><td><button>删除</button></td></tr><tr><td>参数为空登录失败</td><td>输入的参数为空登录失败</td><td>用户名 密码</td><td>用户名</td><td>密码</td><td><button>删除</button></td></tr></col></table></div>
</body></html>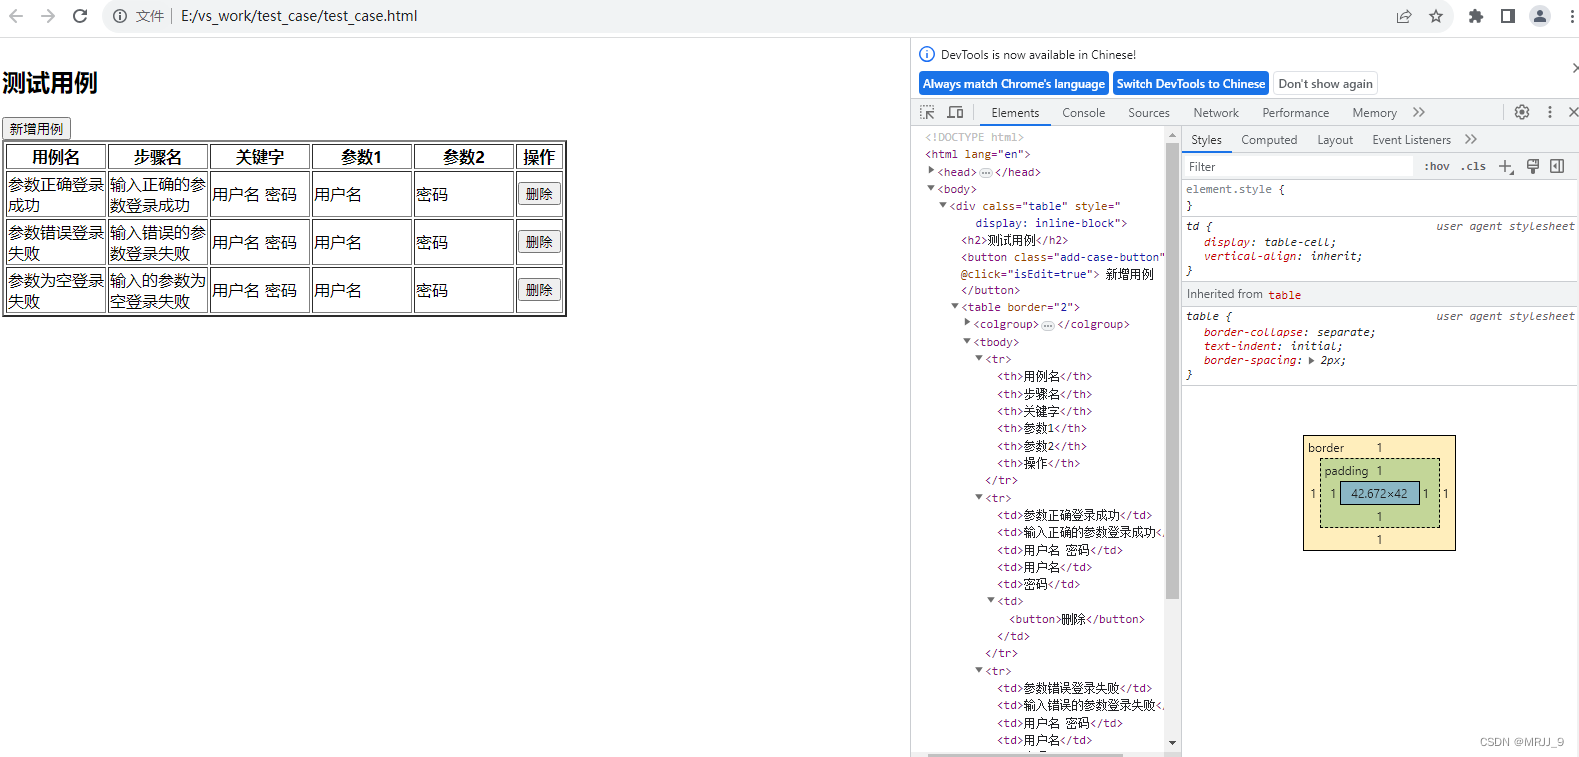
上面的实现方式用到了很多个th、td标签,维护很麻烦,那有没有更好的解决方法?
如何用vue框架实现?
用v-for,遍历数组中的元素,进行列表的渲染。
关键两行代码:
取列表的表头,表头名称前加上编号,编号从1开始
<th v-for="(Name,key,index) in tableName " :key="key">{{index+1}}{{Name}}</th>
取列表里具体的内容
<tr v-for="testCase in testCases" >
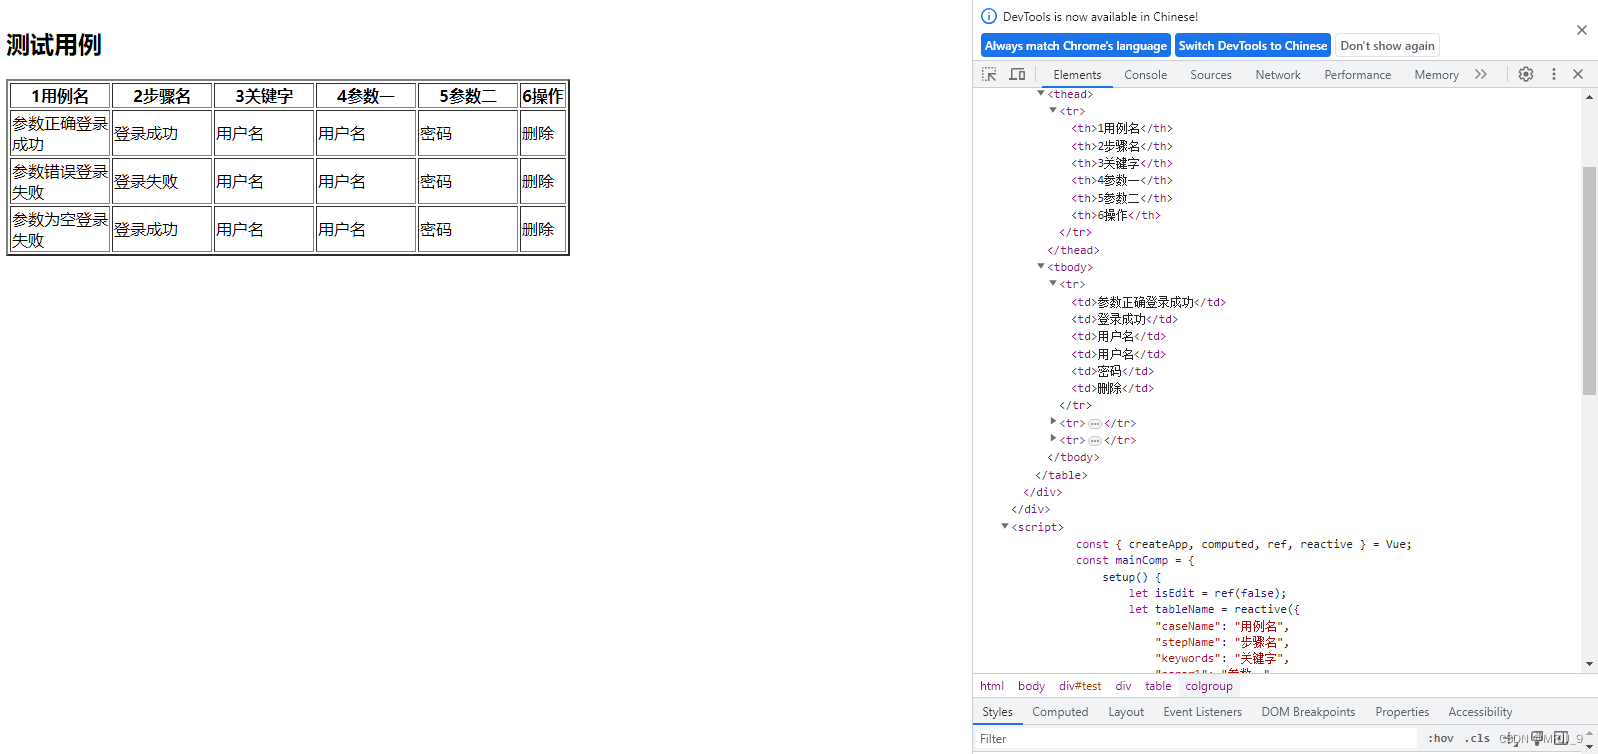
如果要修改表头、列表里内容,不需要在标签里一个一个改,只需要去维护tableName、testCases里的值即可。是不是很省劲!
<!DOCTYPE html>
<html lang="en"><head><meta charset="UTF-8"><meta name="viewport" content="width=device-width, initial-scale=1.0"><title>测试用例管理平台</title><script src="https://unpkg.com/vue@3/dist/vue.global.js"></script>
</head><body><div id="test"><div calss="table" style="display: inline-block"><h2>测试用例</h2><table border="2"><col style="width: 100px; overflow: hidden; text-overflow: ellipsis" /><col style="width: 100px" /><col style="width: 100px" /><col style="width: 100px" /><col style="width: 100px" /><thead><tr><th v-for="(Name,key,index) in tableName " :key="key">{{index+1}}{{Name}}</th></tr></thead><tbody><tr v-for="testCase in testCases"><td>{{testCase.caseName}}</td><td>{{testCase.stepName}}</td><td>{{testCase.keywords}}</td><td>{{testCase.param1}}</td><td>{{testCase.param2}}</td><td>{{testCase.opration}}</td></tr></tbody></table></div></div><script>const { createApp, computed, ref, reactive } = Vue;const = MRJJ{setup() {let tableName = reactive({"caseName": "用例名","stepName": "步骤名","keywords": "关键字","param1": "参数一","param2": "参数二","opration": "操作",})let testCases = ref([{"id": 1,"caseName": "参数正确登录成功","stepName": "登录成功","keywords": "用户名","param1": "用户名","param2": "密码","opration": "删除"},{"id": 2,"caseName": "参数错误登录失败","stepName": "登录失败","keywords": "用户名","param1": "用户名","param2": "密码","opration": "删除"},{"id": 3,"caseName": "参数为空登录失败","stepName": "登录成功","keywords": "用户名","param1": "用户名","param2": "密码","opration": "删除"},])return { tableName, testCases }}};createApp(MRJJ).mount('#test');</script>
</body></html>
可以看到td标签里的内容自动取出来了。
踩坑记录:
createApp(MRJJ).mount('#test');
id为test这个div标签里的内容,才能引用MRJJ里面的方法。
结合前面的内容,最终写出来的页面!
<!DOCTYPE html>
<html lang="en"><head><meta charset="UTF-8"><meta name="viewport" content="width=device-width, initial-scale=1.0"><title>测试用例管理平台</title><script src="https://unpkg.com/vue@3/dist/vue.global.js"></script>
</head>
<header id="title">欢迎来到MRJJ_9的自动化测试平台
</header>
<body><div class="learn-website"><h3>前端学习网站</h3><a class="biglink" href="https://www.w3school.com.cn/html/index.asp">w3school.com</a></br><a href="https://developer.mozilla.org/zh-CN/docs/Web/HTML">MDN 社区</a></br><a class="test01" href="https://www.csdn.net">CSDN社区</a></br><h3>本人博客</h3><a href="https://blog.csdn.net/mrjj_9/category_12393537.html">前端学习博客</a></div><div id="test"><div class="form" style="display: inline-block"><h2 id="form-title">添加测试用例</h2><!-- <button class="close-button" @click="isEdit=false">关闭</button> --><label>用例名:<input type="text" placeholder="输入测试用例名称" name="caseName" v-model="newCase.caseName"></label><label>步骤名:<input type="text" placeholder="输入测试步骤名称" name="stepName" v-model="newCase.stepName"></label><div>请选择用例类型:<label><input type="radio" name="type" value="api">接口自动化</label><label><input type="radio" name="type" value="ui">UI自动化<br></label></div><label for="keywords">关键字:</label><select name="keywords" v-model="newCase.keywords"><option value="openBrowser">打开浏览器</option><option value="params">传入必传参数</option></select></br><lable>参数一:<input type="text" name="param1" v-model="newCase.param1"></lable><lable>参数二:<input type="text" name="param2" v-model="newCase.param2"></lable></br><button id="addSubmit" type="button" @click="addCase">提交新增</button></form></div><div calss="table" style="display: inline-block"><h2>测试用例</h2><table border="2"><col style="width: 100px; overflow: hidden; text-overflow: ellipsis" /><col style="width: 100px" /><col style="width: 100px" /><col style="width: 100px" /><col style="width: 100px" /><thead><tr><th v-for="(Name,key,index) in tableName " :key="key">{{index+1}}{{Name}}</th></tr></thead><tbody><tr v-for="testCase in testCases"><td>{{testCase.caseName}}</td><td>{{testCase.stepName}}</td><td>{{testCase.keywords}}</td><td>{{testCase.param1}}</td><td>{{testCase.param2}}</td><td><button id="delete" @click="deleteCase(testCase)">删除</button></td></tr></tbody></table></div></div><script>const { createApp, computed, ref, reactive } = Vue;const MRJJ = {setup() {let tableName = reactive({"caseName": "用例名","stepName": "步骤名","keywords": "关键字","param1": "参数一","param2": "参数二","opration": "操作",})let testCases = ref([{"id": 1,"caseName": "参数正确登录成功","stepName": "登录成功","keywords": "用户名","param1": "用户名","param2": "密码","opration": "删除"},{"id": 2,"caseName": "参数错误登录失败","stepName": "登录失败","keywords": "用户名","param1": "用户名","param2": "密码","opration": "删除"},{"id": 3,"caseName": "参数为空登录失败","stepName": "登录成功","keywords": "用户名","param1": "用户名","param2": "密码","opration": "删除"},])let newCase = reactive({"caseName": "用例名","stepName": "步骤名","keywords": "关键字","param1": "参数一","param2": "参数二",})let isCaseName = ref(true);function deleteCase(testCase) {console.log("要删除的用例是:", testCase)testCases.value.splice(testCases.value.indexOf(testCase), 1);}function addCase() {let lastId = testCases.value[testCases.value.length - 1].id;console.log(lastId);let addCase = { ...newCase };addCase.id = lastId + 1;testCases.value.push(addCase);isEdit.value = false;}return { tableName, testCases, newCase, addCase, deleteCase}}};createApp(MRJJ).mount('#test');</script><link rel="stylesheet" href="case.css"><style>body {background: aliceblue;background-image: url("./picture.jpg");background-size: 60vw;background-position: 10% 10%;}</style>
</body>
</html>
Vue项目搭建
npm init vue
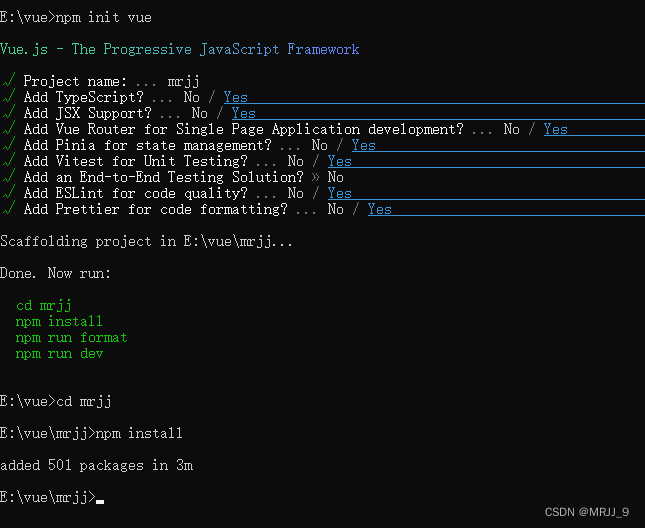
创建的项目结构, 在本地将项目启动起来,进入工程目录,打开终端,输入命令:npm run dev
 本地启动完成的项目

vue插件安装必备,推荐看下面的这篇博客
开发vue3必备的几个vscode插件,你用上了吗?-腾讯云开发者社区-腾讯云 (tencent.com)
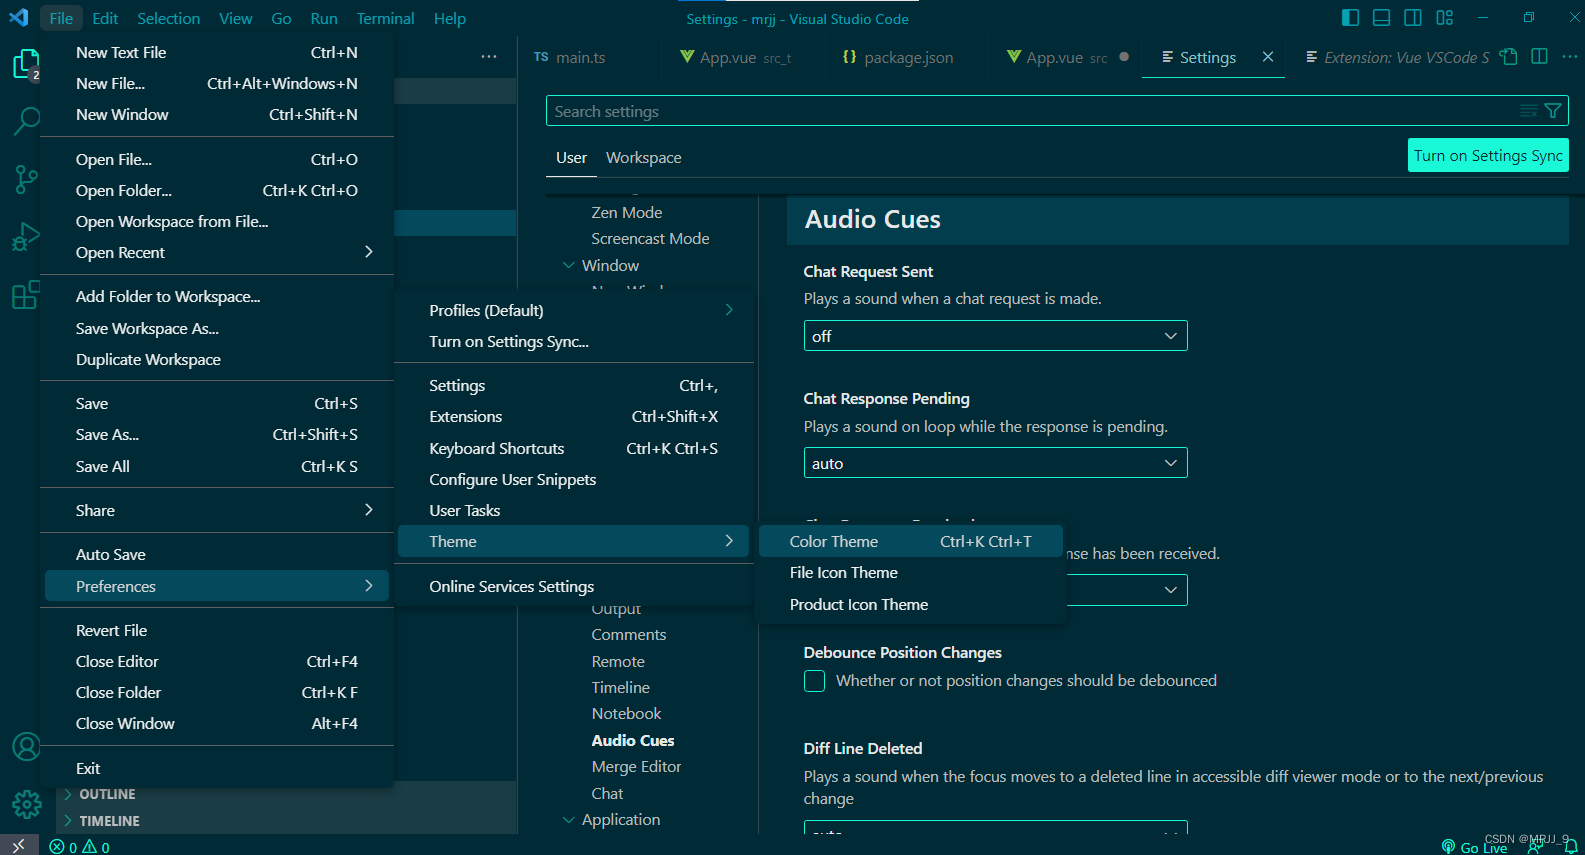
vs code切换主题,File->preferences-Theme