【基础】Flink -- ProcessFunction
Flink -- ProcessFunction
- 处理函数概述
- 处理函数
- 基本处理函数 ProcessFunction
- 按键分区处理函数 KeyedProcessFunction
- 定时器与定时服务
- 基于处理时间的分区处理函数
- 基于事件时间的分区处理函数
- 窗口处理函数 ProcessWindowFunction
- 应用案例 -- Top N
处理函数概述
为了使代码拥有更强大的表现力和易用性,Flink 本身提供了多层 API 供我们选择,如下图所示。之前我们所学习的转换、聚合以及窗口函数等操作,都是基于 Flink 核心的 DataStream API 实现的。

在更底层,Flink 允许我们可以不定义任何具体的算子,而是提炼出了一个统一的处理操作。在这个处理函数中,我们可以对数据进行更加灵活的定制化的处理,其不限定我们具体要做什么,因此在理论再说我们可以实现任何操作。
本文用到的实体类代码以及源算子代码如下:
实体类 Event
@Data
@AllArgsConstructor
@NoArgsConstructor
public class Event {public String user;public String url;public Long timestamp;}
源算子 EventSource
public class EventSource implements SourceFunction<Event> {private Boolean flag = true;String[] users = {"曹操", "刘备", "孙权", "诸葛亮"};String[] urls = {"/home", "/test?id=1", "/test?id=2", "/play/football", "/play/basketball"};@Overridepublic void run(SourceContext<Event> sourceContext) throws Exception {Random random = new Random();while (flag) {sourceContext.collect(new Event(users[random.nextInt(users.length)],urls[random.nextInt(urls.length)],Calendar.getInstance().getTimeInMillis()));Thread.sleep(1000);}}@Overridepublic void cancel() {flag = false;}
}
处理函数
Flink 提供了 8 个不同的处理函数:
-
ProcessFunction:最基本的处理函数,基于DataStream调用process()并将该处理函数作为参数传入; -
KeyedProcessFunction:对按键分区后的流的处理函数,基于KeyedStream调用process()并将该处理函数作为参数传入; -
ProcessWindowFunction:开窗操作之后的处理函数,也是全窗口函数的代表,基于WindowedStream调用process()并将该处理函数作为参数传入; -
ProcessAllWindowFunction:开窗操作之后的处理函数,基于AllWindowedStream调用process()并将该处理函数作为参数传入; -
CoProcessFunction:合并两条流之后的处理函数,基于ConnectedStreams调用process()并将该处理函数作为参数传入; -
ProcessJoinFunction:间接连接两条流之后的处理函数,基于IntervalJoined调用process()并将该处理函数作为参数传入; -
BroadcastProcessFunction:广播连接流处理函数,基于BroadcastConnectedStream调用process()并将该处理函数作为参数传入; -
KeyedBroadcastProcessFunction:基于按键分区的广播连接流的处理函数,基于BroadcastConnectedStream调用process()并将该处理函数作为参数传入;
基本处理函数 ProcessFunction
使用基本处理函数需要我们实例化抽象类ProcessFunction,其内部定义了两个抽象方法:
-
processElement():必须实现,用于处理元素。其传入的三个参数如下-
value:当前正在被处理的元素,类型与流中的数据类型一致;
-
ctx:内部抽象类,代表当前正在运行的上下文,可以获取当前时间戳,并提供了用于查询时间和注册定时器的“定时服务”,以及可以将数据发送到“侧输出流” 的方法
output(); -
out:用于返回输出数据;
-
-
onTimer():用于定义定时触发的操作,其同样需要传入三个参数-
timestamp:设定好的时间,在事件时间语义下即水位线;
-
ctx:运行上下文;
-
out:用于返回输出数据;
-
处理函数都是基于事件触发的。水位线就如同插入流中的一条数据一样。只不过处理真正的数据事件调用的是processElement()方法,而处理水位线事件调用的是onTimer()。
基本处理函数的基本使用代码如下:
public class ProcessFunctionDemo {public static void main(String[] args) throws Exception {// 1. 环境准备StreamExecutionEnvironment environment = StreamExecutionEnvironment.getExecutionEnvironment();environment.setRuntimeMode(RuntimeExecutionMode.AUTOMATIC);environment.setParallelism(1);// 2. 加载数据源并设置水位线environment// 2.1 加载数据源.addSource(new EventSource())// 2.2 获取时间戳、设置水位线.assignTimestampsAndWatermarks(WatermarkStrategy.<Event>forMonotonousTimestamps().withTimestampAssigner((SerializableTimestampAssigner<Event>) (event, l) -> event.timestamp))// 2.3 设置处理函数.process(new ProcessFunction<Event, String>() {@Overridepublic void processElement(Event event, ProcessFunction<Event, String>.Context context, Collector<String> collector) throws Exception {if ("曹操".equals(event.user)) {collector.collect(event.user + ">>>说曹操曹操到...");} else if ("刘备".equals(event.user)) {collector.collect(event.user + ">>>不可能,我二弟天下无敌!");} else {collector.collect("无关人等~");}System.out.println(longToDate(context.timerService().currentWatermark()));}})// 2.4 执行输出.print();// 3. 执行程序environment.execute();}/*** long类型转换成日期** @param lo 毫秒数* @return String yyyy-MM-dd HH:mm:ss*/public static Date longToDate(long lo) throws ParseException {SimpleDateFormat sd = new SimpleDateFormat("yyyy-MM-dd HH:mm:ss");//long转Datereturn new SimpleDateFormat("yyyy-MM-dd HH:mm:ss").parse(sd.format(new Date(lo)));}}
按键分区处理函数 KeyedProcessFunction
定时器与定时服务
定时器 Timer 是处理函数当中进行时间相关的操作的主要机制,在onTimer()方法中可以自定义定时器触发的逻辑。而定时器触发的前提是该定时器已经注册且当前已经到达了触发时间。定时器的注册通过上下文提供的定时服务 TimerService 实现。
定时服务与当前运行环境有关,上下文 context 提供了timerService()方法可以直接获取TimerService对象。TimerService类中定义了关于时间和定时器的基础服务接口,主要包含以下 6 个方法:
// 获取当前的处理时间
long currentProcessingTime();
// 获取当前的水位线(事件时间)
long currentWatermark();
// 注册处理时间定时器,当处理时间超过 time 时触发
void registerProcessingTimeTimer(long time);
// 注册事件时间定时器,当水位线超过 time 时触发
void registerEventTimeTimer(long time);
// 删除触发时间为 time 的处理时间定时器
void deleteProcessingTimeTimer(long time);
// 删除触发时间为 time 的事件时间定时器
void deleteEventTimeTimer(long time);
这些方法总体上可以分为两大类,根据定义的时间语义的不同,分为基于处理时间的和基于事件时间的。对应的操作主要有三个,即获取当前时间、注册定时器、删除定时器。
基于处理时间的分区处理函数
基本使用代码如下,详细步骤见代码注释:
public class ProcessingTimeTimerDemo {public static void main(String[] args) throws Exception {// 1. 环境准备StreamExecutionEnvironment environment = StreamExecutionEnvironment.getExecutionEnvironment();environment.setRuntimeMode(RuntimeExecutionMode.AUTOMATIC);environment.setParallelism(1);// 2. 加载数据源并设置水位线environment// 2.1 加载数据源.addSource(new EventSource())// 处理时间语义,不需要分配时间戳和 watermark// 2.2 按键分区,这里将所有数据分配到同一区// 使用定时器,必须基于 KeyedStream.keyBy(event -> true)// 2.3 设置按键分区处理函数.process(new KeyedProcessFunction<Boolean, Event, Object>() {@Overridepublic void processElement(Event event, KeyedProcessFunction<Boolean, Event, Object>.Context context, Collector<Object> collector) throws Exception {long currTs = context.timerService().currentProcessingTime();collector.collect("数据到达,到达时间>>>" + new Timestamp(currTs));// 注册一个 10 秒后的定时器context.timerService().registerProcessingTimeTimer(currTs + 10 * 1000L);}@Overridepublic void onTimer(long timestamp, KeyedProcessFunction<Boolean, Event, Object>.OnTimerContext ctx, Collector<Object> out) throws Exception {out.collect("定时器触发,触发时间>>>" + new Timestamp(timestamp));}})// 2.4 执行打印.print();// 3. 执行程序environment.execute();}}
基于事件时间的分区处理函数
基本使用代码如下,详细步骤见代码注释:
public class EventTimeTimerDemo {public static void main(String[] args) throws Exception {// 1. 环境准备StreamExecutionEnvironment environment = StreamExecutionEnvironment.getExecutionEnvironment();environment.setRuntimeMode(RuntimeExecutionMode.AUTOMATIC);environment.setParallelism(1);// 2. 加载数据源并设置水位线environment// 2.1 加载数据源.socketTextStream("XXX.XX.XX.XXX", 8080)// 2.2 对数据源进行简单处理,封装成对象.map(new MapFunction<String, Event>() {@Overridepublic Event map(String s) throws Exception {String[] split = s.split(",");return new Event(split[0].trim(),split[1].trim(),Long.valueOf(split[2].trim()));}})// 2.3 获取时间戳、设置水位线.assignTimestampsAndWatermarks(WatermarkStrategy.<Event>forMonotonousTimestamps().withTimestampAssigner((SerializableTimestampAssigner<Event>) (event, l) -> event.timestamp))// 2.4 设置按键分区处理函数.keyBy(event -> true)// 2.5 设置处理函数.process(new KeyedProcessFunction<Boolean, Event, String>() {@Overridepublic void processElement(Event event, KeyedProcessFunction<Boolean, Event, String>.Context context, Collector<String> collector) throws Exception {collector.collect("数据到达,时间戳>>>" + context.timestamp());collector.collect("数据到达,水位线>>>" + context.timerService().currentWatermark());// 注册一个 10 秒后的定时器context.timerService().registerEventTimeTimer(context.timestamp() + 10 * 1000L);}@Overridepublic void onTimer(long timestamp, KeyedProcessFunction<Boolean, Event, String>.OnTimerContext ctx, Collector<String> out) throws Exception {out.collect("定时器触发,触发时间>>>" + timestamp);}})// 2.6 执行打印.print();// 3. 执行程序environment.execute();}}
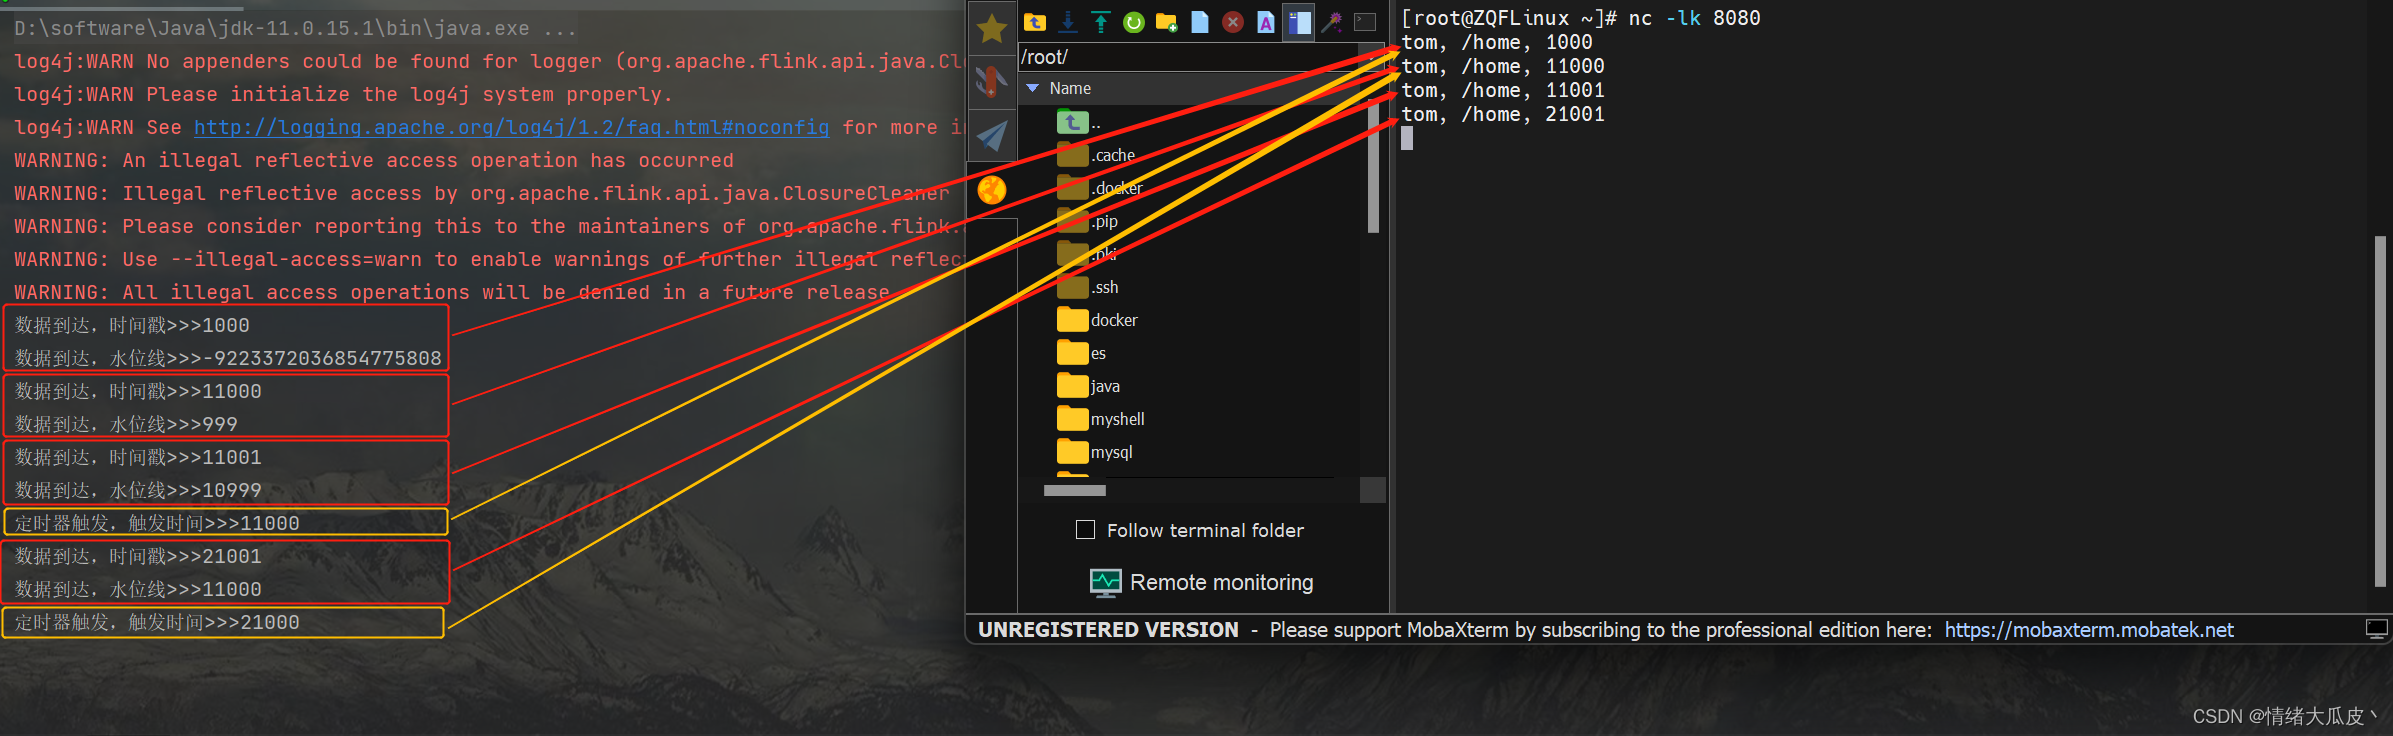
执行测试,对应数据的输出以及定时器对应的数据分别用红色和黄色标注
窗口处理函数 ProcessWindowFunction
关于窗口处理函数的使用,在之前的Flink – Time and Window已经介绍过其基本的使用方法,示例代码如下:
public class ProcessWindowDemo {public static void main(String[] args) throws Exception {// 1. 环境准备StreamExecutionEnvironment environment = StreamExecutionEnvironment.getExecutionEnvironment();environment.setRuntimeMode(RuntimeExecutionMode.AUTOMATIC);environment.setParallelism(1);// 2. 加载数据源并设置水位线SingleOutputStreamOperator<Event> stream = environment// 2.1 加载数据源.addSource(new EventSource())// 2.2 获取时间戳、设置水位线.assignTimestampsAndWatermarks(WatermarkStrategy.<Event>forBoundedOutOfOrderness(Duration.ZERO).withTimestampAssigner((SerializableTimestampAssigner<Event>) (event, l) -> event.timestamp));// 3. 数据处理及输出stream// 3.1 分区,将所有数据发送到一个分区进行统计.keyBy(item -> true)// 3.2 设置滚动事件时间窗口,窗口大小为 10s.window(TumblingEventTimeWindows.of(Time.seconds(5)))// 3.3 定义窗口函数处理规则.process(new CustomProcessWindow())// 3.4 输出结果.print();// 4. 执行程序environment.execute();}public static class CustomProcessWindow extends ProcessWindowFunction<Event, String, Boolean, TimeWindow> {/*** 窗口函数处理规则,窗口关闭时执行处理*/@Overridepublic void process(Boolean aBoolean, ProcessWindowFunction<Event, String, Boolean, TimeWindow>.Context context,Iterable<Event> iterable, Collector<String> collector) {// 创建用户统计SetHashSet<String> userSet = new HashSet<>();for (Event event: iterable) {userSet.add(event.user);}long start = context.window().getStart();long end = context.window().getEnd();// 定制输出内容collector.collect("窗口【" + new TimeStamp(start) + "~" + new TimeStamp(end)+ "】的独立访客数量为>>>" + userSet.size());}}}
ProcessWindowFunction继承了AbstractRichFunction抽象类,其存在 4 个类型参数,按顺序分别为:
-
IN:即数据流中窗口函数输入的数据类型; -
OUT:即窗口函数经过计算后输出的; -
KEY:即数据中分区键 key 的类型; -
W:即窗口的类型,一般使用TimeWindow;
使用过程中需要实现抽象方法process(),该方法也包含 4 个参数,按序分别为:
-
key:分区字段;
-
context:当前窗口计算的上下文;
-
elements:窗口收集到的所有元素的可迭代集合;
-
out:用于发送数据输出结果的收集器;
应用案例 – Top N
使用之前学习的各种方法可以实现对访问量 Top N 的 url 的计算,使用到的实体类 EventUrlCount 代码如下:
@Data
@NoArgsConstructor
@AllArgsConstructor
public class EventUrlCount {public String url;public Long count;public Long windowStart;public Long windowEnd;}
业务实现代码如下:
public class TopNDemo {public static void main(String[] args) throws Exception {// 1. 配置环境StreamExecutionEnvironment environment = StreamExecutionEnvironment.getExecutionEnvironment();environment.setParallelism(1);// 2. 数据处理environment// 2.1 添加数据源.addSource(new EventSource())// 2.2 设置水位线.assignTimestampsAndWatermarks(WatermarkStrategy.<Event>forMonotonousTimestamps().withTimestampAssigner(new SerializableTimestampAssigner<Event>() {@Overridepublic long extractTimestamp(Event event, long l) {return event.timestamp;}}))// 2.3 按照 url 进行分区,统计 10s 的时间窗口内各个 url 的访问量.keyBy(event -> event.url)// 2.4 设置滑动窗口.window(SlidingEventTimeWindows.of(Time.seconds(10), Time.seconds(5)))// 2.5 设置窗口处理逻辑.aggregate(new UrlCountAgg(), new UrlCountRes())// 2.6 按窗口结束时间进行分区,统计相同时间窗口各 url 的访问量.keyBy(eventUrlCount -> eventUrlCount.windowEnd)// 2.7 设置处理函数计算top n.process(new TopN(2))// 2.8 执行输出.print();// 3. 执行程序environment.execute();}/*** 自定义增量聚合*/public static class UrlCountAgg implements AggregateFunction<Event, Long, Long> {@Overridepublic Long createAccumulator() {return 0L;}@Overridepublic Long add(Event event, Long aLong) {return aLong + 1;}@Overridepublic Long getResult(Long aLong) {return aLong;}@Overridepublic Long merge(Long aLong, Long acc1) {return null;}}/*** 自定义全窗口函数*/public static class UrlCountRes extends ProcessWindowFunction<Long, EventUrlCount, String, TimeWindow> {@Overridepublic void process(String s, ProcessWindowFunction<Long, EventUrlCount, String, TimeWindow>.Context context,Iterable<Long> iterable, Collector<EventUrlCount> collector) throws Exception {collector.collect(new EventUrlCount(s,iterable.iterator().next(),context.window().getStart(),context.window().getEnd()));}}/*** 自定义处理函数,计算 top n*/public static class TopN extends KeyedProcessFunction<Long, EventUrlCount, String> {// 定义属性 nprivate final Integer n;// 定义状态列表private ListState<EventUrlCount> urlCountListState;public TopN(Integer n) {this.n = n;}@Overridepublic void open(Configuration parameters) throws Exception {// 从环境中获取状态列表urlCountListState = getRuntimeContext().getListState(new ListStateDescriptor<EventUrlCount>("event-url-count-list", Types.POJO(EventUrlCount.class)));}@Overridepublic void processElement(EventUrlCount eventUrlCount, KeyedProcessFunction<Long, EventUrlCount, String>.Context context,Collector<String> collector) throws Exception {// 将数据保存至状态列表urlCountListState.add(eventUrlCount);// 设置定时器,在窗口关闭 1s 后触发context.timerService().registerEventTimeTimer(context.getCurrentKey() + 1L);}@Overridepublic void onTimer(long timestamp, KeyedProcessFunction<Long, EventUrlCount, String>.OnTimerContext ctx, Collector<String> out) throws Exception {// 将数据从状态列表取出并放入 ArrayList,方便排序ArrayList<EventUrlCount> urlCountArrayList = new ArrayList<>();for (EventUrlCount eventUrlCount: urlCountListState.get()) {urlCountArrayList.add(eventUrlCount);}// 清空状态列表urlCountListState.clear();// 执行排序urlCountArrayList.sort(new Comparator<EventUrlCount>() {@Overridepublic int compare(EventUrlCount o1, EventUrlCount o2) {return o2.count.intValue() - o1.count.intValue();}});// 组装结果并输出StringBuilder result = new StringBuilder();result.append("========================================\n");result.append("窗口结束时间:").append(new Timestamp(timestamp - 1)).append("\n");for (int i = 0; i < this.n; i++) {EventUrlCount eventUrlCount = urlCountArrayList.get(i);String info = "No." + (i + 1) + " " + "url:" + eventUrlCount.url + " "+ "浏览量:" + eventUrlCount.count + "\n";result.append(info);}result.append("========================================\n");out.collect(result.toString());}}}
我们在上面的代码中使用ListState。在open()方法中初始化了列表状态变量,初始化的时候使用了ListStateDescriptor描述符,这个描述符用来告诉 Flink 列表状态变量的名字和类型。列表状态变量是单例,也就是说只会被实例化一次。这个列表状态变量的作用域是当前 key 所对应的逻辑分区。可以使用add()方法向列表状态变量中添加数据,使用get()方法读取列表状态变量中的所有元素。