【torch.nn.PixelShuffle】和 【torch.nn.UnpixelShuffle】
文章目录
- torch.nn.PixelShuffle
- 直观解释
- 官方文档
- torch.nn.PixelUnshuffle
- 直观解释
- 官方文档
torch.nn.PixelShuffle
直观解释
PixelShuffle是一种上采样方法,它将形状为 ( ∗ , C × r 2 , H , W ) (∗, C\times r^2, H, W) (∗,C×r2,H,W)的张量重新排列转换为形状为 ( ∗ , C , H × r , W × r ) (∗, C, H\times r, W\times r) (∗,C,H×r,W×r)的张量:

举个例子
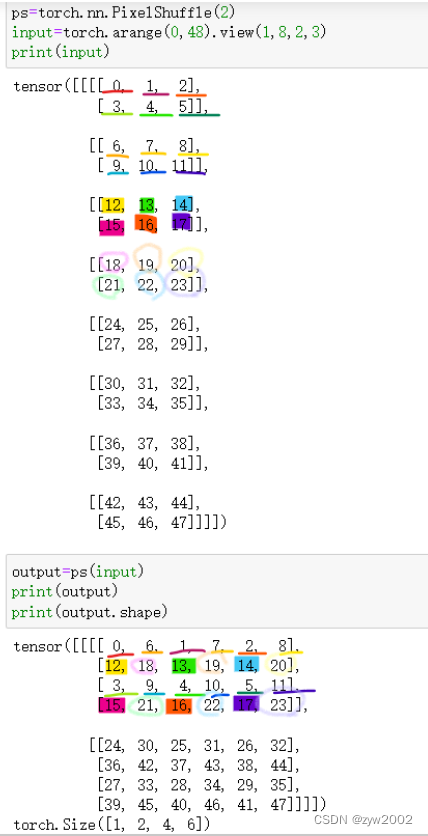
输入的张量大小是(1,8,2,3),PixelShuffle的 缩放因子是r=2。
import torch
ps=torch.nn.PixelShuffle(2)
input=torch.arange(0,48).view(1,8,2,3)
print(input)
output=ps(input)
print(output)
print(output.shape)
如下图可以看到,PixelShuffle是把输入通道按照缩放因子r^2进行划分成8/(2^2)=2 组。
也就是输入的第一组(前4个通道)中的元素,每次间隔r=2 交错排列,合并成输出的第一个通道维度。
输入的第二组(后4个通道)中的元素,每次间隔r=2交错排列,合并成输出通道的第二个维度。
输入的大小为(batchsize,in_channel,in_height,in_width)=(1,8,2,3)
输出的大小为(batchsize,out_channel,out_height,out_width)(1,2,4,6)
各个维度的变化规律如下:
batchsize 不变;
out_channel=in_channel/(r^2)
out_height=in_height*r
out_width=in_width*r
官方文档
CLASS
torch.nn.PixelShuffle(upscale_factor)
-
功能: 把大小为 ( ∗ , C × r 2 , H , W ) (*,C\times r^2,H,W) (∗,C×r2,H,W)的张量重新排列为大小为 ( ∗ , C , H × r , W × r ) (*,C,H\times r,W\times r) (∗,C,H×r,W×r) , 其中 r r r 是 upscale factor 。
这个操作对于实现步长为 1 r \frac {1}{r} r1的efficient sub-pixel convolution有用。
-
参数
- upscale_factor(int) : 增加空间分辨率的因子
-
形状
-
输入: ( ∗ , C i n , H i n , W i n ) (*,C_{in},H_{in},W_{in}) (∗,Cin,Hin,Win) ,其中 ∗ * ∗ 是 0 或者batch大小
-
输出: ( ∗ , C o u t , H o u t , W o u t ) (*,C_{out},H_{out},W_{out}) (∗,Cout,Hout,Wout) , 其中
C out = C in ÷ u p s c a l e _ f a c t o r 2 H out = H in × u p s c a l e _ f a c t o r W out = W in × u p s c a l e _ f a c t o r C_{\text {out }}=C_{\text {in }} \div upscale\_factor ^2 \\ H_{\text {out }}=H_{\text {in }} \times upscale\_factor \\ W_{\text {out }}=W_{\text {in }} \times upscale\_factor Cout =Cin ÷upscale_factor2Hout =Hin ×upscale_factorWout =Win ×upscale_factor
-
-
例子
>>> pixel_shuffle = nn.PixelShuffle(3)
>>> input = torch.randn(1, 9, 4, 4)
>>> output = pixel_shuffle(input)
>>> print(output.size())
torch.Size([1, 1, 12, 12])
torch.nn.PixelUnshuffle
直观解释
PixelUnshuffle就是PixelShuffle的逆操作。
import torch
pus=torch.nn.PixelUnshuffle(2)
input_restore=pus(putput)
print(input_restore)
print(input_restore.shape)
print(input_restore==input) # input_restore和input一样
官方文档
CLASS
torch.nn.PixelUnshuffle(downscale_factor)
-
功能: 是PixelShuffle的逆操作,把大小为 ( ∗ , C , H × r , W × r ) (*,C,H\times r,W\times r) (∗,C,H×r,W×r)的张量重组成大小为 ( ∗ , C × r , H , W ) (*,C\times r,H,W) (∗,C×r,H,W)的张量。其中 r r r 是downscale factor。
-
参数:
downscale_factor (int): 降低空间分辨率的因子。
-
形状:
-
输入: ( ∗ , C i n , H i n , W i n ) (*,C_{in},H_{in},W_{in}) (∗,Cin,Hin,Win), 其中 ∗ * ∗ 是 0 或者batch大小
-
输出: ( ∗ , C o u t , H o u t , W o u t ) (*,C_{out},H_{out},W_{out}) (∗,Cout,Hout,Wout), 其中
C out = C in × downscale _ factor 2 H out = H in ÷ downscale _ factor W out = W in ÷ downscale _ factor \begin{aligned}& C_{\text {out }}=C_{\text {in }} \times \text { downscale } \_ \text {factor }{ }^2 \\& H_{\text {out }}=H_{\text {in }} \div \text { downscale } \_ \text {factor } \\& W_{\text {out }}=W_{\text {in }} \div \text { downscale } \_ \text {factor }\end{aligned} Cout =Cin × downscale _factor 2Hout =Hin ÷ downscale _factor Wout =Win ÷ downscale _factor
-
-
例子
>>> pixel_unshuffle = nn.PixelUnshuffle(3)
>>> input = torch.randn(1, 1, 12, 12)
>>> output = pixel_unshuffle(input)
>>> print(output.size())
torch.Size([1, 9, 4, 4])