复习之kickstart无人职守安装脚本
一、kickstart简介
kickstart是红帽发行版中的一种安装方式,它通过以配置文件的方式来记录linux系统安装的各项参数和想要安装的软件。只要配置正确,整个安装过程中无需人工交互参与,达到无人值守安装的目的。
二、kickstar文件的生成
- 进入/root目录找到模板:anaconda-ks.cfg
- 根据模板编辑kickstar文件
- 检测kickstar语法错误
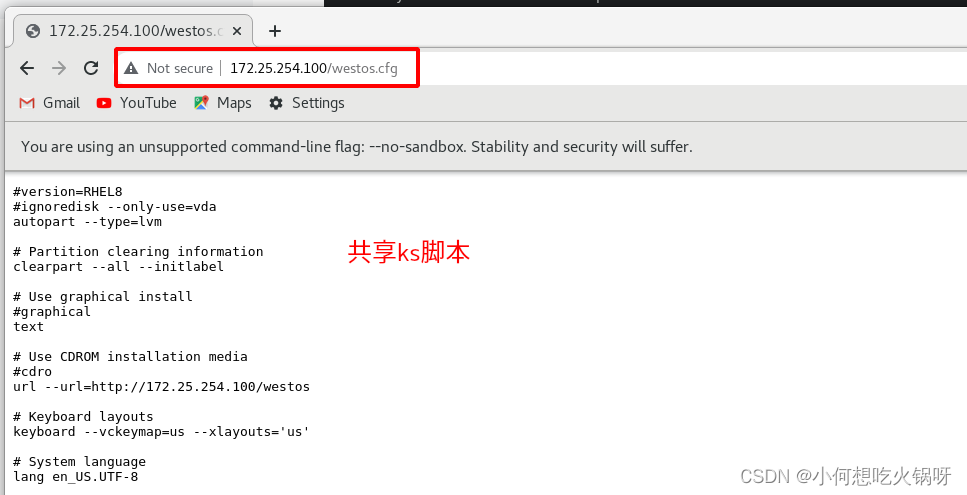
[root@westosa ~]# cat westos.cfg
#version=RHEL8
#ignoredisk --only-use=vda
autopart --type=lvm# Partition clearing information
clearpart --all --initlabel# Use graphical install
#graphical
text# Use CDROM installation media
#cdro
url --url=http://172.25.254.100/westos# Keyboard layouts
keyboard --vckeymap=us --xlayouts='us'# System language
lang en_US.UTF-8 # Network information
network --bootproto=dhcp --device=enp1s0 --onboot=no --ipv6=auto --no-activate
network --hostname=localhost.localdomain
repo --name="AppStream" --baseurl=http://172.25.254.100/westos/AppStream# Root password
#rootpw --plant westos
rootpw --iscrypted $6$xPOQGqf3UsUPjuV5$wMByLsY60INgTbIO.VgyD8lawrmDlzXTaVkHeSiFjYxywVxzvfLX9uprA66CnugTo5m9mzW9fgAio3fkR1Bih/# X Window System configuration information
xconfig --startxonboot# Run the Setup Agent on first boot
#firstboot --enable
firstboot --disable# System services
services --disabled="chronyd"
# System timezone
timezone Asia/Shanghai --isUtc --nontpreboot%packages
@base
firefox
%end%post
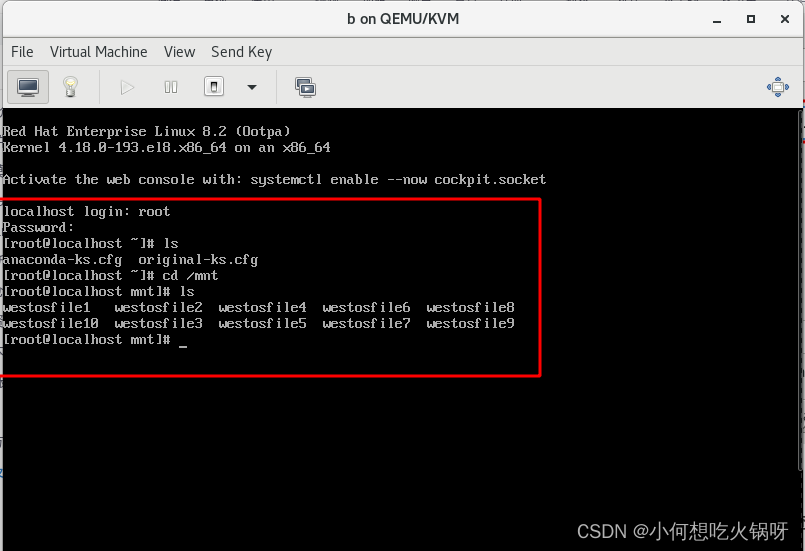
touch /mnt/westosfile{1..10}
%end
[root@westosa ~]#
1. 进目录找模板
[root@westosa ~]# cd /root/
[root@westosa ~]# ls
anaconda-ks.cfg  Documents  fstab                 Music     Public     Videos
Desktop          Downloads  initial-setup-ks.cfg  Pictures  Templates
[root@westosa ~]# cp anaconda-ks.cfg westos.cfg
[root@westosa ~]# ls
anaconda-ks.cfg  Documents  fstab                 Music     Public     Videos
Desktop          Downloads  initial-setup-ks.cfg  Pictures  Templates  westos.cfg
[root@westosa ~]# vim westos.cfg
2. 编辑kickstar文件
具体编辑步骤如下:
一定要仔细,否则后续无法安装!

注意:加密密码如何生成?

ps:所有文件连接必须都可以在浏览器打开!
例如:


3.检测kickstar语法错误
- 安装检测软件
- 检测:没有反应则语法正确
[root@westosa ~]# dnf search kickstar
Updating Subscription Management repositories.
Unable to read consumer identity
This system is not registered to Red Hat Subscription Management. You can use subscription-manager to register.
Last metadata expiration check: 0:43:22 ago on Sun 30 Jul 2023 06:52:16 PM CST.
================================= Name & Summary Matched: kickstar ==================================
pykickstart.noarch : Python utilities for manipulating kickstart files.
python3-kickstart.noarch : Python 3 library for manipulating kickstart files.
[root@westosa ~]# dnf install -y pykickstart.noarch
Updating Subscription Management repositories.
检测方法:ksvalidator + 脚本名
[root@westosa ~]# ksvalidator westos.cfg
The following problem occurred on line 21 of the kickstart file:Unexpected arguments to lang command: ['--addaupport=zh_CN.UTF-8']
出现错误,修改脚本,再次检测!没有错误了!ps:只能检测出语法错误
[root@westosa ~]# ksvalidator westos.cfg
[root@westosa ~]#
三、 部署安装所需环境
- 搭建好软件仓库:建立共享目录:/var/www/html/westos
- 共享镜像资源:安装httpd和dhcp服务;关闭火墙
- 共享ks脚本:复制ks脚本到共享目录,修改权限
- 配置dhcp服务:之前学过
以上全部在虚拟机westosa上完成!!
1. 搭建软件仓库
首先要有镜像资源,从主机发送到虚拟机,发现虚拟机内存不够,因此可以通过挂载设备发送!
首先需要一块10G的硬盘,镜像为7.9G。然后分区

将该设备挂载在/iso目录
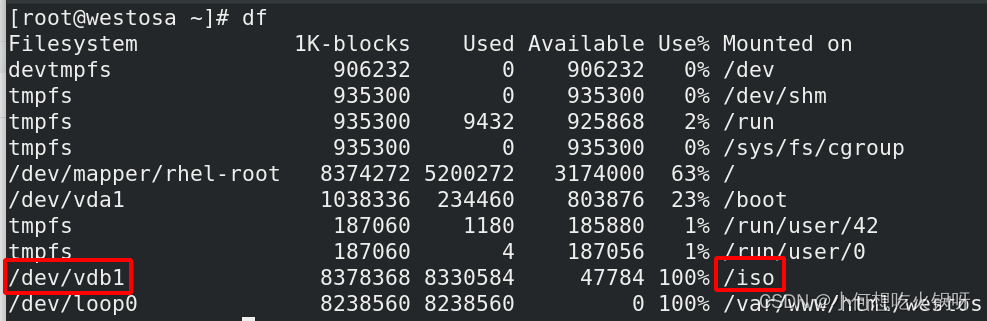
然后发送镜像,成功!
[root@westosa ~]# cd /iso/
[root@westosa iso]# ls
rhel-8.2-x86_64-dvd.iso
[root@westosa iso]#
新建共享目录,将镜像挂载在该目录上!
249 mkdir /var/www/html/westos250 mount /iso/rhel-8.2-x86_64-dvd.iso /var/www/html/westos/
编辑配置文件,保证文件都可以打开!!则软件仓库配置成功!
[root@westosa ~]# cd /etc/yum.repos.d/
[root@westosa yum.repos.d]# ls
redhat.repo  westos.repo
[root@westosa yum.repos.d]# cat westos.repo
[AppStream]
name=AppStream
baseurl=http://172.25.254.100/westos/AppStream
gpgcheck=0
gpgkey=/etc/pki/rpm-gpg/RPM-GPG-KEY-redhat-release
enabled=1[BaseOS]
name=BaseOS
baseurl=http://172.25.254.100/westos/BaseOS
gpgcheck=0
gpgkey=/etc/pki/rpm-gpg/RPM-GPG-KEY-redhat-release
enabled=1[root@westosa yum.repos.d]#
2. 共享镜像资源
安装httpd和dhcp服务!并且关闭火墙,开启httpd服务!
245 dnf install httpd dhcp-server -y246 systemctl enable --now httpd247 systemctl status httpd248 systemctl disable --now firewalld

3. 共享ks脚本+修改权限
共享ks脚本到共享目录,保证主机都可以看见!
252 cp westos.cfg /var/www/html/253 chmod 644 /var/www/html/westos.cfg
共享结果如下:
4. 配置dhcp服务
在westosa为dhcp服务器,在上面配置dhcp服务,保证其他主机有ip可以访问共享目录!
254 dnf search dhcp255 cat /etc/dhcp/dhcpd.conf 256 cp /usr/share/doc/dhcp-server/dhcpd.conf.example /etc/dhcp/dhcpd.conf257 vim /etc/dhcp/dhcpd.conf258 systemctl restart dhcpd259 systemctl enable --now dhcpd
dhcp的配置文件如下:认真不要写错!
[root@westosa dhcp]# cat dhcpd.conf
# dhcpd.conf
#
# Sample configuration file for ISC dhcpd
## option definitions common to all supported networks...
option domain-name "westos.org";
option domain-name-servers 172.25.254.100;default-lease-time 600;
max-lease-time 7200;# Use this to enble / disable dynamic dns updates globally.
#ddns-update-style none;# If this DHCP server is the official DHCP server for the local
# network, the authoritative directive should be uncommented.
#authoritative;# Use this to send dhcp log messages to a different log file (you also
# have to hack syslog.conf to complete the redirection).
log-facility local7;# No service will be given on this subnet, but declaring it helps the
# DHCP server to understand the network topology.#subnet 10.152.187.0 netmask 255.255.255.0 {
#}# This is a very basic subnet declaration.subnet 172.25.254.0 netmask 255.255.255.0 {range 172.25.254.10 172.25.254.20;#option routers rtr-239-0-1.example.org, rtr-239-0-2.example.org;
}[root@westosa dhcp]#
四、测试
测试ks脚本!
在虚拟机管理界面创建新的虚拟机!
1. 选择创建方式

2. 填写镜像及ks脚本目录
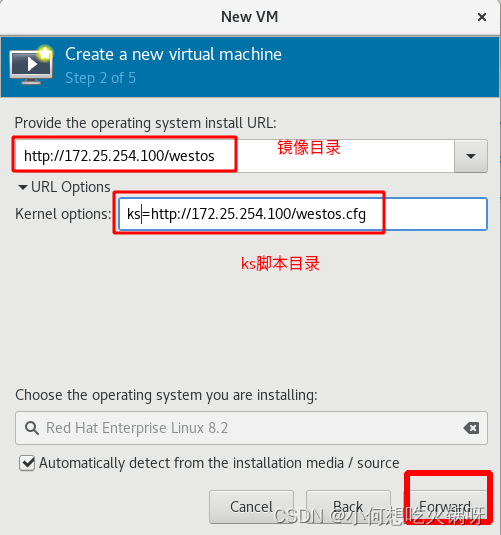
后续就是分配内存大小等和之前创建虚拟机一样
填写完成后等待加载。。。。。如果出现错误检查ks脚本和dhcp配置!
加载完成后,可以登陆用户!进入/mnt目录,发现有10个文件!
证明成功!