利用MATLAB制作DEM山体阴影
在地理绘图中,我们使用的DEM数据添加山体阴影使得绘制的图件显得更加的美观。
GIS中使用ArcGIS软件就可以达到这一目的,或者使用GMT,同样可以得到山体阴影的效果。
本文提供了一个MATLAB的函数,可以得到山体阴影。
clear all;clc;close all
load demo.mat
%% draw hillshade
x=x(:,1);
y=y(1,:);
hs=hillshade_esri(z,x,y);
subplot(1,2,1)
imagesc(x,y,z')
axis image
set(gca,'ydir','normal')
title('DEM')
colormap(gray)
caxis([min(z(:)) max(z(:))])
subplot(1,2,2)
imagesc(x,y,hs')
axis image
set(gca,'ydir','normal')
title('Hillshade')
colormap(gray)
hold on
caxis([min(hs(:)) max(hs(:))])
drawnow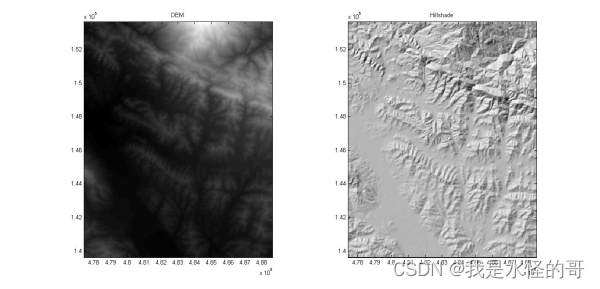
其中调用的函数 hillshade_esri.m如下:
function h = hillshade_esri(dem,X,Y,varargin)
% PUPROSE: Calculate hillshade for a digital elevation model (DEM) based on
%          the algorithm posted on http://edndoc.esri.com/arcobjects/9.2/net/shared/geoprocessing/spatial_analyst_tools/how_hillshade_works.htm
% -------------------------------------------------------------------
% USAGE: h = hillshade_esri(dem,X,Y,varagin)
% where: dem is the DEM to calculate hillshade for
%        X and Y are the DEM coordinate vectors
%        varargin are parameters options
%
% OPTIONS:
%        'azimuth'  is the direction of lighting in deg (default 315)
%        'altitude' is the altitude of the lighting source in
%                   in degrees above horizontal (default 45)
%        'zfactor'  is the DEM altitude scaling z-factor (default 1)
%        'plotit'   creates a simple plot of the hillshade
%
% EXAMPLE:
%       h=hillshade_esri(peaks(50),1:50,1:50,'azimuth',45,'altitude',100,'plotit')
%       - calculates the hillshade for an example 50x50 peak surface.
%       - changes the default settings for azimuth and altitude.
%       - creates an output hillshade plot% See also: GRADIENT, CART2POL
%
% Note: Uses ESRIs hillshade algorithm, the output will be the same as the
% output with ArcGIS Hillshade Function.
%
% Felix Hebeler, Dept. of Geography, University Zurich, February 2007.
% modified by Andrew Stevens (astevens@usgs.gov), 5/04/2007
% modified by Wenbin Jiang (jwbalbert@gmail.com), 7/06/2011%% configure inputs
%default parameters
azimuth=315;
altitude=45;
zf=1;
plotit=0;%parse inputs
if isempty(varargin)~=1     % check if any arguments are given[m1,n1]=size(varargin);opts={'azimuth';'altitude';'zfactor';'plotit'};for i=1:n1;             % check which parameters are givenindi=strcmpi(varargin{i},opts);ind=find(indi==1);if isempty(ind)~=1switch indcase 1azimuth=varargin{i+1};case 2altitude=varargin{i+1};case 3zf=varargin{i+1};case 4plotit=1;endendend
end%% Initialize paramaters
dx=abs(X(2)-X(1));  % get cell spacing in x and y direction
dy=abs(Y(2)-Y(1));  % from coordinate vectors% lighting azimuth
azimuth = 360.0-azimuth+90; %convert to mathematic unit
azimuth(azimuth>=360)=azimuth-360;
azimuth = azimuth * (pi/180); %  convert to radians%lighting altitude
altitude = (90-altitude) * (pi/180); % convert to zenith angle in radians%% calc slope and aspect (radians)
im=length(X);
jm=length(Y);
fx=zeros(im,jm);
fy=zeros(im,jm);
asp=zeros(im,jm);
for i=2:im-1for j=2:jm-1fx(i,j)=((dem(i+1,j+1)+2*dem(i+1,j)+dem(i+1,j-1))-(dem(i-1,j+1)+2*dem(i-1,j)+dem(i-1,j-1)))/8/dx;fy(i,j)=((dem(i-1,j-1)+2*dem(i,j-1)+dem(i+1,j-1))-(dem(i-1,j+1)+2*dem(i,j+1)+dem(i+1,j+1)))/8/dy;if fx(i,j)~=0asp(i,j) = atan2(fy(i,j),-fx(i,j));if asp(i,j)<0asp(i,j)=asp(i,j)+2*pi;endelseif fy(i,j)>0asp(i,j)=pi/2;elseif fy(i,j)<0asp(i,j)=3*pi/2;endend     end
end
grad = hypot(fx,fy);
grad=atan(zf*grad); %steepest slope%% hillshade calculation
h = 255.0*( (cos(altitude).*cos(grad) ) + ( sin(altitude).*sin(grad).*cos(azimuth-asp)) ); % ESRIs algorithm
h(h<0)=0; % set hillshade values to min of 0.
h=setborder(h,1,NaN); % set border cells to NaN%% plot results if requested
if plotit==1figureimagesc(X,Y,h')axis imageset(gca,'ydir','normal')colormap(gray)
end%% -- Subfunction--------------------------------------------------------------------------
function grid = setborder(grid,bs,bvalue)
grid(1:bs,:)=bvalue; %toprows
grid(size(grid,1)-bs+1:size(grid,1),:)=bvalue; %bottom rows
grid(:,1:bs)=bvalue; %left cols
grid(:,size(grid,2)-bs+1:size(grid,2))=bvalue;
其中有三个参数可以修改:azimuth=315;altitude=45;zf=1;
1.修改 azimuth,the direction of lighting in deg,下图的变化范围为0:360:
2.修改 altitude,the altitude of the lighting source in degrees above horizontal,下图变化范围为0:180:

3.修改 zf,the DEM altitude scaling z-factor ,下图变化范围为1:50: