Spring 拦截器
上篇博客链接:SpringAOP详解
上篇博客我们提到使用AOP的环绕通知来完成统一的用户登陆验证虽然方便了许多,但随之而来也带来了新的问题:
- HttpSession不知道如何去获取,获取困难
- 登录和注册的方法并不需要拦截,使用切点没办法定义哪些方法需要拦截,哪些不需要拦截
所以本篇博客我们来介绍Spring 拦截器:
1.Spring 拦截器
对于上面的问题,Spring提供了具体的实现拦截器:HandlerInterceptor,拦截器的实现分为以下两个步骤:
- 创建⾃定义拦截器,实现 HandlerInterceptor 接⼝的 preHandle(执⾏具体⽅法之前的预处理)方法
- 将⾃定义拦截器加⼊ WebMvcConfigurer 的 addInterceptors ⽅法中
1.创建自定义的拦截器
自定义拦截器是一个普通类,需要实现HandlerInterceptor接口的preHandle方法,我们来实现一个用户登陆的权限校验,如果验证后用户未登录,则需要进行拦截,返回false表示未通过验证,如果用户已登录,则不需要拦截,返回true表示通过验证
package com.example.springaop.interceptor;import org.springframework.web.servlet.HandlerInterceptor;import javax.servlet.http.HttpServletRequest;
import javax.servlet.http.HttpServletResponse;
import javax.servlet.http.HttpSession;@Component
public class LoginInterceptor implements HandlerInterceptor {@Overridepublic boolean preHandle(HttpServletRequest request, HttpServletResponse response, Object handler) throws Exception {// 判断是否登录,所以如果没有登陆, 不需要创建一个新的对象HttpSession session = request.getSession(false);if (session == null || session.getAttribute("username") == null) {// 说明用户并没有登录,所以我们需要进行拦截,返回false,表示未通过response.setStatus(401);return false;}// 走到这说明用户已经登陆,不需要对他进行拦截,返回true,表示通过验证return true;}
}
2. 将⾃定义拦截器加⼊到系统配置
实现WebMvcConfigurer接口的添加拦截器方法addInterceptors
- 在方法中设置需要拦截那些url(需要通过验证方可通过拦截器,也就是不被拦截)
- 需要放过哪些url(不需要通过验证,永远不会被该拦截器拦截)
import com.example.springaop.interceptor.LoginInterceptor;
import org.springframework.beans.factory.annotation.Autowired;
import org.springframework.stereotype.Component;
import org.springframework.web.servlet.config.annotation.InterceptorRegistry;
import org.springframework.web.servlet.config.annotation.WebMvcConfigurer;@Component
public class AppConfig implements WebMvcConfigurer {@Autowiredprivate LoginInterceptor loginInterceptor;@Overridepublic void addInterceptors(InterceptorRegistry registry) {// 添加登陆验证的拦截器registry.addInterceptor(loginInterceptor)// 表示拦截所有路径.addPathPatterns("/**")// 但是需要排除登陆与注册的url,因为这两个不需要验证登陆身份.excludePathPatterns("/user/log").excludePathPatterns("/user/reg");}
}
3.测试一下拦截效果
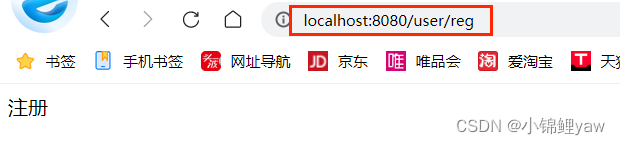
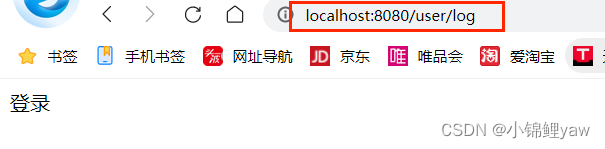
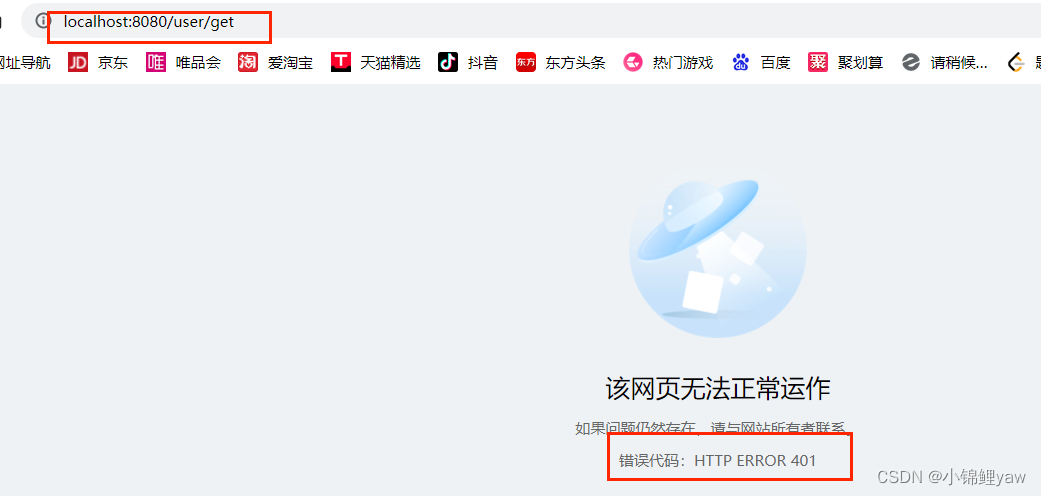 使用fiddler抓包查看

可以看到我们在未登陆的情况下登录和注册并没有被拦截,但是get却被拦截了,证明我们拦截器中设置的路径都成功了
4.完善登陆操作,登陆成功后添加Session
这样登陆成功后,所有需要身份认证的页面就会通过验证,不会被拦截了
// 登录@RequestMapping("/log")public Boolean log(HttpServletRequest request, String username, String password) {log.info("login...");// 判断用户名和密码,如果有任意一个为空,那么就不能登陆成功if (!StringUtils.hasLength(username) || !StringUtils.hasLength(password)) {return false;}// 此时判断用户名和密码是否正确// 假装判断一下if (!"admin".equals(username) || !"admin".equals(password)) {return false;}// 此时用户名和密码校验通过// 参数true表示,如果没有存放Session,那么需要创建一个Session来存放当前登录的用户HttpSession session = request.getSession(true);session.setAttribute("username",username);return true;}
5.测试一下session
首先我们在不登陆的情况下不能访问/get页面
我们先去登录
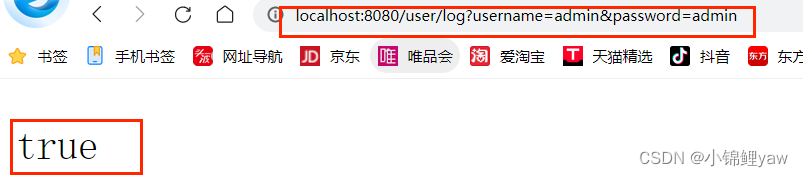
输入正确的用户名和密码后登陆成功,然后我们在去访问/get页面
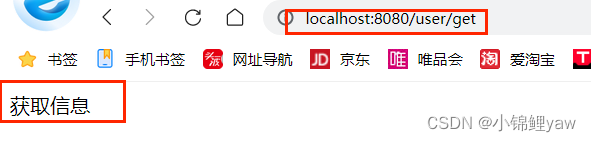
此时就成功通过了验证,没有被拦截
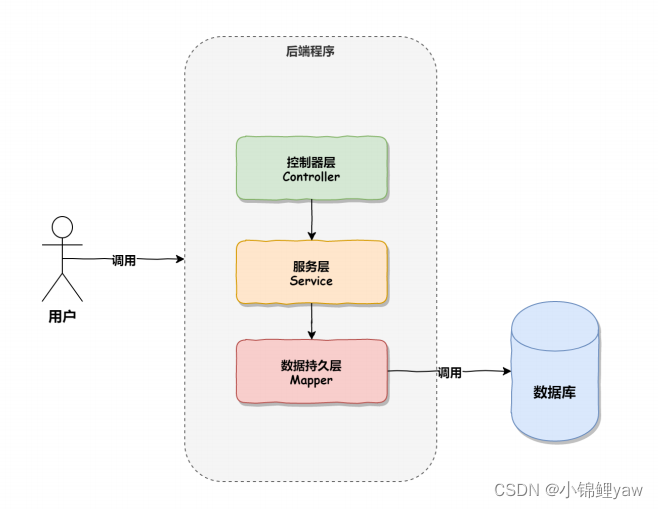
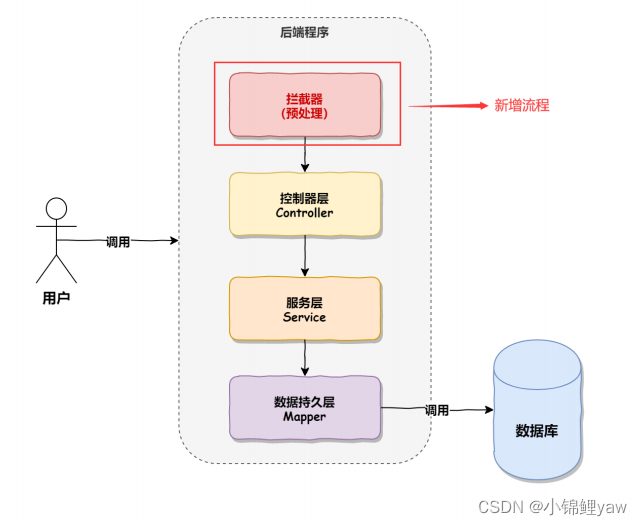
2.拦截器实现原理
1.正常情况写的调用顺序
然而有了拦截器之后,会在调用Controller层前进行相关的业务处理,
2.使用拦截器之后的调用顺序
3.拦截器实现原理源码分析
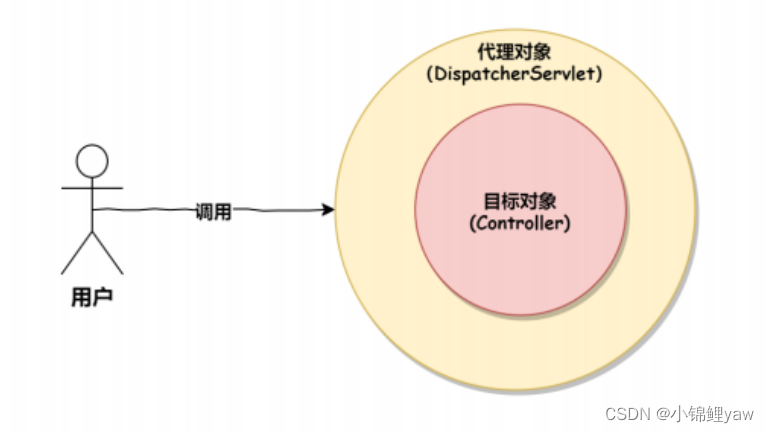
所有的 Controller 执⾏都会通过⼀个调度器 DispatcherServlet 来实现,这⼀点可以从 Spring Boot 控制台的打印信息看出,如下图所示:

⽽所有⽅法都会执⾏ DispatcherServlet 中的 doDispatch 调度⽅法,doDispatch 源码如下:
protected void doDispatch(HttpServletRequest request, HttpServletResponse response) throws Exception {HttpServletRequest processedRequest = request;HandlerExecutionChain mappedHandler = null;boolean multipartRequestParsed = false;WebAsyncManager asyncManager = WebAsyncUtils.getAsyncManager(request);try {try {ModelAndView mv = null;Exception dispatchException = null;try {processedRequest = this.checkMultipart(request);multipartRequestParsed = processedRequest != request;mappedHandler = this.getHandler(processedRequest);if (mappedHandler == null) {this.noHandlerFound(processedRequest, response);return;}HandlerAdapter ha = this.getHandlerAdapter(mappedHandler.getHandler());String method = request.getMethod();boolean isGet = HttpMethod.GET.matches(method);if (isGet || HttpMethod.HEAD.matches(method)) {long lastModified = ha.getLastModified(request, mappedHandler.getHandler());if ((new ServletWebRequest(request, response)).checkNotModified(lastModified) && isGet) {return;}}// 调用预处理【重点】if (!mappedHandler.applyPreHandle(processedRequest, response)) {return;}// 执行Contorller层的逻辑mv = ha.handle(processedRequest, response, mappedHandler.getHandler());if (asyncManager.isConcurrentHandlingStarted()) {return;}this.applyDefaultViewName(processedRequest, mv);mappedHandler.applyPostHandle(processedRequest, response, mv);} catch (Exception var20) {dispatchException = var20;} catch (Throwable var21) {dispatchException = new NestedServletException("Handler dispatch failed", var21);}this.processDispatchResult(processedRequest, response, mappedHandler, mv, (Exception)dispatchException);} catch (Exception var22) {this.triggerAfterCompletion(processedRequest, response, mappedHandler, var22);} catch (Throwable var23) {this.triggerAfterCompletion(processedRequest, response, mappedHandler, new NestedServletException("Handler processing failed", var23));}} finally {if (asyncManager.isConcurrentHandlingStarted()) {if (mappedHandler != null) {mappedHandler.applyAfterConcurrentHandlingStarted(processedRequest, response);}} else if (multipartRequestParsed) {this.cleanupMultipart(processedRequest);}}}从上述源码可以看出在开始执⾏ Controller 之前,会先调⽤ 预处理⽅法 applyPreHandle,⽽applyPreHandle ⽅法的实现源码如下:
boolean applyPreHandle(HttpServletRequest request, HttpServletResponse response) throws Exception {for(int i = 0; i < this.interceptorList.size(); this.interceptorIndex = i++) {// 获取项目中使用的拦截器, 我们之前就是实现了这个类,然后添加的拦截器// 在这里,我们自定义的拦截器就会被调用,用户登陆权限验证的方法就会实现,这就是拦截器实现的原理HandlerInterceptor interceptor = (HandlerInterceptor)this.interceptorList.get(i);if (!interceptor.preHandle(request, response, this.handler)) {this.triggerAfterCompletion(request, response, (Exception)null);return false;}}return true;}
拦截器总结
通过源码分析,我们发现spring中的拦截器也是通过动态代理和环绕通知的思想实现的,大致的调用流程如下图:
动态代理的内容请参考这篇博客~
链接
本篇博客就到这里啦~~
我们下篇博客见~