Vue学习Day3——生命周期\组件化
一、Vue生命周期
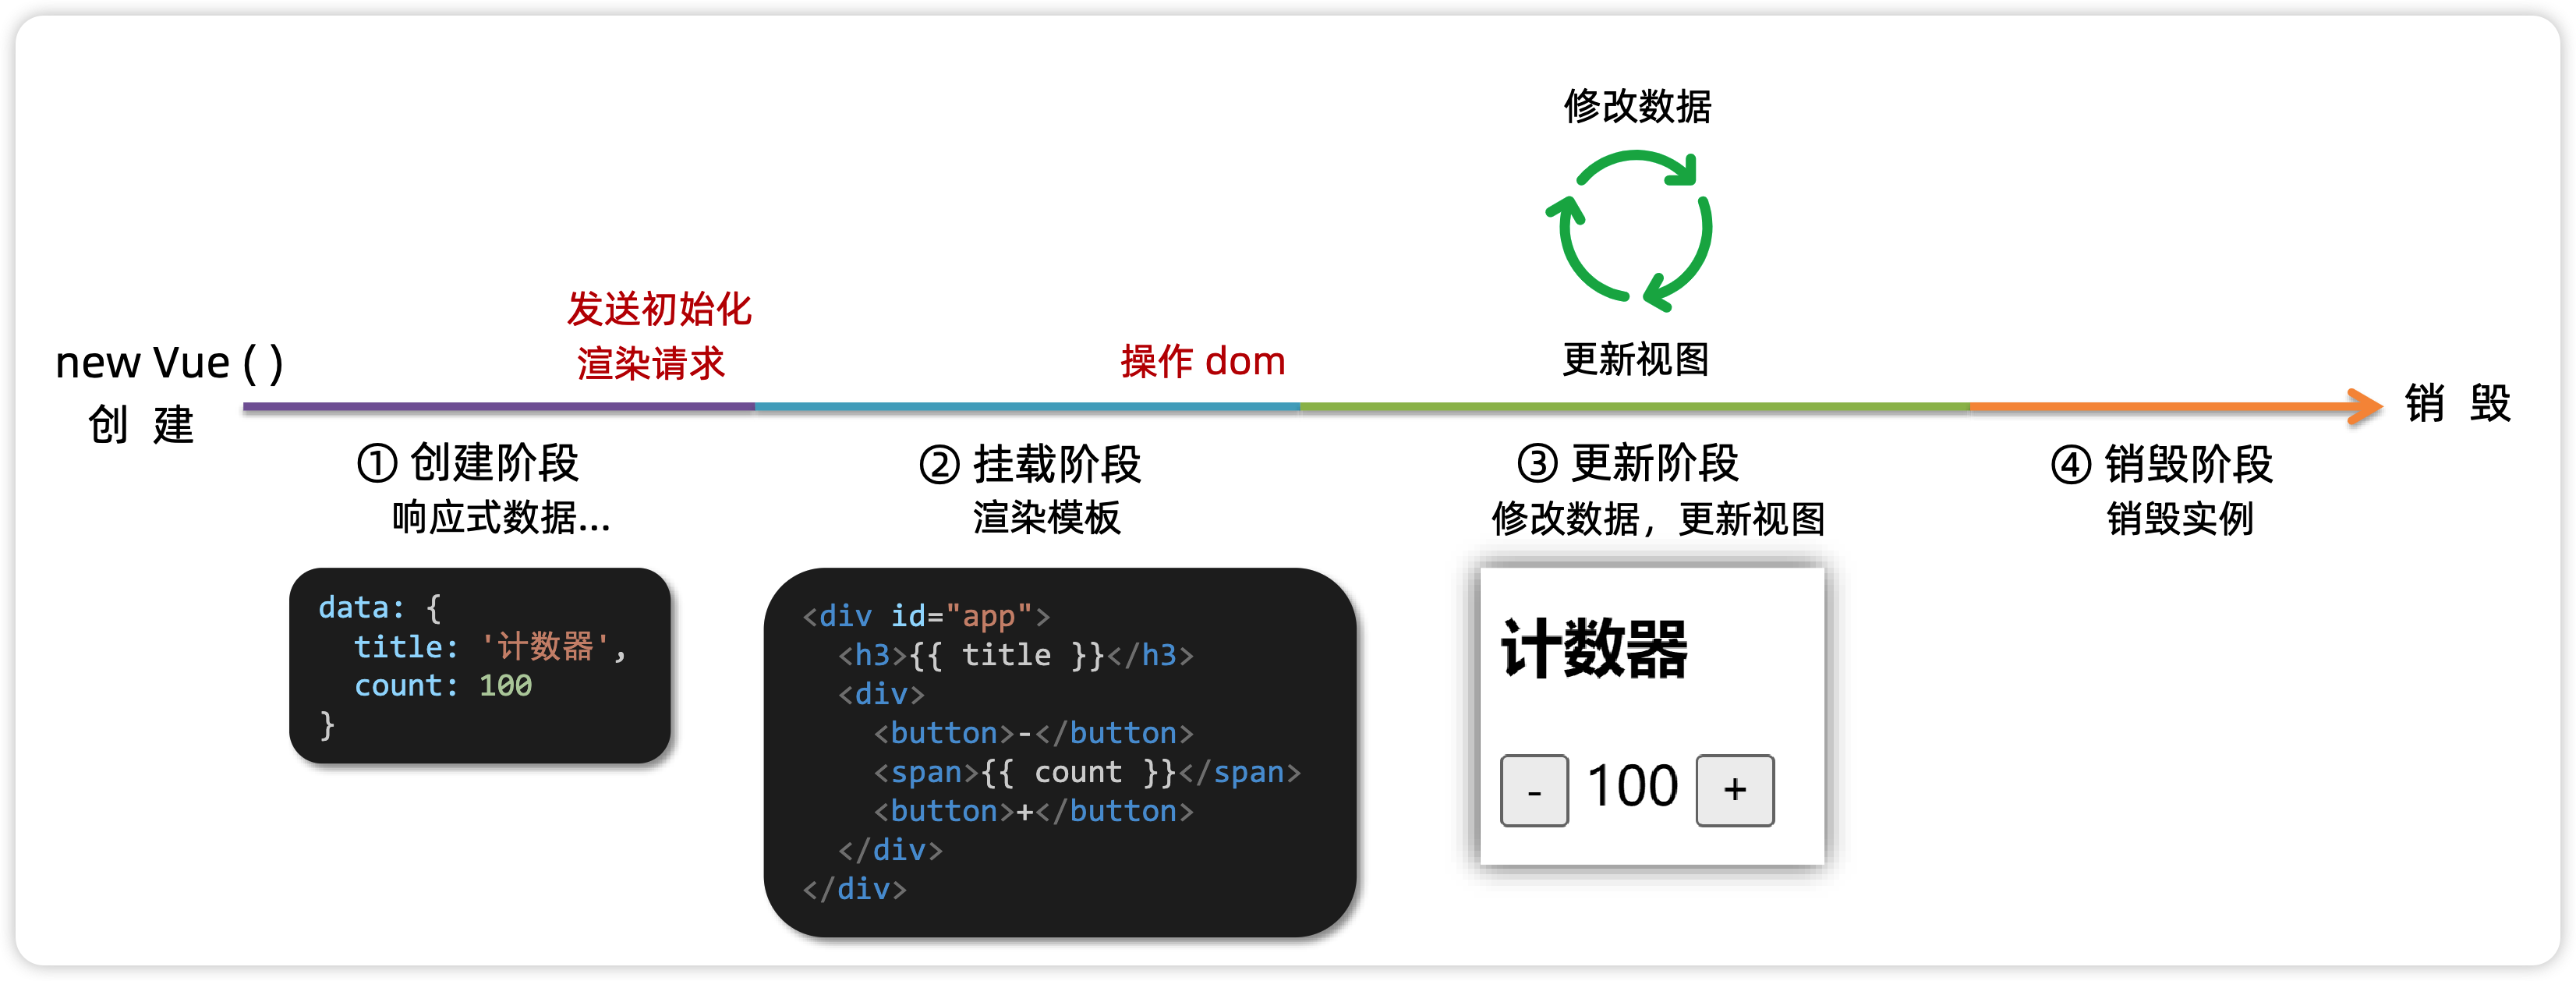
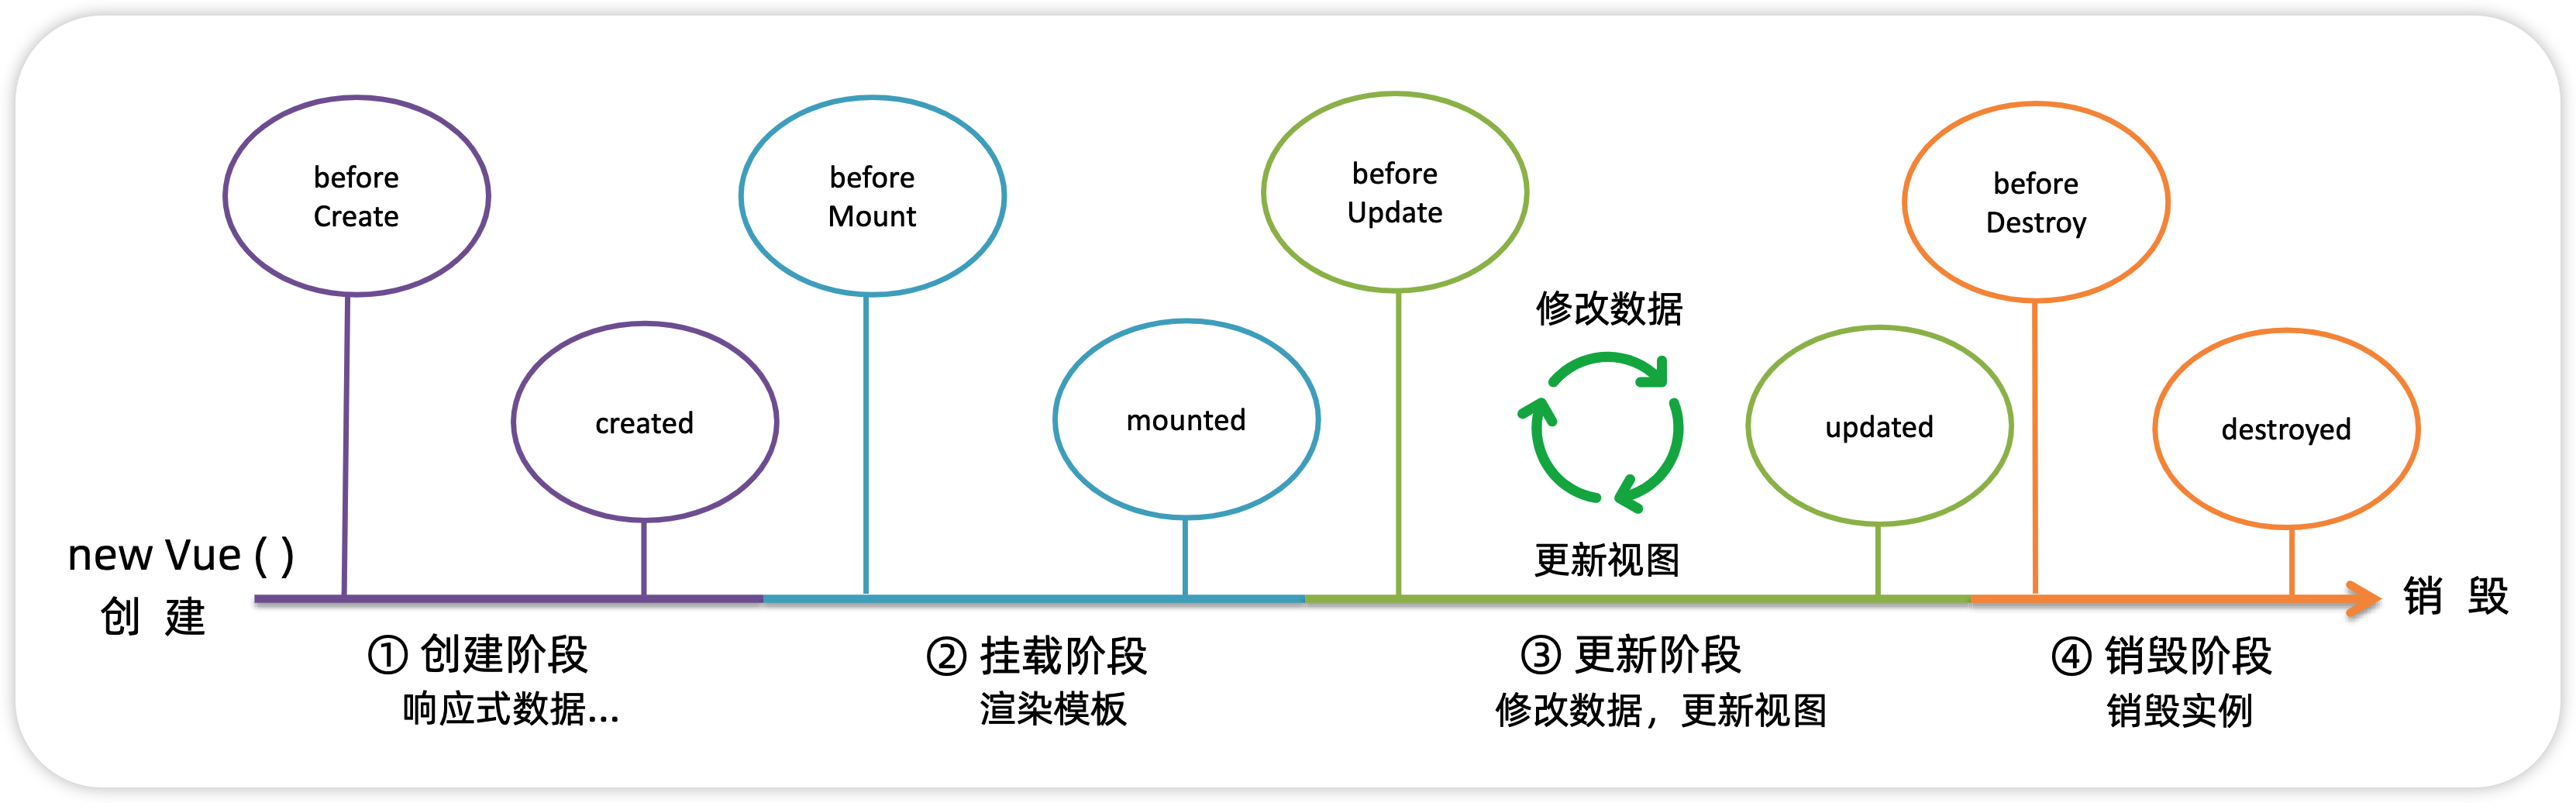
Vue生命周期:就是一个Vue实例从创建 到 销毁 的整个过程。
生命周期四个阶段:① 创建 ② 挂载 ③ 更新 ④ 销毁
-
1.创建阶段:创建响应式数据
-
2.挂载阶段:渲染模板
-
3.更新阶段:修改数据,更新视图
-
4.销毁阶段:销毁Vue实例
二、Vue生命周期钩子
Vue生命周期过程中,会自动运行一些函数,被称为【生命周期钩子】→ 让开发者可以在【特定阶段】运行自己的代码
<!DOCTYPE html>
<html lang="en">
<head><meta charset="UTF-8"><title>Title</title>
</head>
<div id="app"><h3>{{ title }}</h3><div><button @click="count--">-</button><span>{{ count }}</span><button @click="count++">+</button></div>
</div>
<script src="https://cdn.jsdelivr.net/npm/vue@2/dist/vue.js"></script>
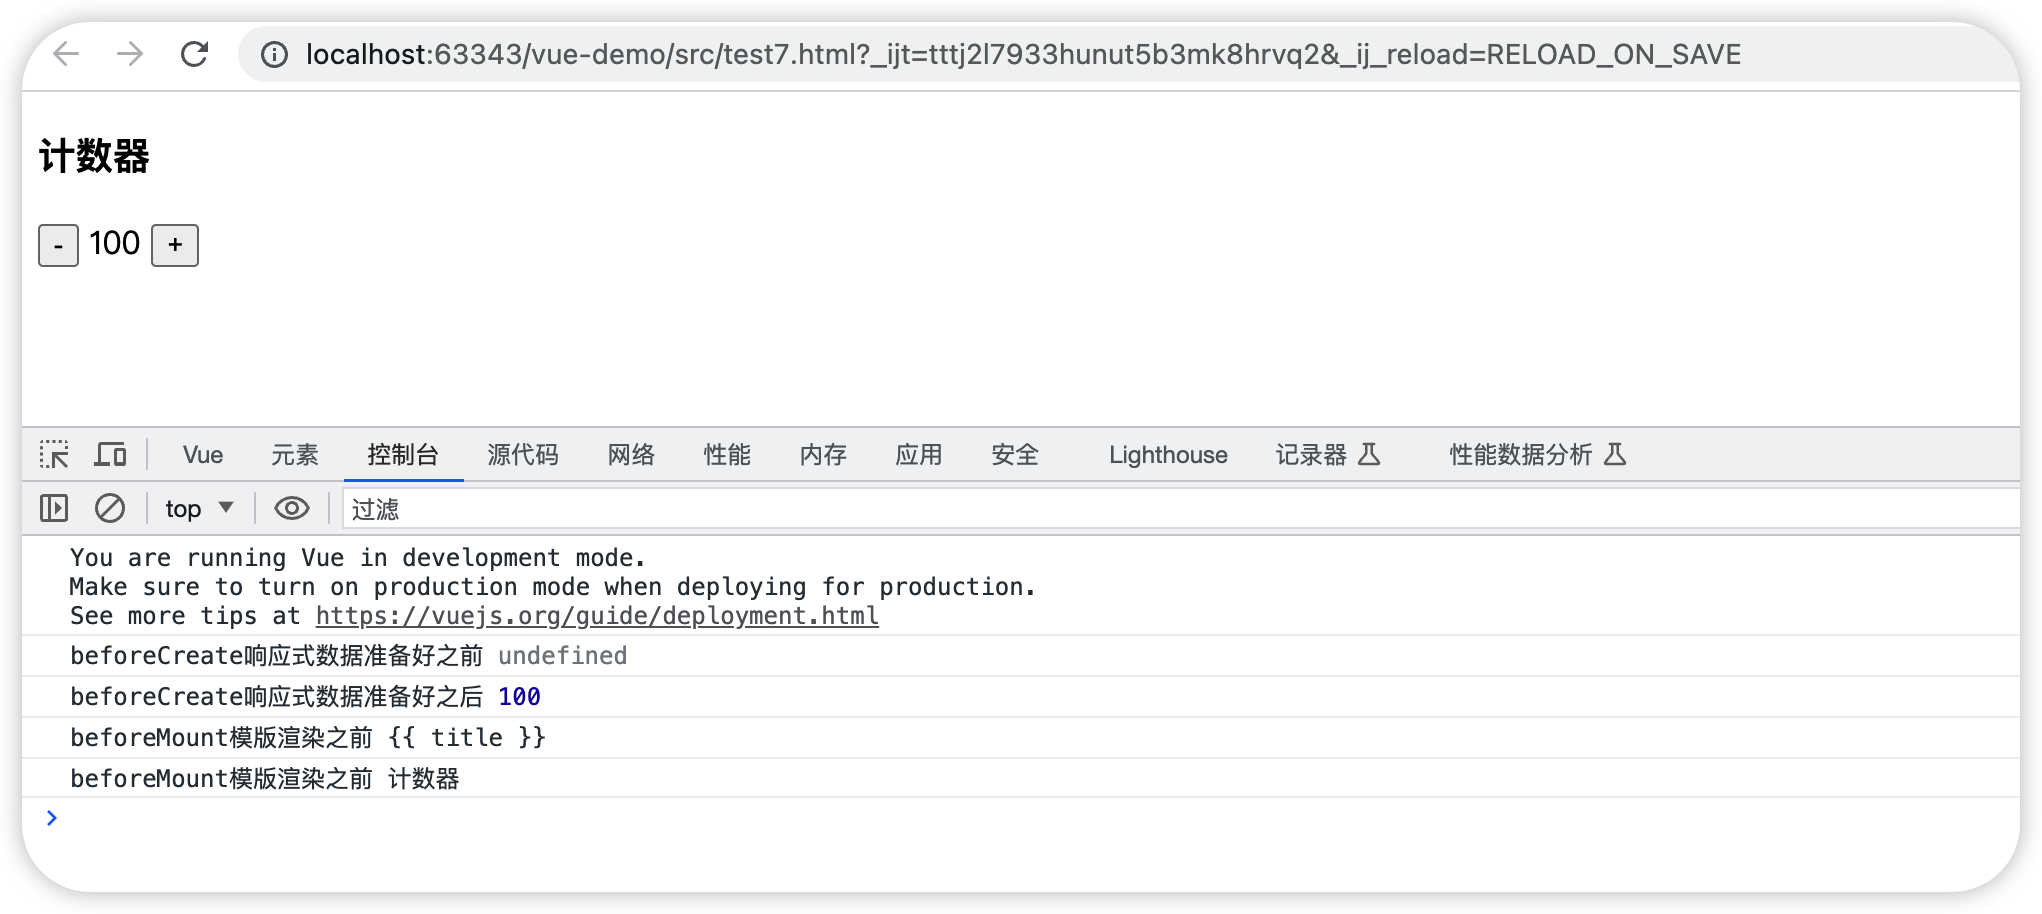
<script>const app = new Vue({el: '#app',data: {count: 100,title: '计数器'},// 1. 创建阶段(准备数据)beforeCreate() {console.log('beforeCreate响应式数据准备好之前',this.count)},created() {console.log('beforeCreate响应式数据准备好之后',this.count)//this.数据名 = 请求回来的数据//可以开始发送初始化渲染的请求了},// 2. 挂载阶段(渲染模板)beforeMount() {console.log('beforeMount模版渲染之前',document.querySelector('h3').innerHTML)},mounted() {console.log('beforeMount模版渲染之前',document.querySelector('h3').innerHTML)},// 3. 更新阶段(修改数据 → 更新视图)beforeUpdate() {console.log('beforeUpdate')},updated() {console.log('Updated')},// 4. 卸载阶段beforeDestroy() {console.log('beforeDestroy')},destroyed() {console.log('destroyed')}})
</script>
</html>
三、生命周期钩子小案例
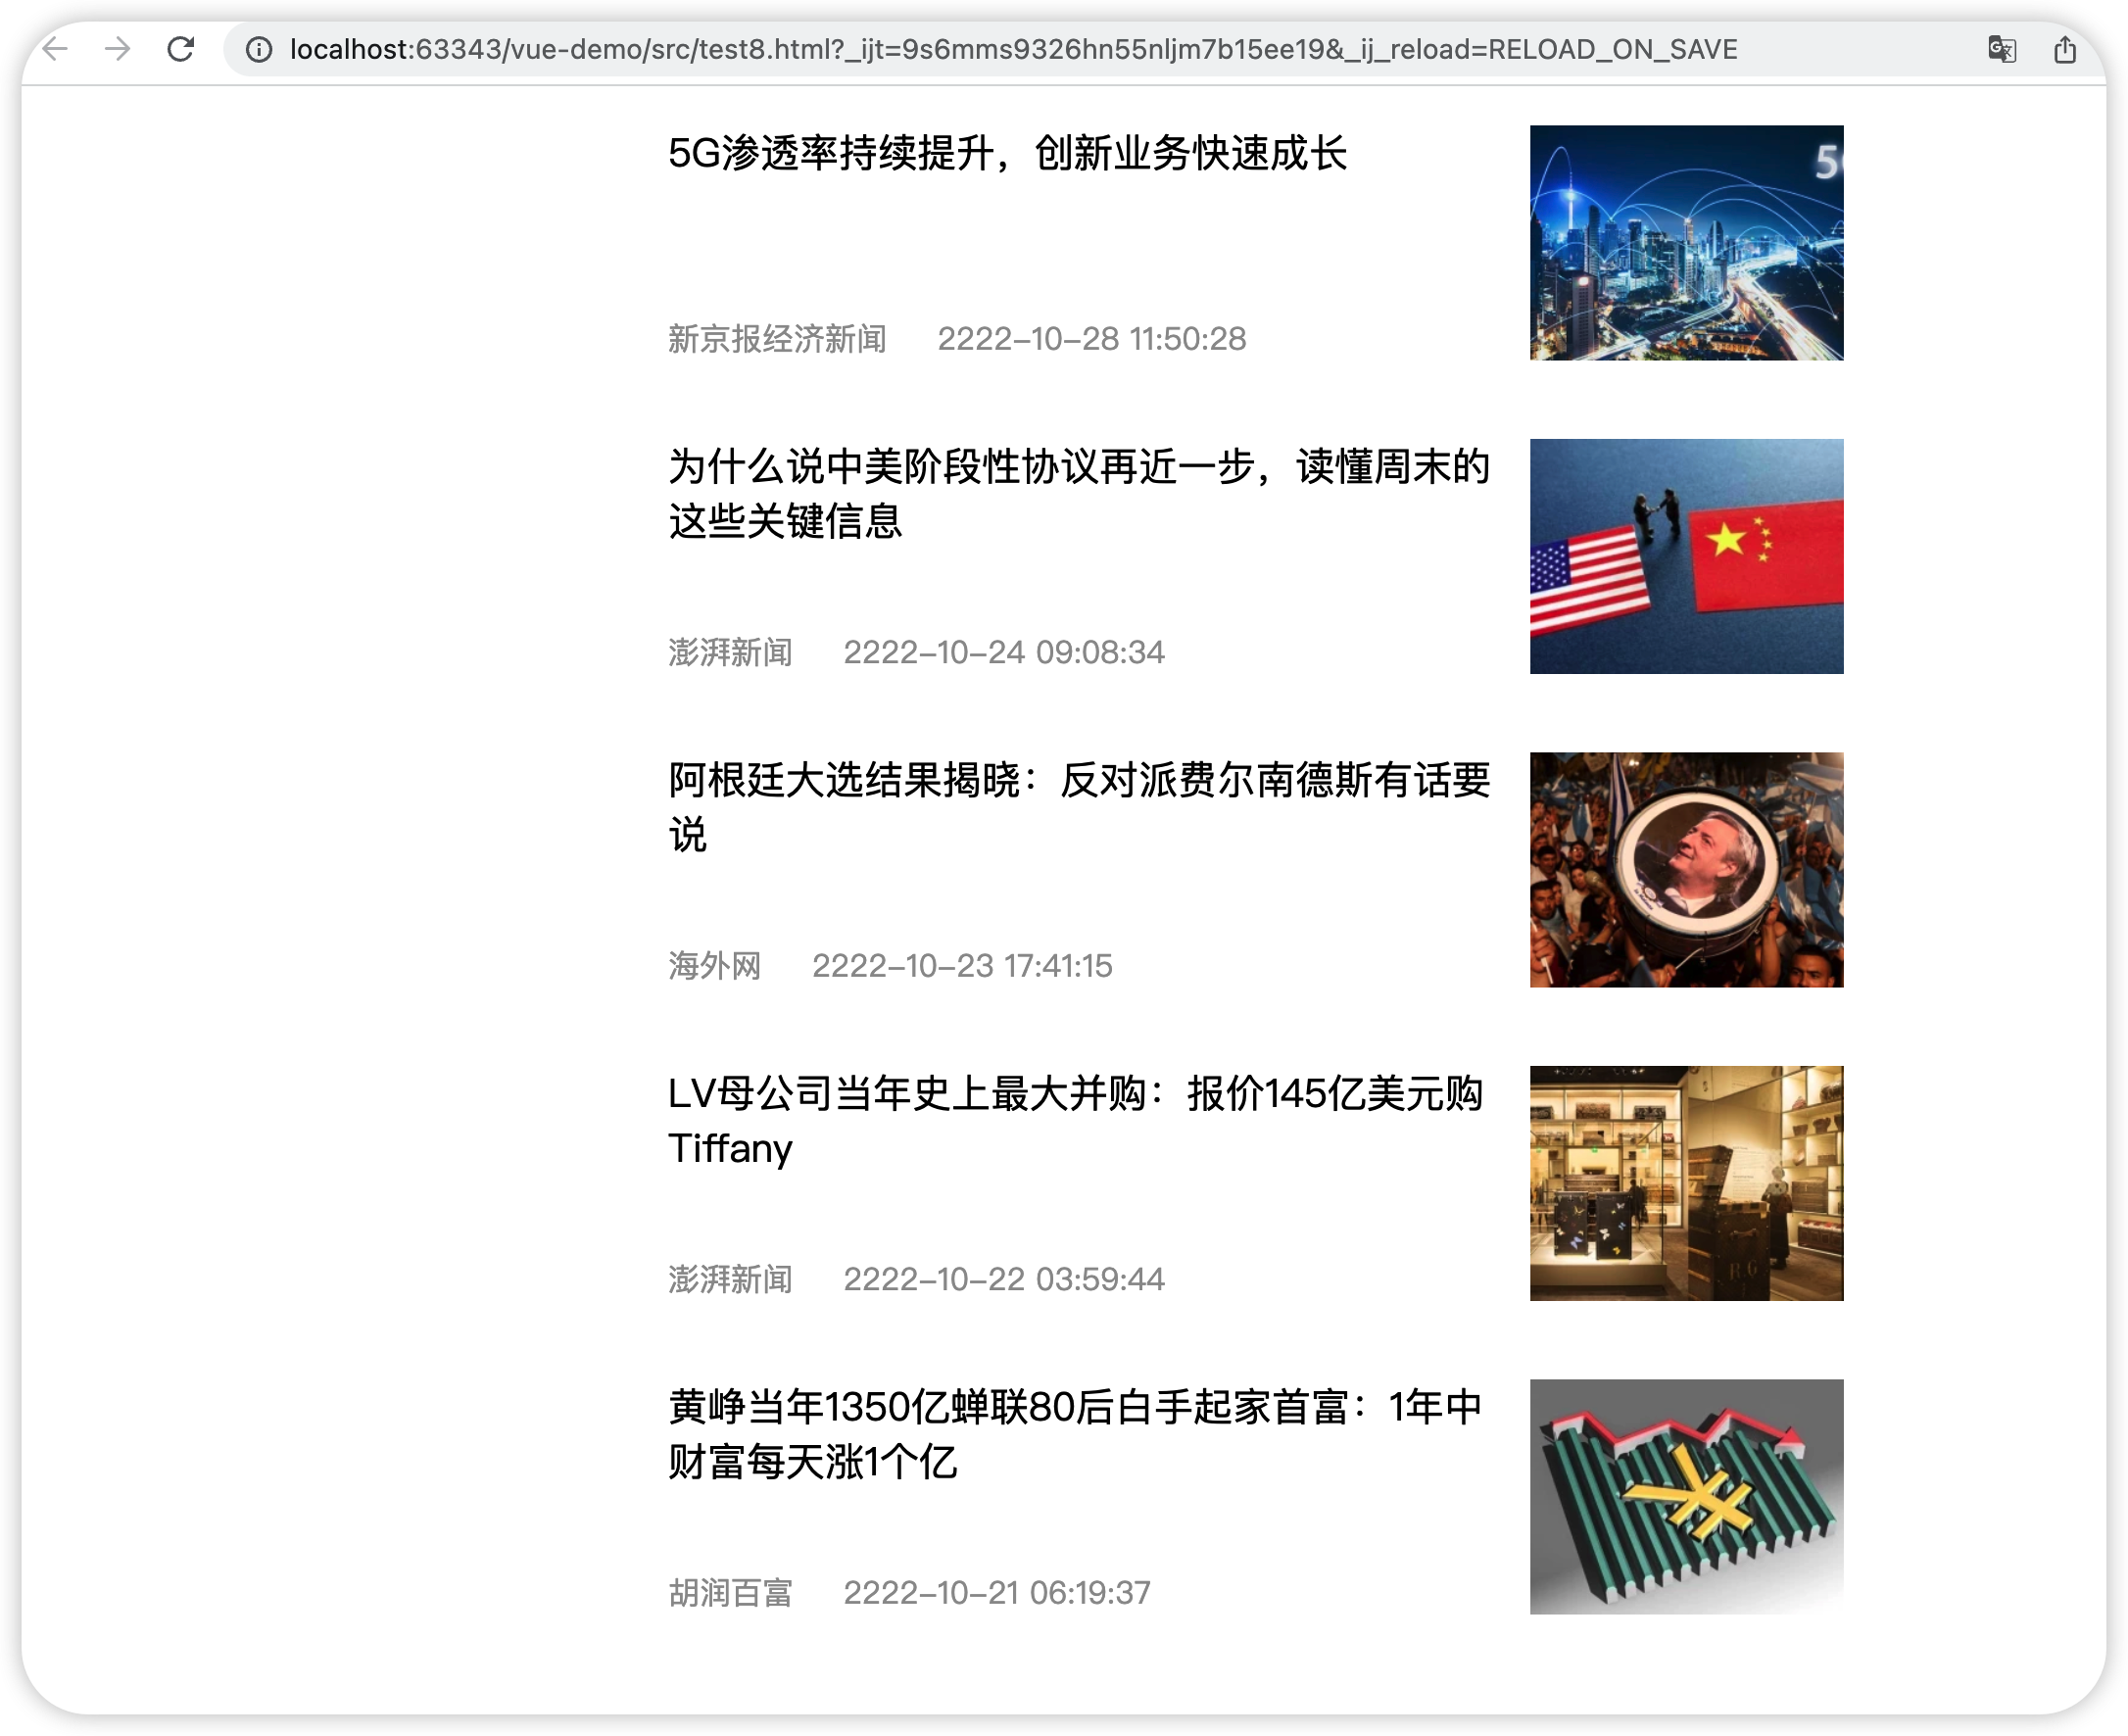
1、在created中发送数据
<!DOCTYPE html>
<html lang="en">
<head><meta charset="UTF-8"><title>头条</title>
</head>
<style>* {margin: 0;padding: 0;list-style: none;}.news {display: flex;height: 120px;width: 600px;margin: 0 auto;padding: 20px 0;cursor: pointer;}.news .left {flex: 1;display: flex;flex-direction: column;justify-content: space-between;padding-right: 10px;}.news .left .title {font-size: 20px;}.news .left .info {color: #999999;}.news .left .info span {margin-right: 20px;}.news .right {width: 160px;height: 120px;}.news .right img {width: 100%;height: 100%;object-fit: cover;}
</style><div id="app"><ul><li  class="news" v-for="(item,index) in list" :key="item.id"><div class="left"><div class="title">{{ item.title }}</div><div class="info"><span>{{ item.source }}</span><span>{{item.time}}</span></div></div><div class="right"><img :src="item.img" alt=""></div></li></ul>
</div>
<script src="https://cdn.jsdelivr.net/npm/vue@2/dist/vue.js"></script>
<script src="https://cdn.jsdelivr.net/npm/axios/dist/axios.min.js"></script>
<script>// 接口地址:http://hmajax.itheima.net/api/news// 请求方式:getconst app = new Vue({el: '#app',data: {list: []},async created(){const res = await  axios.get('http://hmajax.itheima.net/api/news')this.list = res.data.data}})
</script></html>
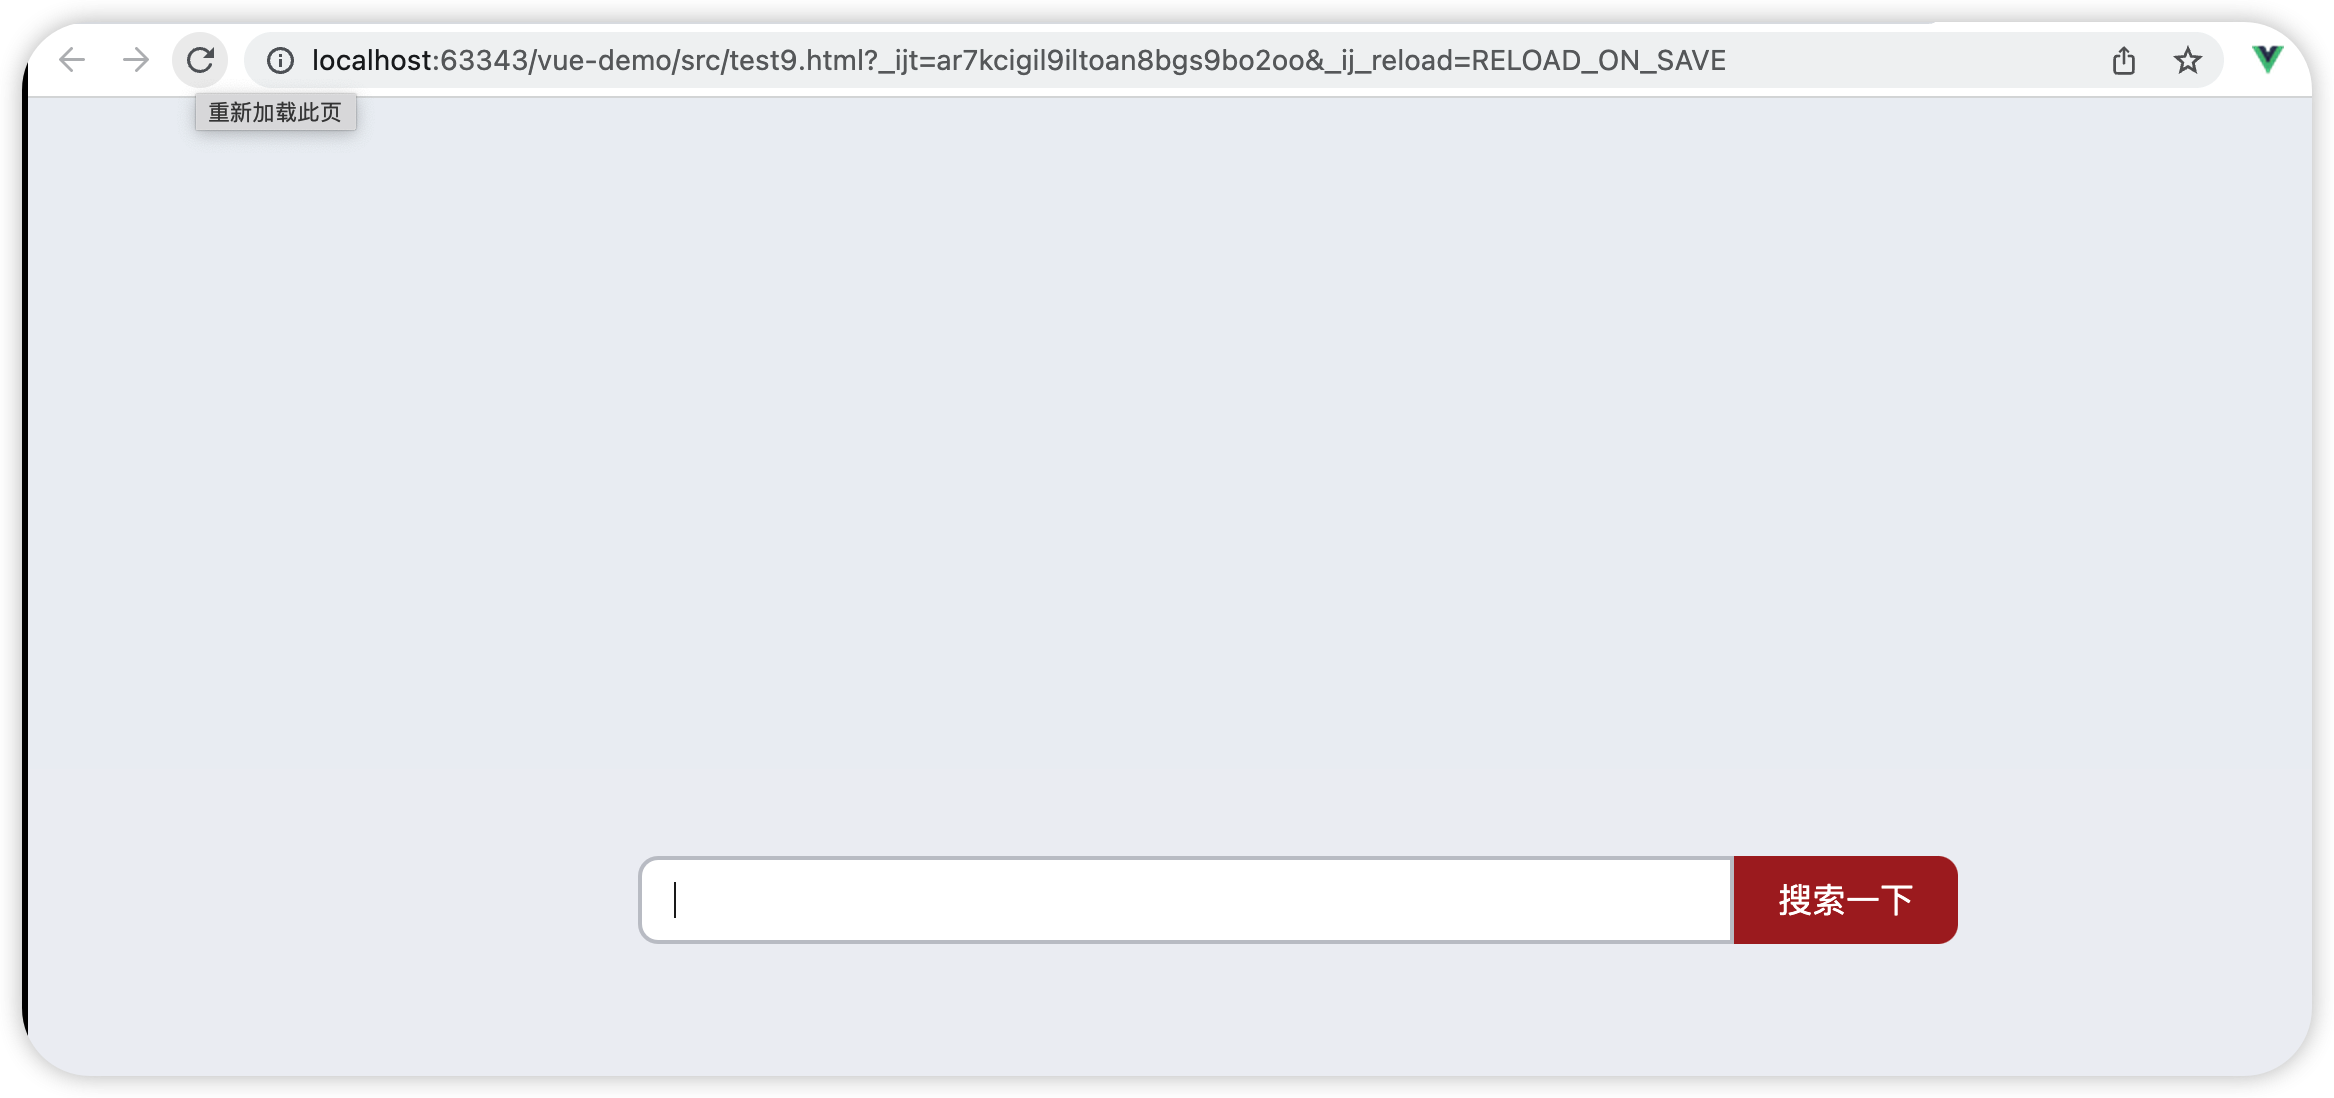
2、在mounted中获取焦点
在进入页面时,让输入框获取焦点
<!DOCTYPE html>
<html lang="en">
<head><meta charset="UTF-8"><title>搜索</title>
</head>
<style>html,body {height: 100%;}.search-container {position: absolute;top: 30%;left: 50%;transform: translate(-50%, -50%);text-align: center;}.search-container .search-box {display: flex;}.search-container img {margin-bottom: 30px;}.search-container .search-box input {width: 512px;height: 16px;padding: 12px 16px;font-size: 16px;margin: 0;vertical-align: top;outline: 0;box-shadow: none;border-radius: 10px 0 0 10px;border: 2px solid #c4c7ce;background: #fff;color: #222;overflow: hidden;box-sizing: content-box;-webkit-tap-highlight-color: transparent;}.search-container .search-box button {cursor: pointer;width: 112px;height: 44px;line-height: 41px;line-height: 42px;background-color: #ad2a27;border-radius: 0 10px 10px 0;font-size: 17px;box-shadow: none;font-weight: 400;border: 0;outline: 0;letter-spacing: normal;color: white;}body {background: no-repeat center /cover;background-color: #edf0f5;}
</style><div class="container" id="app"><div class="search-container"><div class="search-box"><input type="text" v-model="words" id="inp"><button>搜索一下</button></div></div>
</div><script src="https://cdn.jsdelivr.net/npm/vue@2/dist/vue.js"></script>
<script>const app = new Vue({el: '#app',data: {words: ''},//核心思路:等输入框出来,让输入框获取焦点mounted() {document.querySelector('#inp').focus()}})
</script>
</html>
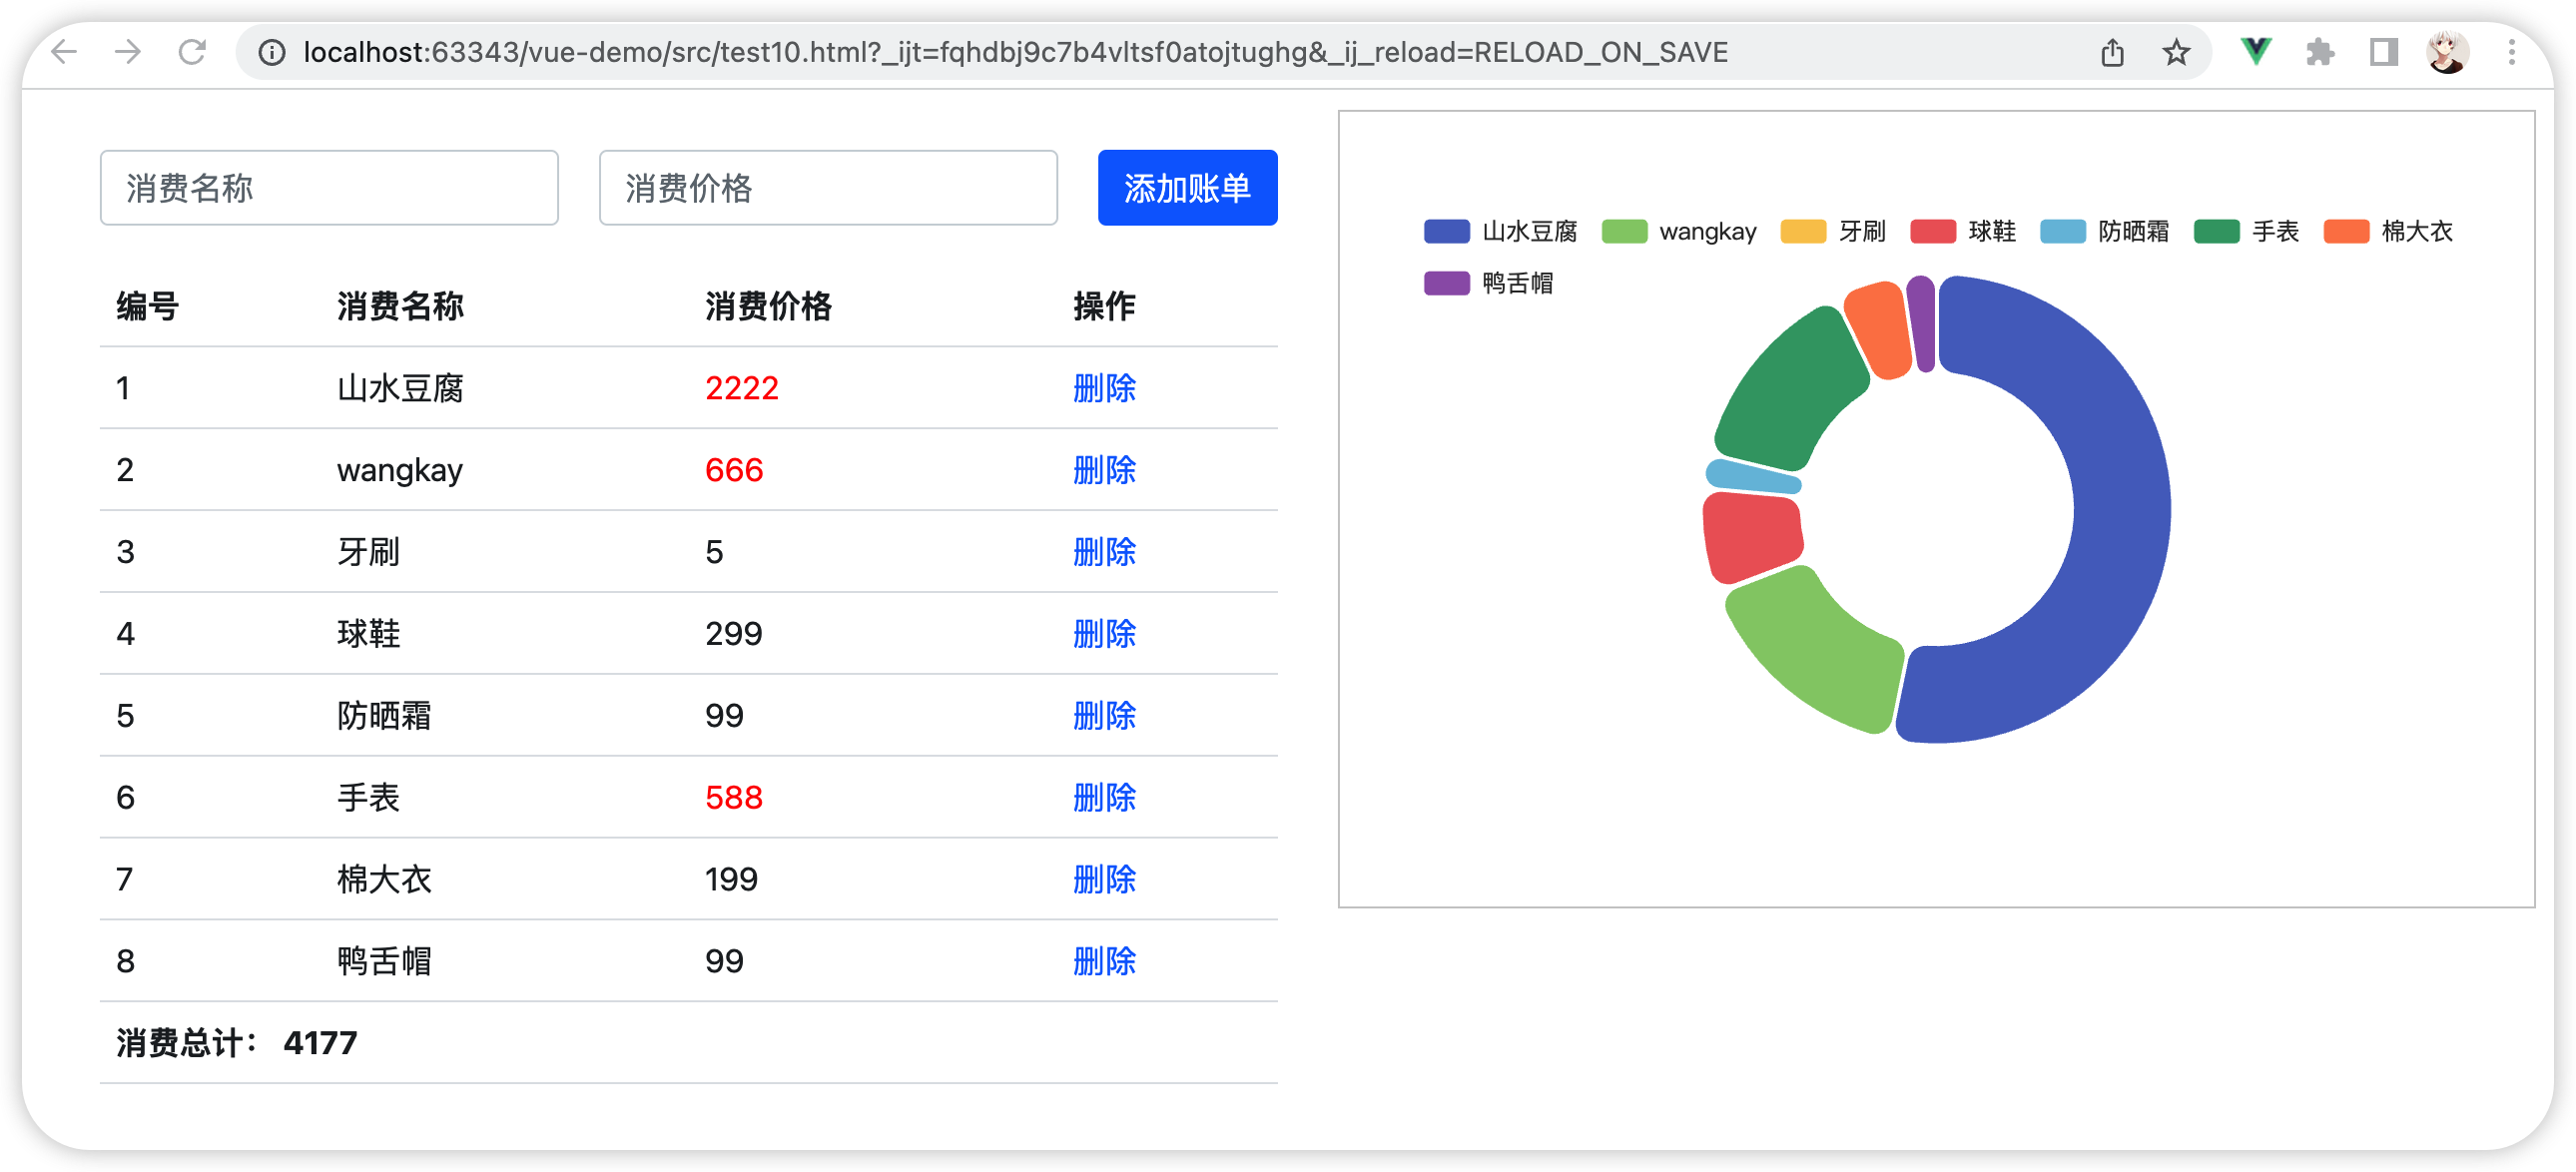
四、案例——记账清单
1、需求图示
2、需求分析
1.基本渲染
2.添加功能
3.删除功能
4.饼图渲染
3、思路分析
1.基本渲染
- 立刻发送请求获取数据 created
- 拿到数据,存到data的响应式数据中
- 结合数据,进行渲染 v-for
- 消费统计 —> 计算属性
2.添加功能
- 收集表单数据 v-model,使用指令修饰符处理数据
- 给添加按钮注册点击事件,对输入的内容做非空判断,发送请求
- 请求成功后,对文本框内容进行清空
- 重新渲染列表
3.删除功能
- 注册点击事件,获取当前行的id
- 根据id发送删除请求
- 需要重新渲染
4.饼图渲染
- 初始化一个饼图 echarts.init(dom) mounted钩子中渲染
- 根据数据试试更新饼图 echarts.setOptions({…})
4、实现
<!DOCTYPE html>
<html lang="en">
<head><meta charset="UTF-8"><title>Title</title>
</head>
<!-- CSS only -->
<linkrel="stylesheet"href="https://cdn.jsdelivr.net/npm/bootstrap@5.1.3/dist/css/bootstrap.min.css"
/>
<style>.red {color: red!important;}.search {width: 300px;margin: 20px 0;}.my-form {display: flex;margin: 20px 0;}.my-form input {flex: 1;margin-right: 20px;}.table > :not(:first-child) {border-top: none;}.contain {display: flex;padding: 10px;}.list-box {flex: 1;padding: 0 30px;}.list-box  a {text-decoration: none;}.echarts-box {width: 600px;height: 400px;padding: 30px;margin: 0 auto;border: 1px solid #ccc;}tfoot {font-weight: bold;}@media screen and (max-width: 1000px) {.contain {flex-wrap: wrap;}.list-box {width: 100%;}.echarts-box {margin-top: 30px;}}
</style><div id="app"><div class="contain"><!-- 左侧列表 --><div class="list-box"><!-- 添加资产 --><form class="my-form"><input v-model.trim="name" type="text" class="form-control" placeholder="消费名称" /><input v-model.number="price" type="text" class="form-control" placeholder="消费价格" /><button @click="add" type="button" class="btn btn-primary">添加账单</button></form><table class="table table-hover"><thead><tr><th>编号</th><th>消费名称</th><th>消费价格</th><th>操作</th></tr></thead><tbody><tr v-for="(item,index) in list" :key="item.id"><td>{{ index + 1}}</td><td>{{  item.name }}</td><td :class="{ red: item.price > 500}">{{ item.price}}</td><td><a @click="del(item.id)" href="javascript:;">删除</a></td></tr></tbody><tfoot><tr><td colspan="4">消费总计: {{ totalPrice }}</td></tr></tfoot></table></div><!-- 右侧图表 --><div class="echarts-box" id="main"></div></div>
</div>
<script src="https://cdn.jsdelivr.net/npm/echarts@5.4.0/dist/echarts.min.js"></script>
<script src="https://cdn.jsdelivr.net/npm/vue@2/dist/vue.js"></script>
<script src="https://cdn.jsdelivr.net/npm/axios/dist/axios.min.js"></script>
<script>/*** 接口文档地址:* https://www.apifox.cn/apidoc/shared-24459455-ebb1-4fdc-8df8-0aff8dc317a8/api-53371058** 功能需求:* 1. 基本渲染** 2. 添加功能* 3. 删除功能* 4. 饼图渲染*/const app = new Vue({el: '#app',data: {list: [],name:'',price:''},computed: {totalPrice () {return this.list.reduce((sum, item)=> sum + item.price,0 )}},created() {// const  res = await axios.get('https://applet-base-api-t.itheima.net/bill',{//   params: {//     creator: 'wangkay'//   }// })//  this.list = res.data.datathis.getList()},mounted() {this.myChart =  echarts.init(document.querySelector('#main'))this.myChart.setOption ({tooltip: {trigger: 'item'},legend: {top: '5%',left: 'center'},series: [{name: '消费账单',type: 'pie',radius: ['40%', '70%'],avoidLabelOverlap: false,itemStyle: {borderRadius: 10,borderColor: '#fff',borderWidth: 2},label: {show: false,position: 'center'},emphasis: {label: {show: true,fontSize: 40,fontWeight: 'bold'}},labelLine: {show: false},data: []}]});},methods:{async getList(){const  res = await axios.get('https://applet-base-api-t.itheima.net/bill',{params: {creator: 'wangkay'}})this.list = res.data.datathis.myChart.setOption({series: [{data: this.list.map(item => ({value: item.price, name: item.name}))}]})},async add() {if (!this.name){alert('请输入名称')return}if (typeof this.price !=='number'){alert('请输入正确的消费价格')return}const res = await axios.post('https://applet-base-api-t.itheima.net/bill',{creator: 'wangkay',name: this.name,price: this.price})this.getList()this.name=''this.price=''},async del(id) {const res = await axios.delete(`https://applet-base-api-t.itheima.net/bill/${id}`)this.getList()}}})
</script>
</html>
五、工程化开发和脚手架
1.开发Vue的两种方式
- 核心包传统开发模式:基于html / css / js 文件,直接引入核心包,开发 Vue。
- 工程化开发模式:基于构建工具(例如:webpack)的环境中开发Vue。
工程化开发模式优点:
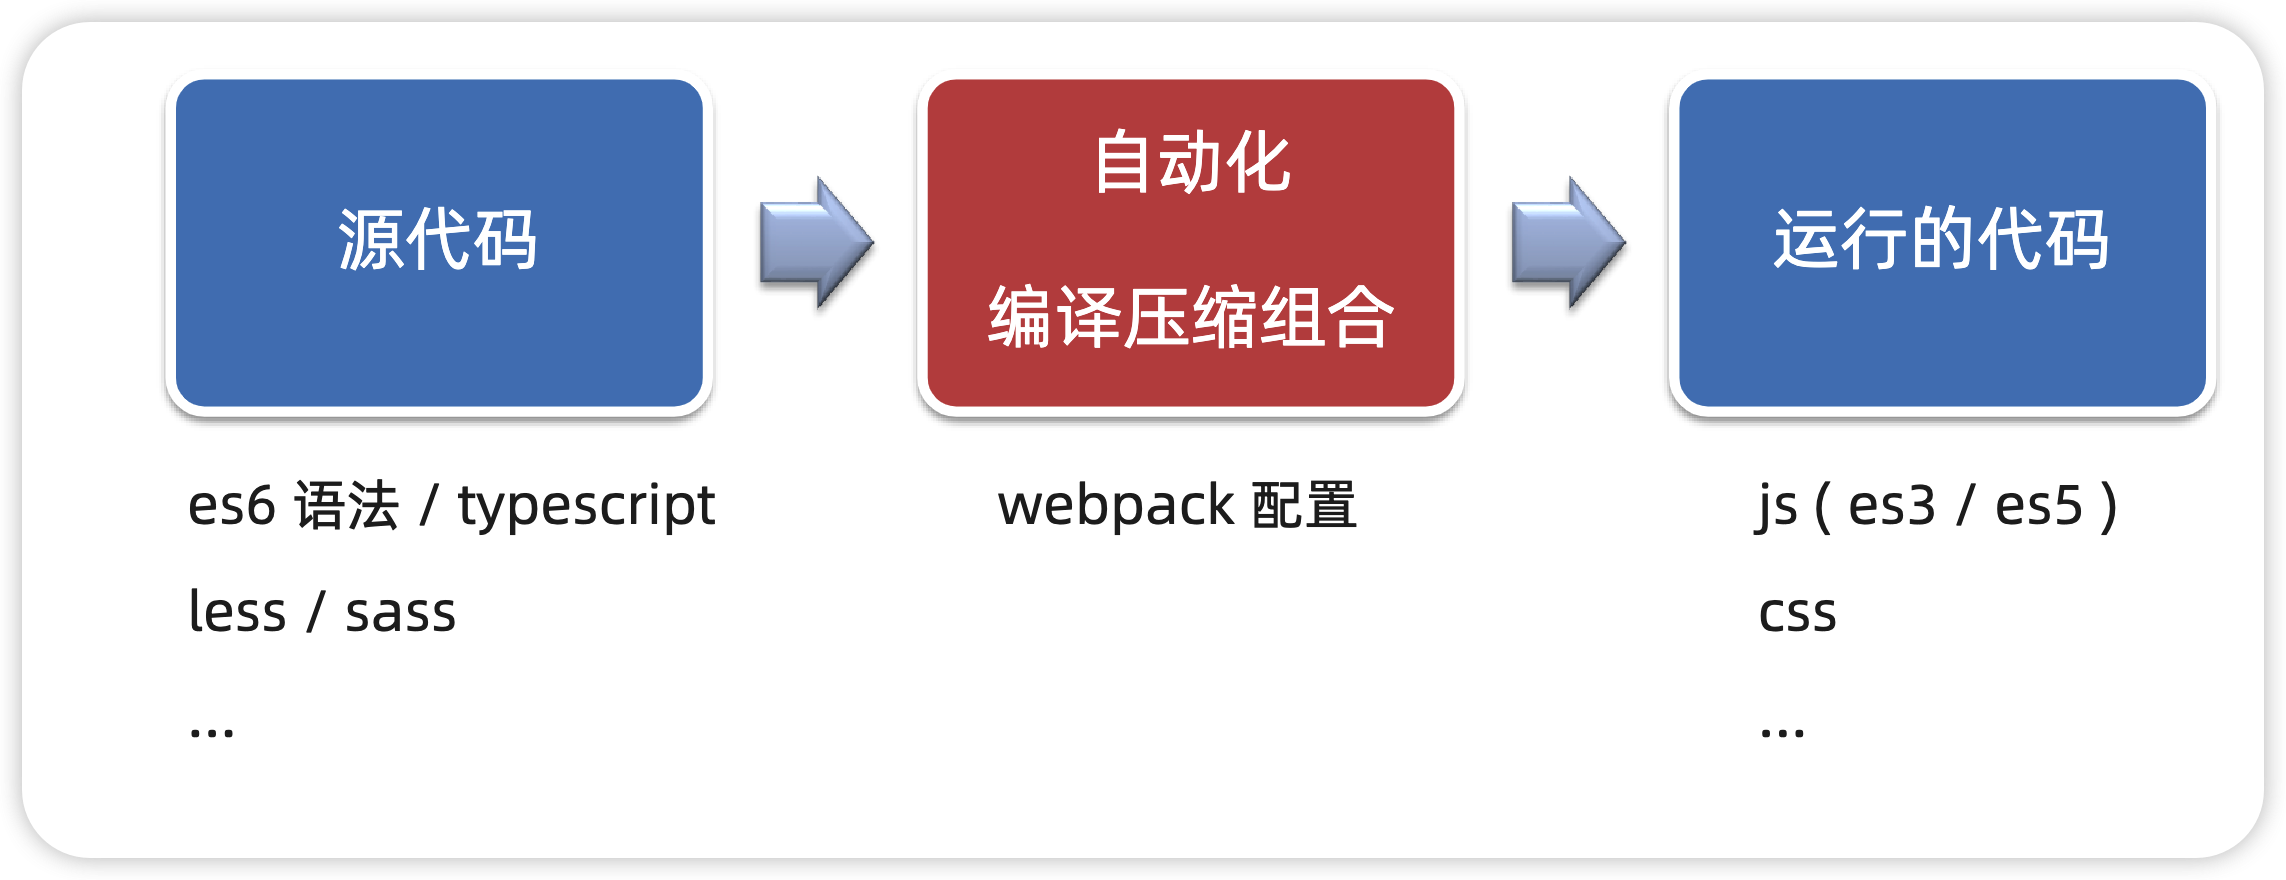
提高编码效率,比如使用JS新语法、Less/Sass、Typescript等通过webpack都可以编译成浏览器识别的ES3/ES5/CSS等
工程化开发模式问题:
- webpack配置不简单
- 雷同的基础配置
- 缺乏统一的标准
为了解决以上问题,所以我们需要一个工具,生成标准化的配置
2.脚手架Vue CLI
基本介绍:
Vue CLI 是Vue官方提供的一个全局命令工具
可以帮助我们快速创建一个开发Vue项目的标准化基础架子。【集成了webpack配置】
好处:
- 开箱即用,零配置
- 内置babel等工具
- 标准化的webpack配置
使用步骤:
- 全局安装(只需安装一次即可) yarn global add @vue/cli 或者 npm i @vue/cli -g
- 查看vue/cli版本: vue --version
- 创建项目架子:vue create project-name(项目名不能使用中文)
- 启动项目:yarn serve 或者 npm run serve(命令不固定,找package.json)
六、项目目录介绍和运行流程
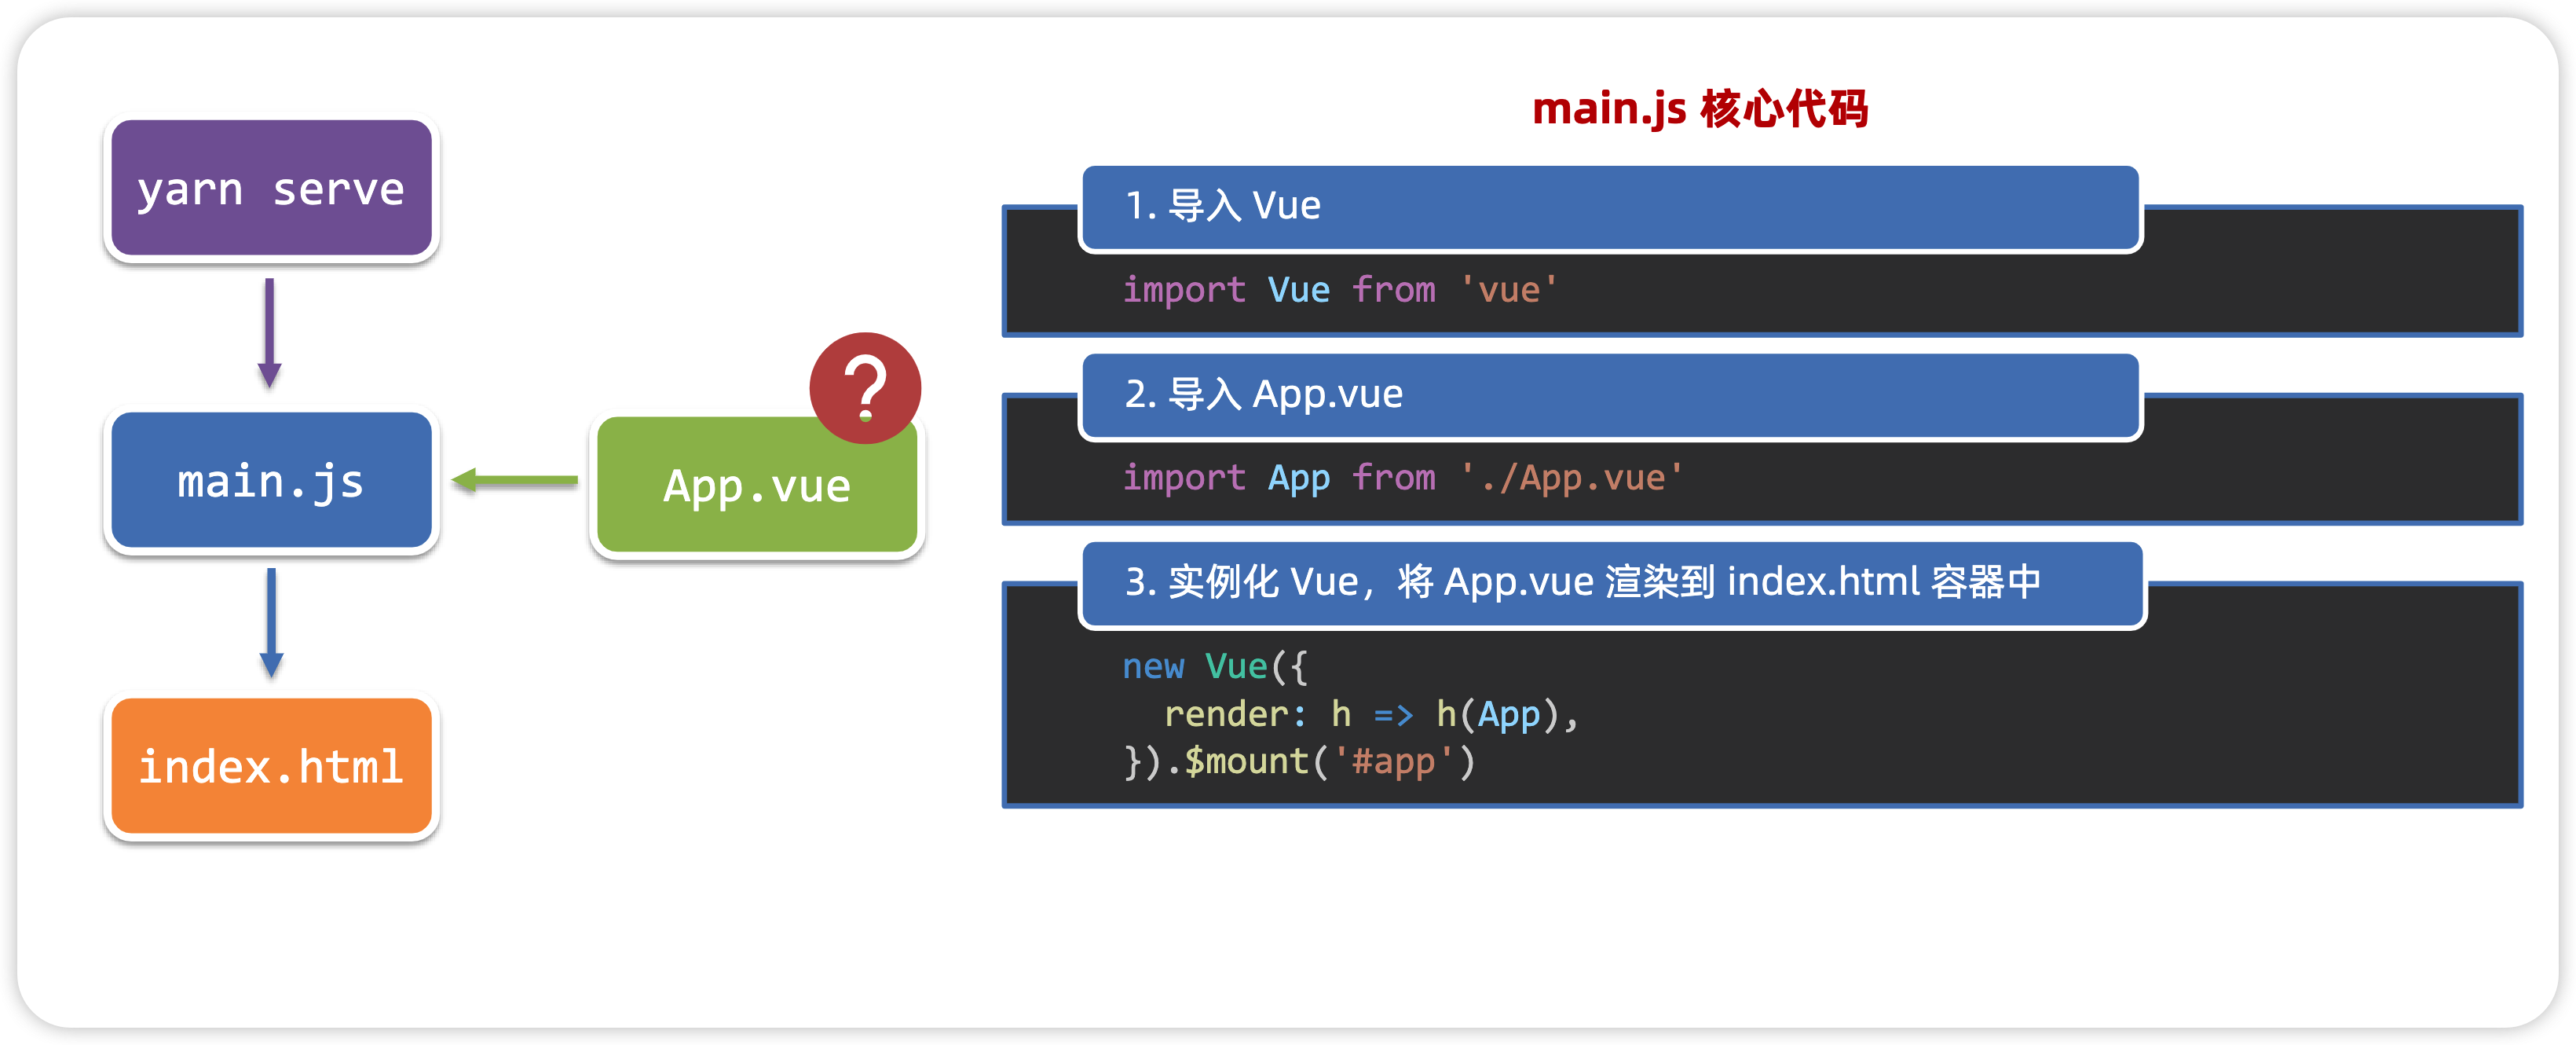
1、项目目录介绍
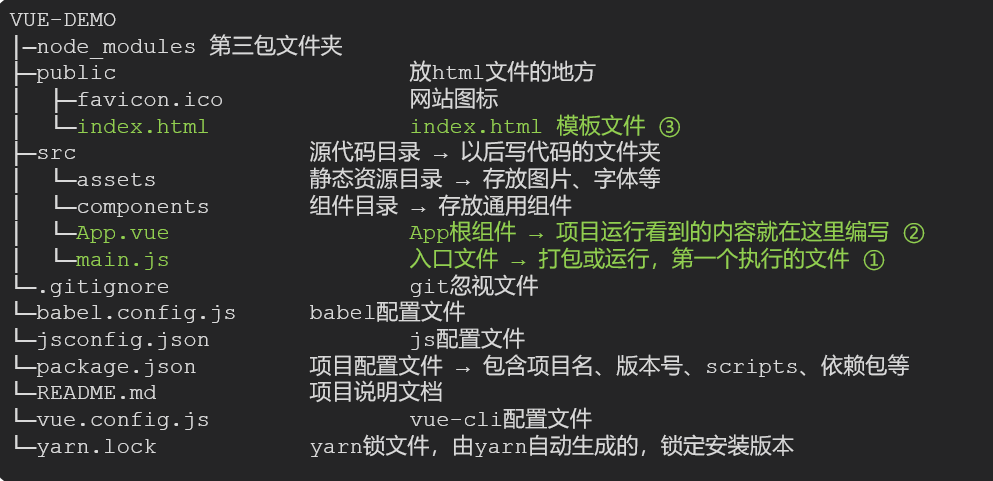

虽然脚手架中的文件有很多,目前咱们只需人事三个文件即可
- main.js 入口文件
- App.vue App根组件
- index.html 模板文件
2、运行流程
七、组件化开发
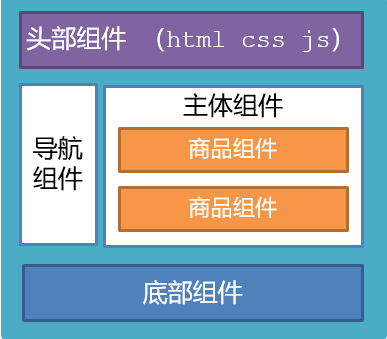
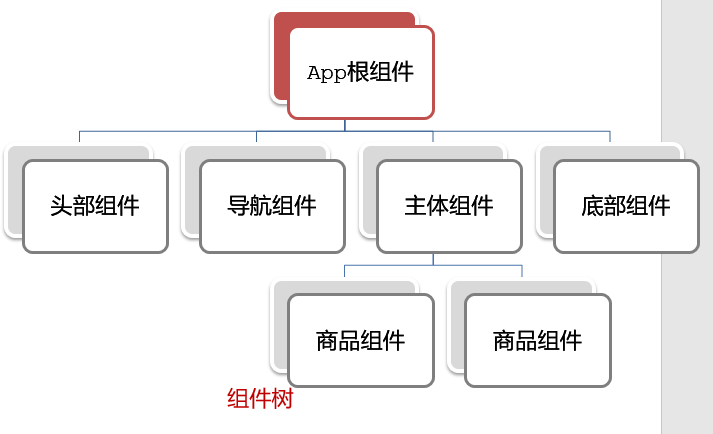
组件化:一个页面可以拆分成一个个组件,每个组件有着自己独立的结构、样式、行为。
好处:便于维护,利于复用 → 提升开发效率。
组件分类:普通组件、根组件。
比如:下面这个页面,可以把所有的代码都写在一个页面中,但是这样显得代码比较混乱,难易维护。咱们可以按模块进行组件划分
1、根组件App.vue
1.根组件介绍
整个应用最上层的组件,包裹所有普通小组件
2.组件是由三部分构成
-
三部分构成
- template:结构 (有且只能一个根元素)
- script: js逻辑
- style: 样式 (可支持less,需要装包)
-
让组件支持less
(1) style标签,lang=“less” 开启less功能
(2) 装包: yarn add less less-loader -D 或者npm i less less-loader -D
2、普通组件的注册使用-局部注册
1.特点:
只能在注册的组件内使用
2.步骤:
- 创建.vue文件(三个组成部分)
- 在使用的组件内先导入再注册,最后使用
3.使用方式:
当成html标签使用即可 <组件名></组件名>
4.注意:
组件名规范 —> 大驼峰命名法, 如 HmHeader
5.语法:
// 导入需要注册的组件
import 组件对象 from '.vue文件路径'
import HmHeader from './components/HmHeader'export default {  // 局部注册components: {'组件名': 组件对象,HmHeader:HmHeaer,HmHeader}
}
3、普通组件的注册使用-全局注册
1.特点:
全局注册的组件,在项目的任何组件中都能使用
2.步骤
- 创建.vue组件(三个组成部分)
- main.js中进行全局注册
3.使用方式
当成HTML标签直接使用
<组件名></组件名>
4.注意
组件名规范 —> 大驼峰命名法, 如 HmHeader
5.语法
Vue.component(‘组件名’, 组件对象)
例:
// 导入需要全局注册的组件
import HmButton from './components/HmButton'
Vue.component('HmButton', HmButton)