Apache 配置和应用
目录
构建虚拟 Web 主机
Options指令解释
Options指令常用选项
AllowOverride指令解释:
地址限制策略:
httpd服务支持的虚拟主机类型包括以下三种:
基于域名的虚拟主机
1.为虚拟主机提供域名解析
2.为虚拟主机准备网页文档
3.添加虚拟主机配置
4.设置访问控制
5.加载独立的配置文件
编辑
6.在客户机中访问虚拟 Web 主机
基于IP地址的虚拟主机
1.添加一个虚拟网卡
2.修改虚拟主机配置文件
3.修改主配置文件
编辑 4.在客户机中浏览器访问虚拟 Web 主机
基于端口的虚拟主机
1.修改虚拟主机配置
2.修改主机主配置文件
3.验证
Apache 连接保持
构建Web虚拟目录与用户授权限制
1.查看默认根目录是哪个
2.创建虚拟目录
3.用户授权限制
Apache 日志分割
浏览器访问
构建虚拟 Web 主机
虚拟Web主机指的是在同一台服务器中运行多个Web站点,其中每一个站点实际上并不独立占用整个服务器,因此被称为“虚拟”Web 主机。通过虚拟 Web 主机服务可以充分利用服务器的硬件资源,从而大大降低网站构建及运行成本。
使用httpd服务可以非常方便地构建虚拟主机服务器,只需要运行一个httpd服务就能够同时支撑大量的Web站点。Apache虚拟主机相当于一个在同一台服务器中却相互独立的站点,从而实现一台主机对外提供多个 web 服务,每个虚拟主机之间是独立的,互不影响的。
Options指令解释
Options指令的主要作用是控制特定目录将启用哪些服务器特性。可以在Apache服务配置文件的虚拟主机配置(VirtualHost)、特定目录配置(Directory)以及.htaccess文件中使用。
Options指令常用选项
None:表示不启用任何的服务器特性。
FollowSymLinks:服务器允许在此目录中使用符号连接(软链接)。
Indexes:如果输入的网址对应服务器上的一个文件目录,而此目录中又没有Apache配置文件中的DirectoryIndex指令指定的文件(例如: DirectoryIndex index.html index.php),则列出该目录下的所有文件。
MultiViews:如果客户端请求的路径可能对应多种类型的文件,那么服务器将根据客户端请求的具体情况自动选择一个最匹配客户端要求的文件。例如,在服务器站点的file文件夹下中存在名为hello.jpg和hello.html的两个文件,此时用户输入 http://localhost/file/hello ,如果在 file文件夹下并没有 hello子目录,那么服务器将会尝试在 file目录下查找形如 hello.*的文件,然后根据用户请求的具体情况返回最匹配要求的 hello.jpg或者 hello.html。
All:表示除 MultiViews之外的所有特性。这也是Options指令的默认设置。
AllowOverride指令解释:
.htaccess(分布式隐含配置文件):提供了针对每个目录改变配置的方法,即在一个特定的目录中放置一个包含特定指令的文件,其中的指令作用于此目录及其所有子目录。
当AllowOverride设置成None时,相应的配置目录下的.htaccess文件是不被读取的,即无法生效。
当AllowOverride设置成All时,每一次请求访问相应目录下的文件时,都会读取.htaccess文件的配置,意味着原Apache指令会被.htaccess文件中的指令重写。
从性能和安全性考虑,一般都尽可能避免使用.htaccess文件,任何希望放在.htaccess文件中的配置,都可放在主配置文件(httpd.conf)的 <Directory>段中,而且高效。因此AllowOverride属性一般都配置成None 。
地址限制策略:
Require all granted:允许所有主机访问。
Require all denied:拒绝所有主机访问。
Require local:仅允许本地主机访问。
Require [not] host <主机名或域名列表>:允许或拒绝指定主机或域名访问。
Require [not] ip <IP 地址或网段列表>:允许或拒绝指定 IP 地址网络访问。
httpd服务支持的虚拟主机类型包括以下三种:
基于域名的虚拟主机
基于域名:为每个虚拟主机使用不同的域名,但是其对应的 IP 地址是相同的。例如,www.benet.com 和 www.accp.com 站点的 IP 地址都是 192.168.47.20。这是使用最为普遍的虚拟 Web 主机类型。
1.为虚拟主机提供域名解析
方法一:部署DNS域名解析服务器 来提供域名解析
方法二:在/etc/hosts 文件中临时配置域名与IP地址的映射关系
echo "192.168.80.10 www.benet.com" >> /etc/hosts
echo "192.168.80.10 www.accp.com" >> /etc/hosts
#!/bin/bash
read -p "请输入你的IP:" LAN_IP
mount /dev/sr0 /mnt/ &> /dev/null
#rpm -ivh /mnt/Packages/bind-9.9.4-50.el7.x86_64.rpm &> /dev/null
yum install -y bind
cp /etc/named.conf{,.bak}
sed -i -e '13 s/127.0.0.1/any/' -e '19 s/localhost/any/' /etc/named.conf
cp /etc/named.rfc1912.zones{,.bak}
sed -i '24 a zone "benet.com" IN {\n\ttype master;\n\tfile "benet.com.zone";\n\tallow-update { none;};\n};\n' /etc/named.rfc1912.zones
cp -p /var/named/named.localhost /var/named/benet.com.zone
sed -i -e '2 s/rname.invalid./admin/' -e '9 s/127.0.0.1/'$LAN_IP'/' -e '$a www IN A '$LAN_IP'' -e '10d' /var/named/benet.com.zonesystemctl restart named
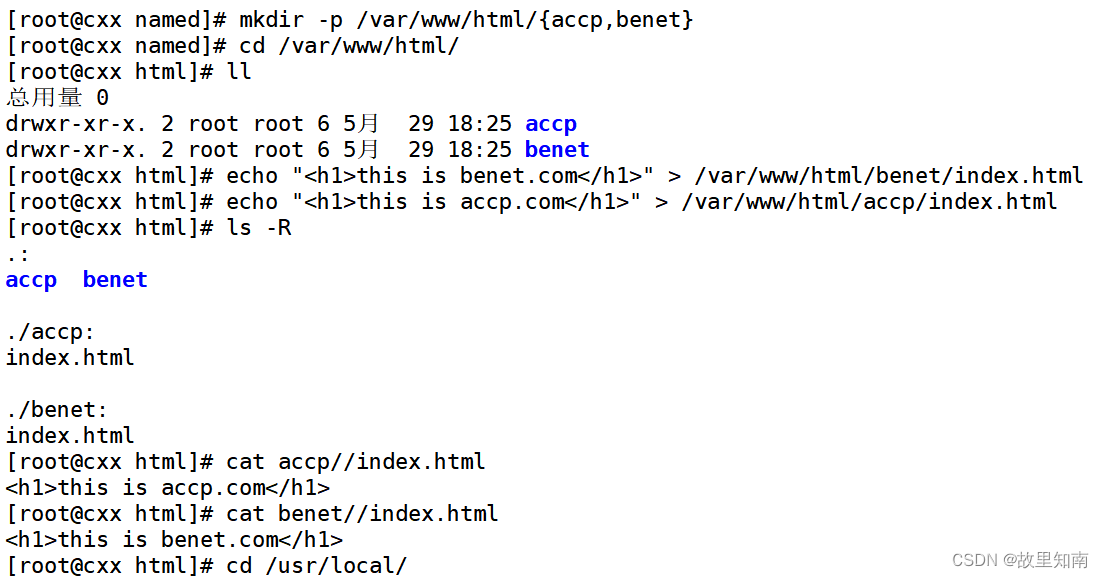
2.为虚拟主机准备网页文档
mkdir -p /var/www/html/benet
mkdir -p /var/www/html/accp
echo "<h1>www.benet.com</h1>" > /var/www/html/benet/index.html
echo "<h1>www.accp.com</h1>" > /var/www/html/accp/index.html
3.添加虚拟主机配置
vim /usr/local/httpd/conf/extra/httpd-vhosts.conf #源码编译安装的虚拟主机配置文件路径
<VirtualHost 192.168.47.20:80>     设置虚拟主机的IP和端口# ServerAdmin webmaster@dummy-host.example.com    设置管理员邮箱,这行可忽略#DocumentRoot "/usr/local/httpd/docs/dummy-host.example.com"DocumentRoot "/var/www/html/accp"              设置网站根目录# ServerName dummy-host.example.comServerName www.accp.cpm                 设置Web站点的完整域名(主机名+域名)#ServerAlias www.dummy-host.example.comErrorLog "logs/accp.com-error_log"        设置错误日志文件的路径CustomLog "logs/accp.com-access_log" common  设置访问日志文件的路径
</VirtualHost><VirtualHost 192.168.47.20:80>#ServerAdmin webmaster@dummy-host2.example.com#DocumentRoot "/usr/local/httpd/docs/dummy-host2.example.com"DocumentRoot "/var/www/html/benet"ServerName www.benet.com# ErrorLog "logs/dummy-host2.example.com-error_log"# CustomLog "logs/dummy-host2.example.com-access_log" commonErrorLog "logs/benet.com-error_log"CustomLog "logs/benet.com-access_log" common
</VirtualHost>
4.设置访问控制
vim /usr/local/httpd/conf/httpd.conf
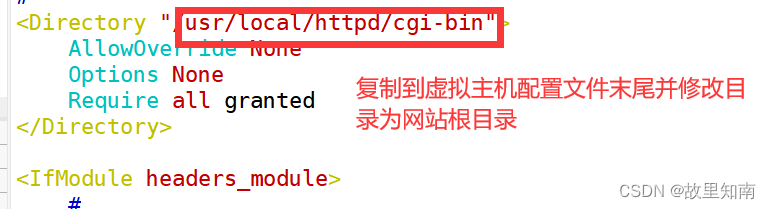
<Directory "/var/www/html">AllowOverride NoneOptions NoneRequire all granted
</Directory>
5.加载独立的配置文件
vim /usr/local/httpd/conf/httpd.conf #源码编译安装的httpd服务主配置文件路径
--483行--取消注释
Include conf/extra/httpd-vhosts.confhttpd -t
systemctl restart named


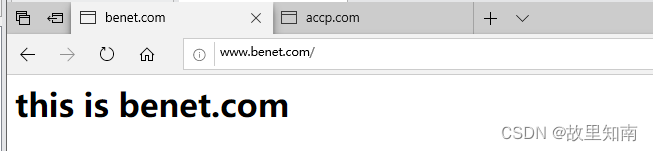
6.在客户机中访问虚拟 Web 主机


基于IP地址的虚拟主机
1.添加一个虚拟网卡
[root@cxx ~]# ifconfig ens33:1 192.168.47.210/24
[root@cxx ~]# ifconfig
ens33: flags=4163<UP,BROADCAST,RUNNING,MULTICAST>  mtu 1500inet 192.168.47.20  netmask 255.255.255.0  broadcast 192.168.47.255inet6 fe80::7968:1e8f:6cd7:6859  prefixlen 64  scopeid 0x20<link>ether 00:0c:29:e1:93:33  txqueuelen 1000  (Ethernet)RX packets 998  bytes 84230 (82.2 KiB)RX errors 0  dropped 0  overruns 0  frame 0TX packets 566  bytes 57523 (56.1 KiB)TX errors 0  dropped 0 overruns 0  carrier 0  collisions 0ens33:1: flags=4163<UP,BROADCAST,RUNNING,MULTICAST>  mtu 1500inet 192.168.47.210  netmask 255.255.255.0  broadcast 192.168.47.255ether 00:0c:29:e1:93:33  txqueuelen 1000  (Ethernet)
2.修改虚拟主机配置文件
[root@cxx ~]# cd /usr/local/httpd/conf/extra/
[root@cxx extra]# ls
httpd-autoindex.conf httpd-languages.conf httpd-ssl.conf
httpd-dav.conf httpd-manual.conf httpd-userdir.conf
httpd-default.conf httpd-mpm.conf httpd-vhosts.conf
httpd-info.conf httpd-multilang-errordoc.conf proxy-html.conf
[root@cxx extra]# vim httpd-vhosts.conf
<VirtualHost 192.168.47.20:80># ServerAdmin webmaster@dummy-host.example.com#DocumentRoot "/usr/local/httpd/docs/dummy-host.example.com"DocumentRoot "/var/www/html/accp"# ServerName dummy-host.example.comServerName www.accp.cpm#ServerAlias www.dummy-host.example.comErrorLog "logs/accp.com-error_log"CustomLog "logs/accp.com-access_log" common
</VirtualHost><VirtualHost 192.168.47.210:80>     修改IP地址#ServerAdmin webmaster@dummy-host2.example.com#DocumentRoot "/usr/local/httpd/docs/dummy-host2.example.com"DocumentRoot "/var/www/html/benet"ServerName www.benet.com# ErrorLog "logs/dummy-host2.example.com-error_log"# CustomLog "logs/dummy-host2.example.com-access_log" commonErrorLog "logs/benet.com-error_log"CustomLog "logs/benet.com-access_log" common
</VirtualHost>
3.修改主配置文件
root@cxx ~]# cd /usr/local/httpd/conf/
[root@cxx conf]# ls
extra httpd.conf httpd.conf.bak magic mime.types original
[root@cxx conf]# vim httpd.conf[root@cxx conf]# systemctl restart httpd

 4.在客户机中浏览器访问虚拟 Web 主机


基于端口的虚拟主机
1.修改虚拟主机配置
[root@cxx conf]# vim /usr/local/httpd/conf/extra/httpd-vhosts.conf
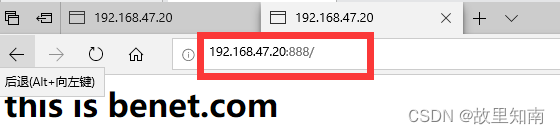
<VirtualHost 192.168.47.20:666>   同一IP不同端口# ServerAdmin webmaster@dummy-host.example.com#DocumentRoot "/usr/local/httpd/docs/dummy-host.example.com"DocumentRoot "/var/www/html/accp"# ServerName dummy-host.example.comServerName www.accp.cpm#ServerAlias www.dummy-host.example.comErrorLog "logs/accp.com-error_log"CustomLog "logs/accp.com-access_log" common
</VirtualHost><VirtualHost 192.168.47.20:888>  修改端口#ServerAdmin webmaster@dummy-host2.example.com#DocumentRoot "/usr/local/httpd/docs/dummy-host2.example.com"DocumentRoot "/var/www/html/benet"ServerName www.benet.com# ErrorLog "logs/dummy-host2.example.com-error_log"# CustomLog "logs/dummy-host2.example.com-access_log" commonErrorLog "logs/benet.com-error_log"CustomLog "logs/benet.com-access_log" common
</VirtualHost>
2.修改主机主配置文件
[root@cxx conf]# vim /usr/local/httpd/conf/httpd.conf
51 #Listen 12.34.56.78:80 52 Listen 192.168.47.20:666 修改端口53 Listen 192.168.47.20:888 同一IP不同端口54 55 #
3.验证
[root@cxx conf]# systemctl restart httpd
[root@cxx conf]# netstat -lntp | grep httpd
tcp        0      0 192.168.47.20:888       0.0.0.0:*               LISTEN      3690/httpd
tcp        0      0 192.168.47.20:666       0.0.0.0:*               LISTEN      3690/httpd

Apache 连接保持
vim /usr/local/httpd/conf/extra/httpd-default.conf
KeepAlive On #设置是否打开连接保持功能,后面接OFF表示关闭,接ON表示打开。可以根据网站的并发请求量决定是否打开,即在高并发时打开连接保持功能,并发量不高时关闭此功能。
MaxKeepAliveRequests 100 #用于设置在一次长连接中可以传输的最大请求数量,超过此最大请求数量就会断开连接,最大值的设置决定于网站中网页的内容,一般设置数量会多于网站中所有的元素。
KeepAliveTimeout 5 #设置来自同一个客户端一次连接多次请求之间的最大间隔时间,即两次请求之间超过该时间连接就会自动断开,从而避免客户端占用连接资源。
注意:要想支持httpd-default,conf的配置文件,需要在主配置文件中开启服务,并systemctl restart httpd 重启加载下


构建Web虚拟目录与用户授权限制
1.查看默认根目录是哪个
[root@cxx htdocs]# pwd
/usr/local/httpd/htdocs[root@cxx htdocs]# mkdir file
[root@cxx htdocs]# ls
bbs  file  index.php
[root@cxx htdocs]# echo '<h1>nihao everyone!</h1>' > file/hello.html
[root@cxx htdocs]# ls
bbs  file  index.php[root@cxx htdocs]# cat file/hello.html
<h1>nihao everyone!</h1>[root@cxx conf]# systemctl restart httpd
[root@cxx conf]# netstat -lntp | grep httpd
tcp        0      0 192.168.47.20:80        0.0.0.0:*               LISTEN      4304/http
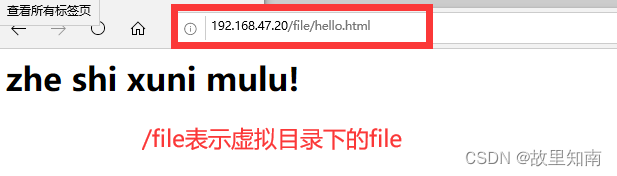
2.创建虚拟目录
# vim /usr/local/httpd/conf/httpd.conf 在主配置文件中添加虚拟目录

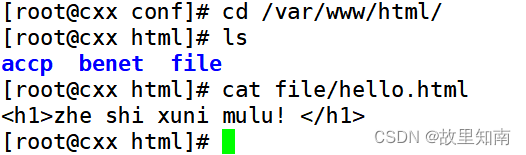
[root@cxx htdocs]# cd /var/www/html/
[root@cxx html]# ls
accp  benet
[root@cxx html]# mkdir file
[root@cxx html]# ls
accp  benet  file
[root@cxx html]# echo '<h1>zhe shi xuni mulu! </h1>' > file/hello.html
[root@cxx html]# cat file/hello.html
<h1>zhe shi xuni mulu! </h1>
[root@cxx html]# systemctl restart httpd
3.用户授权限制
(1)创建用户认证数据文件
[root@cxx html]# htpasswd -c /usr/local/httpd/usrlist cx
New password:
Re-type new password:
Adding password for user cx
[root@cxx html]# cd /usr/local/httpd/
[root@cxx httpd]# ls
bin    cgi-bin  error   icons    lib   man     modules
build  conf     htdocs  include  logs  manual  usrlist
[root@cxx httpd]# htpasswd ./usrlist zss
New password:
Re-type new password:
Adding password for user zss#-c选项表示新建用户数据文件,缺省时则表示指定的用户数据文件已经存在,用于添加新的用户或修改现有用户的密码。
[root@cxx httpd]# cat /usr/local/httpd/usrlist   #确认用户数据文件
cx:$apr1$v2WYMeOj$LephjHva/Qmj9EjG7N0IU.
zss:$apr1$IL.jo1Ks$COmLztjzATmyDo8N3l/0Y1
(2)添加用户授权配置
[root@cxx conf]# vim /usr/local/httpd/conf/httpd.conf  修改主配置文件<Directory "/var/www/html/file">  #设置虚拟目录配置区域AllowOverride NoneOptions NoneRequire valid-user         #开启用户认证,只有认证文件中的合法用户才能访问AuthName "hello somebody!"  #定义受保护的领域名称,会在认证对话框中显示AuthType Basic              #设置认证的类型,Basic表示基本认证AuthUserFile /usr/local/httpd/userlist #设置用于保存用户账号和密码的认证文件的路径# Require all granted
</Directory>Alias /file /var/www/html/file #设置虚拟目录的根目录,/file 为虚拟目录名称
(3)验证用户访问授权


ps:如果出现访问显示Internal Server Error,那就把主配置文件删除重新写
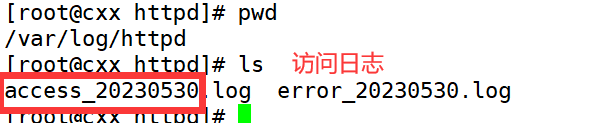
Apache 日志分割
使用Apache 自带 rotatelogs 分割工具,将 Apache 的日志进行按每天的日期自动分割。


[root@cxx httpd]# vim /usr/local/httpd/conf/httpd.conf
--275行--修改
275 #ErrorLog "logs/error_log"
276 ErrorLog "| /usr/local/bin/rotatelogs -l /var/log/httpd/error_%Y%m%d.log 86400"
#分割错误日志
--305行--修改
305     #CustomLog "logs/access_log" common
306     CustomLog "| /usr/local/bin/rotatelogs -l /var/log/httpd/access_%Y%m%d.log 86400" combined  #分割访问日志#开头的 | 为管道符号。
#-l选项表示使用本地时间为时间基准。
#86400表示一天,即每天生成一个新的日志文件。
mkdir /var/log/httpd			#创建分割后的日志文件保存目录systemctl restart httpd
浏览器访问