Nginx(四)
部署LNMP架构动态网站WordPress
LNMP=Linux+Nginx+MySQL+Php
环境
| 192.168.29.141 | centos8 | Nginx | 1.24.0 |
| 192.168.29.142 | centos8 | MySQL | 8.0.33 |
| 192.168.29.143 | centos8 | Php | 7.2.24 |
关闭firewalld
systemctl stop firewalld
systemctl disable firewalld
关闭selinux
setenforce 0
sed -ir 's/SELINUX=enforcing/SELINUX=disabled/g' /etc/selinux/config &> /dev/null
部署Nginx
#先决条件
[root@nginx ~]#yum -y install yum-utils#配置nginx官方yum源
[root@nginx ~]#vim /etc/yum.repos.d/nginx.repo
[nginx-stable]
name=nginx stable repo
baseurl=http://nginx.org/packages/centos/$releasever/$basearch/
gpgcheck=1
enabled=1
gpgkey=https://nginx.org/keys/nginx_signing.key
module_hotfixes=true[nginx-mainline]
name=nginx mainline repo
baseurl=http://nginx.org/packages/mainline/centos/$releasever/$basearch/
gpgcheck=1
enabled=0
gpgkey=https://nginx.org/keys/nginx_signing.key
module_hotfixes=true#安装
[root@nginx ~]#yum -y install nginx#查看版本
[root@nginx ~]#nginx -v
nginx version: nginx/1.24.0#新建用户www
[root@nginx ~]#useradd www -s /sbin/nologin -M#修改nginx启动用户
[root@nginx ~]#vim /etc/nginx/nginx.conf
user=www www
...#新建配置文件
[root@nginx ~]#vim /etc/nginx/conf.d/wordpress.conf
server {listen       80;server_name  myblog.com;access_log  /var/log/nginx/host.access.log  main;location / {root   /www/wordpress;index  index.php index.html index.htm;}#error_page  404              /404.html;# redirect server error pages to the static page /50x.html#error_page   500 502 503 504  /50x.html;location = /50x.html {root   /usr/share/nginx/html;}# proxy the PHP scripts to Apache listening on 127.0.0.1:80##location ~ \.php$ {#    proxy_pass   http://127.0.0.1;#}# pass the PHP scripts to FastCGI server listening on 127.0.0.1:9000#location ~ \.php$ {root           /www/wordpress;fastcgi_pass   192.168.29.143:9000;fastcgi_index  index.php;fastcgi_param  SCRIPT_FILENAME  $document_root$fastcgi_script_name;include        fastcgi_params;}# deny access to .htaccess files, if Apache's document root# concurs with nginx's one##location ~ /\.ht {#    deny  all;#}
}[root@nginx ~]systemctl restart nginx
[root@nginx ~]systemctl enable nginx
[root@nginx ~]#ps aux | grep nginx
root        2936  0.0  0.1  41492   944 ?        Ss   00:48   0:00 nginx: master process /usr/sbin/nginx -c /etc/nginx/nginx.conf
www         2937  0.0  0.6  72632  5132 ?        S    00:48   0:00 nginx: worker process
root        2976  0.0  0.1 221924  1120 pts/0    R+   00:52   0:00 grep --color=auto nginx
location ~ \.php${...}中,
nginx的fastcgi_param默认为SCRIPT_FILENAME /scripts$fastcgi_script_name; 当php部署完成后,访问192.168.29.141/index.php会提示file not found。将/script替换为$document_root即可,指使用location / {...}中root指定的路径。
部署MySQL
[root@mysql ~]#wget https://repo.mysql.com//mysql80-community-release-el8-5.noarch.rpm
[root@mysql ~]#yum -y install mysql80-community-release-el8-5.noarch.rpm
[root@mysql ~]#ls /etc/yum.repos.d/
CentOS-Base.repo                CentOS-Devel.repo               CentOS-Media.repo               mysql-community-debuginfo.repo
CentOS-centosplus.repo          CentOS-Extras.repo              CentOS-PowerTools.repo          mysql-community.repo
CentOS-CR.repo                  CentOS-fasttrack.repo           CentOS-Sources.repo             mysql-community-source.repo
CentOS-Debuginfo.repo           CentOS-HA.repo                  CentOS-Vault.repo               nginx.repo#(仅限 EL8 系统)基于 EL8 的系统(例如 RHEL8 和 Oracle Linux 8)包括默认启用的 MySQL 模块。除非禁用此模块,否则它会屏蔽 MySQL 存储库提供的包
[root@mysql ~]#yum -y module disable mysql
[root@mysql ~]#yum install -y mysql-community-server
[root@mysql ~]#mysql --version
mysql  Ver 8.0.33 for Linux on x86_64 (MySQL Community Server - GPL)#启动mysql服务并设置为开机启动
[root@mysql ~]#systemctl start mysqld.service
[root@mysql ~]#systemctl enable mysqld#查询mysql数据库默认密码
[root@mysql ~]#grep "password" /var/log/mysqld.log
2023-05-14T02:45:28.175684Z 6 [Note] [MY-010454] [Server] A temporary password is generated for root@localhost: <.XMel1ukpiw
#修改mysql密码
[root@mysql ~]#mysqladmin -uroot -p'<.XMel1ukpiw' password 'Admin.123'
mysqladmin: [Warning] Using a password on the command line interface can be insecure.
Warning: Since password will be sent to server in plain text, use ssl connection to ensure password safety.
#登录数据库
[root@mysql ~]#mysql -uroot -p'Admin.123'
mysql: [Warning] Using a password on the command line interface can be insecure.
Welcome to the MySQL monitor.  Commands end with ; or \g.
Your MySQL connection id is 9
Server version: 8.0.33 MySQL Community Server - GPLCopyright (c) 2000, 2023, Oracle and/or its affiliates.Oracle is a registered trademark of Oracle Corporation and/or its
affiliates. Other names may be trademarks of their respective
owners.Type 'help;' or '\h' for help. Type '\c' to clear the current input statement.mysql> show databases;
+--------------------+
| Database           |
+--------------------+
| information_schema |
| mysql              |
| performance_schema |
| sys                |
+--------------------+
4 rows in set (0.00 sec)
#创建网站数据库
mysql> create database wordpress;
Query OK, 1 row affected (0.00 sec)
#创建php登录数据库的用户
mysql> create user 'zhangsan'@'192.168.29.143' identified by 'Admin.123';
Query OK, 0 rows affected (0.01 sec)
#给新用户授权
mysql> grant all privileges on wordpress.* to 'zhangsan'@'192.168.29.143';
Query OK, 0 rows affected (0.01 sec)
#刷新权限
mysql> flush privileges;
Query OK, 0 rows affected (0.00 sec)
mysql> show grants for zhangsan@'192.168.29.143';
+----------------------------------------------------------------------+
| Grants for zhangsan@192.168.29.143                                   |
+----------------------------------------------------------------------+
| GRANT USAGE ON *.* TO `zhangsan`@`192.168.29.143`                    |
| GRANT ALL PRIVILEGES ON `wordpress`.* TO `zhangsan`@`192.168.29.143` |
+----------------------------------------------------------------------+
2 rows in set (0.00 sec)
#mysql8.0启用了新的密码认证插件caching_sha2_password,为了和php适配,修改密码认证插件为旧版的mysql_native_password
mysql> alter user 'zhangsan'@'192.168.29.143' identified with mysql_native_password by 'Admin.123';
Query OK, 0 rows affected (0.02 sec)mysql> flush privileges;
Query OK, 0 rows affected (0.01 sec)[root@mysql ~]#netstat -tnlp
Active Internet connections (only servers)
Proto Recv-Q Send-Q Local Address           Foreign Address         State       PID/Program name
tcp        0      0 0.0.0.0:22              0.0.0.0:*               LISTEN      914/sshd
tcp6       0      0 :::22                   :::*                    LISTEN      914/sshd
tcp6       0      0 :::33060                :::*                    LISTEN      4165/mysqld
tcp6       0      0 :::3306                 :::*                    LISTEN      4165/mysqld
部署PHP
[root@php ~]#yum -y install php-fpm php-mysqlnd php-gd php-json.x86_64
#新建用户www
[root@nginx ~]#useradd www -s /sbin/nologin -M
#因为nginx和php不在同一台服务器上,启用tcp通讯模式
[root@php ~]#vim /etc/php-fpm.d/www.conf
...
user = www
group = www
; Note: This value is mandatory.
listen = /run/php-fpm/www.sock
listen = 0.0.0.0:9000
...
; Default Value: any
#将下行注释掉,启动默认值any
;listen.allowed_clients = 127.0.0.1
...#创建index.php文件
[root@php ~]#vim /usr/share/nginx/html/index.php
<?php
phpinfo();
?>
#创建mysql.php文件,测试数据库连接
[root@php ~]#vim /usr/share/nginx/html/mysql.php
<?php
$servername = "192.168.29.142";
$username = "zhangsan";   //定义数据库用户名
$passwd = "Admin.123";   //定义数据库密码
#注意:php7版本之后mysql_connect已被废弃,使用mysqli_connect替代
$conntest = mysqli_connect($servername,$username,$passwd);
if($conntest) { echo "连接成功";
}
?>[root@php ~]#systemctl start php-fpm.service
[root@php ~]#systemctl enable php-fpm.service
[root@php ~]#ps aux | grep php
root        2557  0.0  2.4 428032 20236 ?        Ss   01:58   0:00 php-fpm: master process (/etc/php-fpm.conf)
www         2558  0.0  1.4 443232 11992 ?        S    01:58   0:00 php-fpm: pool www
www         2559  0.0  1.4 443232 11992 ?        S    01:58   0:00 php-fpm: pool www
www         2560  0.0  1.4 443232 11992 ?        S    01:58   0:00 php-fpm: pool www
www         2561  0.0  1.4 443232 11992 ?        S    01:58   0:00 php-fpm: pool www
www         2562  0.0  1.4 443232 11992 ?        S    01:58   0:00 php-fpm: pool www
root        2572  0.0  0.1 221924  1176 pts/0    R+   01:58   0:00 grep --color=auto php
PHP相关配置
核心配置文件——/etc/php.ini
date.timezone = PRC 设置php时区,PRC是中国
open_basedir 设置PHP脚本允许访问的目录;它将PHP所能打开的文件限制在指定的目录树中,包括文件本身。当程序要使用例如fopen()或file_get_contents()打开一个文件时,这个文件的位置将会被检查。当文件在指定的目录树之外,程序将拒绝打开。
全局配置文件——/etc/php-fpm.conf
pid = /run/php-fpm/php-fpm.pid 设置pid文件位置
error_log = /var/log/php-fpm/error.log 设置错误日志文件位置
log_level = notice 记录日志的等级。alert(必须立即处理), error(错误情况), warning(警告情况), notice(一般重要信息), debug(调试信息). 默认: notice.
process.max = 128 默认无设置;控制子进程最大数的全局变量, 后边的设置子进程数量的指令受到这个值的限制, 0表示无限制。
daemonize = yes 将fpm转至后台运行
拓展配置文件——/etc/php-fpm.d/www.conf
user = www 设置php-fpm启动用户和组
listen.allowed_clients = 127.0.0.1 允许访问FastCGI进程的IP,设置any为不限制IP,如果要设置其他主机的nginx也能访问这台FPM进程,listen处要设置成本地可被访问的IP。默认值是any。每个地址是用逗号分隔. 如果没有设置或者为空,则允许任何服务器请求连接
listen = 127.0.0.1:9000 fpm监听端口,即nginx中php处理的地址,一般默认值即可。
slowlog = /var/log/php-fpm/$pool-slow.log 开启慢日志
pm = dynamic 动态模式进程管理开启
pm.start_servers = 32 最初开启多少进程
pm.min_spare_servers = 32 最小的多余进程数,最少空闲。用户访问会消耗掉进程。然后为了满足后续游湖随时随地开启进程保持空闲数为32。
pm.max_children = 512 指PHP-FPM Pool 最大的子进程数,数值取决于你的服务器内存。 假设你打算给10G内存给当前配置的PHP-FPM Pool,一般一个PHP请求占用内存10M-40M,我们按站点每个PHP请求占用内存25M,这样max_children = 10G/25M = 409。所以,这个值可以根据情况算出来
pm.max_spare_servers = 64 最大的多余进程。大规模断开后,高并发访问过后,还剩多少。
pm.max_requests = 1500 每个子进程能响应的请求数量,到达此数字,该PHP进程就被释放掉了。ax_requests是每个子进程重生之前处理的请求数, 默认值为unlimited(默认为1024),可以设置小一点(如500左右),这样可以避免内存泄露带来的问题
测试
在物理机本地做host解析:192.168.29.143 myblog.com
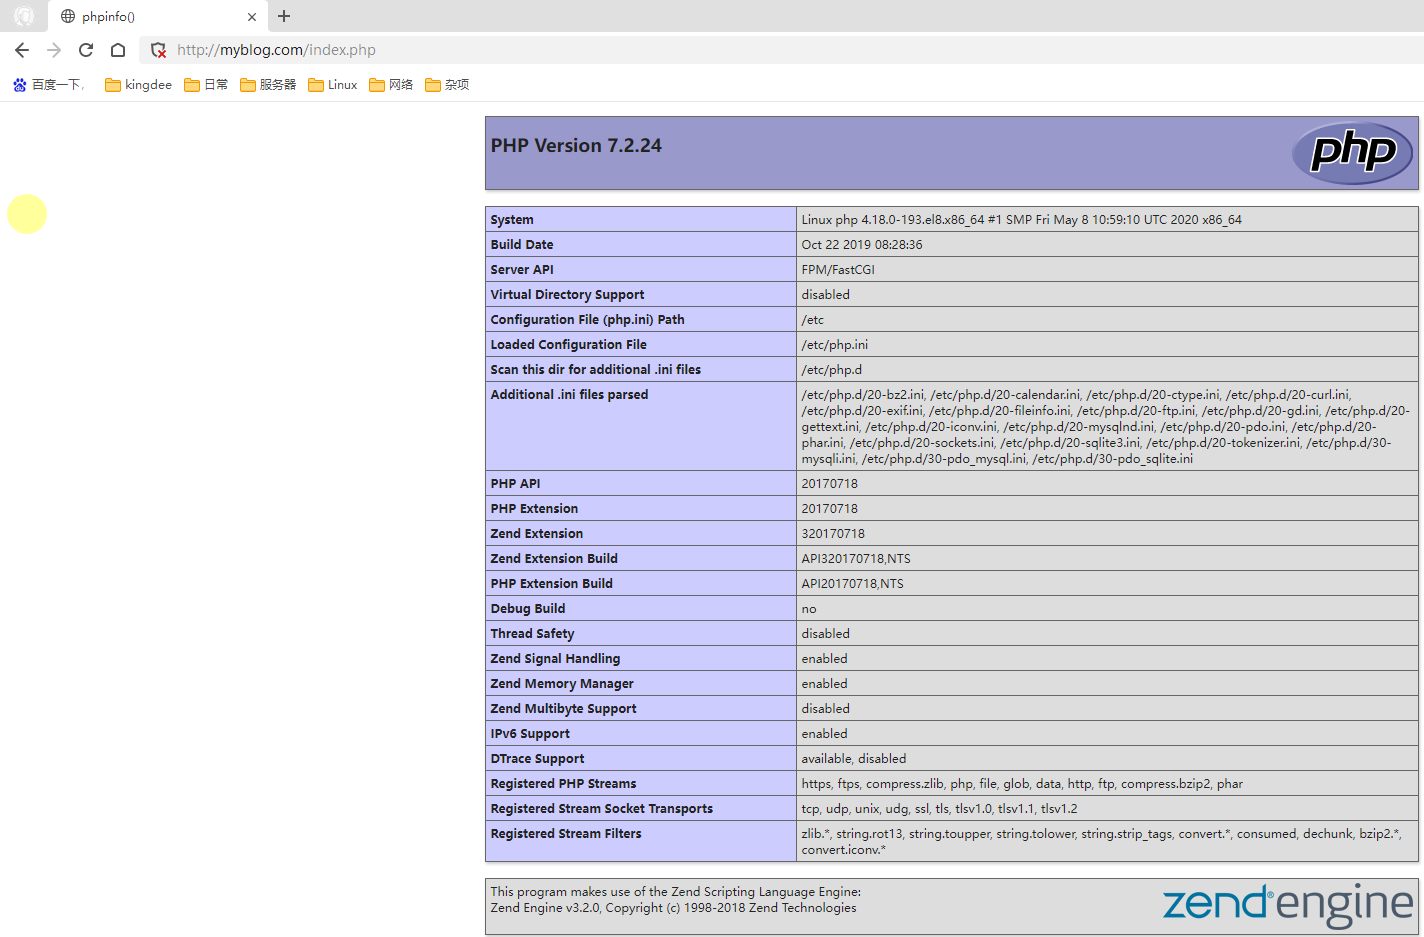
访问http://myblog.com/index.php如下。
踩坑:
一、在访问测试数据库连接mysql.php页面时,网页无法访问
nginx日志
2023/05/20 03:29:37 [error] 3287#3287: *23 FastCGI sent in stderr: "PHP message: PHP Fatal error: Uncaught Error: Call to undefined function mysql_connect() in /www/wordpress/mysql.php:5
解决
php7.0高版本已废弃mysql_connect()函数,使用mysqli_connect()替代
二、第一个坑解决后,再次访问mysql.php,依然无法正确访问,访问页面空白
nginx日志
PHP message: PHP Warning: mysqli_connect(): (HY000/2054): The server requested authentication method unknown to the client in /www/wordpress/mysql.php on line 5" while reading response header from upstream, client: 192.168.29.1, server: myblog.com, request: "GET /mysql.php HTTP/1.1", upstream: "fastcgi://192.168.29.143:9000", host: "myblog.com"
解决
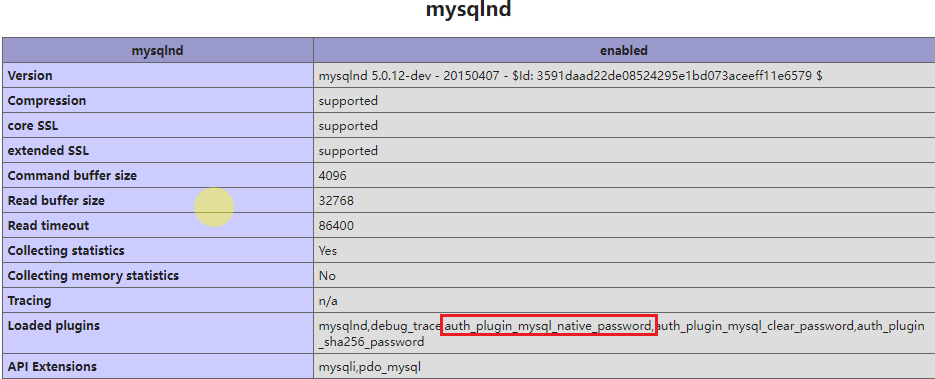
mysql8.0版本使用新的密码认证插件 caching_sha2_password,先前版本使用的默认插件是mysql_native_password。在index.php页面可看到mysqlnd部分php支持的认证插件,没有caching_sha2_password,可使用mysql_native_password;所以在mysql部署部分将zhangsan认证插件改为mysql_native_password。
业务上线——WordPress
#下载wordpress并解压
[root@php ~]#wget -O wordpress.tar.gz https://cn.wordpress.org/latest-zh_CN.tar.gz
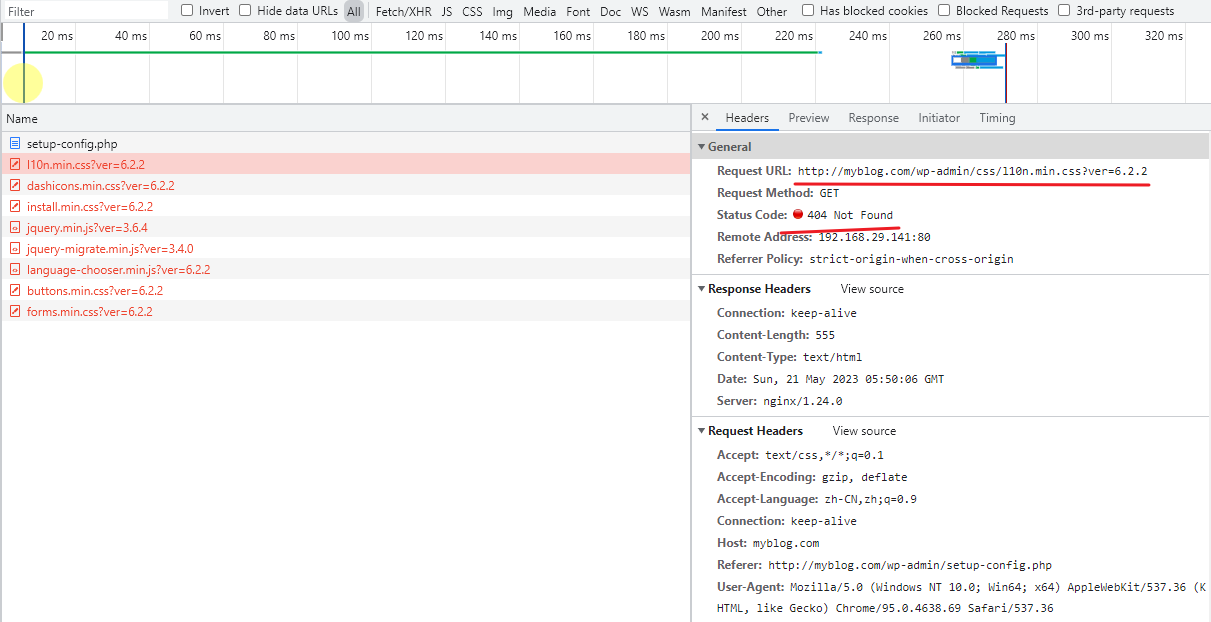
[root@php ~]#tar -x wordpress.tar.gz -C /www/访问http://myblog.com/index.php
无法加载网页样式,实际是有这些样式文件的。待解决