07-Vue技术栈之(组件之间的通信方式)
目录
- 1、组件的自定义事件
- 1.1 绑定自定义事件:
- 1.1.1 第一种方式
- 1.1.2 第二种方式
- 1.1.3 自定义事件只触发一次
- 1.2 解绑自定义事件
- 1.3绑定原生DOM事件
- 1.4 总结
- 2、全局事件总线(GlobalEventBus)
- 2.1 应用全局事件总线
- 3、 消息订阅与发布(pubsub)
- 3.1 应用消息订阅与发布
前言:
组件之间通信的方式有很多种,比如props、自定义事件、全局事件总线、消息订阅与发布、父链与子组件索引、插槽、Vuex等都可以实现组件之间的通信。在这里我将介绍以下三种通信方式。
1、组件的自定义事件
- 它是一种组件间通信的方式,适用于:子组件 ===> 父组件
- 使用场景:A是父组件,B是子组件,B想给A传数据,那么就要在A中给B绑定自定义事件(事件的回调在A中)。
1.1 绑定自定义事件:
1.1.1 第一种方式
- 在父组件中:
<Demo @dome="test"/>或<Demo v-on:dome="test"/> - 触发自定义事件:
this.$emit('dome',数据)
代码示例:
app组件
<template><div><h1 class="title">你好啊</h1><Student @dome="test" /></div>
</template><script>
import Student from "./components/Student";
export default {name: "App",components: { Student },methods: {test() {console.log("我被触发了");},},
};
</script><style scoped>
</style>
子组件student
<template><div class="demo"><button @click="domes">点我触发</button></div>
</template><script>
export default {name: "Student",methods: {domes() {this.$emit("dome");},},
};
</script><style scoped>
</style>
1.1.2 第二种方式
在父组件中:
<Demo ref="xxx"/>......mounted(){this.$refs.xxx.$on('demo',this.test)}
代码示例:
app组件
<template><div><h1 class="title">你好啊</h1><!-- <Student @dome.once="test" /> --><Student ref="student" /></div>
</template><script>
import Student from "./components/Student";
export default {name: "App",components: { Student },methods: {test() {console.log("我被调用了");},},mounted() {this.$refs.student.$on("dome", this.test);},
};
</script><style scoped>
</style>
子组件student
<template><div class="demo"><button @click="domes">点我触发</button></div>
</template><script>
export default {name: "Student",methods: {domes() {this.$emit("dome");},},
};
</script><style scoped>
</style>
注意:通过
this.$refs.xxx.$on('dome',回调)绑定自定义事件时,回调要么配置在methods中,要么用箭头函数,否则this指向会出问题!
代码示例:
mounted() {this.$refs.student.$on("dome", function() {console.log(this);this指向子组件student将普通函数换成箭头函数,this指向就还是原来的app组件});},
1.1.3 自定义事件只触发一次
若想让自定义事件只能触发一次,可以使用once修饰符,或$once方法。
代码示例:
- once修饰符使用方法
代码示例:
app组件
<template><div><h1 class="title">你好啊</h1><Student @dome.once="test" /><!--绑定自定义事件,一次性 --><!-- <Student ref="student" /> --></div>
</template><script>
import Student from "./components/Student";
export default {name: "App",components: { Student },methods: {test() {console.log("我被调用了");},},/*  mounted() {this.$refs.student.$on("dome", this.test);}, */
};
</script><style scoped>
</style>- $once使用方法
代码示例:
app组件
<template><div><h1 class="title">你好啊</h1><!-- <Student @dome.once="test" /> --><Student ref="student" /></div>
</template><script>
import Student from "./components/Student";
export default {name: "App",components: { Student },methods: {test() {console.log("我被调用了");},},mounted() {this.$refs.student.$once("dome", this.test);//绑定自定义事件(一次性)},
};
</script><style scoped>
</style>
1.2 解绑自定义事件
- 解绑自定义事件通过
this.$off('atguigu')
代码示例:
app组件
<template><div><h1 class="title">你好啊</h1><Student @dome="test" @dome2="test2"/><!-- <Student ref="student" /> --></div>
</template><script>
import Student from "./components/Student";
export default {name: "App",components: { Student },methods: {test() {console.log("我被调用了");},test2() {console.log("我是第二个事件");},},/* mounted() {this.$refs.student.$on("dome", this.test);}, */
};
</script><style scoped>
</style>子student组件
<template><div class="demo"><button @click="domes">点我触发</button><button @click="unbind">点我解绑事件</button></div>
</template><script>
export default {name: "Student",methods: {domes() {this.$emit("dome");this.$emit("dome2");//绑定多个自定义事件},unbind() {// this.$off("dome")//解绑一个自定义事件// this.$off(['dome','dome2'])//解绑多个自定义事件this.$off()//解绑所有的自定义事}},
};
</script><style scoped>
</style>
1.3绑定原生DOM事件
- 组件上也可以绑定原生DOM事件,需要使用
native修饰符。如果不加上native修饰符,Vue会默认将此事件当作自定义事件。
代码示例:
<Student @click.native="xxx"/>
1.4 总结
-
一种组件间通信的方式,适用于:子组件 ===> 父组件
-
使用场景:A是父组件,B是子组件,B想给A传数据,那么就要在A中给B绑定自定义事件(事件的回调在A中)。
-
绑定自定义事件:
-
第一种方式,在父组件中:
<Demo @atguigu="test"/>或<Demo v-on:atguigu="test"/> -
第二种方式,在父组件中:
<Demo ref="demo"/> ...... mounted(){this.$refs.xxx.$on('atguigu',this.test) } -
若想让自定义事件只能触发一次,可以使用
once修饰符,或$once方法。
-
-
触发自定义事件:
this.$emit('atguigu',数据) -
解绑自定义事件
this.$off('atguigu') -
组件上也可以绑定原生DOM事件,需要使用
native修饰符。 -
注意:通过
this.$refs.xxx.$on('atguigu',回调)绑定自定义事件时,回调要么配置在methods中,要么用箭头函数,否则this指向会出问题!
2、全局事件总线(GlobalEventBus)
-
一种组件间通信的方式,适用于任意组件间通信。
-
安装全局事件总线:
new Vue({......beforeCreate() {Vue.prototype.$bus = this //安装全局事件总线,$bus就是当前应用的vm},...... }) -
使用事件总线:
-
接收数据:A组件想接收数据,则在A组件中给$bus绑定自定义事件,事件的回调留在A组件自身。
methods(){demo(data){......} } ...... mounted() {this.$bus.$on('xxxx',this.demo) } -
提供数据:
this.$bus.$emit('xxxx',数据) -
最好在beforeDestroy钩子中,用$off去解绑当前组件所用到的事件。
2.1 应用全局事件总线
- 我们利用全局事件总线来完成一个兄弟间的通信
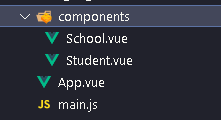
目录结构图:

代码示例:
在main文件里面安装全局事件总线
//引入Vue
import Vue from 'vue'
//引入App
import App from './App.vue'
//关闭Vue的生产提示
Vue.config.productionTip = false//创建vm
new Vue({el:'#app',render: h => h(App),beforeCreate() {Vue.prototype.$bus = this //安装全局事件总线},
})
没有涉及到和app组件通信,所以app组件正常编写即可
<template><div class="app"><h1>{{msg}}</h1><School/><Student/></div>
</template><script>import Student from './components/Student'import School from './components/School'export default {name:'App',components:{School,Student},data() {return {msg:'你好啊!',}}}
</script><style scoped>.app{background-color: gray;padding: 5px;}
</style>由于我们将school组件作为接受数据方,所以我们要给school组件种的$bus绑定自定义事件,事件的回调留在school组件自身。
<template><div class="school"><h2>学校名称:{{name}}</h2><h2>学校地址:{{address}}</h2></div>
</template><script>export default {name:'School',data() {return {name:'东方',address:'北京',}},mounted() {// console.log('School',this)this.$bus.$on('hello',(data)=>{console.log('我是School组件,收到了数据',data)})},beforeDestroy() {this.$bus.$off('hello')},}
</script><style scoped>.school{background-color: skyblue;padding: 5px;}
</style>
由于我们将student组件作为提供数据方,所以我们要在student组件中调用自定义事件
<template><div class="student"><h2>学生姓名:{{name}}</h2><h2>学生性别:{{sex}}</h2><button @click="sendStudentName">把学生名给School组件</button></div>
</template><script>export default {name:'Student',data() {return {name:'张三',sex:'男',}},mounted() {// console.log('Student',this.x)},methods: {sendStudentName(){this.$bus.$emit('hello',this.name)}},}
</script><style lang="less" scoped>.student{background-color: pink;padding: 5px;margin-top: 30px;}
</style>
3、 消息订阅与发布(pubsub)
-
一种组件间通信的方式,适用于任意组件间通信。
-
使用步骤:
-
安装pubsub:
npm i pubsub-js -
引入:
import pubsub from 'pubsub-js' -
接收数据:A组件想接收数据,则在A组件中订阅消息,订阅的回调留在A组件自身。
methods(){demo(data){......} } ...... mounted() {this.pid = pubsub.subscribe('xxx',this.demo) //订阅消息 } -
提供数据:
pubsub.publish('xxx',数据) -
最好在beforeDestroy钩子中,用
PubSub.unsubscribe(pid)去取消订阅。
-
3.1 应用消息订阅与发布
- 将上面的
全局事件总线案例应用消息订阅与发布的方法实现一下,整体思路是一样的。
目录结构图:

首先我们先要安装pubsub:npm i pubsub-js,然后在需要通信的组件中引入import pubsub from 'pubsub-js'这个包。
代码示例:
main文件
//引入Vue
import Vue from 'vue'
//引入App
import App from './App.vue'
//关闭Vue的生产提示
Vue.config.productionTip = false//创建vm
new Vue({el:'#app',render: h => h(App),
})
app组件
<template><div class="app"><h1>{{msg}}</h1><School/><Student/></div>
</template><script>import Student from './components/Student'import School from './components/School'export default {name:'App',components:{School,Student},data() {return {msg:'你好啊!',}}}
</script><style scoped>.app{background-color: gray;padding: 5px;}
</style>school组件作为接受信息订阅方
<template><div class="school"><h2>学校名称:{{name}}</h2><h2>学校地址:{{address}}</h2></div>
</template><script>import pubsub from 'pubsub-js'export default {name:'School',data() {return {name:'东方',address:'北京',}},mounted() {this.pubId = pubsub.subscribe('hello',(msgName,data)=>{console.log(this)// console.log('有人发布了hello消息,hello消息的回调执行了',msgName,data)})},beforeDestroy() {pubsub.unsubscribe(this.pubId)},}
</script><style scoped>.school{background-color: skyblue;padding: 5px;}
</style>
student组件作为发布信息方
<template><div class="student"><h2>学生姓名:{{name}}</h2><h2>学生性别:{{sex}}</h2><button @click="sendStudentName">把学生名给School组件</button></div>
</template><script>import pubsub from 'pubsub-js'export default {name:'Student',data() {return {name:'张三',sex:'男',}},mounted() {},methods: {sendStudentName(){pubsub.publish('hello',666)}},}
</script><style lang="less" scoped>.student{background-color: pink;padding: 5px;margin-top: 30px;}
</style>