Learn RabbitMQ with SpringBoot
文章目录
- What is RabbitMQ?
- RabbitMQ Core concept
- RabbitMQ Architecture
- Install and setup RabbitMQ using Docker
- Explore RabbitMQ using management UI
- Create and setup Springboot3 project in intellij
- Springboot and RabbitMQ Basic Message
- Connection between Springboot and RabbitMQ
- Create core component
- Create RabbitMQProducer
- Create REST API to send message
- create RabbitMQConsumer
- Springboot and RabbitMQ Json Message
- Create Json object
- add config
- Produce json message
- Create API to send json object
- Consum json message
What is RabbitMQ?
RabbitMQ Core concept
RabbitMQ Architecture
Install and setup RabbitMQ using Docker
# notice: select 3.11.15-management, it will have web management web page
docker pull rabbitmq:3.11.15-management
docker run --rm  -it -p 15672:15672 -p 5672:5672 rabbitmq:3.11.0
Explore RabbitMQ using management UI
when we first login, username is guest and password is guest. Then we do some common operations in the dashboard.
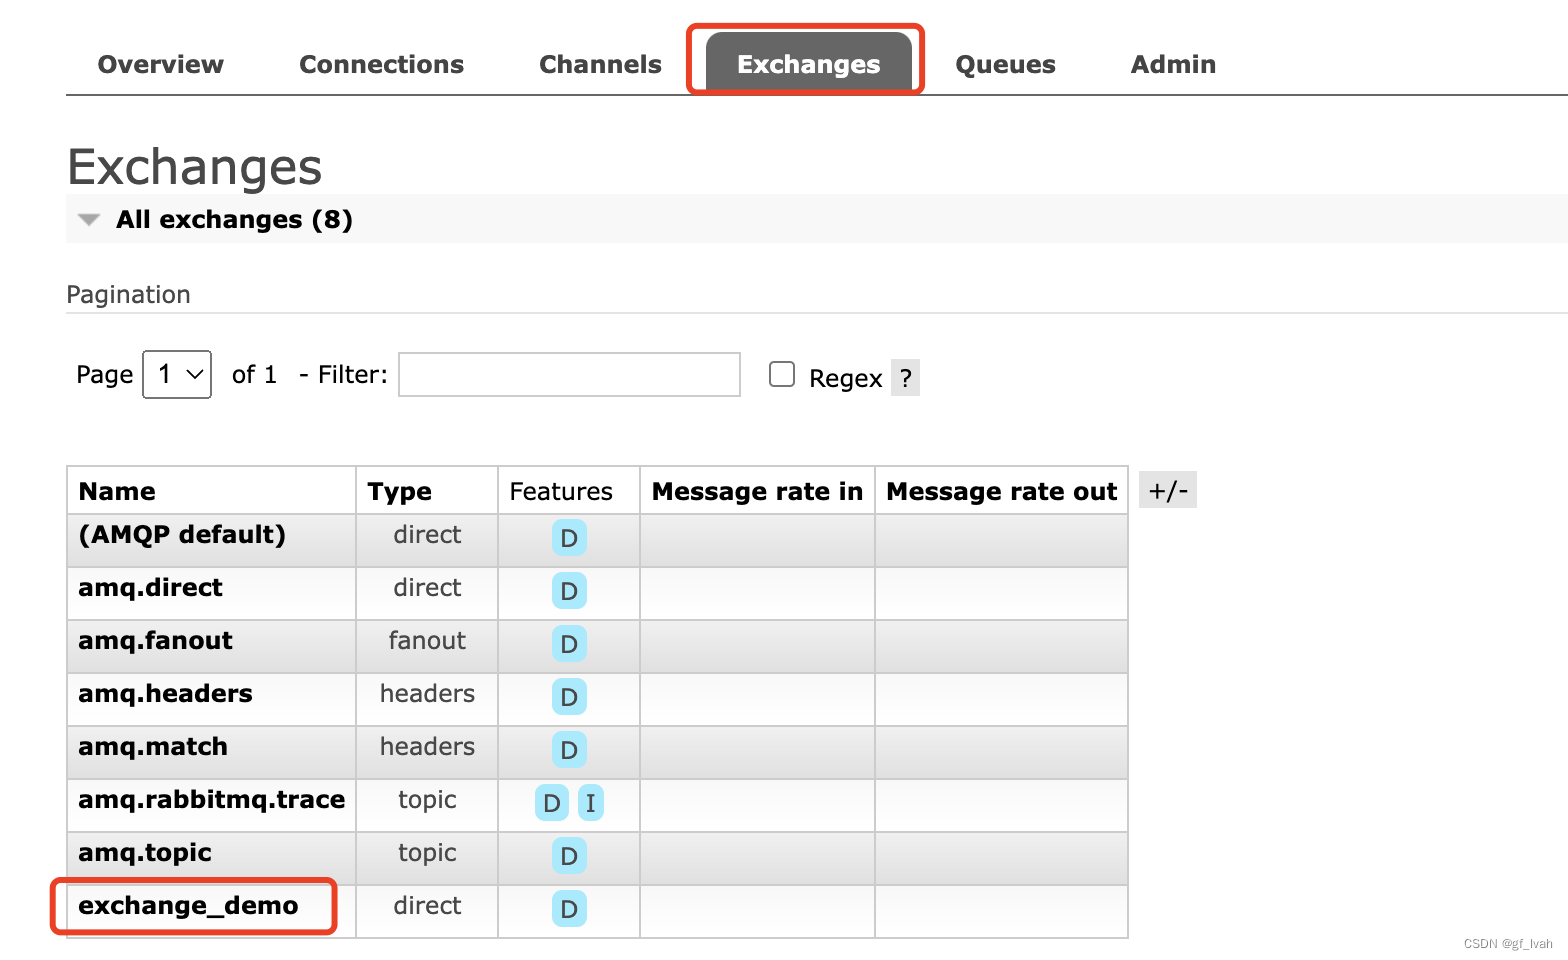
- create exchange

- create queue
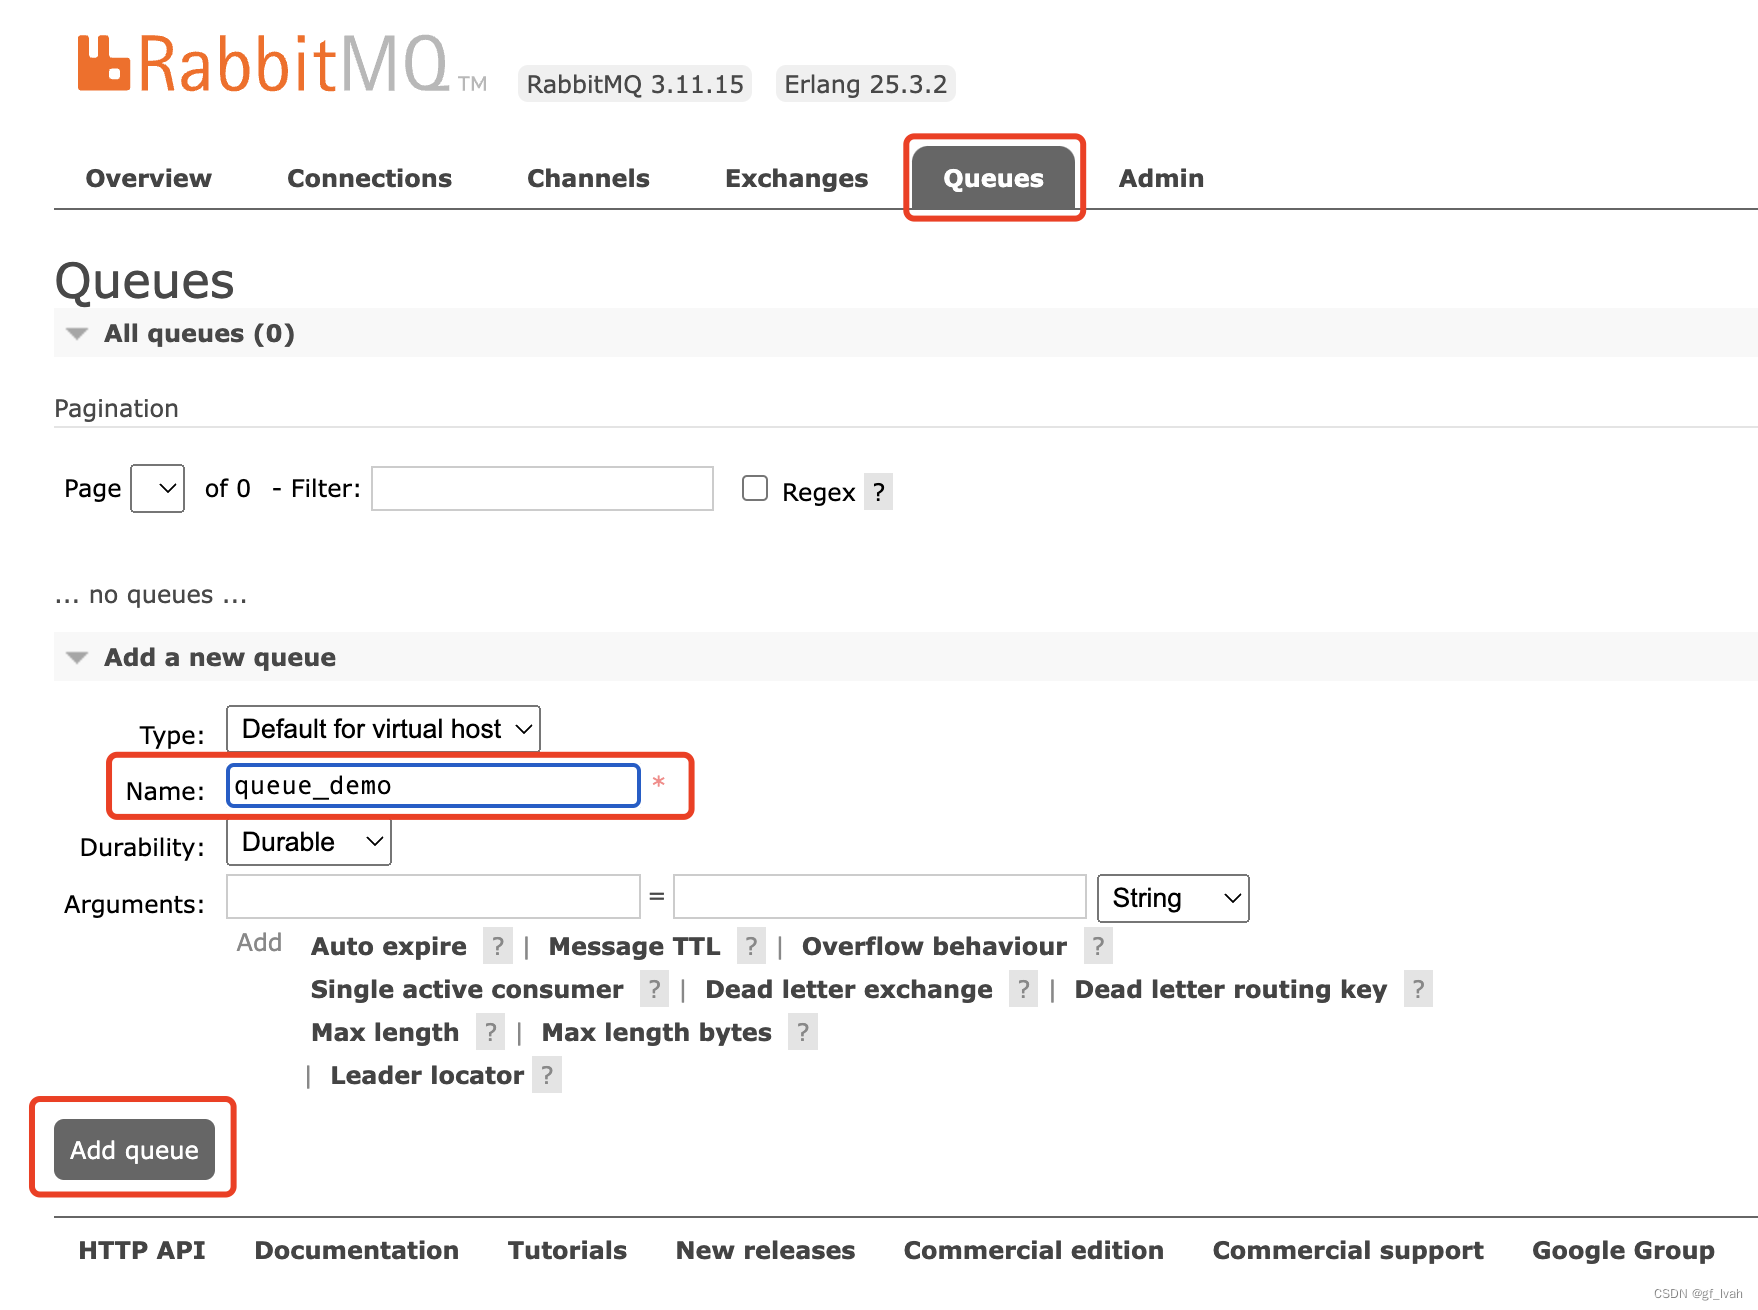
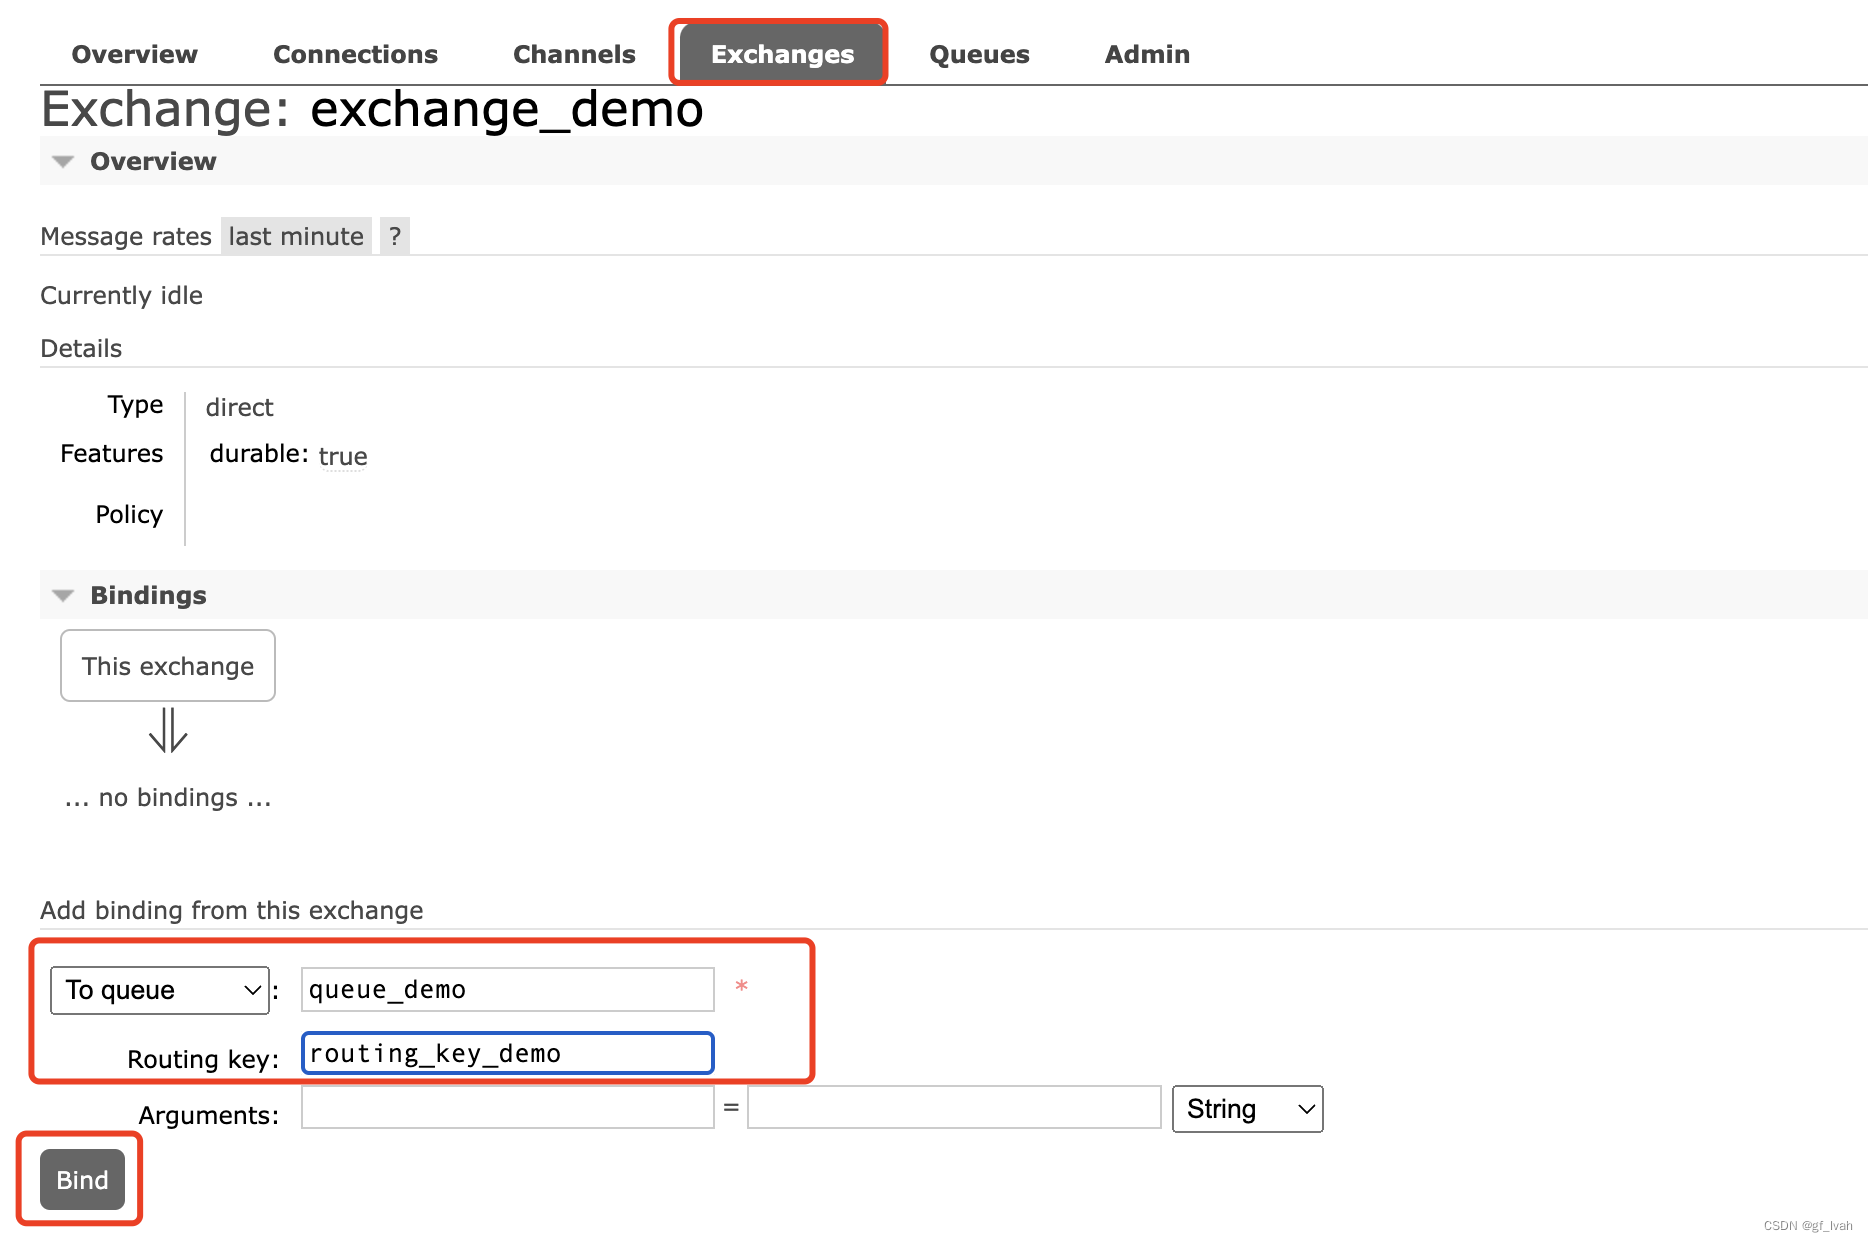
- binding exchange with queue using routing key
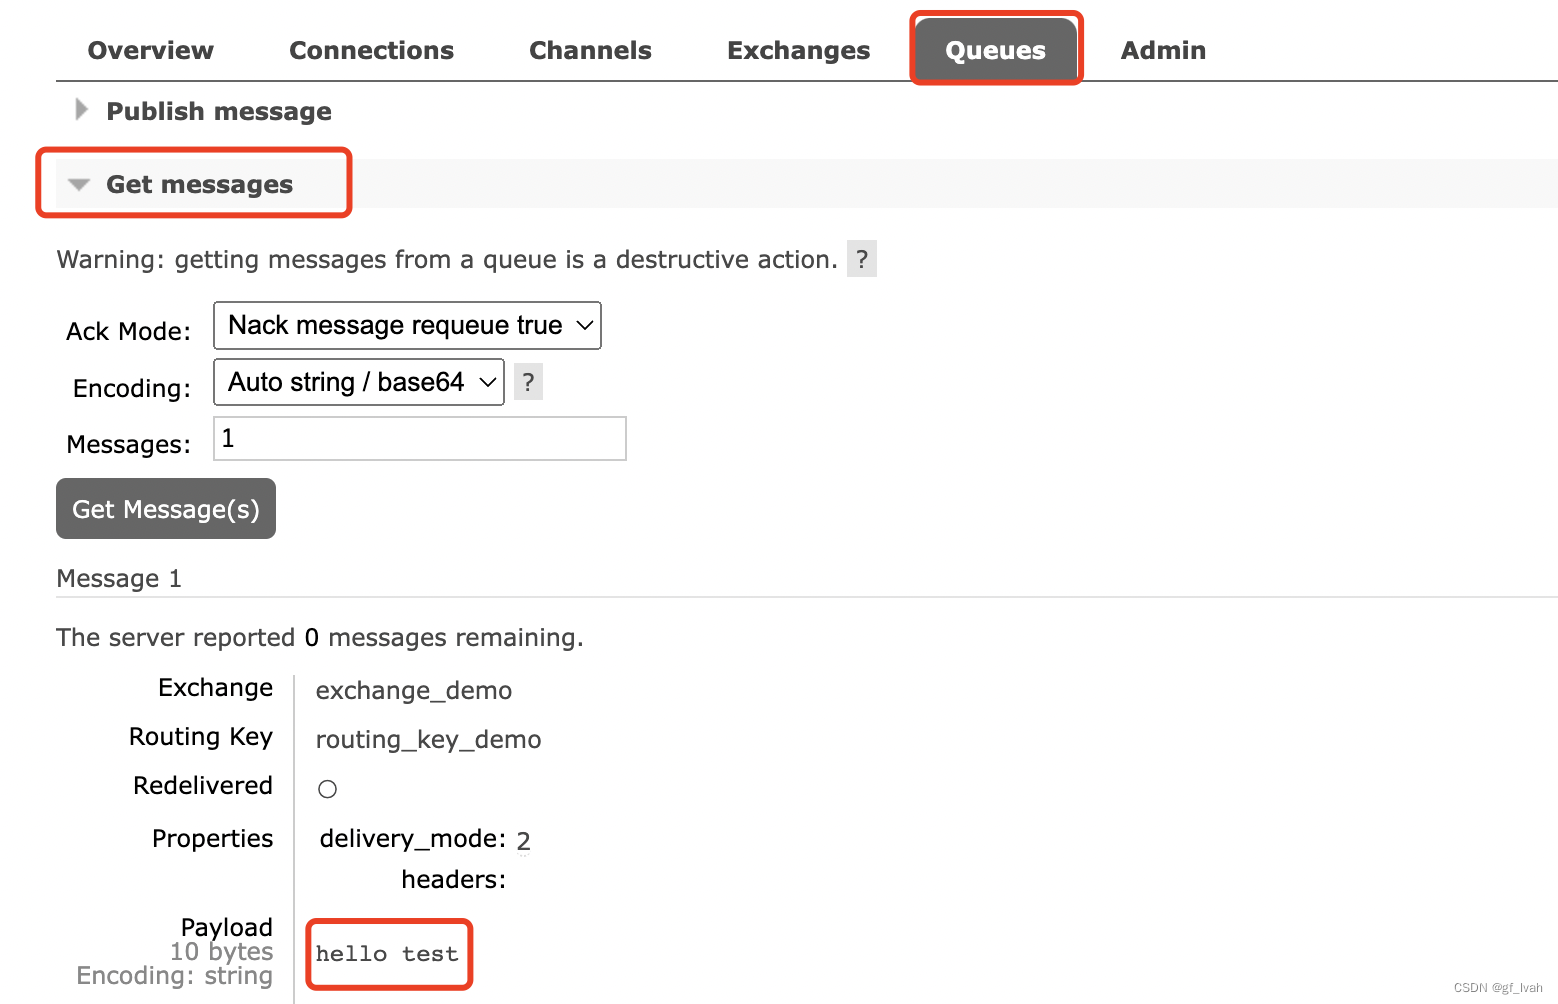
After finish all the operations, we can test whether it is work here. So publish a message to exchange, if we can get message in queue, we can think it works.

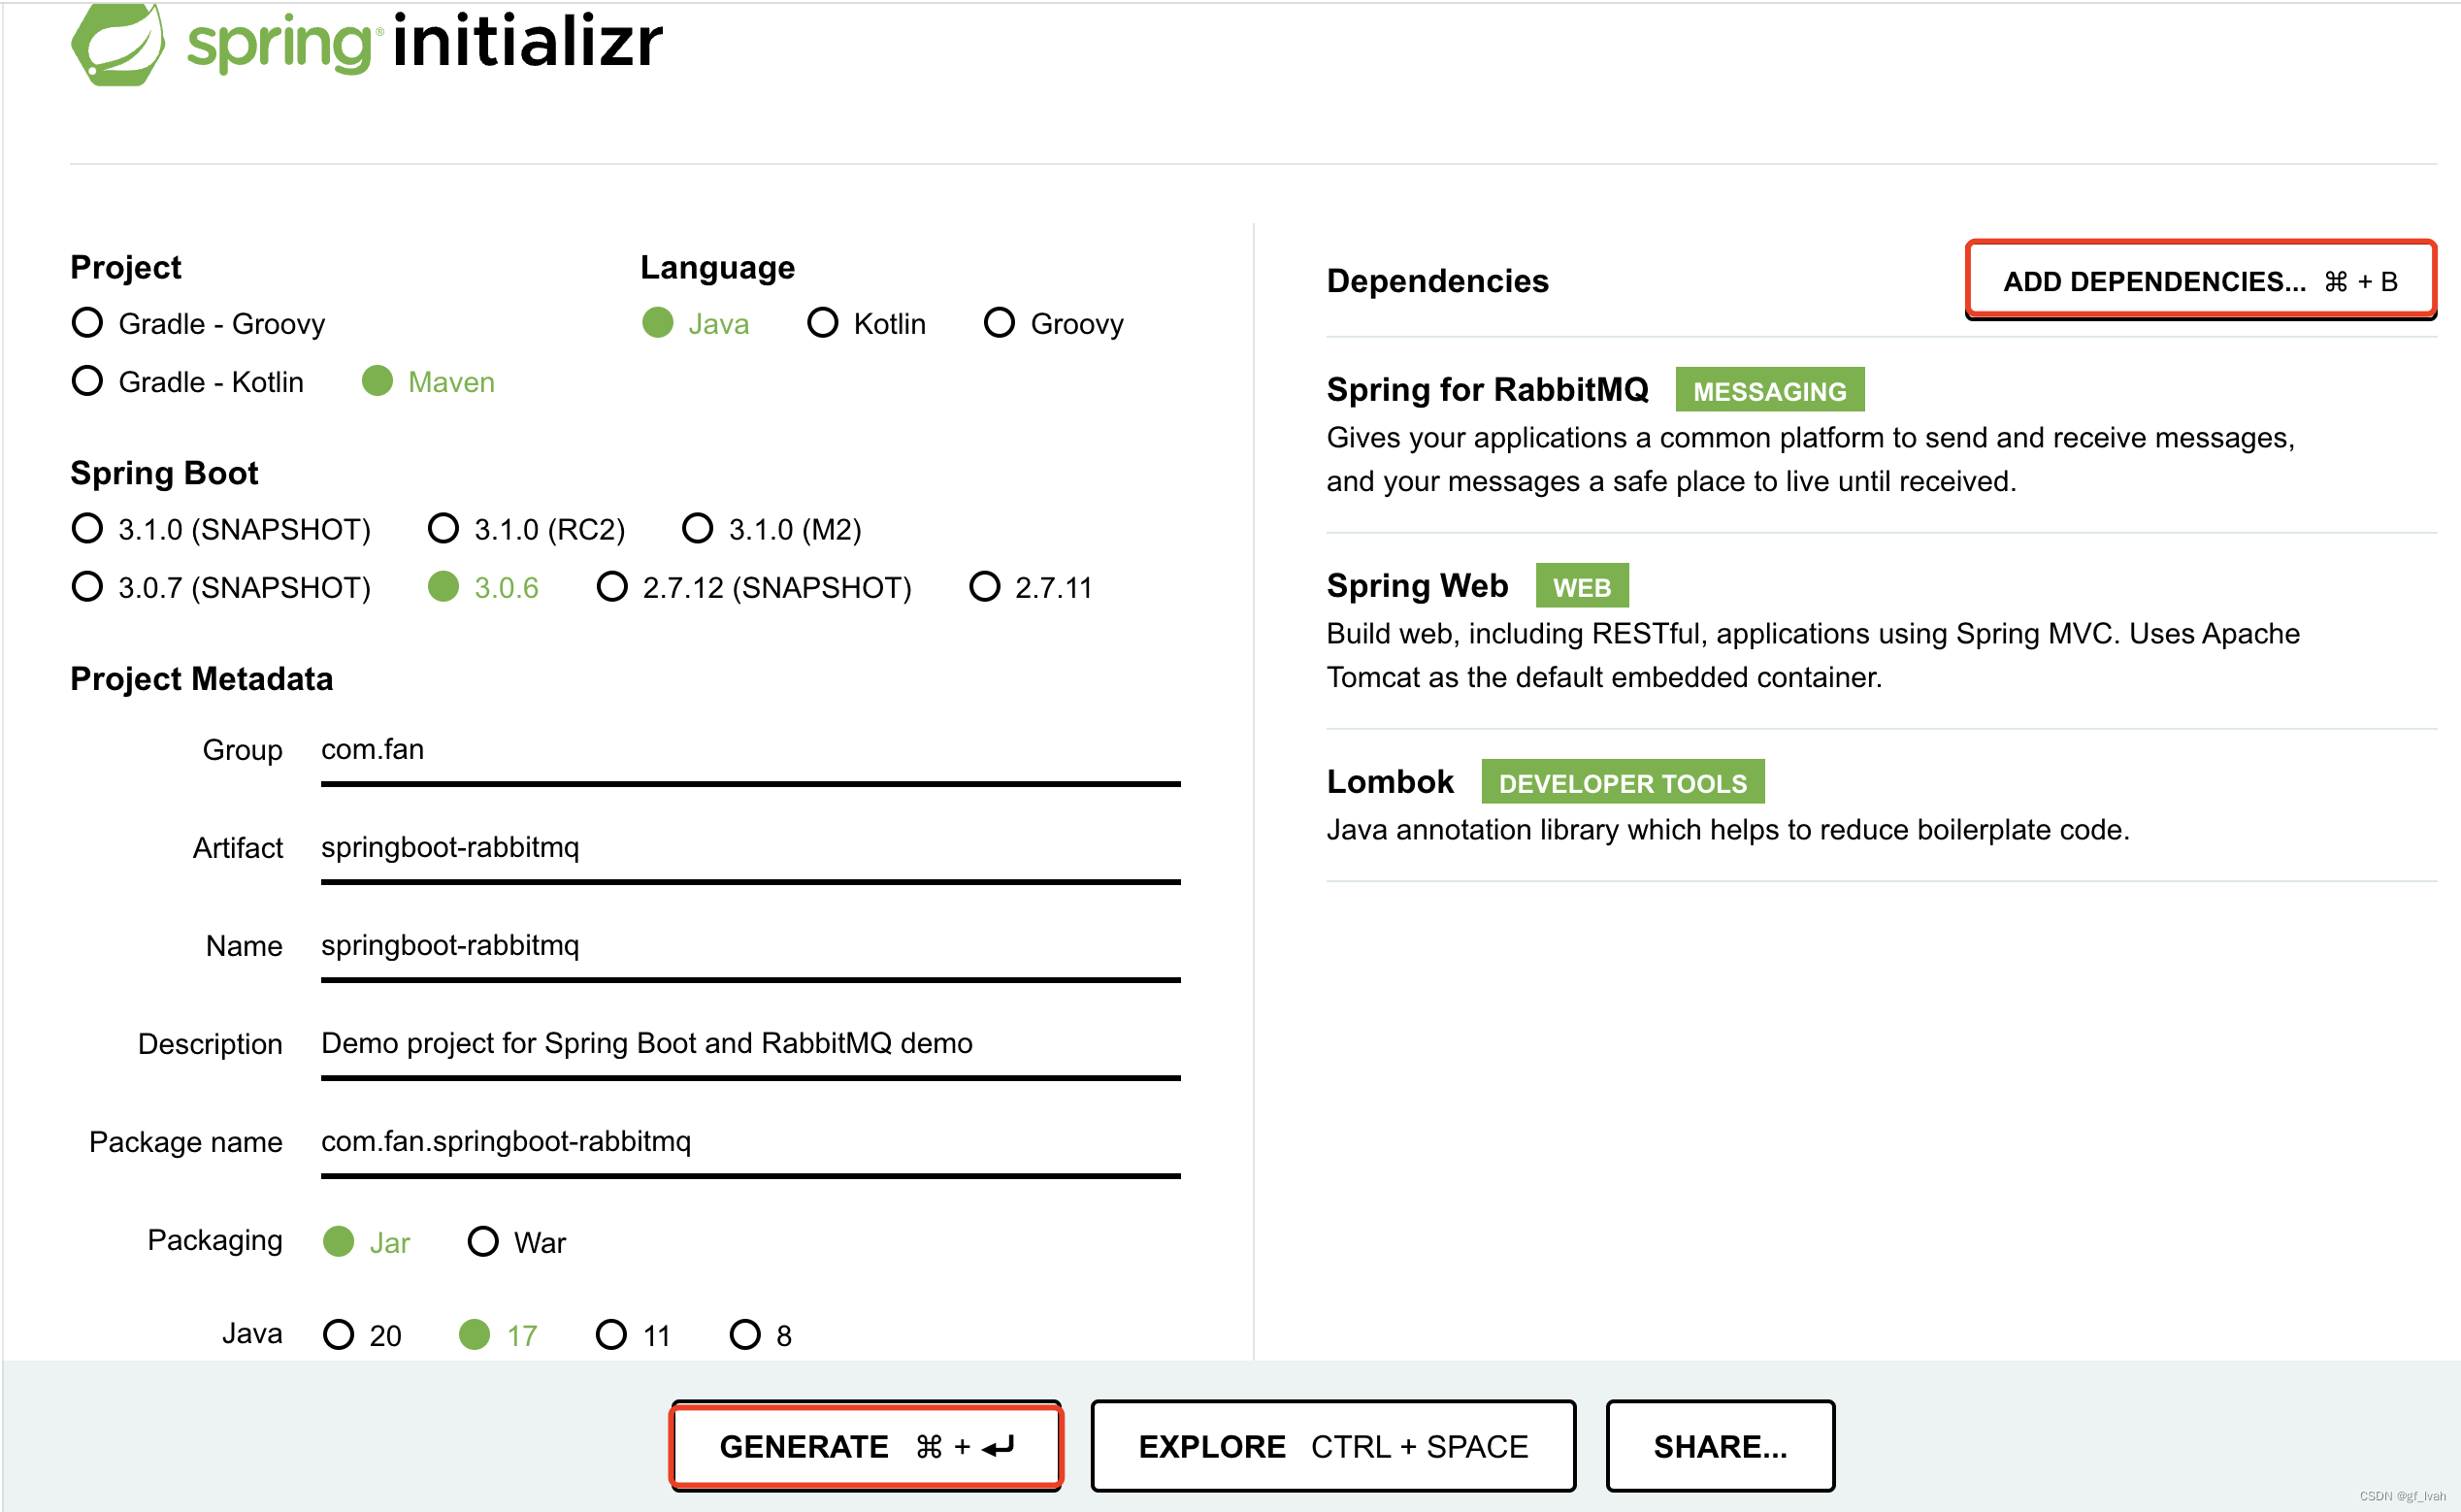
Create and setup Springboot3 project in intellij
First, using spring initializr to quick create and bootstrap spring boot project.
Second, using intellij open the project.

Springboot and RabbitMQ Basic Message
Connection between Springboot and RabbitMQ
Springboot autoconfiguration for spring AMQP(RabbitMQ). We get a connection to our RabbitMQ broker on port 5672 using the default username and password of "guest".
Define these proprtties in a application.properties.
spring.rabbitmq.host=localhost
spring.rabbitmq.port=5672
spring.rabbitmq.username=guest
spring.rabbitmq.password=guest
Create core component
- setup queue name, exchange name and routing key name in
application.properties.
spring.rabbitmq.queue_name=fan_queue
spring.rabbitmq.exchange_name=fan_exchange
spring.rabbitmq.routing_key=fan_routing_key
- write the java code to create queue, exchange and binding.
// file path: com/fan/springbootrabbitmq/config
package com.fan.springbootrabbitmq.config;import org.springframework.amqp.core.*;
import org.springframework.beans.factory.annotation.Value;
import org.springframework.context.annotation.Bean;
import org.springframework.context.annotation.Configuration;@Configuration
public class RabbitMQConfig {@Value("${spring.rabbitmq.queue_name}")private String queueName;@Value("${spring.rabbitmq.exchange_name}")private String exchangeName;@Value("${spring.rabbitmq.routing_key}")private String routingKey;// spring bean for rabbitmq queue@Beanpublic Queue queue() {return new Queue(queueName);}// spring bean for rabbitmq exchange@Beanpublic TopicExchange exchange() {return new TopicExchange(exchangeName);}// binding between queue and exchange using routing key@Beanpublic Binding binding() {return BindingBuilder.bind(queue()).to(exchange()).with(routingKey);}
}
- rerun the project and check whether there are error, if no error, it works.
Create RabbitMQProducer
// file path:  com/fan/springbootrabbitmq/publisher/RabbitMQProducer.java
package com.fan.springbootrabbitmq.publisher;import org.slf4j.Logger;
import org.slf4j.LoggerFactory;
import org.springframework.amqp.rabbit.core.RabbitTemplate;
import org.springframework.beans.factory.annotation.Value;
import org.springframework.stereotype.Service;@Service
public class RabbitMQProducer {@Value("${spring.rabbitmq.exchange_name}")private String exchangeName;@Value("${spring.rabbitmq.routing_key}")private String routingKey;// use RabbitTemplate to send the messages. it auto config for us, we just need to inject and use it.private final RabbitTemplate rabbitTemplate;private static final Logger LOGGER = LoggerFactory.getLogger(RabbitMQProducer.class);public RabbitMQProducer(RabbitTemplate rabbitTemplate) {this.rabbitTemplate = rabbitTemplate;}public void sendMessage(String message) {LOGGER.info(String.format("Message sent => %s", message));rabbitTemplate.convertAndSend(exchangeName, routingKey, message);}
}
Create REST API to send message
// file path: com/fan/springbootrabbitmq/controller/RabbitMQController.java
package com.fan.springbootrabbitmq.controller;import com.fan.springbootrabbitmq.publisher.RabbitMQProducer;
import org.springframework.http.ResponseEntity;
import org.springframework.stereotype.Service;
import org.springframework.web.bind.annotation.GetMapping;
import org.springframework.web.bind.annotation.RequestMapping;
import org.springframework.web.bind.annotation.RequestParam;
import org.springframework.web.bind.annotation.RestController;@RestController
@RequestMapping("/api/v1")
public class RabbitMQController {private RabbitMQProducer producer;public RabbitMQController(RabbitMQProducer producer) {this.producer = producer;}@GetMapping("/publish")public ResponseEntity<String> publish(@RequestParam("message") String message) {producer.sendMessage(message);return ResponseEntity.ok("Message sent to rabbitmq...");}
}
how to test?
- send api request to send message to rabbitmq:
http://localhost:8080/api/v1/publish?message=xxx - check in the dashboard:
http://localhost:15672/
create RabbitMQConsumer
// file path: com/fan/springbootrabbitmq/publisher/RabbitMQConsumer.java
package com.fan.springbootrabbitmq.publisher;import org.slf4j.Logger;
import org.slf4j.LoggerFactory;
import org.springframework.amqp.rabbit.annotation.RabbitListener;
import org.springframework.stereotype.Service;@Service
public class RabbitMQConsumer {private static final Logger LOGGER = LoggerFactory.getLogger(RabbitMQProducer.class);@RabbitListener(queues = "${spring.rabbitmq.queue_name}")public void consum(String message) {LOGGER.info(String.format("Message received => %s", message));}}
after finish this part, rerun the project and send a request for sending message to rabbitmq, and then you can see the result in peoject like this:
[ntContainer#0-1] c.f.s.publisher.RabbitMQProducer         : Message sent => hello1
[ntContainer#0-1] c.f.s.publisher.RabbitMQProducer         : Message received => hello1
Springboot and RabbitMQ Json Message
Create Json object
// file path: com/fan/springbootrabbitmq/dto/User.java
package com.fan.springbootrabbitmq.dto;import lombok.AllArgsConstructor;
import lombok.Data;
import lombok.NoArgsConstructor;@Data
@AllArgsConstructor
@NoArgsConstructor
public class User {private Long id;private String firstName;private String lastName;
}
add config
// file path: com/fan/springbootrabbitmq/config/RabbitMQConfig.java// add this attributes to RabbitMQConfig class@Value("${spring.rabbitmq.json.queue_name}")private String queueJsonName;@Value("${spring.rabbitmq.json.routing_key}")private String routingJsonKey;// add this methods to RabbitMQConfig class@Beanpublic Queue jsonQueue() {return new Queue(queueJsonName);}@Beanpublic MessageConverter converter(){return new Jackson2JsonMessageConverter();}@Beanpublic AmqpTemplate amqpTemplate(ConnectionFactory connectionFactory){RabbitTemplate rabbitTemplate = new RabbitTemplate(connectionFactory);rabbitTemplate.setMessageConverter(converter());return rabbitTemplate;}@Beanpublic Binding jsonBinding() {return BindingBuilder.bind(jsonQueue()).to(exchange()).with(routingJsonKey);}
Produce json message
// file path: com/fan/springbootrabbitmq/publisher/RabbitMQJsonProducer.java
package com.fan.springbootrabbitmq.publisher;import com.fan.springbootrabbitmq.dto.User;
import org.slf4j.Logger;
import org.slf4j.LoggerFactory;
import org.springframework.amqp.rabbit.core.RabbitTemplate;
import org.springframework.beans.factory.annotation.Value;
import org.springframework.stereotype.Service;@Service
public class RabbitMQJsonProducer {@Value("${spring.rabbitmq.exchange_name}")private String exchangeName;@Value("${spring.rabbitmq.routing_key}")private String routingKey;// use RabbitTemplate to send the messages. it auto config for us, we just need to inject and use it.private final RabbitTemplate rabbitTemplate;private static final Logger LOGGER = LoggerFactory.getLogger(RabbitMQJsonProducer.class);public RabbitMQJsonProducer(RabbitTemplate rabbitTemplate) {this.rabbitTemplate = rabbitTemplate;}public void sendJsonMessage(User user) {LOGGER.info(String.format("Message sent => %s", user.toString()));rabbitTemplate.convertAndSend(exchangeName, routingKey, user);}
}
Create API to send json object
// file path: com/fan/springbootrabbitmq/publisher/RabbitMQJsonProducer.java
package com.fan.springbootrabbitmq.publisher;import com.fan.springbootrabbitmq.dto.User;
import org.slf4j.Logger;
import org.slf4j.LoggerFactory;
import org.springframework.amqp.rabbit.core.RabbitTemplate;
import org.springframework.beans.factory.annotation.Value;
import org.springframework.stereotype.Service;@Service
public class RabbitMQJsonProducer {@Value("${spring.rabbitmq.exchange_name}")private String exchangeName;@Value("${spring.rabbitmq.json.routing_key}")private String routingJsonKey;// use RabbitTemplate to send the messages. it auto config for us, we just need to inject and use it.private final RabbitTemplate rabbitTemplate;private static final Logger LOGGER = LoggerFactory.getLogger(RabbitMQJsonProducer.class);public RabbitMQJsonProducer(RabbitTemplate rabbitTemplate) {this.rabbitTemplate = rabbitTemplate;}public void sendJsonMessage(User user) {LOGGER.info(String.format("Message sent => %s", user.toString()));rabbitTemplate.convertAndSend(exchangeName, routingJsonKey, user);}
}
Consum json message
file path: com/fan/springbootrabbitmq/publisher/RabbitMQJsonConsumer.java
package com.fan.springbootrabbitmq.publisher;import com.fan.springbootrabbitmq.dto.User;
import org.slf4j.Logger;
import org.slf4j.LoggerFactory;
import org.springframework.amqp.rabbit.annotation.RabbitListener;
import org.springframework.stereotype.Service;@Service
public class RabbitMQJsonConsumer {private static final Logger LOGGER = LoggerFactory.getLogger(RabbitMQProducer.class);@RabbitListener(queues = "${spring.rabbitmq.json.queue_name}")public void consum(User user) {LOGGER.info(String.format("Message received => %s", user.toString()));}}