利用Iptables构建虚拟路由器
利用Iptables构建虚拟路由器
(1)修改网络类型
在VMware Workstation软件中选择“编辑→虚拟网络编辑器”菜单命令,在虚拟网络列表中选中VMnet1,将其配置为“仅主机模式(在专用网络内连接虚拟机)”,设置子网IP为192.168.1.0,子网掩码为255.255.255.0,完成后单击“确定”按钮,如图1-41所示。
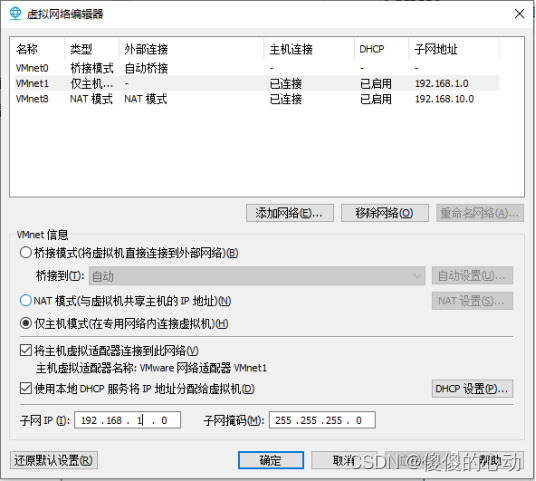
图1-41 设置主机网络模式
(2)添加网络适配器
在虚拟网络编辑器中添加一个虚拟网络VMnet2,配置为“仅主机模式”,设置子网IP为“192.168.2.0”,子网掩码为“255.255.255.0”,如图1-42、图1-43所示。
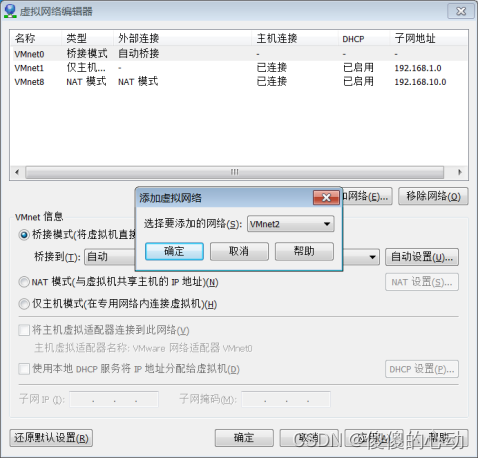
图1-42 配置主机网络模式
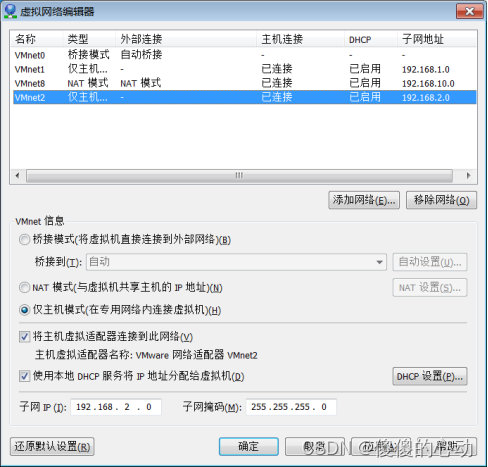
图1-43 DHCP设置
(3)添加网卡
使用VMware Workstation创建3个CentOS 7.5系统的虚拟机,分别命名为student1、student2、student3。
student1配置VMnet1,student2配置VMnet2,student3配置VMnet1和VMnet2两块网卡,如图1-44所示。
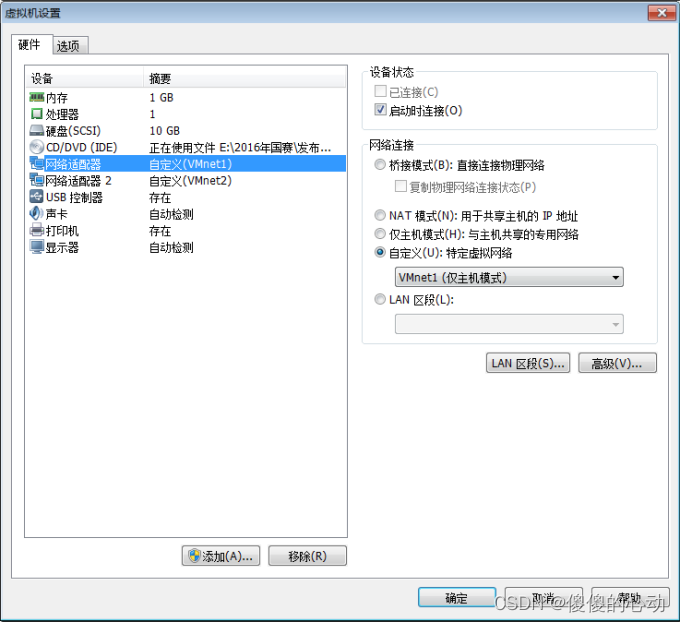
图1-44 student3设置双网卡模式
(4)配置IP地址
使用静态IP配置3个虚拟机的IP地址,使虚拟机student1和虚拟机student2在不同网段,而虚拟机student3两张网卡分别对应着不同的两个网段。虚拟机IP地址详细信息见表1-1。
表1-1 虚拟机网络规划表
| 主机名 | 网卡 | IP地址 | 子网掩码(netmask) | 网关(gateway) |
| student1 | ens33 | 192.168.1.128 | 255.255.255.0 | 192.168.1.129 |
| student2 | ens33 | 192.168.2.128 | 255.255.255.0 | 192.168.2.129 |
| student3 | ens33 | 192.168.1.129 | 255.255.255.0 | 192.168.1.1 |
| ens34 | 192.168.2.129 | 255.255.255.0 | 192.168.2.1 |
(5)远程连接
使用SecureCRT工具远程连接3台虚拟机,用虚拟机student3分别ping虚拟机student1和student2,并让虚拟机student1和虚拟机student2互ping,验证虚拟机student3和student1、student2之间分别相通,虚拟机student1和虚拟机student2不通。
| [root@student3 ~]# ping 192.168.1.128 –c 4 PING 192.168.1.128 (192.168.1.128) 56(84) bytes of data. 64 bytes from 192.168.1.128: icmp_seq=1 ttl=64 time=0.365 ms 64 bytes from 192.168.1.128: icmp_seq=2 ttl=64 time=0.356 ms 64 bytes from 192.168.1.128: icmp_seq=3 ttl=64 time=0.433 ms 64 bytes from 192.168.1.128: icmp_seq=3 ttl=64 time=0.433 ms --- 192.168.1.128 ping statistics --- 4 packets transmitted, 4 received, 0% packet loss, time 2259ms rtt min/avg/max/mdev = 0.433/0.642/1.020/0.267 ms [root@student3 ~]# ping 192.168.2.128 –c 4 PING 192.168.2.128 (192.168.2.128) 56(84) bytes of data. 64 bytes from 192.168.2.128: icmp_seq=1 ttl=64 time=0.533 ms 64 bytes from 192.168.2.128: icmp_seq=2 ttl=64 time=0.422 ms 64 bytes from 192.168.2.128: icmp_seq=3 ttl=64 time=0.435 ms 64 bytes from 192.168.2.128: icmp_seq=4 ttl=64 time=0.452 ms --- 192.168.2.128 ping statistics --- 4 packets transmitted, 4 received, 0% packet loss, time 3523ms rtt min/avg/max/mdev = 0.422/0.460/0.533/0.048 ms [root@student1 ~]# ping 192.168.2.128 –c 4 PING 192.168.2.128 (192.168.2.128) 56(84) bytes of data. From 172.24.13.1 icmp_seq=3 Destination Host Unreachable From 172.24.13.1 icmp_seq=4 Destination Host Unreachable --- 192.168.2.128 ping statistics --- 4 packets transmitted, 0 received, 100% packet loss, time 23961ms [root@student2 ~]# ping 192.168.1.128 –c 4 PING 192.168.1.128 (192.168.1.128) 56(84) bytes of data. From 172.24.13.1 icmp_seq=3 Destination Host Unreachable From 172.24.13.1 icmp_seq=4 Destination Host Unreachable --- 192.168.1.128 ping statistics --- 4 packets transmitted, 0 received, 100% packet loss, time 34618ms |
(6)构建虚拟路由器
现在将虚拟机student3作为虚拟交换路由器,使得不同网段的虚拟机student1和虚拟机student2可以互相通信。在虚拟机student3中作出如下操作使其成为虚拟路由器。
| # echo 'net.ipv4.ip_forward=1' > /etc/sysctl.conf \\开启包过滤功能即开启路由功能 # echo "net.ipv4.conf.default.rp_filter=0" >> /etc/sysctl.conf \\启用源路由核查功能 # echo 'net.ipv4.conf.all.rp_filter=0' >> /etc/sysctl.conf \\关闭反向路径过滤 #sysctl –p \\内核网络设置生效 |
(7)修改防火墙配置
修改虚拟机student3的IPtables配置,使其可以接受并转发192.168.1.0/24和192.168.2.0/24两个网段的包。
| # iptables –F \\清空所有 chain中的规则 # iptables –X \\删除所有用户自定义 # iptables –Z \\把所有链的包及字节的计数器清空 # iptables-save \\保存IPtables的配置 iptables: Saving firewall rules to /etc/sysconfig/iptables:[ OK ] # iptables -t nat -A POSTROUTING -s 192.168.10.0/24 -o ens33 \\指定192.168.10.0/24网段的包从ens33出去 # iptables -t nat -A POSTROUTING -s 192.168.20.0/24 -o ens34 \\指定192.168.20.0/24网段的包从ens34出去 |
(8)检查连通性
检查虚拟机student1和虚拟机student2之间是否可以连通。
| [root@student1 ~]# ping 192.168.2.128 –c 4 PING 192.168.2.128 (192.168.2.128) 56(84) bytes of data. 64 bytes from 192.168.2.128: icmp_seq=1 ttl=63 time=17.2 ms 64 bytes from 192.168.2.128: icmp_seq=2 ttl=63 time=0.873 ms 64 bytes from 192.168.2.128: icmp_seq=3 ttl=63 time=1.11 ms 64 bytes from 192.168.2.128: icmp_seq=3 ttl=63 time=1.11 ms --- 192.168.2.128 ping statistics --- 4 packets transmitted, 4 received, 0% packet loss, time 2567ms rtt min/avg/max/mdev = 0.873/6.413/17.256/7.667 ms [root@student2 ~]# ping 192.168.1.128 PING 192.168.1.128 (192.168.1.128) 56(84) bytes of data. 64 bytes from 192.168.1.128: icmp_seq=1 ttl=63 time=1.03 ms 64 bytes from 192.168.1.128: icmp_seq=2 ttl=63 time=0.842 ms 64 bytes from 192.168.1.128: icmp_seq=3 ttl=63 time=0.833 ms 64 bytes from 192.168.1.128: icmp_seq=3 ttl=63 time=0.833 ms --- 192.168.1.128 ping statistics --- 4 packets transmitted, 4 received, 0% packet loss, time 2419ms rtt min/avg/max/mdev = 0.833/0.902/1.031/0.091 ms |
(9)IPtables的网络隔离
使用IPtables规则隔离同网段的连接。使虚拟机student2和虚拟机student3直接无法连通。
| #iptables -I INPUT -s 192.168.2.0/24 -j DROP \\设置一个规则来自192.168.2.0/24的包直接drop掉 [root@student2 ~]# ping 192.168.2.129 \\用ping测试192.168.2.0/24网段连通 PING 192.168.1.129 (192.168.1.129) 56(84) bytes of data. ^C --- 192.168.2.129 ping statistics --- 5 packets transmitted, 0 received, 100% packet loss, time 4679ms |