Linux日志管理与时间同步
Linux日志管理与时间同步
日志管理
systemd-journald:临时,服务器重启后,日志随之消失。
rsyslog:永久,日志文件永久保存,配置文件:/etc/rsyslog.conf
日志文件的种类:
1、内核及系统日志 //记录了操作系统内核本身、系统启动过程、核心系统服务(如 systemd、init、cron、udev、网络服务守护进程等)以及硬件设备驱动相关的活动、事件、错误和状态信息。
2、用户日志 //用户的登录、登出行为,以及用户身份验证相关的成功或失败尝试。
3、程序日志 //记录该程序自身的运行细节、处理的事务、遇到的错误、调试信息等。
主要日志文件:
补充
/var/log/dmesg :记录linux系统在引导过程中的各种事件信息
/var/log/lastlog :记录每个用户最近的登录事件信息
/var/log/wtmp :记录每个用户登录、注销及系统启动和停机事件
/var/log/btmp :记录失败的、错误的登录尝试及验证事件
分析日志:
1、日志优先级
优先级由低到高:
debug–程序或系统调试级别
info–一般信息性事件
notice–不会影响正常功能,但是需要注意的事件
warning–可能影响系统功能,需要提醒用户的重要事件
err–运行出现错误,非严重错误状况
cirt–比较严重的情况
alert–必须立即采取措施解决的问题
emerg–会导致主机系统不可用的情况
tail -f 实时监控日志文件
tail -f /var/log/messages
[root@ws ~]# cd /var/log/
[root@ws log]# vim messages		查看日志信息
[root@ws log]#
日志记录格式
时间标签:消息发出的日期和时间
主机名:生成消息的主机名称
子系统名称:发出消息的应用程序名称或者进程名和PID编号
消息:消息具体的内容
手动发送syslog消息
向rsyslog服务发送消息并记录在/var/log/boot.log日志文件中
logger -p local7.notice “chenyu”
主要用来测试rsyslog服务配置的
journalctl -n 默认查看最新10条日志信息,-n后面也可以跟数字
journalctl -f 实时监控日志
journalctl -p err 可以按照日志级别的优先级进行显示日志,显示该优先级及以上日志信息
[root@ws ~]# journalctl -n 5
-- Logs begin at 四 2025-07-31 10:12:47 CST, end at 四 2025-07-31 14:30:01 CST. --
7月 31 14:20:31 ws.example.com sshd[64418]: pam_unix(sshd:session): session opened for user root by (uid=0)
7月 31 14:20:31 ws.example.com dbus[8635]: [system] Activating service name='org.freedesktop.problems' (using servicehelper)
7月 31 14:20:31 ws.example.com dbus[8635]: [system] Successfully activated service 'org.freedesktop.problems'
7月 31 14:30:01 ws.example.com systemd[1]: Started Session 33 of user root.
7月 31 14:30:01 ws.example.com CROND[64540]: (root) CMD (/usr/lib64/sa/sa1 1 1)
[root@ws ~]# journalctl -f
-- Logs begin at 四 2025-07-31 10:12:47 CST. --
7月 31 14:20:01 ws.example.com systemd[1]: Started Session 31 of user root.
7月 31 14:20:01 ws.example.com CROND[64406]: (root) CMD (/usr/lib64/sa/sa1 1 1)
7月 31 14:20:31 ws.example.com sshd[64418]: Accepted password for root from 192.168.110.1 port 61366 ssh2
7月 31 14:20:31 ws.example.com systemd-logind[8627]: New session 32 of user root.
7月 31 14:20:31 ws.example.com systemd[1]: Started Session 32 of user root.
7月 31 14:20:31 ws.example.com sshd[64418]: pam_unix(sshd:session): session opened for user root by (uid=0)
7月 31 14:20:31 ws.example.com dbus[8635]: [system] Activating service name='org.freedesktop.problems' (using servicehelper)
7月 31 14:20:31 ws.example.com dbus[8635]: [system] Successfully activated service 'org.freedesktop.problems'
7月 31 14:30:01 ws.example.com systemd[1]: Started Session 33 of user root.
7月 31 14:30:01 ws.example.com CROND[64540]: (root) CMD (/usr/lib64/sa/sa1 1 1)
^Z
[1]+  已停止               journalctl -f
[root@ws ~]# journalctl -p err
-- Logs begin at 四 2025-07-31 10:12:47 CST, end at 四 2025-07
7月 31 10:12:47 ws.example.com kernel: Detected CPU family 6 m
7月 31 10:12:47 ws.example.com kernel: Warning: Intel Processo
7月 31 10:12:50 ws.example.com kernel: sd 0:0:0:0: [sda] Assum
7月 31 10:12:55 ws.example.com kernel: piix4_smbus 0000:00:07.
7月 31 10:12:59 ws.example.com mcelog[8671]: Family 6 Model 15
7月 31 10:12:59 ws.example.com mcelog[8703]: Family 6 Model 15
7月 31 10:13:11 ws.example.com pulseaudio[9792]: [alsa-sink-ES
7月 31 10:13:11 ws.example.com pulseaudio[9792]: [alsa-sink-ES
显示某个时间段的日志
journalctl --since today
journalctl --since “2020-11-11 21:00:00” --until “2020-11-11 21:10:00”
journalctl --since “-1 hour”
journalctl -o verbose —查看详细日志信息,后可以跟条件进行查找
如:
journalctl --since “-1 hour” -o verbose _COMM=su
(1)_COMM 是命令的名称
(2)_EXE 是进程的可执行文件的路径
(3)_PID 是进程的PID
(4)_UID 是运行该进程的用户的UID
(5)_SYSTEMD_UNIT 是启动该进程的systemd单元
用户日志
lastlog
users:查看系统中被使用用户的次数
[root@ws ~]# users
root root root
who:查看哪台机器在哪个时间的哪个终端登录的哪个用户
[root@ws ~]# who
root     :0           2025-07-31 10:15 (:0)
root     pts/0        2025-07-31 10:16 (:0)
root     pts/1        2025-07-31 10:16 (192.168.110.1)
w:查看哪台机器在哪个时间的哪个终端登录的哪个用户,并显示正在操作的命令
[root@ws log]# w14:49:02 up  4:36,  3 users,  load average: 1.00, 1.00, 0.96
USER     TTY      FROM             LOGIN@   IDLE   JCPU   PCPU WHAT
root     :0       :0               10:15   ?xdm?   2:55   0.79s /usr/libexec/gn
root     pts/0    :0               10:16    6.00s  0.26s  0.07s w
root     pts/1    192.168.110.1    10:16   14.00s  3:06m  0.96s -bash
wtmp
last:显示成功访问过服务器的用户信息
[root@ws ~]# last
root     pts/2        192.168.110.1    Thu Jul 31 14:49 - 14:50  (00:00)
root     pts/2        192.168.110.1    Thu Jul 31 14:20 - 14:44  (00:23)
root     pts/1        192.168.110.1    Thu Jul 31 10:16   still logged in
root     pts/0        :0               Thu Jul 31 10:16   still logged in
root     :0           :0               Thu Jul 31 10:15   still logged in
reboot   system boot  3.10.0-957.el7.x Thu Jul 31 10:12 - 14:53  (04:40)
root     pts/0        :0               Wed Jul 30 19:57 - crash  (14:15)
root     :0           :0               Wed Jul 30 19:57 - crash  (14:15)
reboot   system boot  3.10.0-957.el7.x Wed Jul 30 19:55 - 14:53  (18:57)
reboot   system boot  3.10.0-957.el7.x Wed Jul 30 19:53 - 14:53  (18:59)
reboot   system boot  3.10.0-957.el7.x Wed Jul 30 19:52 - 14:53  (19:00)
reboot   system boot  3.10.0-957.el7.x Wed Jul 30 19:51 - 14:53  (19:01)
reboot   system boot  3.10.0-957.el7.x Wed Jul 30 19:46 - 19:47  (00:01)
root     pts/0        :0               Wed Jul 30 19:39 - 19:39  (00:00)
root     :0           :0               Wed Jul 30 19:39 - 19:39  (00:00)
reboot   system boot  3.10.0-957.el7.x Wed Jul 30 19:37 - 19:39  (00:01)
root     pts/0        :0               Wed Jul 23 12:21 - 12:23  (00:01)
root     :0           :0               Wed Jul 23 12:19 - 12:24  (00:04)
reboot   system boot  3.10.0-957.el7.x Wed Jul 23 12:18 - 19:39 (7+07:20)
btmp
lastb:显示失败访问过服务器的用户信息
[root@ws ~]# lastbbtmp begins Thu Jul 31 10:12:57 2025
第一个*:事件
第二个*:优先级
时钟同步:
timedatectl —查看当前的时间、时区和NTP同步设置
timedatectl list-timezones 列出时区
timedatectl set-timezone 设置时区
如:
timedatectl set-timezone “Asia/Shanghai”
[root@ws ~]# timedatectl Local time: 四 2025-07-31 15:18:16 CSTUniversal time: 四 2025-07-31 07:18:16 UTCRTC time: 四 2025-07-31 07:18:16Time zone: Asia/Shanghai (CST, +0800)NTP enabled: no
NTP synchronized: noRTC in local TZ: noDST active: n/a[root@ws ~]# timedatectl list-timezones
Africa/Abidjan
Africa/Accra
Africa/Addis_Ababa
Africa/Algiers
Africa/Asmara
Africa/Bamako
Africa/Bangui
Africa/Banjul
Africa/Bissau
更改系统的当前时间:
语法:
timedatectl set-time “YYYY-MM-DD hh:mm:ss”
或者使用
语法:
date -s “YYYY-MM-DD hh:mm:ss”
chrony
UDP协议传输报文,端口323
chrony由chronyd 和chronyc两个程序组成
chronyd不能与ntpd同时使用
服务端:
1、安装chrony
2、修改配置
vim /etc/chrony.conf
local stratum 10 -----不去同步任何人的时间。时间同步服务级别
allow 172.16.30.0/24 ----允许172.16.30.0/24网段内的主机来同步我的时钟服务器
3、重启服务
systemctl restart chronyd
systemctl enable chronyd
[root@ws ~]# rpm -q chrony
chrony-3.2-2.el7.x86_64
已经安装
[root@ws ~]# vim /etc/chrony.conf
[root@ws ~]# systemctl restart chronyd
[root@ws ~]# systemctl enable chronyd
Created symlink from /etc/systemd/system/multi-user.target.wants/chronyd.service to /usr/lib/systemd/system/chronyd.service.
[root@ws ~]# systemctl stop firewalld.service
[root@ws ~]# setenforce 0   // 关闭防火墙
[root@ws ~]# timedatectl Local time: 四 2025-07-31 16:12:46 CSTUniversal time: 四 2025-07-31 08:12:46 UTCRTC time: 四 2025-07-31 08:12:46Time zone: Asia/Shanghai (CST, +0800)NTP enabled: yes
NTP synchronized: yesRTC in local TZ: noDST active: n/a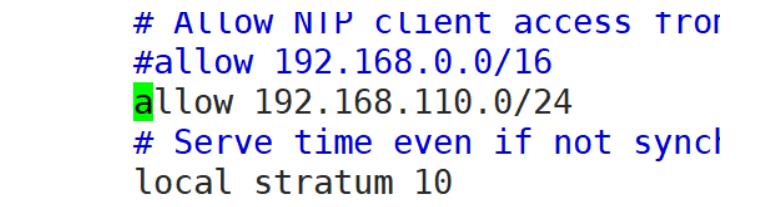
4、设置防火墙
firewall-cmd --add-service=ntp --permanent
firewall-cmd --reload
客户端:
yum -y install chrony
vim /etc/chrony.conf
server 172.16.30.20 iburst
systemctl restart chronyd
systemctl enable chronyd
hwclock -w
[root@ws2 ~]# rpm -q chrony
chrony-3.2-2.el7.x86_64
已经安装
[root@ws2 ~]# date -s "2025-7-13 12:25:00"
2025年 07月 13日 星期日 12:25:00 CST
[root@ws2 ~]# hwclock -w
[root@ws2 ~]# timedatectl Local time: 日 2025-07-13 12:25:32 CSTUniversal time: 日 2025-07-13 04:25:32 UTCRTC time: 日 2025-07-13 04:25:31Time zone: Asia/Shanghai (CST, +0800)NTP enabled: no
NTP synchronized: noRTC in local TZ: noDST active: n/a
[root@ws2 ~]# vim /etc/chrony.conf
[root@ws2 ~]# systemctl restart chronyd
[root@ws2 ~]# systemctl enable chronyd
[root@ws2 ~]# timedatectl Local time: 四 2025-07-31 16:11:53 CSTUniversal time: 四 2025-07-31 08:11:53 UTCRTC time: 四 2025-07-31 08:11:53Time zone: Asia/Shanghai (CST, +0800)NTP enabled: yes
NTP synchronized: yesRTC in local TZ: noDST active: n/a
[root@ws2 ~]# chronyc  sources
210 Number of sources = 1
MS Name/IP address         Stratum Poll Reach LastRx Last sample
===============================================================================
^* 192.168.110.10                3   7   377    14  -8958ns[  +44us] +/-   43ms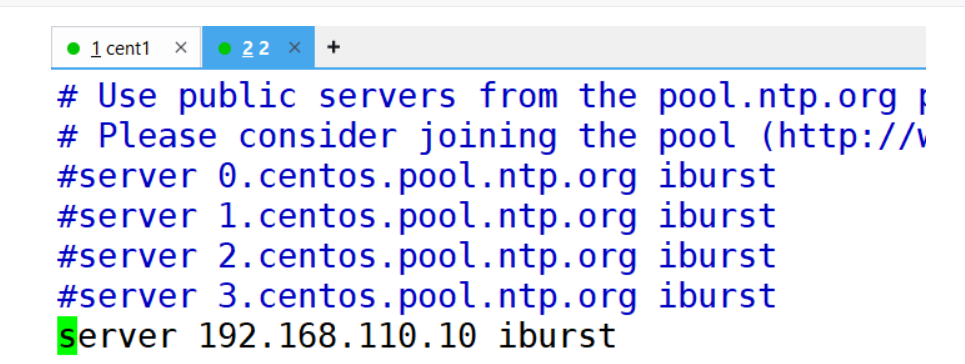
chronyc命令----在客户端使用
chronyc sources —查看时间同步源信息
chronyc sourcestats -v —查看时间同步源状态信息