C#控件开发6—指示灯
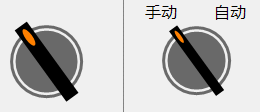
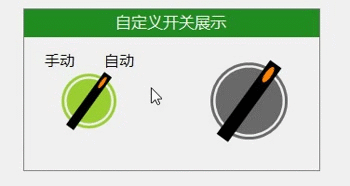
按钮功能:手自动旋转,标签文本显示、点击二次弹框确认(源码在最后边);
【制作方法】
- 找到控件的中心坐标,画背景外环、内圆;再绘制矩形开关,进行角度旋转即可获得;
【关键节点】
- No.1 获取中心坐标,思考要绘制图形的相对坐标、宽度、高度;
- No.2 更改坐标系原点,以此原点为坐标,绘制矩形开关,再旋转指定角度
//方法中获取原点
Point centerPoint = GetCenterPoint();#region 获取中心原点
private Point GetCenterPoint()
{if (this.height > this.width){return new Point(this.width / 2, this.width / 2);}else{return new Point(this.height / 2, this.height / 2);}
}
#endregion
//更改坐标系原点
g.TranslateTransform(centerPoint.X, centerPoint.Y);//旋转指定角度
if (switchStatus)
{g.RotateTransform(36.0f);
}
else
{g.RotateTransform(-36.0f);
}
**【1】**按钮的背景(外环<g.DrawEllipse>、内圆<g.FillEllipse>)绘制方法与指示灯的方法一样;
注意:此坐标系以控件左上角为准
//绘制外环—(Pen)-DrawEllipse
p = new Pen(this.cirInColor, this.cirOutWidth);
RectangleF rec = new RectangleF(this.cirOutGap, this.cirOutGap, (centerPoint.X - this.cirOutGap) * 2, (centerPoint.X - this.cirOutGap) * 2);
g.DrawEllipse(p, rec);//填充内圆—(SolidBrush)-FillEllipse
sb = new SolidBrush(this.cirInColor);
rec = new RectangleF(this.cirInGap, this.cirInGap, (centerPoint.X - this.cirInGap) * 2, (centerPoint.X - this.cirInGap) * 2);
g.FillEllipse(sb, rec);
**【2】**绘制中间矩形及圆点,画刷填充指定区域(g.FillRectangle、g.FillEllipse)
注意:此坐标系以中心点为准
//更改坐标系原点
g.TranslateTransform(centerPoint.X, centerPoint.Y);//填充矩形开关
rec = new RectangleF(-this.togWidth * 0.5f, this.togGap - centerPoint.Y, togWidth, (centerPoint.Y - togGap) * 2);
g.FillRectangle(new SolidBrush(this.togColor), rec);//填充矩形开关圆点
rec = new RectangleF(-this.togWidth * 0.5f + togForeGap, this.togGap - centerPoint.Y + togForeGap, togWidth - 2 * togForeGap, togForeHeight);
g.FillEllipse(new SolidBrush(this.togForeColor), rec);
**【3】**绘制文本,在指定的矩形中绘制指定的字符串(g.DrawString)
//指定字符串
rec = new RectangleF(this.width * 0.05f, 1, this.width, 20);
g.DrawString(this.textLeft, this.textFont, new SolidBrush(this.textColor), rec, sf);
rec = new RectangleF(this.width * 0.63f, 1, this.width, 20);
g.DrawString(this.textRight, this.textFont, new SolidBrush(this.textColor), rec, sf);
**【4】**创建鼠标点击事件,添加鼠标点击事件处理<更改属性值>,在属性中触发事件(Event)
#region 添加事件
[Browsable(true)]
[Category("操作_G")]
[Description("双击进入事件")]
public event EventHandler MouseDown_G;   //事件声明
//初始化函数添加鼠标点击事件处理
this.MouseDown += Switch_MouseDown; ;
//鼠标点击事件处理逻辑
private void Switch_MouseDown(object sender, MouseEventArgs e)
{DialogResult dr = MessageBox.Show("二次确认操作?", "提示您", MessageBoxButtons.OKCancel, MessageBoxIcon.Question);if (dr == DialogResult.OK){SwitchStatus = !SwitchStatus; //此处属性值,不是字段}else return;
}
#endregion
//开关状态属性private bool switchStatus = false;[Browsable(true)][Category("布局_G")][Description("开关状态")]public bool SwitchStatus{get { return switchStatus; }set{switchStatus = value; this.Invalidate();//激活触发事件this.MouseDown_G?.Invoke(this, null);}}
备忘:指定默认事件(在应用时点击鼠标即可进入自定义事件,否则进入‘load’事件)
[DefaultEvent("MouseDown_G")]
最后生成
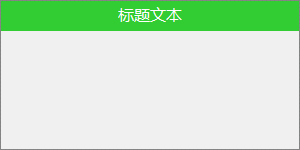
下一个:一个标题面板,方便用户界面的布局
【1】新建用户组件

【2】更改组件继承为Panel

【3】定义属性(标题的颜色、字体、高度;抬头背景色;边框颜色)
private Font titleFont = new Font("微软雅黑", 12);
[Browsable(true)]
[Category("布局_G")]
[Description("标题字体")]
public Font TitleFont
{get { return titleFont; }set{titleFont = value;this.Invalidate();}
}
【4】重绘画布
//画外边框
g.DrawRectangle(new Pen(this.colorBorder), new Rectangle(0, 0, this.Width - 1, this.Height - 1));//填充抬头矩形
RectangleF rec = new RectangleF(0.5f, 0.5f, this.Width - 2, this.titleHeight);
g.FillRectangle(new SolidBrush(this.colorBack), rec);//文本绘制
g.DrawString(this.titleText, this.titleFont, new SolidBrush(this.colorTitle), rec, sf);
【5】备注说明
- 初始化字体格式-需要再两个方法中定义文本对齐格式
//字体对齐格式
this.sf = new StringFormat();
this.sf.Alignment = StringAlignment.Center;
this.sf.LineAlignment = StringAlignment.Center;//指定控件大小
this.Size = new System.Drawing.Size(300, 150);
最后生成并应用