【深度学习】wsl-ubuntu深度学习基本配置
配置pip镜像源
这里注意一点,你换了源之后就最好不要开代理了,要不然搞不好下载失败,pip和conda都是
## 配置中科大镜像
pip config set global.index-url https://mirrors.ustc.edu.cn/pypi/web/simple# 配置阿里源
pip config set global.index-url https://mirrors.aliyun.com/pypi/simple/
# 配置腾讯源
pip config set global.index-url http://mirrors.cloud.tencent.com/pypi/simple
# 配置豆瓣源
pip config set global.index-url http://pypi.douban.com/simple/## 你只需配置其中一个即可
方法一:pip install 安装包名字
方法二:python -m pip install 安装包名字
方法三:pip --trusted-host pypi.python.org install 安装包名字pip install 安装包名字 -i http://pypi.doubanio.com/simple/ --trusted-host pypi.doubanio.com            //豆瓣镜像网站pip install 安装包名字 -i http://pypi.douban.com/simple/ --trusted-host pypi.douban.com                  //豆瓣pip install 安装包名字 -i https://pypi.tuna.tsinghua.edu.cn/simple/ --trusted-host pypi.tuna.tsinghua.edu.cn    //清华大学
conda配置镜像
conda config --add channels https://mirrors.tuna.tsinghua.edu.cn/anaconda/pkgs/free/
conda config --add channels https://mirrors.tuna.tsinghua.edu.cn/anaconda/pkgs/main/
conda config --set show_channel_urls yes
conda config --add channels https://mirrors.tuna.tsinghua.edu.cn/anaconda/cloud/pytorch/
pip install -r requirements.txt除了使用pip命令来生成及安装requirement.txt文件以外,也可以使用conda命令来安装。
conda install --yes --file requirements.txt
怎么用wsl的conda跑深度学习代码


正常打开终端选择即可。
运行即可跑pycharm中的项目了
wls安装
https://zhuanlan.zhihu.com/p/663817616 基本都是跟着这个装的,写的很好
https://blog.csdn.net/weixin_45840825/article/details/127138564 怎么把wls不安装在C盘

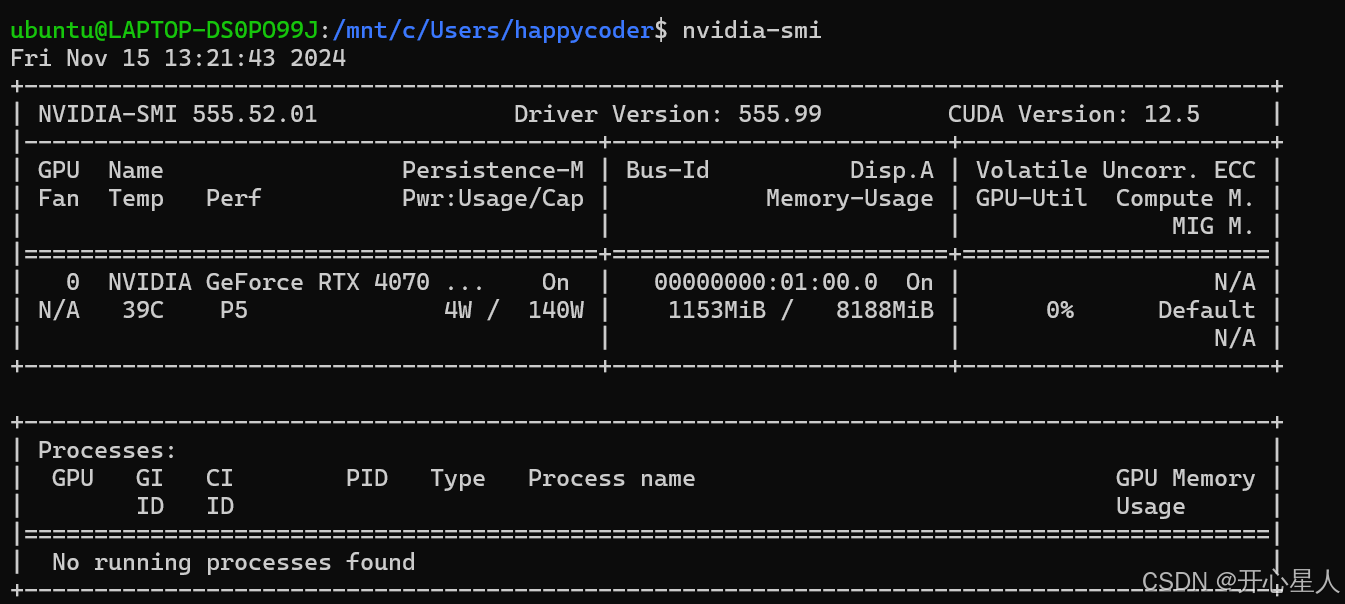
最高支持cuda是12.5
最新默认安装的是12.6,所以要找旧的
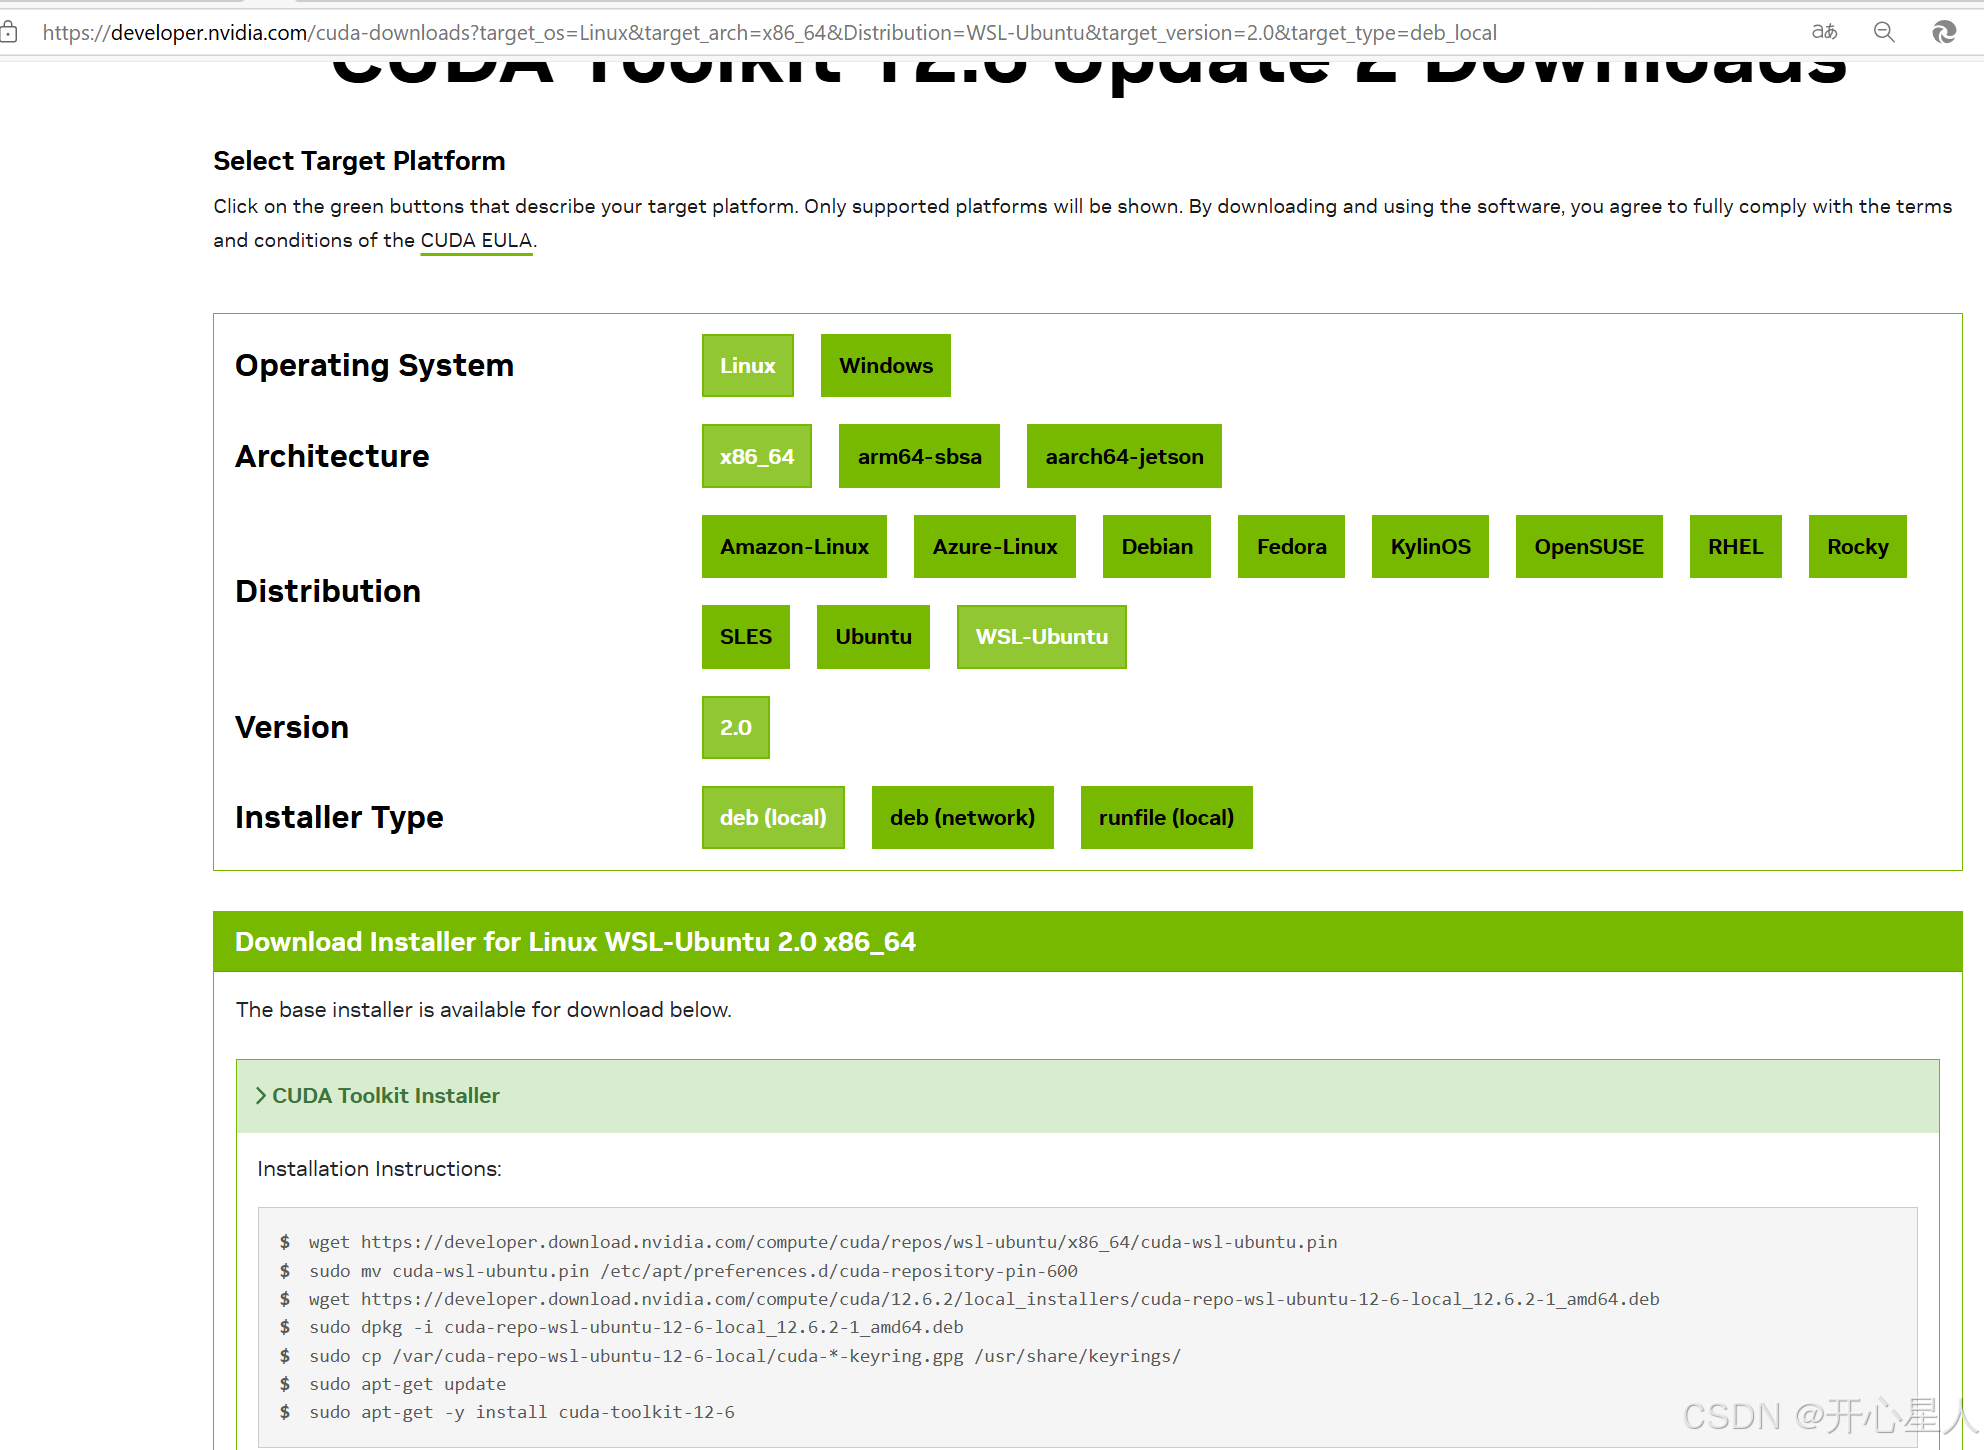
https://developer.nvidia.com/cuda-11-6-0-download-archive?target_os=Linux&target_arch=x86_64&Distribution=WSL-Ubuntu&target_version=2.0&target_type=deb_local
安装11.6
wget https://developer.download.nvidia.com/compute/cuda/repos/wsl-ubuntu/x86_64/cuda-wsl-ubuntu.pin
sudo mv cuda-wsl-ubuntu.pin /etc/apt/preferences.d/cuda-repository-pin-600
wget https://developer.download.nvidia.com/compute/cuda/11.6.0/local_installers/cuda-repo-wsl-ubuntu-11-6-local_11.6.0-1_amd64.deb
sudo dpkg -i cuda-repo-wsl-ubuntu-11-6-local_11.6.0-1_amd64.deb
sudo apt-key add /var/cuda-repo-wsl-ubuntu-11-6-local/7fa2af80.pub
sudo apt-get update
sudo apt-get -y install cuda
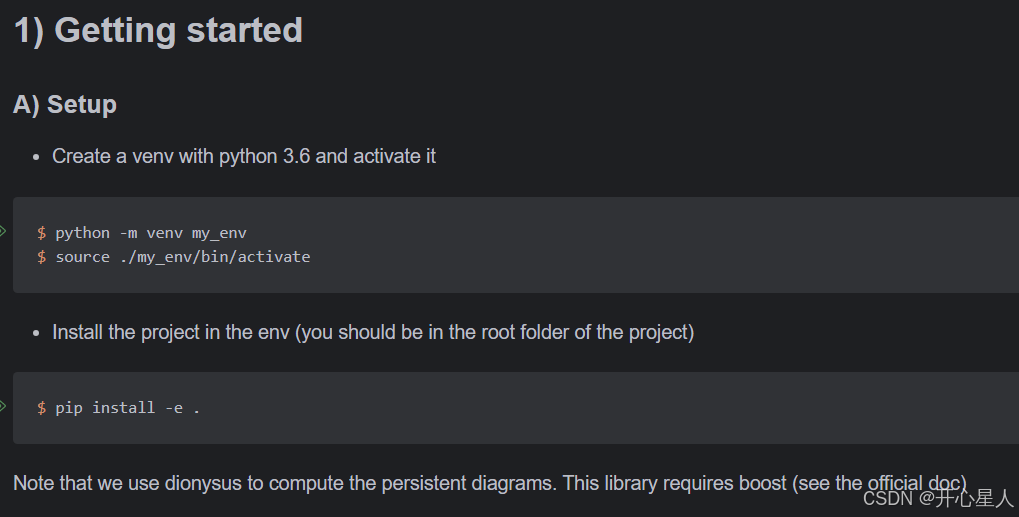
创建环境
conda create -n py39gpu python=3.9激活环境
conda activate py39gpu设置conda下载的时长大一点,然后运行安装命令
conda config --set remote_read_timeout_secs 600.0
conda install pytorch==1.12.1 torchvision==0.13.1 torchaudio==0.12.1 cudatoolkit=11.6 -c pytorch -c conda-forge
挑一个你的小于或者等于你的cuda的平台,使用安装命令安装即可
-c pytorch 指定了从pytorch频道安装PyTorch相关的包,而-c conda-forge 指定了从conda-forge频道安装其他包。在该命令中,pytorch和torchvision以及torchaudio可能从pytorch频道安装,而cudatoolkit可能从conda-forge频道安装,因为conda-forge频道提供了更多的CUDA版本选择。
实战
setup.py如下
#!/usr/bin/env python3import setuptools
import osdef _read_reqs(relpath):fullpath = os.path.join(os.path.dirname(__file__), relpath)with open(fullpath) as f:return [s.strip() for s in f.readlines()if (s.strip() and not s.startswith("#"))]_REQUIREMENTS_TXT = _read_reqs("requirements.txt")
_INSTALL_REQUIRES = [l for l in _REQUIREMENTS_TXT if "://" not in l]setuptools.setup(name='tda',version='0.2',install_requires=_INSTALL_REQUIRES,data_files=[('.', ['requirements.txt'])],packages=setuptools.find_packages(),
)
requirements.txt如下
numpy
scipy
seaborn
torch==1.4.0
torchvision==0.5.0
ipython
tqdm
joblib
dionysus
scikit-learn
networkx==1.11
qgrid
numba==0.48.0
cached-property>=1.5.1
pandas
adversarial-robustness-toolbox-1.3.2
mlflow
这里是使用的virtualenv来构建虚拟环境的,没有使用conda
当你运行pip install -e .时,pip会在当前目录(即包的根目录)查找setup.py文件。setup.py是一个Python脚本,用于定义包的元数据和安装要求。pip使用这个文件来安装包。
用于以“editable”模式(也称为“开发模式”)安装Python包。在editable模式下,pip不会复制包的文件到Python的site-packages目录,而是在site-packages目录下创建一个链接(通常是符号链接),指向包的源代码目录。这样,当你修改源代码时,这些更改会立即反映在已安装的包中。
我们这里使用conda
conda create -n my_env python=3.6
conda activate my_env
pip install -e .
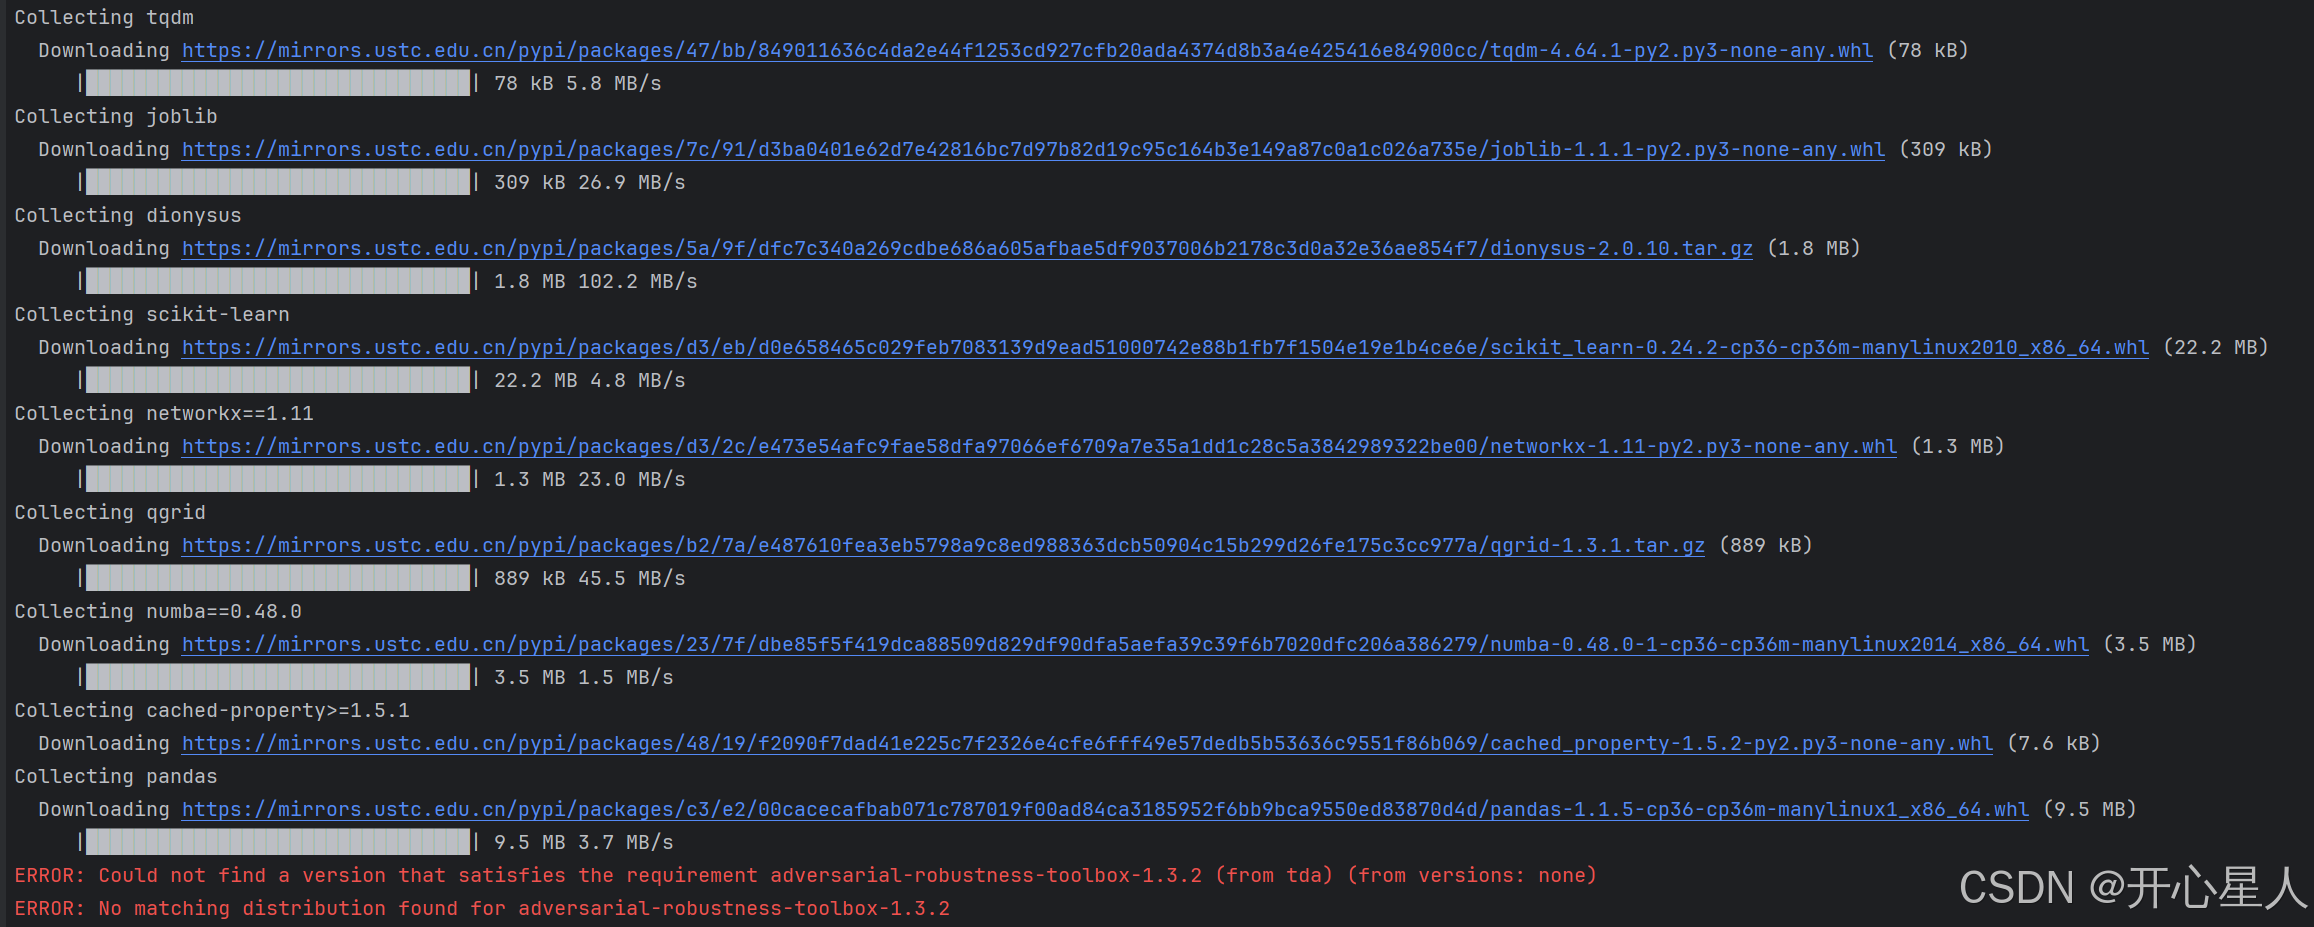
这里有一个库安装失败了,原因是因为指定的版本号太低了,这里直接安装最新的,看看后面能不能用
pip install adversarial-robustness-toolbox

显示还有几个库没有安装,因为adversarial-robustness-toolbox-1.3.2安装失败,导致后面的都没有安装了
修改一下requirements.txt

再次运行pip install -e .

正如作者在readme中所写,dionysus很特殊
https://github.com/mrzv/dionysus
#安装boost
sudo apt-get update
sudo apt-get install libboost-all-devpip install --verbose dionysus   #报错
pip install --verbose git+https://github.com/mrzv/dionysus.git  #报错
conda install -c conda-forge dionysus  #成功
报错如下

对于一些仍有问题的包单独安装即可
运行,报错
ModuleNotFoundError: No module named ‘tda’ 但tda是项目的一级目录

尝试一:
https://zhuanlan.zhihu.com/p/526710677
将根目录标记一下

尝试二:
tda目录下的__init__.py文件,在其中加上 from tda import *
https://blog.csdn.net/lu8000/article/details/120490555
这篇文章是有思考的
分析一下是和环境有关的
在pycharm控制台运行下面命令
python tda/experiments/mahalanobis/mahalanobis_binary.py \--attack_type PGD \--architecture cifar_lenet \--dataset CIFAR10 \--epochs 300 \--number_of_samples_for_mu_sigma 500 \--preproc_epsilon 0.01

直接使用pycharm自带的运行

点击绿色运行小箭头

就不是刚才的报错了,已经绕过了刚才的报错了
复制真正的执行代码到conda的控制台
/home/ubuntu/miniconda3/bin/conda run -n my_env --no-capture-output python /mnt/d/all_for_study/python_code/experiment/detecting-by-dissecting-master/tda/experiments/mahalanobis/mahalanobis_binary.py --attack_type PGD --architecture cifar_lenet --dataset CIFAR10 --epochs 300 --number_of_samples_for_mu_sigma 500 --preproc_epsilon 0.01

wsl如何使用本机windows的代理
https://www.zhihu.com/question/435906813