多模态大语言模型(MLLM)-Blip3/xGen-MM
论文链接:https://www.arxiv.org/abs/2408.08872
代码链接:https://github.com/salesforce/LAVIS/tree/xgen-mm
本次解读xGen-MM (BLIP-3): A Family of Open Large Multimodal Models
可以看作是
[1] Blip: Bootstrapping language-image pre-training for unified vision-language understanding and generation
[2] BLIP-2: Bootstrapping Language-Image Pre-training with Frozen Image Encoders and Large Language Models
的后继版本
前言
没看到Blip和Blip2的一作Junnan Li,不知道为啥不参与Blip3
整体pipeline服从工业界的一贯做法,加数据,加显卡,模型、训练方式简单,疯狂scale up
创新点
- 开源模型在模型权重、训练数据、训练方法上做的不好
- Blip2用的数据不够多、质量不够高;Blip2用的Q-Former、训练Loss不方便scale up;Blip2仅支持单图输入,不支持多图输入
- Blip3收集超大规模数据集,并且用相对简单的训练方式,实现多图、文本的交互。
- 开放两个数据集:BLIP3-OCR-200M(大规模OCR标注数据集),BLIP3-GROUNDING-50M(大规模visual grounding数据集)
具体细节
模型结构
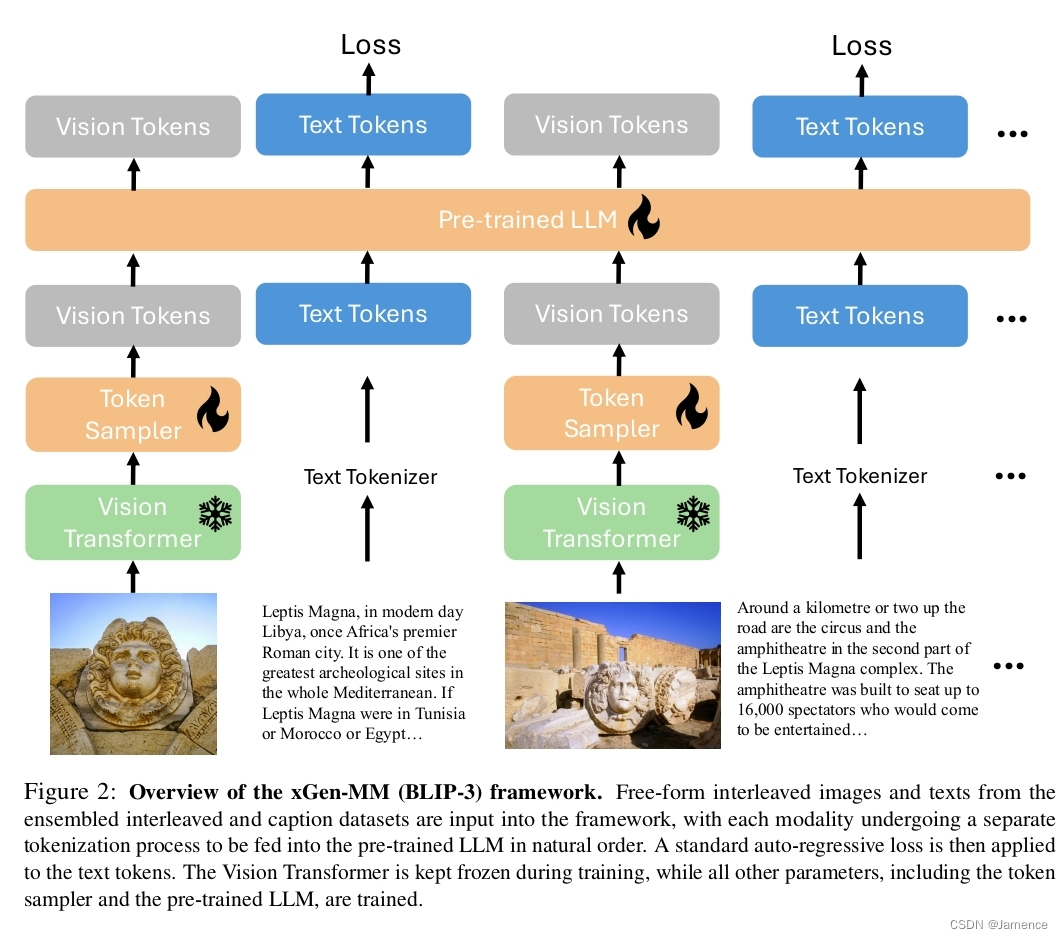
整体结构非常简单
- 图像经过ViT得到patch embedding,再经过token sampler得到vision token。(先经过Token Sampler,得到视觉embedding,而后经过VL connector,得到vision token)
- 文本通过tokenizer获得text token
- 文本、图像输入均送到LLM中,并且仅对本文加next prediction loss
- 注意:ViT参数冻结,其他参数可训练
- 注意:支持图像和文本交替输入,支持多图,任意分辨率图像
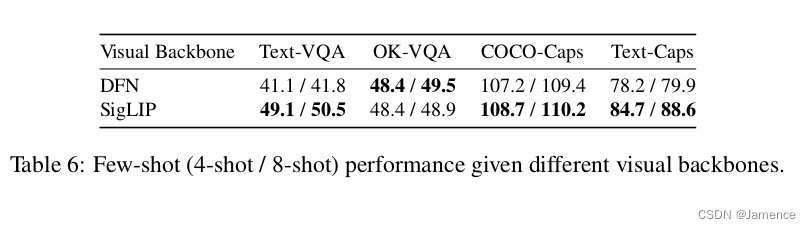
- ViT:所用模型有DFN、SigLIP,在不同任务上,效果不同,如下:

- LLM:所用模型为phi3-mini
- 模型结构代码见https://github.com/salesforce/LAVIS/blob/xgen-mm/open_flamingo/src/factory.py
- token Sampler代码见https://github.com/salesforce/LAVIS/blob/xgen-mm/open_flamingo/src/vlm.py
- VL connector代码见https://github.com/salesforce/LAVIS/blob/xgen-mm/open_flamingo/src/helpers.py
Token Sampler
详见博客https://blog.csdn.net/weixin_40779727/article/details/142019977,就不赘述了
VL Connector
整体结构如下:
class PerceiverAttention(nn.Module):def __init__(self, *, dim, dim_head=64, heads=8):super().__init__()self.scale = dim_head**-0.5self.heads = headsinner_dim = dim_head * headsself.norm_media = nn.LayerNorm(dim)self.norm_latents = nn.LayerNorm(dim)self.to_q = nn.Linear(dim, inner_dim, bias=False)self.to_kv = nn.Linear(dim, inner_dim * 2, bias=False)self.to_out = nn.Linear(inner_dim, dim, bias=False)def forward(self, x, latents, vision_attn_masks=None):"""Args:x (torch.Tensor): image featuresshape (b, T, n1, D)latent (torch.Tensor): latent featuresshape (b, T, n2, D)"""x = self.norm_media(x)latents = self.norm_latents(latents)h = self.headsq = self.to_q(latents)kv_input = torch.cat((x, latents), dim=-2) # TODO: Change the shape of vision attention mask according to this.if vision_attn_masks is not None:vision_attn_masks = torch.cat((vision_attn_masks, torch.ones((latents.shape[0], latents.shape[-2]), dtype=latents.dtype, device=latents.device)),dim=-1)k, v = self.to_kv(kv_input).chunk(2, dim=-1)q, k, v = rearrange_many((q, k, v), "b t n (h d) -> b h t n d", h=h)q = q * self.scale# attentionsim = einsum("... i d, ... j d -> ... i j", q, k)# Apply vision attention mask here.# Reference: https://pytorch.org/docs/stable/generated/torch.nn.functional.scaled_dot_product_attention.html#torch.nn.functional.scaled_dot_product_attentionif vision_attn_masks is not None:attn_bias = torch.zeros((q.size(0), 1, 1, q.size(-2), k.size(-2)), dtype=q.dtype, device=q.device)vision_attn_masks = repeat(vision_attn_masks, 'b n -> b 1 1 l n', l=q.size(-2))attn_bias.masked_fill_(vision_attn_masks.logical_not(), float("-inf"))sim += attn_biassim = sim - sim.amax(dim=-1, keepdim=True).detach()attn = sim.softmax(dim=-1)out = einsum("... i j, ... j d -> ... i d", attn, v)out = rearrange(out, "b h t n d -> b t n (h d)", h=h)return self.to_out(out)class PerceiverResampler(VisionTokenizer):def __init__(self,*,dim,dim_inner=None,depth=6,dim_head=96,heads=16,num_latents=128,max_num_media=None,max_num_frames=None,ff_mult=4,):"""Perceiver module which takes in image features and outputs image tokens.Args:dim (int): dimension of the incoming image featuresdim_inner (int, optional): final dimension to project the incoming image features to;also the final dimension of the outputted features. If None, no projection is used, and dim_inner = dim.depth (int, optional): number of layers. Defaults to 6.dim_head (int, optional): dimension of each head. Defaults to 64.heads (int, optional): number of heads. Defaults to 8.num_latents (int, optional): number of latent tokens to use in the Perceiver;also corresponds to number of tokens per sequence to output. Defaults to 64.max_num_media (int, optional): maximum number of media per sequence to input into the Perceiverand keep positional embeddings for. If None, no positional embeddings are used.max_num_frames (int, optional): maximum number of frames to input into the Perceiverand keep positional embeddings for. If None, no positional embeddings are used.ff_mult (int, optional): dimension multiplier for the feedforward network. Defaults to 4."""if dim_inner is not None:projection = nn.Linear(dim, dim_inner)else:projection = Nonedim_inner = dimsuper().__init__(dim_media=dim, num_tokens_per_media=num_latents)self.projection = projectionself.latents = nn.Parameter(torch.randn(num_latents, dim))# positional embeddingsself.frame_embs = (nn.Parameter(torch.randn(max_num_frames, dim))if exists(max_num_frames)else None)self.media_time_embs = (nn.Parameter(torch.randn(max_num_media, 1, dim))if exists(max_num_media)else None)self.layers = nn.ModuleList([])for _ in range(depth):self.layers.append(nn.ModuleList([PerceiverAttention(dim=dim, dim_head=dim_head, heads=heads),FeedForward(dim=dim, mult=ff_mult),]))self.norm = nn.LayerNorm(dim)def forward(self, x, vision_attn_masks):"""Args:x (torch.Tensor): image featuresshape (b, T, F, v, D)vision_attn_masks (torch.Tensor): attention masks for padded visiont tokens (i.e., x)shape (b, v)Returns:shape (b, T, n, D) where n is self.num_latents"""b, T, F, v = x.shape[:4]# frame and media time embeddingsif exists(self.frame_embs):frame_embs = repeat(self.frame_embs[:F], "F d -> b T F v d", b=b, T=T, v=v)x = x + frame_embsx = rearrange(x, "b T F v d -> b T (F v) d") # flatten the frame and spatial dimensionsif exists(self.media_time_embs):x = x + self.media_time_embs[:T]# blockslatents = self.latentslatents = repeat(latents, "n d -> b T n d", b=b, T=T)for attn, ff in self.layers:latents = attn(x, latents, vision_attn_masks) + latentslatents = ff(latents) + latentsif exists(self.projection):return self.projection(self.norm(latents)) else:return self.norm(latents)
训练及数据
预训练
- 训练数据:
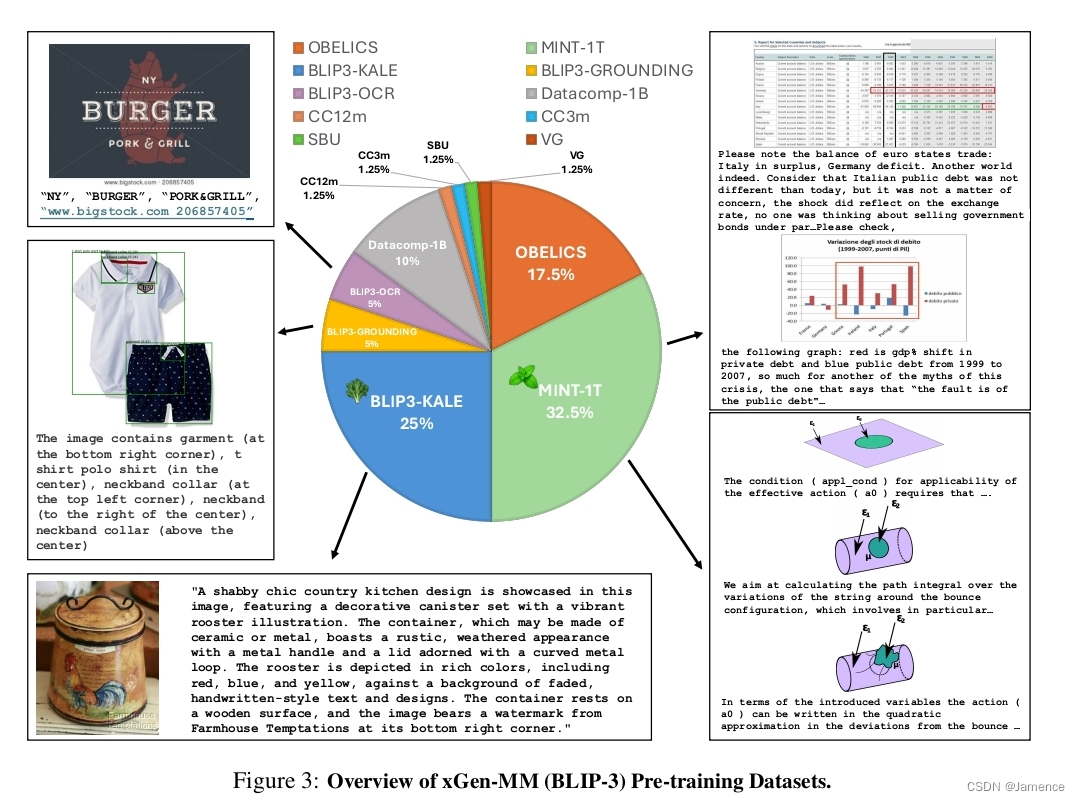
用了0.1T token的多模态数据训练,和一些知名的MLLM相比,例如Qwen2VL 0.6T,还是不太够 - 训练方式:针对文本的next token prediction方式训练,图像输入为384x384
有监督微调(SFT)
- 训练数据:从不同领域(multi-modal conversation、 image captioning、chart/document understanding、science、math),收集一堆开源数据。从中采样1百万,包括图文指令+文本指令数据。
训练1epoch - 训练方式:针对文本的next token prediction方式训练
交互式多图有监督微调(Interleaved Multi-Image Supervised Fine-tuning)
- 训练数据:首先,收集多图指令微调数据(MANTIS和Mmdu)。为避免模型过拟合到多图数据,选择上一阶段的单图指令微调数据子集,与收集的多图指令微调数据合并,构成新的训练集合。
- 训练方式:针对文本的next token prediction方式训练
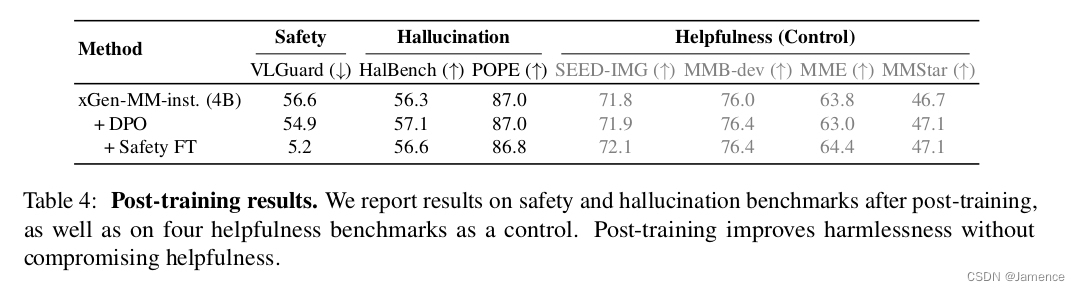
后训练(Post-training)
DPO提升Truthfulness
part1
- 训练数据:利用开源的VLFeedback数据集。VLFeedback数据集构造方式:输入指令,让多个VLM模型做生成,随后GPT4-v从helpfulness, visual faithfulness, ethics三个维度对生成结果打分。分值高的输出作为preferred responses,分值低的输出作为dispreferred responses。BLIP3进一步过滤掉一部分样本,最终得到62.6K数据。
- 训练方式:DPO为训练目标,用LoRA微调LLM 2.5%参数,总共训练1 epoch
part2
- 训练数据:根据该工作,生成一组额外responses。该responses能够捕捉LLM的内在幻觉,作为额外dispreferred responses,采用DPO训练。
- 训练方式:同part1,再次训练1 epoch
Safety微调(Safety Fine-tuning)提升Harmlessness
- 训练数据:用2k的VLGua数据集+随机5K SFT数据集。VLGuard包括两个部分:
这段话可以翻译为:
(1) 恶心图配上安全指示及安全回应
(2) 安全图配上安全回应及不安全回应 - 训练方式:用上述7k数据,训练目标为next token prediction,用LoRA微调LLM 2.5%参数,总共训练1 epoch
实验效果
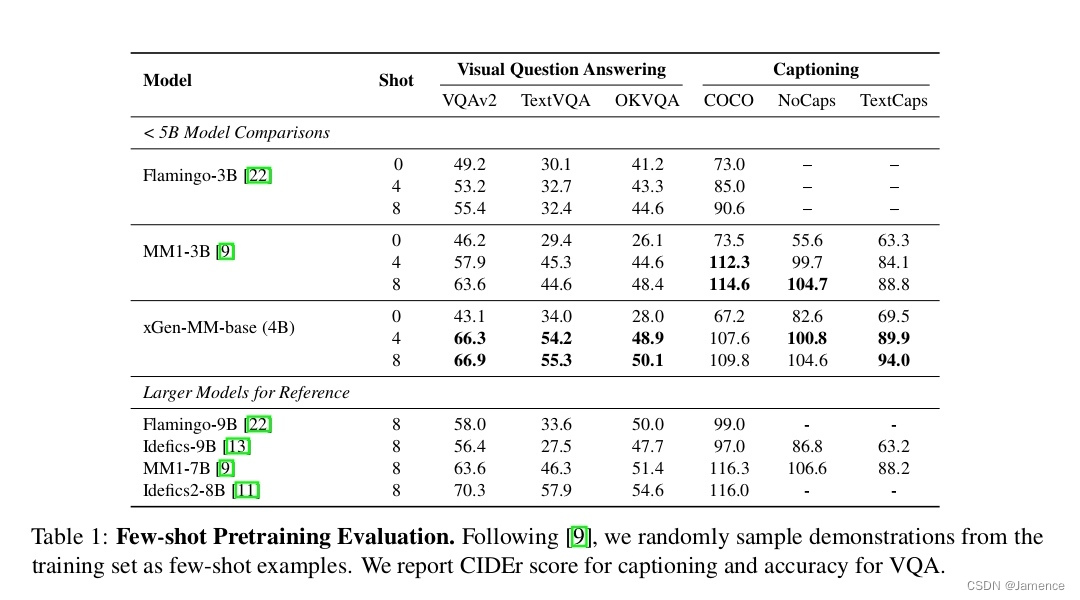
预训练
对比类似于预训练任务的VQA、Captioning任务,效果在使用小参数量LLM的MLLM里,效果不错。
有监督微调(SFT)
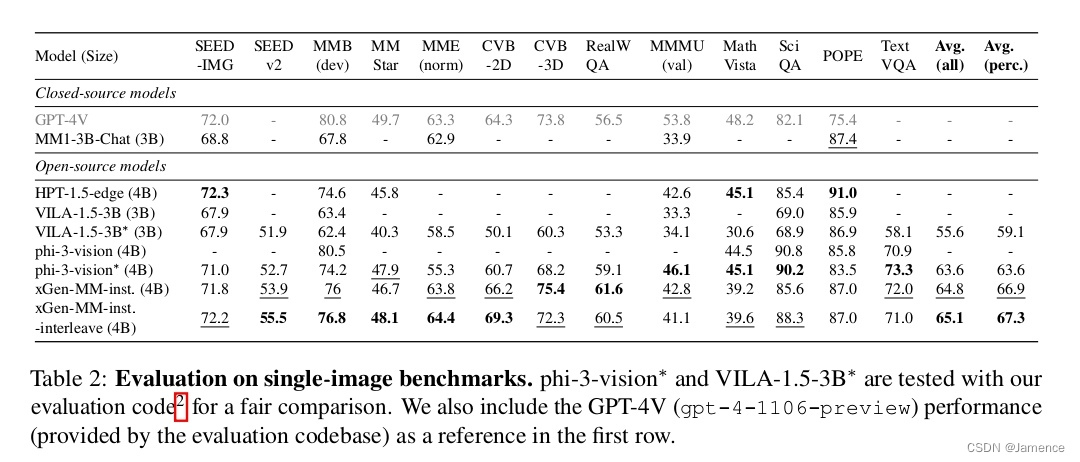
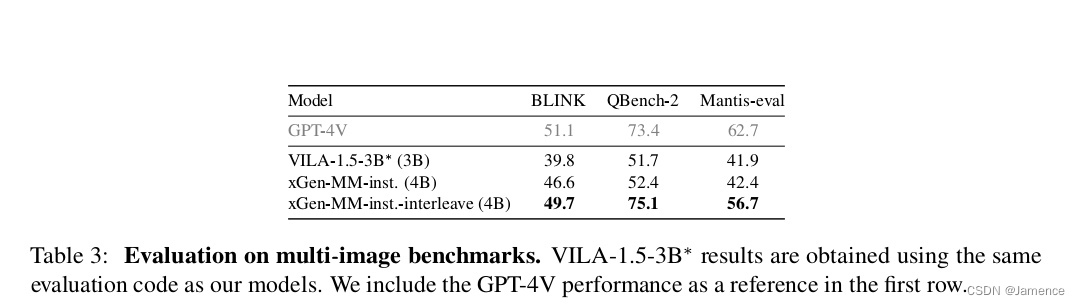
交互式多图有监督微调(Interleaved Multi-Image Supervised Fine-tuning)
后训练(Post-training)
消融实验
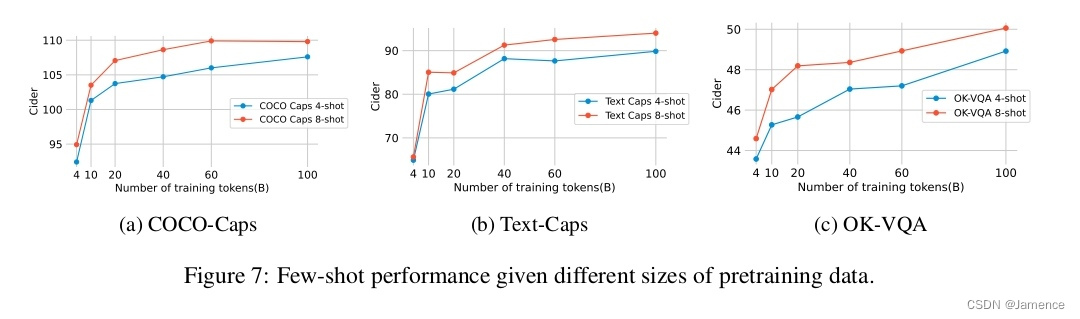
预训练
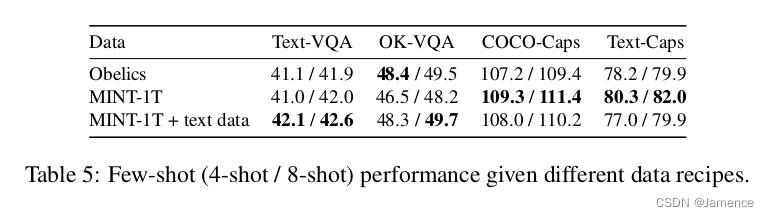
预训练数据量
预训练数据配比
视觉backbone
有监督微调(SFT)
视觉Token Sampler对比

base resolution:直接把图片resize到目标大小
anyres-fixed-sampling (ntok=128):把所有图像patch的表征concat起来,经过perceiver resampler,得到128个vision token
anyres-fixed-sampling (ntok=256):把所有图像patch的表征concat起来,经过perceiver resampler,得到256个vision token
anyres-patch-sampling:本文采用的方法
Instruction-Aware Vision Token Sampling.

XGen-MM:输入图像,获取vision token
XGen-MM(instruction-aware):同时输入图像+指令,获取vision token
Quality of the Text-only Instruction Data.
 仅利用文本指令数据,训练SFT模型,对比效果
https://blog.csdn.net/weixin_40779727/article/details/142019977