【手写 Vuex 源码】第七篇 - Vuex 的模块安装
一,前言
上一篇,主要介绍了 Vuex 模块收集的实现,主要涉及以下几个点:
- Vuex 模块的概念;
- Vuex 模块和命名空间的使用;
- Vuex 模块收集的实现-构建“模块树”;
本篇,继续介绍 Vuex 模块相关概念:Vuex 模块安装的实现;
二,前文梳理
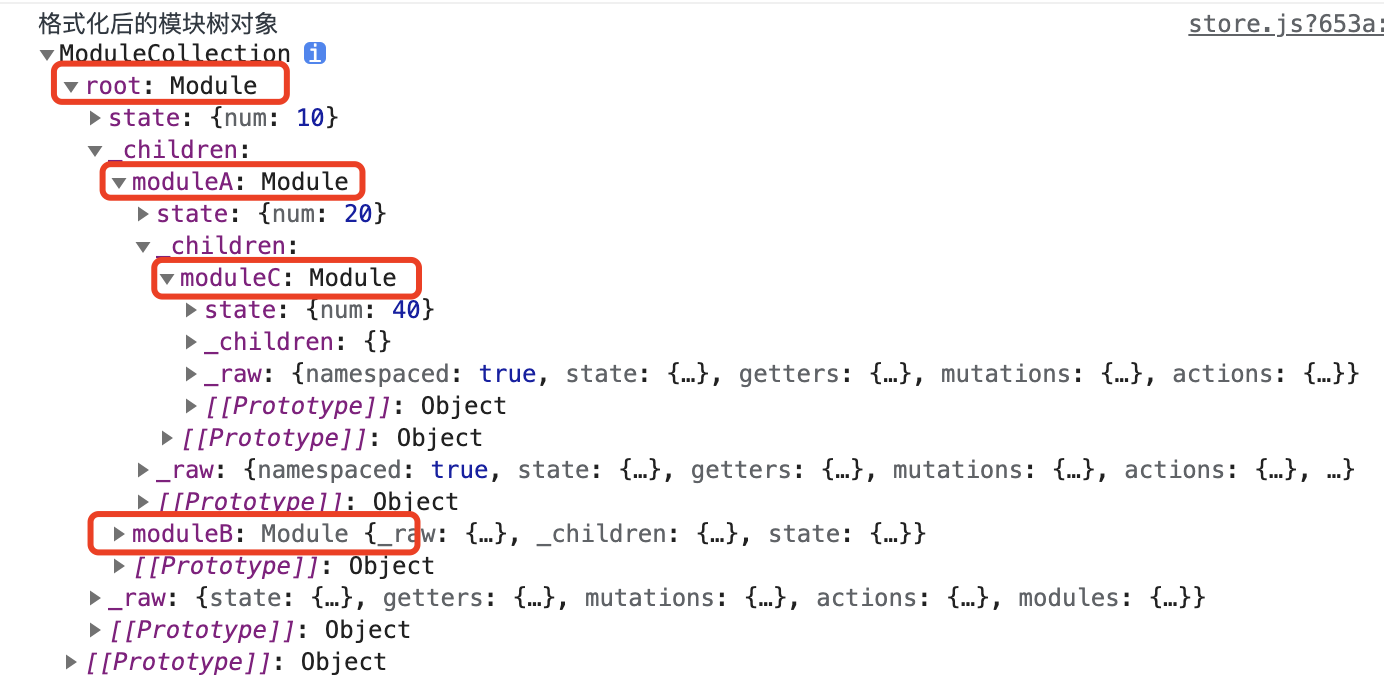
Vuex 的根模块,即 index 模块:src/store/index.js:
- 根模块通过 modules 注册子模块:示例包含 A、B 两个子模块;
- 模块A 又包含了子模块 C,这样就构建了一个三层的树形结构;
- 所以,Vuex 的模块,理论上是一棵支持无限层级的模块树;
依赖收集的过程:就是根据 Vuex 模块关系进行数据格式化,体现到代码上就是递归;
- 通过
ModuleCollection类,递归地对 Vuex 模块进行格式化处理,以便于后续的状态操作;
这里,大家可以借鉴组合模式,用于处理树型结构,如组织架构等层级嵌套的场景;
- 通过
register(path, rootModule)进行模块注册: path数组类型,当前待注册模块的完整路径;rootModule当前待注册模块对象;
至此,在 Vuex 中就完成了模块间层级关系的维护,从而递归构建出一棵“模块树”对象;
备注:
- 同名模块会在 Vuex 的模块收集阶段被覆盖;
- 多个模块中存在同名状态时,默认将同时触发更新
$store.commit('changeNum', 5);可添加 namespaced 命名空间进行隔离; - 添加了 namespaced 命名空间后,状态操作需添加命名空间标识,如
$store.commit('moduleA/changeNum',5)
下一步,根据格式化后的“模块树”对象,实现 Vuex 的模块安装;
三,模块安装的逻辑
模块收集:将模块对象格式化成为一棵“模块树”;
模块安装:递归“模块树”并将所有模块的 getter、mutation、action 定义到当前 store 实例中;
- 从根模块开始进行模块安装,递归处理格式化后的“模块树”对象;
- 根据模块名称,将全部子模块定义到根模块上,同时将状态合并到根模块上;
在 Store 类中,创建 installModule 模块安装方法:对当前模块对象进行递归处理;
从根模块开始,将对应的 getter、mutation、action 统一放入 Store 类中的 this._actions、this._mutations、this._wrappedGetters;
备注:由于模块对象不便于能力的扩展,考虑重构为类,将模块相关操作进行封装提供外部调用;
四,代码优化
优化1:将模块对象重构为模块类
创建 Module 类:src/vuex/modules/module.js
// src/vuex/modules/module.js/*** Module 模块类,提供模块数据结构与相关能力扩展*/
class Module {constructor(newModule) {this._raw = newModule;this._children = {};this.state = newModule.state}/*** 根据模块名获取模块实例* @param {*} key 模块名* @returns 模块实例*/getChild(key) {return this._children[key];}/*** 向当前模块实例添加子模块* @param {*} key     模块名* @param {*} module  子模块实例*/addChild(key, module) {this._children[key] = module}// 基于 Module 类,为模块扩展其他能力.../*** 遍历当前模块下的 mutations,具体处理由外部回调实现* @param {*} fn 返回当前 mutation 和 key,具体处理逻辑由调用方实现*/forEachMutation(fn) {if (this._raw.mutations) {Object.keys(this._raw.mutations).forEach(key=>fn(this._raw.mutations[key],key));}}/*** 遍历当前模块下的 actions,具体处理由外部回调实现* @param {*} fn 返回当前 action 和 key,具体处理逻辑由调用方实现*/forEachAction(fn) {if (this._raw.actions) {Object.keys(this._raw.actions).forEach(key=>fn(this._raw.actions[key],key));}}/*** 遍历当前模块下的 getters,具体处理由外部回调实现* @param {*} fn 返回当前 getter 和 key,具体处理逻辑由调用方实现*/forEachGetter(fn) {if (this._raw.getters) {Object.keys(this._raw.getters).forEach(key=>fn(this._raw.getters[key],key));}}/*** 遍历当前模块的子模块,具体处理由外部回调实现* @param {*} fn 返回当前子模块 和 key,具体处理逻辑由调用方实现*/forEachChild(fn) {Object.keys(this._children).forEach(key=>fn(this._children[key],key));}
}export default Module;
修改 ModuleCollection 类,将模块对象更新为 Module 类:
import Module from "./module";class ModuleCollection {constructor(options) {this.register([], options);}register(path, rootModule) {// 格式化:构建 Module 对象// 通过类的方式产生实例,便于后续的扩展let newModule = new Module(rootModule);// let newModule = {//   _raw: rootModule,        // 当前模块的完整对象//   _children: {},           // 当前模块的子模块//   state: rootModule.state  // 当前模块的状态// } if (path.length == 0) {this.root = newModule;} else {let parent = path.slice(0, -1).reduce((memo, current) => {// 此时 memo 为 Module 类,使用 getChild 方法进行处理;return memo.getChild(current);// return memo._children[current];}, this.root)// 此时 memo 为 Module 类,使用 addChild 方法进行处理;parent.addChild(path[path.length - 1], newModule);// parent._children[path[path.length - 1]] = newModule}if (rootModule.modules) {Object.keys(rootModule.modules).forEach(moduleName => {let module = rootModule.modules[moduleName];this.register(path.concat(moduleName), module)});}}
}export default ModuleCollection;
优化2:抽取对象遍历工具方法
代码中多次使用 Object.keys 进行对象遍历操作,可封装为工具函数;
创建 src/vuex/utils.js 文件,统一存放 vuex 插件使用的工具函数:
// src/vuex/utils.js/*** 对象遍历,返回 value、key,具体处理由外部实现* @param {*} obj       需要遍历的对象* @param {*} callback  对当前索引的处理,又外部实现*/
export const forEachValue = (obj, callback) =>{Object.keys(obj).forEach(key=>callback(obj[key],key));
}
使用工具函数替换 Object.keys:
// src/vuex/module/module-collection.jsimport { forEachValue } from "../utils";
import Module from "./module";class ModuleCollection {constructor(options) {this.register([], options);}register(path, rootModule) {let newModule = new Module(rootModule);if (path.length == 0) {this.root = newModule;} else {let parent = path.slice(0, -1).reduce((memo, current) => {return memo.getChild(current);}, this.root)parent.addChild(path[path.length - 1], newModule);}if (rootModule.modules) {forEachValue(rootModule.modules,(module,moduleName)=>{this.register(path.concat(moduleName),module)})// Object.keys(rootModule.modules).forEach(moduleName => {//   let module = rootModule.modules[moduleName];//   this.register(path.concat(moduleName), module)// });}}
}export default ModuleCollection;
import { forEachValue } from "../utils";class Module {constructor(newModule) {this._raw = newModule;this._children = {};this.state = newModule.state}getChild(key) {return this._children[key];}addChild(key, module) {this._children[key] = module}forEachMutation(fn) {if (this._raw.mutations) {forEachValue(this._raw.mutations, fn)// Object.keys(this._raw.mutations).forEach(key=>fn(this._raw.mutations[key],key));}}forEachAction(fn) {if (this._raw.actions) {forEachValue(this._raw.actions, fn);// Object.keys(this._raw.actions).forEach(key=>fn(this._raw.actions[key],key));}}forEachGetter(fn) {if (this._raw.getters) {forEachValue(this._raw.getters, fn);// Object.keys(this._raw.getters).forEach(key=>fn(this._raw.getters[key],key));}}forEachChild(fn) {forEachValue(this._children, fn);// Object.keys(this._children).forEach(key=>fn(this._children[key],key));}
}export default Module;
优化后测试
功能正常,模块对象已重构为 Module 类,添加了对当前模块 getters、mutations、actions 的遍历处理;
五,模块安装的实现
在 src/vuex/store.js 中,创建 installModule 方法:用于 Vuex 的模块安装操作;
// src/vuex/store.js/*** 安装模块* @param {*} store       容器* @param {*} rootState   根状态* @param {*} path        所有路径* @param {*} module      格式化后的模块对象*/
const installModule = (store, rootState, path, module) => {// 遍历当前模块中的 actions、mutations、getters // 将它们分别定义到 store 中的 _actions、_mutations、_wrappedGetters;// 遍历 mutationmodule.forEachMutation((mutation, key) => {// 处理成为数组类型:每个 key 可能会存在多个需要被处理的函数store._mutations[key] = (store._mutations[key] || []);// 向 _mutations 对应 key 的数组中,放入对应的处理函数store._mutations[key].push((payload) => {// 执行 mutation,传入当前模块的 state 状态mutation.call(store, module.state, payload);})})// 遍历 actionmodule.forEachAction((action, key) => {store._actions[key] = (store._actions[key] || []);store._actions[key].push((payload) => {action.call(store, store, payload);})})// 遍历 gettermodule.forEachGetter((getter, key) => {// 注意:getter 重名将会被覆盖store._wrappedGetters[key] = function () {// 执行对应的 getter 方法,传入当前模块的 state 状态,返回执行结果return getter(module.state)   }})// 遍历当前模块的儿子module.forEachChild((child, key) => {// 递归安装/加载子模块installModule(store, rootState, path.concat(key), child);})
}
依靠 Module 类提供的模块处理方法,深度递归地将全部模块中的 action、mutation、getter 统一收集到了 store 实例中对应的 _actions、_mutations、_wrappedGetters 中;
模块安装结果测试:
// src/vuex/store.js// 容器的初始化
export class Store {constructor(options) {const state = options.state;this._actions = {};this._mutations = {};this._wrappedGetters = {};this._modules = new ModuleCollection(options);installModule(this, state, [], this._modules.root);console.log("模块安装结果:_mutations", this._mutations)console.log("模块安装结果:_actions", this._actions)console.log("模块安装结果:_wrappedGetters", this._wrappedGetters)}// ...
}
打印 _actions、_mutations、_wrappedGetters 结果:

_mutations 共 4 个:根模块、模块 A、模块 B、模块 C;_actions 共 1 个:根模块;_wrappedGetters 共 1 个:根模块;
六,流程梳理
- 当项目引用并注册 vuex 插件时,即
Vuex.use(vuex),将执行 Vuex 插件中的 install 方法; - install 方法,接收外部传入的 Vue 实例,并通过
Vue.mixin实现 store 实例的全局共享; - 项目中通过
new Vuex.Store(options)配置 vuex 并完成 store 状态实例的初始化; - 在 Store 实例化阶段时,将会对 options 选项进行处理,此时完成 Vuex 模块收集和安装操作;
- 在
new Vue初始化时,将 store 实例注入到 vue 根实例中(此时的 store 实例已实现全局共享);
七,结尾
本篇,主要介绍了 Vuex 模块安装的实现,完成了 action、mutation、getter 的收集和处理,主要涉及以下几个点:
- Vuex 模块安装的逻辑;
- Vuex 代码优化;
- Vuex 模块安装的实现;
- Vuex 初始化流程梳理;
下一篇,继续介绍 Vuex 模块相关概念:Vuex 状态的处理;
维护日志
- 20211006:
- 重新梳理全文:添加代码优化与流程梳理部分;
- 添加必要的代码注释;
- 添加测试截图;