day18JS-微任务、宏任务和node.js
1. 代码的执行流程
代码的执行流程分为同步与异步。

2. 什么样子的是宏任务?
1. setTimeout 和 setInterval 定时器: 没有写时间(传参的),代表下一帧执行,如果没有其他任务1ms后执行。
    // 没有写时间(传参的),代表下一帧执行,如果没有其他任务1ms执行。setTimeout(() => {})
-------------------------------setInterval(()=>{})
2. setImmediate的使用和setTimeout类似的,但是在间隔一段时间后执行,闲时执行。闲时执行:是指cpu不繁忙的时候。
setImmediate(()=>{})注意!!!
如果没有大量运行代码时,setImmediate 比 setTimeout 和 setInterval 先执行。
如果运行当中cpu被占用时,setTimeout 和 setInterval 比 setImmediate 先执行。
3. 什么样子的是微任务?
nextTick 等同于Promise.resolve.then(()=>{})。是异步执行。
// 等同于Promise.resolve.then(()=>{})
process.nextTick(()=>{})
3.1 案例1分析:
console.log("a");//同步new Promise(function (resolve, reject) {resolve();console.log("b");//同步}).then(function () {//异步console.log("c");})setTimeout(() => {//异步console.log("d");})console.log("e");//同步
为什么执行流程是这样的呢?
因为遇到宏任务将开辟一个新的任务栈,将这个宏任务放在新任务栈的最顶端。遇到微任务,将放在当前任务栈的最下面。

所以执行结果是:a ----> b ----> e ----> c ----> d
3.2 案例2分析:如果遇到微任务与宏任务遇到一起了是怎么执行的?
// 如果遇到微任务与宏任务遇到一起了是怎么执行的?new Promise(function (resolve, reject) {resolve();}).then(function () {//异步微任务setTimeout(() => {//异步宏任务console.log("a");})})setTimeout(() => {//异步宏任务new Promise(function (resolve, reject) {resolve();}).then(function () {//异步微任务console.log("b");})})

所以执行结果是: b ----> a
3.3 案例3分析:
async function fn1() {console.log("a");await Promise.resolve();//异步微任务console.log("b");}function fn2() {//同步console.log("c");}function init() {//同步fn1();fn2();}init();

所以执行结果是: a ----> c ----> b
3.4 案例4分析:比较几种写法任务的执行速度
写法一:微任务密集性高,速度快。
new Promise(function (resolve, reject) {resolve();}).then(function () {//异步微任务console.log("a1");}).then(function () {//异步微任务console.log("b1");}).then(function () {//异步微任务console.log("c1");}).then(function () {//异步微任务console.log("d1");}).then(function () {//异步微任务console.log("e1");}).then(function () {//异步微任务console.log("f1");}).then(function () {//异步微任务console.log("g1");}).then(function () {//异步微任务console.log("h1");})
 写法二:微任务密集性中等,速度中等。
// 中new Promise(function (resolve, reject) {resolve();}).then(function () {//异步微任务console.log("a2");return new Promise(function (resolve, reject) {resolve();})}).then(function () {//异步微任务console.log("b2");return new Promise(function (resolve, reject) {resolve();})}).then(function () {//异步微任务console.log("c2");return new Promise(function (resolve, reject) {resolve();})}).then(function () {//异步微任务console.log("d2");return new Promise(function (resolve, reject) {resolve();})}).then(function () {//异步微任务console.log("e2");return new Promise(function (resolve, reject) {resolve();})}).then(function () {//异步微任务console.log("f2");return new Promise(function (resolve, reject) {resolve();})}).then(function () {//异步微任务console.log("g2");return new Promise(function (resolve, reject) {resolve();})}).then(function () {//异步微任务console.log("h2");return new Promise(function (resolve, reject) {resolve();})})
写法三:微任务密集性低,速度低。
new Promise(function (resolve, reject) {resolve(new Promise(function (resolve1, reject1) {resolve1();}))}).then(function () {console.log("a3");})写法四:微任务密集性低,速度低。等同于写法三。
Promise.resolve().then(function () {console.log("a4");Promise.resolve().then(function () {console.log("b4");Promise.resolve().then(function () {console.log("c4");Promise.resolve().then(function () {console.log("d4");Promise.resolve().then(function () {console.log("e4");Promise.resolve().then(function () {console.log("f4");Promise.resolve().then(function () {console.log("g4");Promise.resolve().then(function () {console.log("h4");});});});});});});});});
1. 写法一与写法二作比较:
// 写法一:密集性 快new Promise(function (resolve, reject) {resolve();}).then(function () {//异步微任务console.log("a1");}).then(function () {//异步微任务console.log("b1");}).then(function () {//异步微任务console.log("c1");}).then(function () {//异步微任务console.log("d1");}).then(function () {//异步微任务console.log("e1");}).then(function () {//异步微任务console.log("f1");}).then(function () {//异步微任务console.log("g1");}).then(function () {//异步微任务console.log("h1");})// 写法二:中new Promise(function (resolve, reject) {resolve();}).then(function () {//异步微任务console.log("a2");return new Promise(function (resolve, reject) {resolve();})}).then(function () {//异步微任务console.log("b2");return new Promise(function (resolve, reject) {resolve();})}).then(function () {//异步微任务console.log("c2");return new Promise(function (resolve, reject) {resolve();})}).then(function () {//异步微任务console.log("d2");return new Promise(function (resolve, reject) {resolve();})}).then(function () {//异步微任务console.log("e2");return new Promise(function (resolve, reject) {resolve();})}).then(function () {//异步微任务console.log("f2");return new Promise(function (resolve, reject) {resolve();})}).then(function () {//异步微任务console.log("g2");return new Promise(function (resolve, reject) {resolve();})}).then(function () {//异步微任务console.log("h2");return new Promise(function (resolve, reject) {resolve();})})
写法一与写法二作比较:
除了第一次的执行,后面的代码执行,写法一都会比写法二多执行两次。
原因:因为写法二需要接收到上一个then执行的结果才能继续向后执行。
2. 写法一与写法三作比较:
//写法一:快new Promise(function (resolve, reject) {resolve();}).then(function () {//异步微任务console.log("a1");}).then(function () {//异步微任务console.log("b1");}).then(function () {//异步微任务console.log("c1");}).then(function () {//异步微任务console.log("d1");}).then(function () {//异步微任务console.log("e1");}).then(function () {//异步微任务console.log("f1");}).then(function () {//异步微任务console.log("g1");}).then(function () {//异步微任务console.log("h1");})//写法三: 慢new Promise(function (resolve, reject) {resolve(new Promise(function (resolve1, reject1) {resolve1();}))}).then(function () {console.log("a3");})

写法一与写法三作比较:写法一执行速度更快。
写法二与写法三作比较:
// 写法二: 中new Promise(function (resolve, reject) {resolve();}).then(function () {//异步微任务console.log("a2");return new Promise(function (resolve, reject) {resolve();})}).then(function () {//异步微任务console.log("b2");return new Promise(function (resolve, reject) {resolve();})}).then(function () {//异步微任务console.log("c2");return new Promise(function (resolve, reject) {resolve();})}).then(function () {//异步微任务console.log("d2");return new Promise(function (resolve, reject) {resolve();})}).then(function () {//异步微任务console.log("e2");return new Promise(function (resolve, reject) {resolve();})}).then(function () {//异步微任务console.log("f2");return new Promise(function (resolve, reject) {resolve();})}).then(function () {//异步微任务console.log("g2");return new Promise(function (resolve, reject) {resolve();})}).then(function () {//异步微任务console.log("h2");return new Promise(function (resolve, reject) {resolve();})})//写法三: 慢new Promise(function (resolve, reject) {resolve(new Promise(function (resolve1, reject1) {resolve1();}))}).then(function () {console.log("a3");})
写法二与写法三作比较:写法二执行速度快一点。
4. node.js的基础使用
node的版本:
- 1 是大版本 :代码产生大的变化。
- 2 是小版本 :代码迭代增加新的内容。
- 3 是微版本 :修复了代码中bug。
偶数版本为稳定版 (0.6.x ,0.8.x ,0.10.x)
奇数版本为非稳定版(0.7.x ,0.9.x ,0.11.x)
node.js的问题:
- 以前版本安装的很多全局的工具包需要重新安装。
- 无法回滚到之前的版本。
- 无法在多个版本之间切换(很多时候我们要使用特定版本)。
4.1 node.js的命令
1. node 文件名.js : 执行该文件。
2. node 文件名.js 参数1 参数2: 执行该文件并传参。
3. process.argv 属性的内容如下:
[
'/Users/ericxie/.nvm/versions/node/v18.18.0/bin/node', ---> node程序路径
'/Users/ericxie/xja/鸿蒙13/ex/0903/server.js', ---> 执行的文件路径
'1', --->传入的参数1
'2' --->传入参数2
]
4. commonjs模块化 :是NodejsES5版本的内容。
5. ES6模块化 :ES6版本。
4.2 commonjs模块化的语法
导出默认模块的语法:
默认模块关键字:module.exports
module.exports = function(){console.log("aaa");...
}
加载模块的语法:
let 变量名 = require("./导出模块的文件名");
// 不要扩展名
let fn = require("./导出模块的文件名");
//执行加载的模块代码
fn();
导出多个模块的语法:
导出模块关键字 :exports
let a = 1;
let arr = [1, 2, 3];
let obj = { a: 1, b: 2 };
function fn() {console.log("fn");
}exports.a = a;
exports.arr = arr;
exports.obj = obj;
exports.fn = fn;
加载多个模块的语法:
let { 导出的变量名, 导出的变量名,.... } = require("./导出模块的文件名");
注意!!!
1. 有重复的变量名,取别名。
取别名的语法 ---> 原来的变量名:新的变量名
2. 同一个文件中不能既导出多个模块又导出默认模块。只能导出一个默认模块,或者只能导出多个模块,两者不能同时导出。
3.导入nodejs的默认API也是使用require();,但不需要加./这样的路径。导入nodejs的变量一般使用const修饰。
4. 下载的包(库),直接通过require()引入,不需要给路径。
5. 在package.json设置了type:module 表示当前Nodejs使用ES6模块化,不能使用ES5模块化的Commonjs。如果下载包是ES5模块化的也不能使用。
// 不要扩展名
let fn = require("./a");let { a, obj, arr, fn: fn1 } = require("./b");
let fn2 = require("./b");
fn();
console.log(a);
console.log(obj);
console.log(arr);
fn1();
fn2();----------------------------------
// 导入nodejs的API 不需要加./这样的路径
const http = require("http");
// 下载的包,直接通过require引入,不需要给路径
const lodash = require("lodash");console.log(lodash.chunk([1, 2, 3, 4, 5], 2));
5. node版本切换工具nvm
- nvm ls :查看所有已经安装的node版本。
- nvm install v版本 :安装指定的node版本。
- nvm uninstall v版本:卸载安装的版本。
- nvm use 版本:使用某个node版本。
6. node的平台的包管理器npm
npm 是 Node JavaScript 平台的包管理器。它将模块放置到位,以便 node 可以找到它们,并智能地管理依赖冲突。它具有极强的可配置性,可以支持各种用例。最常见的是,您使用它来安装、卸载、更新、查看、搜索、发布和开发 node 程序。运行 npm help 以获取可用命令的列表。
npm的背后,是基于couchdb的一个数据库,详细记录了每个包的信息,包括作者、版本、依赖、授权信息等。它的一个很重要的作用就是:将开发者从繁琐的包管理工作(版本、依赖等)中解放出来,更加专注于功能的开发。
常用命令:
- npm init -y : 自动生成默认的包配置文件package.json。如果没有写-y就需要你自己一步一步的填写配置信息。
- npm -v :查看版本。
下载包的命令:
- npm install 包名:下载指定的包。缩写npm i 包名 。
- npm install 包名@latest :下载最新版本的包。缩写npm i 包名@latest。
- npm install 包名@版本 :下载指定版本的包。缩写npm i 包名@版本。
全局安装命令:
- npm i 包名 -g :全局安装 ,命令行插件可以这么安装。
- npm i nrm -g :全局安装 nrm包 ,nrm包的作用是转换npm的下载地址镜像。
- nrm ls :查看所有镜像地址。
- nrm test :镜像地址 ,测试镜像地址的速度。
- nrm use 镜像地址 :使用某个镜像地址。
- npm i nodemon -g :全局安装nodemon包。nodemon包的作用是实时自动执行程序。nodemon 文件名.js :执行该文件。
- npm i http-server -g :全局安装http-server包。http-server创建一个web服务。
- npm i webpack -g :全局安装webpack打包工具。
项目中用到插件主要分两种,一种项目依赖,一种是开发依赖。
项目依赖:比如项目中需要使用vue或者lodash,项目上线后,vue和lodash都需要一起放在线上,否则无法运行。
开发依赖:项目中如果需要打包、测试、创建临时服务器等操作时,下载的webpack等都是本地开发时需要,但是线上运行时不需要,这种包就叫做开发依赖。
安装到项目依赖中3种写法:
- npm i 包名 --save
- npm i 包名 -S
- npm i 包名
安装到开发依赖中2种写法:
npm i 包名 --save-dev
npm i 包名 -D
同时下载多个包的命令:
npm i 包名1 包名2 包名3 -S
node配置文件package.jsonxian详解:
{
"name": "npms", ---> 项目名,
"version": "1.0.0", ---> 版本
"description": "", ---> 项目描述
"main": "a.js", ---> 项目入口文件
"type" : "module" ---> 设置为ES6模块化
"scripts": { ---> 脚本,要执行的命令
"start": "cross-env PORT=4000 nodemon", ---> "脚本名" :"要执行的命令"。
"dev":"node a.js"
注意!!!
使用npm run 脚本名就可以执行命令。脚本名如果使用的是 start ,执行时不用run ,直接执行npm start。脚本名如果使用 install ,执行时不用run ,直接执行npm i 先下载插件再执行脚本内容。
},
"keywords": [], ---> 项目关键词
"author": "", ---> 作者
"license": "ISC", ---> 项目版权
"dependencies": { ---> 项目依赖
"lodash":"^4.17.21",
"vue":"^3.4.38"
},
"devDependencies": { ---> 开发依赖
"lodash":"^4.17.21", ---> ^大版本锁定,锁定4版本,更新小版本和微版本。
"vue":"~3.4.38", ---> ~ 小版本锁定 锁定大版本和小版本,只更新微版本。
"vue":"3.4.38", ---> 全锁定,只下这个版本。
"vue":"*", ---> *下载最新版本,不建议使用。
},
"config": { ---> 项目依赖
"name":"xietian",
"age":30
}
}
node配置文件package.jsonxian中"scripts"脚本的使用详解:
1. 当开发项目的时候,很多命令行工具,安装在全局中 -g 这时候这个项目就只能你自己跑起来。把项目发给别人,别人没有安装对应全局命令,就无法使用项目。把所有的安装包,包括全局安装包,写在package.json中,把全局插件写在开发依赖中 ,npm i 下载了所有包,当把项目发给别人时,需要先删除node_modules,然后发给别人,别人重新npm i 就会得到所有包。这时候全局命令并不能在命令行执行,把命令写在脚本中,执行脚本时,脚本会先查找本地node_modules,如果查找到就调用本地的命令,不会查找全局命令。
2、可以通过config配置参数传入到主程序中。
process.env.npm_package_config_属性名
3、可以通过脚本传参。
"start":"要执行的命令"
例如: "start": "cross-env PORT=4000 nodemon a.js"
当nodemon不写文件名.js它会直接执行入口文件。
注意!!!
这个方法苹果电脑可以,但是Windows电脑不行。
Windows需要通过配置 "devDependencies" 下载"cross-env": "^7.0.3",并在"scripts"脚本中添加 "start": "cross-env "才能使用。
4、可以使用入口文件。
其它npm命令详解:
根据配置文件下载包:
- npm i :根据package.json文件中dependencies和devDependencies下载更新里面的所有内容。
- npm update :作用和npm i 是一样的。
查看命令:
- npm view 包名 versions :查找指定包线上发布所有版本。
- npm view 包名 :查找指定包的信息。
- npm ls :查看所有安装的包列表。
- npm ls 包名 :查看指定包名的依赖。
清除缓存命令:不支持断点续传和多点下载。
- npm cache clean --force
- npm cache verify
卸载包命令·:
npm uninstall 包名
npm uninstall 包名 -g
npm uninstall 包名 -S
npm uninstall 包名 -D
配置下载镜像地址命令:
npm config set registry https://registry.npmjs.org/
查看npm的代理服务命令:代理必须都指向null。
- npm config get proxy
- npm config get https-proxy
设置npm的代理服务命令:如果代理不为null,使用以下命名设置。错误内容为ECONNREFUSED就会一直连接不上。连接不上就是null。
- npm config set proxy null
- npm config set https-proxy null
代码上传步骤:
1. nrm use npm :重新指向npm官网地址
2. 在npm官网中注册
3. npm login
输入用户名 :不会显示输入内容,直接输入。
输入密码 : 不会显示输入内容,直接输入。
输入邮箱 : 不会显示输入内容,直接输入。
4. 查看是否重名。package.json中 "name": "npms",必须要修改,修改的名字在npmjs官网的包名没有重复。不允许使用大写字母 ,尽量不使用短横线、下划线,可以使用@ /。
5. npm publish :上传。
7. npx
npx的作用就是当别人安装不上全局配置,但是是临时使用。直接执行npx的全局命令,不需要安装。npx 不需要下载到全局中,可以直接下载到缓存运行。
npx 全局命令
例如: npx use taobao
8. 案例
8.1 服务端渲染SSR
1. 创建server文件夹。
2. 创建server.js文件,右键选择在在集成终端打开。
3. npm init -y :初始化,得到一个package.json的文件。
4. 编写package.json的文件。
{"name": "server","version": "1.0.0","main": "server.js","scripts": {"start": "cross-env PORT=4000 nodemon"},"keywords": [],"author": "","license": "ISC","dependencies": {},"devDependencies": {//开发依赖"nodemon": "^3.1.4",//开启服务"cross-env": "^7.0.3"}
}
5. npm i : 下载node_modules。如果该命令无法下载成功。全局下载一个yarn,使用yarn的命令来下载node_modules。yarn的作用和npm的作用是一样的。
yarn有关的命令:
- npm i yarn -g :全局下载一个yarn。
- yarn add 包名 等同于 npm i 包名
- yarn remove 包名 等同于 npm uninstall 包名
- yarn 等同于 npm i
6. npm start :启动程序。
7. 编写server.js文件。
response.end()
方法说明:结束响应,告诉客户端所有消息已经发送。当所有要返回的内容发送完毕时,该函数必须被调用一次。 如果不调用该函数,客户端将永远处于等待状态。
语法:
response.end([data], [encoding])
接收参数:
- data : end()执行完毕后要输出的字符,如果指定了 data 的值,那就意味着在执行完 response.end() 之后,会接着执行一条 response.write(data , encoding);
- encoding: 对应data的字符编码。
// 1.引入http模块
const http = require("http");// 2.创建一个服务实例
//require:请求, response:响应
let app = http.createServer(function (require, response) {// 2.1响应头response.writeHead(200, {// 响应的内容的类型是文本或者是html页面,编译使用utf-8字符集"Content-type": "text/html;charset=utf-8"});// 2.2服务器渲染一个页面,向页面中写入内容response.write("<ul>");for (var i = 0; i < 10; i++) {response.write("<li>" + i + "</li>");}response.write("</ul>");// 2.3返回响应消息,告诉客户端所有消息已经发送。response.end();
});// 3.服务实例侦听来访问服务器的请求,获取到端口号和IP地址
app.listen(process.env.PORT);
8. 访问 localhost:4000

8.2 服务端渲染的通信方法
1. 方法一:获取路由的方法
例如像 localhost:4000/?type=1这样的网址该怎样获取到值
require请求对象有一个属性url可以直接获取到网址中?(包括?)后面的内容和网址标题的图标。
例如:require.url 获取到两部分的内容,分别是/?type=1和/favicon.ico。


根据上述url属性来获取路由修改代码:
// 1.引入http
const http = require("http");// 2.创建一个服务实例
//require:请求, response:响应
let app = http.createServer(function (require, response) {// require.url 可以获取到两部分的内容,分别是/?type=1和/favicon.ico// 2.1当获取到的url是/favicon.ico的部分时,直接告诉客户端所有消息已经发送。if (require.url === "favicon.ico") {response.end();return;}// 2.2当获取到的url是/?type=1的部分时,进行拆分获取到?后面的部分// 调用解析请求url的函数let obj = getQuery(require);// 2.3响应头response.writeHead(200, {// 响应的内容的类型是文本或者是html页面,编译使用utf-8字符集"Content-type": "text/html;charset=utf-8",});switch (obj.type) {case 1:getList(response);break;case 2:addUser(response);break;case 3:removeUser(response);break;}function getList(response) {response.end("list");}function addUser(response) {response.end("addUser");}function removeUser(response) {response.end("removeUser");}// 2.4服务器渲染一个页面,向页面中写入内容response.write("<ul>");for (var i = 0; i < 10; i++) {response.write("<li>" + i + "</li>");}response.write("</ul>");// 2.5返回响应消息,告诉客户端所有消息已经发送。response.end();
});// 解析require请求url的函数
function getQuery(require) {let url = require.url.split("?")[1];// 截取像这样的?type=1&user=kwj 的网址变成 [type=1,user=kwj];// value:上一次返回的结果, item:数组中的每一个元素return url.split("&").reduce((value, item) => {//[type=1,user=kwj]==> [type,1] [user,kwj]var arr = item.split("=");try {value[arr[0]] = JSON.parse(arr[1]);} catch (e) {value[arr[0]] = arr[1];}return value;}, {})
}// 3.服务实例侦听来访问服务器的请求,获取到端口号和IP地址
app.listen(process.env.PORT);

2. 方法二:使用路劲获取路由
例如像 localhost:4000/list?a=1这样的网址该怎样获取到值

8.3 服务端渲染使用get请求怎么获取到地址上的参数
querystring.parse(request.url.split("?")[1])可以直接获取到url。
//get请求讲解
const http = require("http");
let app = http.createServer(function (request, response) {if (request.url === "/favicon.ion") {response.end();return;}// parse可以直接获取到urllet obj = querystring.parse(request.url.split("?")[1]);console.log(obj);//服务端渲染,写入响应头response.writeHead(200, {"Content-Type": "text/html;charset=utf-8","Access-Control-Allow-Origin": "*"})response.end("OK");
});// 端口号
app.listen(process.env.PORT);
8.4 客户端与服务器的交流
1. 创建client文件夹并创建一个getIndex.html。
2.编写getIndex.html。
<!DOCTYPE html>
<html lang="en"><head><meta charset="UTF-8"><meta name="viewport" content="width=device-width, initial-scale=1.0"><title>Document</title>
</head><body><!-- 默认情况下表单有action,当提交时,会把表单元素中所有name对应表单元素的value,拼装成search,提交给action对应的地址 --><form action="http://localhost:4000" method="get"><label>用户名</label> <input type="text" name="user"><label>密码</label> <input type="password" name="password"><label>年龄</label><input type="text" name="age"><label>性别</label><input type="text" name="sex"><button type="submit">提交</button></form>
</body></html>
3. 运行 getIndex.html。

9. node.js的API
9.1 url模块的方法
1. url.parse("网络地址") :解析url地址的。将网络地址解析成一个对象。
// 引入url对象
const url = require("url");let obj = url.parse("https://www.baidu.com:3004/news/index.html?a=1&b=2#abc");
console.log(obj);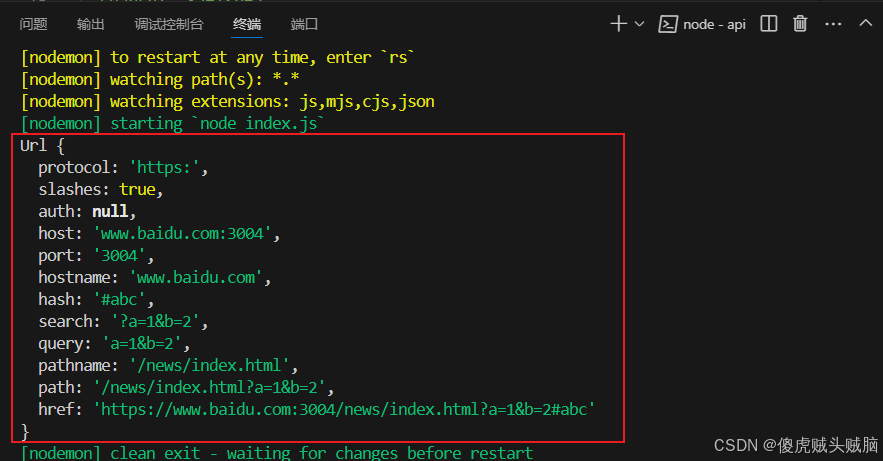
这个对象详解:
Url {
protocol : 'https:', ==> 要使用http协议
slashes : true, ==> 斜杠语法
auth : null, ==> 用于计算授权标头的基本身份验证
host : 'www.baidu.com:3004', ==>域名+端口号/主机地址+端口号
port : 3004, ==> 端口号
hostname : 'www.baidu.com', ==> 原地址,不加端口号
hash : '#abc', ==> 网址#后面的东西
search : '?a=1&b=2', ==> 网址?后面的东西
query : 'a=1&b=2', ==> ?后面的参数
pathname: '/news/index.html', ==> 获取到端口号到?前面的内容
path : '/news/index.html?a=1&b=2', ==>获取到端口号到#前面的内容
href : 'https://www.baidu.com:3004/news/index.html?a=1&b=2#abc' ==>获取到端口号后面的使用内容
}
2. url.format(对象名) :将对象解析成url地址。
// 引入url对象
const url = require("url");var obj = {protocol: 'https:',slashes: true,auth: null,host: 'www.baidu.com:3004',port: 3004,hostname: 'www.baidu.com',hash: '#abc',search: '?a=1&b=2',query: 'a=1&b=2',pathname: '/news/index.html',path: '/news/index.html?a=1&b=2',
}
console.log(url.format(obj)); 
3. url.resolve("地址","地址") :将两个地址拼接成一个地址。 注意一个与两个点的区别。
// 引入url对象
const url = require("url");var str = url.resolve("http://www.baidu.com/news/a", "index.html");
console.log(str);var str = url.resolve("http://www.baidu.com/news/a", "./index.html");
console.log(str);var str = url.resolve("http://www.baidu.com/news/a/", "./index.html");
console.log(str);var str = url.resolve("http://www.baidu.com/news/a/", "../index.html");
console.log(str);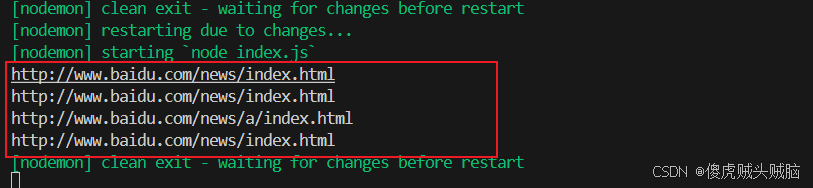
4. Url中重点类URLSearchParams的使用方法
URLSearchParams:该类是用来搜索地址中的参数,并且获取到指定的参数值。
// 引入url对象
const url = require("url");
// 把URLSearchParams单独取出来
const { URLSearchParams } = require("url");
let obj = url.parse("https://www.baidu.com:3004/news/index.html?a=1&b=2#abc");
console.log(obj.query);//获取到?后面的内容
let data = new URLSearchParams(obj.query);
console.log(data.get("a"));//1
console.log(data.get("b"));//2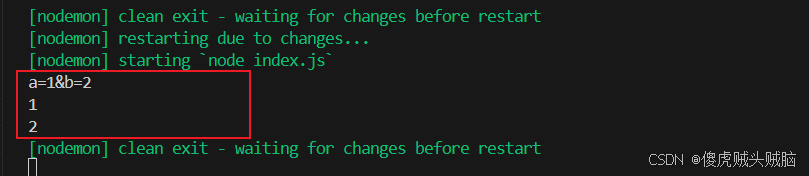
9.2 http和https模块中的请求使用方法
9.2.1 get请求
get("被访问的服务器地址",(响应结果response)=>{...}) : 请求接收到被访问服务器发送返回的结果对象。
案列1:编写一个服务器和客户端进行通信
编写一个服务端:
1. 在server文件夹下创建一个server.js的文件并打开集成终端,在集成终端中执行 npm init -y 命令初始化得到一个package.json的文件,在这个文件中编写配置。
{"name": "server1","version": "1.0.0","description": "","main": "index.js","scripts": {"start": "PORT=4001 nodemon server.js"},"keywords": [],"author": "","license": "ISC","devDependencies": {"nodemon":"^3.1.4"}
}
2. 在集成终端中执行 nmp i 下载package.json文件配置的模块。
3.在创建一个servsr.js文件编写代码,并在集成终端中执行npm start命令开启服务。
const http = require("http");
//创建一个服务实例
http.createServer(function (req, res) {res.end("abc")
}).listen(process.env.PORT)
编写一个客户端:这个客户端不是在浏览器上的,使用这个客户端访问上面的服务器。
步骤1,2和上面一样。
3. 编写httpApi.js文件。
const http = require("http");// response 服务端发生返回的结果对象,响应对象
http.get("http://localhost:4001", (response) => {// 下面是接受响应对象的结果var data = ""response.on("data", (_chunk) => {data += _chunk;})response.on("end", () => {console.log(data);})
})
结论:只要客户端不是使用浏览器访问就不会涉及到跨域问题 。
案列2:使用html文件访问网页上的一个网址是否能够成功 ?
创建一个js文件夹,在js文件夹下创建和编写一个index.html文件。使用该文件访问浏览器上的一个网址。
<body><script type="module">// 引入自己编写的axiosimport axios from "./js/axios.js";axios.get("https://kyfw.12306.cn/otn/leftTicket/queryG?leftTicketDTO.train_date=2024-09-11&leftTicketDTO.from_station=BJP&leftTicketDTO.to_station=SHH&purpose_codes=ADULT").then((res) => {console.log(res);})</script>
</body>
结果:访问失败!!!因为涉及跨域问题。
案列3:重新编写客户端,让客户端访问浏览器上的网址,看看是否哪个访问成功。
1. 重新编写编写httpApi.js文件访问该网址。
const https = require("https");function getSMZDM() {return new Promise(function (resolve, reject) {https.get("https://www.smzdm.com/homepage/headline", (response) => {// 下面是接受响应对象的结果var data = ""response.on("data", (_chunk) => {data += _chunk;})response.on("end", () => {// console.log(JSON.parse(data));resolve(data)})})})
}exports.getSMZDM = getSMZDM;
2. 创建并编写index.js文件。
const { getSMZDM } = require("./httpApi");
const http = require("http");
http.createServer(async function (req, res) {res.writeHead(200, {"Access-Control-Allow-Origin": "*"})let data = await getSMZDM();res.end(data);
}).listen(4000);
3. 在编写index.html文件 访问index.js文件中的服务,就可以访问到浏览器上面的网址
<body><script type="module">import axios from "./js/axios.js";axios.get("http://localhost:4000").then((res) => {console.log(res);})</script>
</body>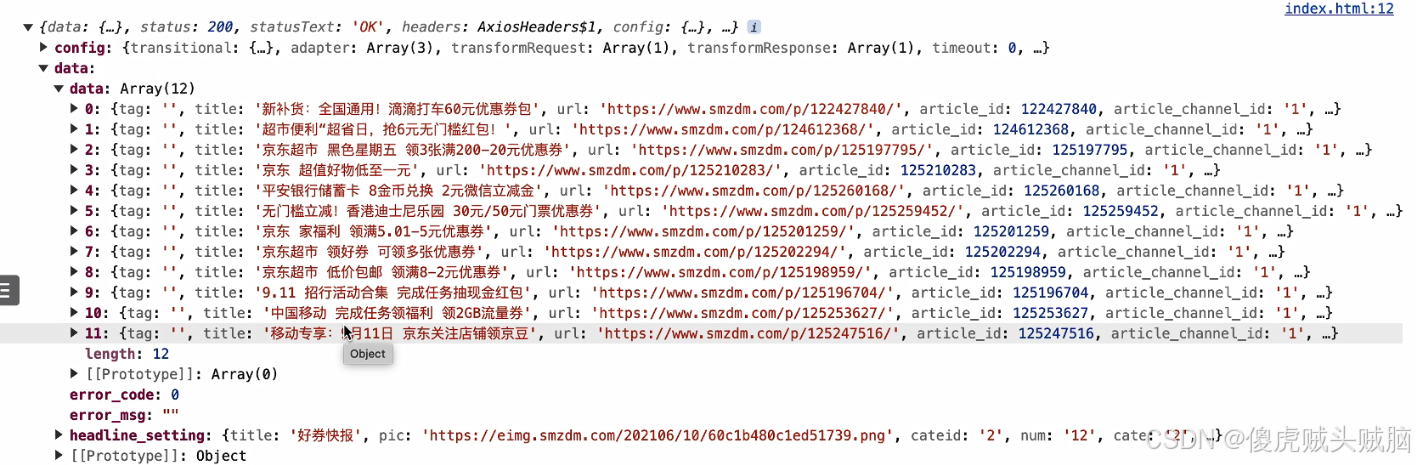
结论:访问成功 !!!
访问流程: index.html文件 ----访问----> 自己编写的服务器(index.js文件--> httpApi.js文件) ----访问----> 什么值得买的网址
成功原因是让页面访问自己编写的服务端,再让自己编写的服务端访问什么值得买的网址,就可以使用页面访问到网址中的数据了。这样就不涉及跨域问题。
我自己编写的服务器就是代理服务器。代理服务器也叫中间服务器或中台服务器。
9.2.2 post请求
post("被访问的服务器地址",要发送的数据)
http.request( url,{ } ,解析响应数据的函数) :有三个参数,使用该方法可以得到一个request对象。
request对象的方法:
- request对象名.write(JSON.stringify(数据))
- request对象名.end()
http.request编写模板:
var data = { a: 1, b: 2 };
var request = http.request(url,{method: "post",headers: { "Content-Type": "", "Content-Length": Buffer.byteLength(data) }},function (res) {// 解析响应数据})
request.write(JSON.stringify(data))
1. 编写一个服务端:
1.1 在server文件夹下创建一个server.js的文件并打开集成终端,在集成终端中执行 npm init -y 命令初始化得到一个package.json的文件,在这个文件中编写配置。
{"name": "server","version": "1.0.0","description": "","main": "index.js","scripts": {"start": "nodemon PORT=4000"},"keywords": [],"author": "","license": "ISC","devDependencies": {"nodemon": "^3.1.4"}
}
1.2. 在集成终端中执行 nmp i 下载package.json文件配置的模块。
1.3 在创建一个index.js文件编写代码,并在集成终端中执行npm start命令开启服务。
const http = require("http");
http.createServer(async function (req, res) {let data = await getData(req)console.log(data);res.end("aa")
}).listen(process.env.PORT)function getData(req) {return new Promise(function (resolve, reject) {var data = "";req.on("data", _chunk => data += _chunk);req.on("end", () => resolve(data))})
}
2. 编写一个客户端:
2.1 创建client文件夹,在该文件夹下创建一个index.html文件。
2.2 在client文件夹下打开集成终端,执行npm i axios 命令下载axios模块
2.3 编写index.html文件,使用 axios与服务器通信。
3. 编写一个Api的服务器:
3.1 在nodeApi文件夹下创建一个index.js的文件并打开集成终端,在集成终端中执行 npm init -y 命令初始化得到一个package.json的文件,在这个文件中编写配置。
{"name": "nodeapi","version": "1.0.0","description": "","main": "index.js","scripts": {"start": "nodemon PORT=4001"},"keywords": [],"author": "","license": "ISC","devDependencies": {"nodemon": "^3.1.4","mime": "^3.0.0"}
}
3.2 创建并编写 request.js文件。
3.2 编写index.js的文件。