YOLOv5改进 | 模块缝合 | C3 融合RVB + EMA注意力机制【二次融合】
秋招面试专栏推荐 :深度学习算法工程师面试问题总结【百面算法工程师】——点击即可跳转
💡💡💡本专栏所有程序均经过测试,可成功执行💡💡💡
专栏目录 :《YOLOv5入门 + 改进涨点》专栏介绍 & 专栏目录 | 目前已有90+篇内容,内含各种Head检测头、损失函数Loss、Backbone、Neck、NMS等创新点改进
C3-RVB 模块是结合了 C3、RepViT Block 和 EMA 注意力机制的优势,实现了轻量化和高效的模型设计。C3模块利用轻量级的 ELAN 注意力机制缓解梯度消失问题,并有效提取关键特征。RepViT Block (RVB) 作为 RepViT 模型的核心组件,通过重新排列 MobileNetV3 模块的 3x3 深度可分离卷积并整合成统一分支。EMA 注意力机制通过对历史数据进行指数移动平均,有效降低噪声或异常值的影响,提高模型的鲁棒性。文章在介绍主要的原理后,将手把手教学如何进行模块的代码添加和修改,并将修改后的完整代码放在文章的最后,方便大家一键运行,小白也可轻松上手实践。以帮助您更好地学习深度学习目标检测YOLO系列的挑战。
专栏地址: YOLOv5改进+入门——持续更新各种有效涨点方法 点击即可跳转
目录
1.原理
2. 将C3-RVB添加到yolov5网络中
2.1 C3-RVB代码实现
2.2 C3_RVB的神经网络模块代码解析
2.3 新增yaml文件
2.4 注册模块
2.5 执行程序
3. 完整代码分享
4. GFLOPs
5. 进阶
6. 总结
1.原理

论文地址:Efficient Multi-Scale Attention Module with Cross-Spatial Learning——点击即可跳转
官方代码:官方代码仓库——点击即可跳转
C3-RVB是轻量级网络模块的关键组件,旨在实现高效的特征提取和融合。
核心原理:
-
C3-RVB结构:YOLOv5网络中的C3结构,利用轻量级的特征提取来防止梯度消失并有效捕获关键特征。C3结构包括Conv层和ELAN机制以增强性能。C3-RVB模块是此结构的扩展,其中集成了RepViT Blocks来替换Bottleneck层。RepViT Blocks通过在推理过程中重新参数化网络架构来提高特征表示和处理效率。
-
RepViT Blocks:是C2f-RVB的核心。RepViT Blocks包括深度卷积和通道间交互机制,可增强特征多样性和表达力,在处理轻量级网络任务时特别有用。这使得模型能够捕捉到更丰富的细节,而不会显著增加计算成本。
-
EMA注意力机制:C2f-RVB中引入了EMA注意力机制来平滑特征权重,减轻检测任务中来自低级特征的噪音。该机制使网络能够更准确地聚焦于重要特征,同时减少背景噪音带来的干扰,提高检测鲁棒性。
总体而言,C2f-RVB模块旨在优化特征提取和融合,专注于提高准确性,同时保持适合在实时应用中部署的轻量级架构。
2. 将C3-RVB添加到yolov5网络中
2.1 C3-RVB代码实现
关键步骤一: 将下面的代码粘贴到\yolov5\models\common.py中
from timm.models.layers import SqueezeExciteclass RepVGGDW(torch.nn.Module):"""RepVGGDW is a class that represents a depth wise separable convolutional block in RepVGG architecture."""def __init__(self, ed) -> None:super().__init__()self.conv = Conv(ed, ed, 7, 1, 3, g=ed, act=False)self.conv1 = Conv(ed, ed, 3, 1, 1, g=ed, act=False)self.dim = edself.act = nn.SiLU()def forward(self, x):"""Performs a forward pass of the RepVGGDW block.Args:x (torch.Tensor): Input tensor.Returns:(torch.Tensor): Output tensor after applying the depth wise separable convolution."""return self.act(self.conv(x) + self.conv1(x))def forward_fuse(self, x):"""Performs a forward pass of the RepVGGDW block without fusing the convolutions.Args:x (torch.Tensor): Input tensor.Returns:(torch.Tensor): Output tensor after applying the depth wise separable convolution."""return self.act(self.conv(x))@torch.no_grad()def fuse(self):"""Fuses the convolutional layers in the RepVGGDW block.This method fuses the convolutional layers and updates the weights and biases accordingly."""conv = fuse_conv_and_bn(self.conv.conv, self.conv.bn)conv1 = fuse_conv_and_bn(self.conv1.conv, self.conv1.bn)conv_w = conv.weightconv_b = conv.biasconv1_w = conv1.weightconv1_b = conv1.biasconv1_w = torch.nn.functional.pad(conv1_w, [2, 2, 2, 2])final_conv_w = conv_w + conv1_wfinal_conv_b = conv_b + conv1_bconv.weight.data.copy_(final_conv_w)conv.bias.data.copy_(final_conv_b)self.conv = convdel self.conv1class EMA(nn.Module):def __init__(self, channels, factor=8):super(EMA, self).__init__()self.groups = factorassert channels // self.groups > 0self.softmax = nn.Softmax(-1)self.agp = nn.AdaptiveAvgPool2d((1, 1))self.pool_h = nn.AdaptiveAvgPool2d((None, 1))self.pool_w = nn.AdaptiveAvgPool2d((1, None))self.gn = nn.GroupNorm(channels // self.groups, channels // self.groups)self.conv1x1 = nn.Conv2d(channels // self.groups, channels // self.groups, kernel_size=1, stride=1, padding=0)self.conv3x3 = nn.Conv2d(channels // self.groups, channels // self.groups, kernel_size=3, stride=1, padding=1)def forward(self, x):b, c, h, w = x.size()group_x = x.reshape(b * self.groups, -1, h, w) # b*g,c//g,h,wx_h = self.pool_h(group_x)x_w = self.pool_w(group_x).permute(0, 1, 3, 2)hw = self.conv1x1(torch.cat([x_h, x_w], dim=2))x_h, x_w = torch.split(hw, [h, w], dim=2)x1 = self.gn(group_x * x_h.sigmoid() * x_w.permute(0, 1, 3, 2).sigmoid())x2 = self.conv3x3(group_x)x11 = self.softmax(self.agp(x1).reshape(b * self.groups, -1, 1).permute(0, 2, 1))x12 = x2.reshape(b * self.groups, c // self.groups, -1) # b*g, c//g, hwx21 = self.softmax(self.agp(x2).reshape(b * self.groups, -1, 1).permute(0, 2, 1))x22 = x1.reshape(b * self.groups, c // self.groups, -1) # b*g, c//g, hwweights = (torch.matmul(x11, x12) + torch.matmul(x21, x22)).reshape(b * self.groups, 1, h, w)return (group_x * weights.sigmoid()).reshape(b, c, h, w)class Conv2d_BN(torch.nn.Sequential):def __init__(self, a, b, ks=1, stride=1, pad=0, dilation=1,groups=1, bn_weight_init=1, resolution=-10000):super().__init__()self.add_module('c', torch.nn.Conv2d(a, b, ks, stride, pad, dilation, groups, bias=False))self.add_module('bn', torch.nn.BatchNorm2d(b))torch.nn.init.constant_(self.bn.weight, bn_weight_init)torch.nn.init.constant_(self.bn.bias, 0)@torch.no_grad()def fuse_self(self):c, bn = self._modules.values()w = bn.weight / (bn.running_var + bn.eps)**0.5w = c.weight * w[:, None, None, None]b = bn.bias - bn.running_mean * bn.weight / \(bn.running_var + bn.eps)**0.5m = torch.nn.Conv2d(w.size(1) * self.c.groups, w.size(0), w.shape[2:], stride=self.c.stride, padding=self.c.padding, dilation=self.c.dilation, groups=self.c.groups,device=c.weight.device)m.weight.data.copy_(w)m.bias.data.copy_(b)return mclass Residual(nn.Module):def __init__(self, fn):super(Residual, self).__init__()self.fn = fndef forward(self, x):return self.fn(x) + xclass SEAM(nn.Module):def __init__(self, c1, c2, n, reduction=16):super(SEAM, self).__init__()if c1 != c2:c2 = c1self.DCovN = nn.Sequential(*[nn.Sequential(Residual(nn.Sequential(nn.Conv2d(in_channels=c2, out_channels=c2, kernel_size=3, stride=1, padding=1, groups=c2),nn.GELU(),nn.BatchNorm2d(c2))),nn.Conv2d(in_channels=c2, out_channels=c2, kernel_size=1, stride=1, padding=0, groups=1),nn.GELU(),nn.BatchNorm2d(c2)) for i in range(n)])self.avg_pool = torch.nn.AdaptiveAvgPool2d(1)self.fc = nn.Sequential(nn.Linear(c2, c2 // reduction, bias=False),nn.ReLU(inplace=True),nn.Linear(c2 // reduction, c2, bias=False),nn.Sigmoid())self._initialize_weights()# self.initialize_layer(self.avg_pool)self.initialize_layer(self.fc)def forward(self, x):b, c, _, _ = x.size()y = self.DCovN(x)y = self.avg_pool(y).view(b, c)y = self.fc(y).view(b, c, 1, 1)y = torch.exp(y)return x * y.expand_as(x)def _initialize_weights(self):for m in self.modules():if isinstance(m, nn.Conv2d):nn.init.xavier_uniform_(m.weight, gain=1)elif isinstance(m, nn.BatchNorm2d):nn.init.constant_(m.weight, 1)nn.init.constant_(m.bias, 0)def initialize_layer(self, layer):if isinstance(layer, (nn.Conv2d, nn.Linear)):torch.nn.init.normal_(layer.weight, mean=0., std=0.001)if layer.bias is not None:torch.nn.init.constant_(layer.bias, 0)class RepViTBlock(nn.Module):def __init__(self, inp, oup, use_se=True):super(RepViTBlock, self).__init__()self.identity = inp == ouphidden_dim = 2 * inpself.token_mixer = nn.Sequential(RepVGGDW(inp),SqueezeExcite(inp, 0.25) if use_se else nn.Identity(),)self.channel_mixer = Residual(nn.Sequential(# pwConv2d_BN(inp, hidden_dim, 1, 1, 0),nn.GELU(),# pw-linearConv2d_BN(hidden_dim, oup, 1, 1, 0, bn_weight_init=0),))def forward(self, x):return self.channel_mixer(self.token_mixer(x))class RepViTBlock_EMA(RepViTBlock):def __init__(self, inp, oup, use_se=True):super().__init__(inp, oup, use_se)self.token_mixer = nn.Sequential(RepVGGDW(inp),EMA(inp) if use_se else nn.Identity(),)class C3_RVB(C3):def __init__(self, c1, c2, n=1, shortcut=False, g=1, e=0.5):super().__init__(c1, c2, n, shortcut, g, e)c_ = int(c2 * e) # hidden channelsself.m = nn.Sequential(*(RepViTBlock(c_, c_, False) for _ in range(n)))2.2 C3_RVB的神经网络模块代码解析
C3_RVB 模块是 C3 结构的扩展,集成了 RepViTBlocks,通过高效的重新参数化和特征提取来提高性能。
-
C3 结构:基础
C3模块融合多尺度特征,同时保持轻量级结构。它由多个具有深度卷积和高效特征融合机制的层组成。原始C3专注于捕获丰富的特征表示,同时平衡计算成本。 -
RepViT 块集成:
C3_RVB模块中引入的 RepViTBlock 通过添加重新参数化的卷积进一步增强了C3的功能。这使模块能够通过在推理过程中更有效地融合特征来适应不同的计算环境。 RepViT 模块还包括深度卷积和可选的挤压和激发 (SE) 模块,以提高空间注意力。 -
通道和标记混合:每个
RepViTBlock都使用 标记混合(深度卷积和 SE/EMA 注意力)和 通道混合(逐点卷积)的组合。标记混合器提取不同的特征表示,而通道混合器增强通道间关系,从而实现更有效的特征融合。 -
通过重新参数化提高效率:
RepViTBlock在推理过程中将多分支结构重新参数化为单分支配置,在保持模型准确性的同时减少计算开销。这使得C3_RVB模块既轻量又具有计算效率。 -
EMA Attention:
C3_RVB还可以在 token 混合阶段利用EMA注意力机制,其中 EMA 有助于平滑特征权重并减少浅层噪声,从而增强模型在实时或低功耗环境下的鲁棒性。
C3_RVB 模块将 C3 的多尺度特征融合与 RepViTBlocks 的高效特征提取相结合,使其成为需要高精度和计算效率的轻量级模型的理想选择。

2.3 新增yaml文件
关键步骤二:在下/yolov5/models下新建文件 yolov5_C3-RVB.yaml并将下面代码复制进去
- 目标检测yaml文件
# Ultralytics YOLOv5 🚀, AGPL-3.0 license# Parameters
nc: 80 # number of classes
depth_multiple: 1.0 # model depth multiple
width_multiple: 1.0 # layer channel multiple
anchors:- [10, 13, 16, 30, 33, 23] # P3/8- [30, 61, 62, 45, 59, 119] # P4/16- [116, 90, 156, 198, 373, 326] # P5/32# YOLOv5 v6.0 backbone
backbone:# [from, number, module, args][[-1, 1, Conv, [64, 6, 2, 2]], # 0-P1/2[-1, 1, Conv, [128, 3, 2]], # 1-P2/4[-1, 3, C3_RVB, [128]],[-1, 1, Conv, [256, 3, 2]], # 3-P3/8[-1, 6, C3_RVB, [256]],[-1, 1, Conv, [512, 3, 2]], # 5-P4/16[-1, 9, C3_RVB, [512]],[-1, 1, Conv, [1024, 3, 2]], # 7-P5/32[-1, 3, C3_RVB, [1024]],[-1, 1, SPPF, [1024, 5]], # 9]# YOLOv5 v6.0 head
head: [[-1, 1, Conv, [512, 1, 1]],[-1, 1, nn.Upsample, [None, 2, "nearest"]],[[-1, 6], 1, Concat, [1]], # cat backbone P4[-1, 3, C3_RVB, [512, False]], # 13[-1, 1, Conv, [256, 1, 1]],[-1, 1, nn.Upsample, [None, 2, "nearest"]],[[-1, 4], 1, Concat, [1]], # cat backbone P3[-1, 3, C3_RVB, [256, False]], # 17 (P3/8-small)[-1, 1, Conv, [256, 3, 2]],[[-1, 14], 1, Concat, [1]], # cat head P4[-1, 3, C3_RVB, [512, False]], # 20 (P4/16-medium)[-1, 1, Conv, [512, 3, 2]],[[-1, 10], 1, Concat, [1]], # cat head P5[-1, 3, C3_RVB, [1024, False]], # 23 (P5/32-large)[[17, 20, 23], 1, Detect, [nc, anchors]], # Detect(P3, P4, P5)]
- 语义分割yaml文件
# Ultralytics YOLOv5 🚀, AGPL-3.0 license# Parameters
nc: 80 # number of classes
depth_multiple: 1.0 # model depth multiple
width_multiple: 1.0 # layer channel multiple
anchors:- [10, 13, 16, 30, 33, 23] # P3/8- [30, 61, 62, 45, 59, 119] # P4/16- [116, 90, 156, 198, 373, 326] # P5/32# YOLOv5 v6.0 backbone
backbone:# [from, number, module, args][[-1, 1, Conv, [64, 6, 2, 2]], # 0-P1/2[-1, 1, Conv, [128, 3, 2]], # 1-P2/4[-1, 3, C3_RVB, [128]],[-1, 1, Conv, [256, 3, 2]], # 3-P3/8[-1, 6, C3_RVB, [256]],[-1, 1, Conv, [512, 3, 2]], # 5-P4/16[-1, 9, C3_RVB, [512]],[-1, 1, Conv, [1024, 3, 2]], # 7-P5/32[-1, 3, C3_RVB, [1024]],[-1, 1, SPPF, [1024, 5]], # 9]# YOLOv5 v6.0 head
head: [[-1, 1, Conv, [512, 1, 1]],[-1, 1, nn.Upsample, [None, 2, "nearest"]],[[-1, 6], 1, Concat, [1]], # cat backbone P4[-1, 3, C3_RVB, [512, False]], # 13[-1, 1, Conv, [256, 1, 1]],[-1, 1, nn.Upsample, [None, 2, "nearest"]],[[-1, 4], 1, Concat, [1]], # cat backbone P3[-1, 3, C3_RVB, [256, False]], # 17 (P3/8-small)[-1, 1, Conv, [256, 3, 2]],[[-1, 14], 1, Concat, [1]], # cat head P4[-1, 3, C3_RVB, [512, False]], # 20 (P4/16-medium)[-1, 1, Conv, [512, 3, 2]],[[-1, 10], 1, Concat, [1]], # cat head P5[-1, 3, C3_RVB, [1024, False]], # 23 (P5/32-large)[[17, 20, 23], 1, Segment, [nc, anchors, 32, 256]], # Segment (P3, P4, P5)]
温馨提示:本文只是对yolov5基础上添加模块,如果要对yolov5n/l/m/x进行添加则只需要指定对应的depth_multiple 和 width_multiple。
# YOLOv5n
depth_multiple: 0.33  # model depth multiple
width_multiple: 0.25  # layer channel multiple# YOLOv5s
depth_multiple: 0.33  # model depth multiple
width_multiple: 0.50  # layer channel multiple# YOLOv5l
depth_multiple: 1.0  # model depth multiple
width_multiple: 1.0  # layer channel multiple# YOLOv5m
depth_multiple: 0.67  # model depth multiple
width_multiple: 0.75  # layer channel multiple# YOLOv5x
depth_multiple: 1.33  # model depth multiple
width_multiple: 1.25  # layer channel multiple
2.4 注册模块
关键步骤三:在yolo.py的parse_model函数替换添加C3_RVB

2.5 执行程序
在train.py中,将cfg的参数路径设置为yolov5_C3_RVB.yaml的路径
建议大家写绝对路径,确保一定能找到

🚀运行程序,如果出现下面的内容则说明添加成功🚀
                 from  n    params  module                                  arguments0                -1  1      7040  models.common.Conv                      [3, 64, 6, 2, 2]1                -1  1     73984  models.common.Conv                      [64, 128, 3, 2]2                -1  3     95488  models.common.C3_RVB                    [128, 128, 3]3                -1  1    295424  models.common.Conv                      [128, 256, 3, 2]4                -1  6    577536  models.common.C3_RVB                    [256, 256, 6]5                -1  1   1180672  models.common.Conv                      [256, 512, 3, 2]6                -1  9   3042304  models.common.C3_RVB                    [512, 512, 9]7                -1  1   4720640  models.common.Conv                      [512, 1024, 3, 2]8                -1  3   5351424  models.common.C3_RVB                    [1024, 1024, 3]9                -1  1   2624512  models.common.SPPF                      [1024, 1024, 5]10                -1  1    525312  models.common.Conv                      [1024, 512, 1, 1]11                -1  1         0  torch.nn.modules.upsampling.Upsample    [None, 2, 'nearest']12           [-1, 6]  1         0  models.common.Concat                    [1]13                -1  3   1627136  models.common.C3_RVB                    [1024, 512, 3, False]14                -1  1    131584  models.common.Conv                      [512, 256, 1, 1]15                -1  1         0  torch.nn.modules.upsampling.Upsample    [None, 2, 'nearest']16           [-1, 4]  1         0  models.common.Concat                    [1]17                -1  3    420352  models.common.C3_RVB                    [512, 256, 3, False]18                -1  1    590336  models.common.Conv                      [256, 256, 3, 2]19          [-1, 14]  1         0  models.common.Concat                    [1]20                -1  3   1364992  models.common.C3_RVB                    [512, 512, 3, False]21                -1  1   2360320  models.common.Conv                      [512, 512, 3, 2]22          [-1, 10]  1         0  models.common.Concat                    [1]23                -1  3   5351424  models.common.C3_RVB                    [1024, 1024, 3, False]        24      [17, 20, 23]  1    457725  Detect                                  [80, [[10, 13, 16, 30, 33, 23], [30, 61, 62, 45, 59, 119], [116, 90, 156, 198, 373, 326]], [256, 512, 1024]]
YOLOv5_C3_RVB summary: 863 layers, 30798205 parameters, 30798205 gradients, 70.8 GFLOPs
3. 完整代码分享
https://pan.baidu.com/s/1su4IwBjlzdYGEy2XZg7nIA?pwd=9jg9提取码: 9jg9
4. GFLOPs
关于GFLOPs的计算方式可以查看:百面算法工程师 | 卷积基础知识——Convolution
未改进的GFLOPs
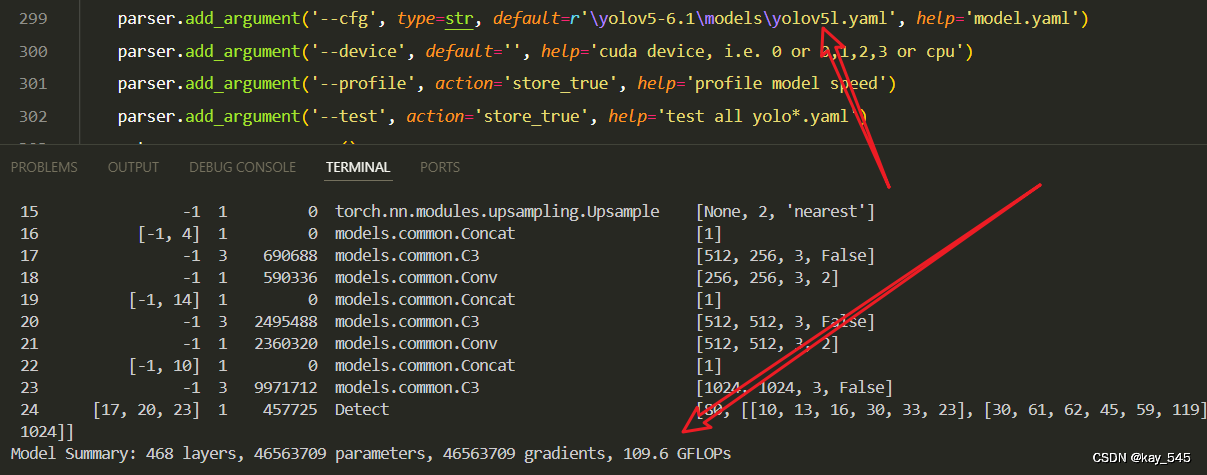
改进后的GFLOPs

5. 进阶
可以结合损失函数或者卷积模块进行多重改进
YOLOv5改进 | 损失函数 | EIoU、SIoU、WIoU、DIoU、FocuSIoU等多种损失函数——点击即可跳转
6. 总结
C3_RVB 模块结合了多尺度特征融合和高效的特征提取,通过引入 RepViTBlock 实现了轻量化和高性能的设计。它基于 C3 结构,专注于捕捉丰富的特征表示,同时保持较低的计算成本。模块中每个 RepViTBlock 包含了 token mixing 和 channel mixing,通过深度卷积和点卷积增强不同通道之间的特征关系,进一步优化特征融合效率。此外,C3_RVB 使用了 重参数化 技术,将多分支结构在推理阶段简化为单分支,大幅减少了计算开销,而不会降低模型的表现。同时,模块可以通过 EMA注意力机制 平滑特征权重,减少来自浅层的噪声干扰,提升模型在实际应用中的鲁棒性。总体而言,C3_RVB 通过多尺度融合、轻量化卷积和注意力机制,实现了高效的特征提取和较低的计算负担,适用于需要精度和效率平衡的任务。