【AI 绘画】 文生图图生图(基于diffusers)
AI 绘画- 文生图&图生图(基于diffusers)
1. 效果展示
本次测试主要结果展示如下:
SDXL文生图

可爱Lora

2. 基本原理
模型基本原理介绍如下
stable diffusion首先训练一个自编码器,学习将图像数据压缩为低维表示。通过使用训练过的编码器E,可以将全尺寸图像编码为低维潜在数据(压缩数据)。然后通过使用经过训练的解码器D,将潜在数据解码回图像。而扩散过程就是在低维的潜在空间完成,这也是为什么它比纯扩散模型更快。
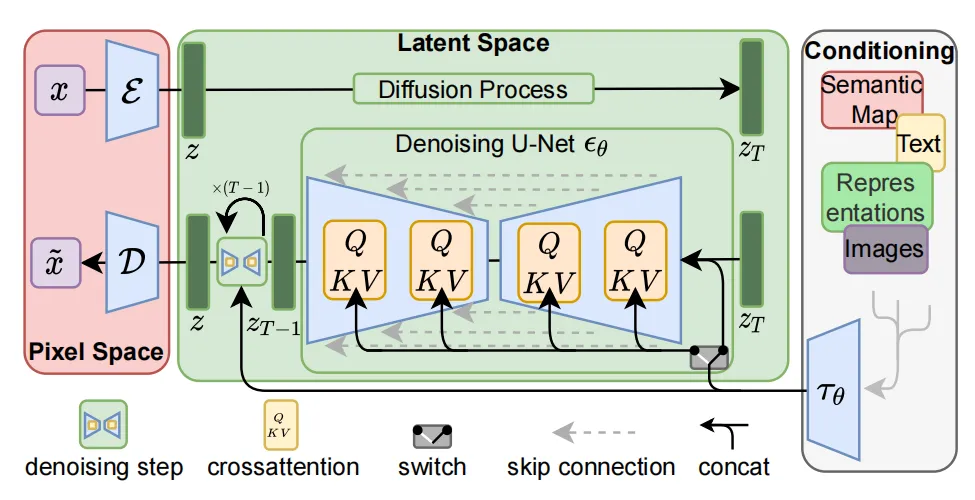
模型基本构成:clip+vae + unet(扩散模型)
U-Net网络负责预测噪声,不断优化生成过程,在预测噪声的同时不断注入文本语义信息。而schedule算法对每次U-Net预测的噪声进行优化处理(动态调整预测的噪声,控制U-Net预测噪声的强度),从而统筹生成过程的进度。在SD中,U-Net的迭代优化步数大概是50或者100次,在这个过程中Latent Feature的质量不断的变好(纯噪声减少,图像语义信息增加,文本语义信息增加)。U-Net网络和Schedule算法的工作完成以后,SD模型会将优化迭代后的Latent Feature输入到图像解码器(VAE Decoder)中,将Latent Feature重建成像素级图像。
主要流程结构:

3. 环境安装
diffusers是Hugging Face推出的一个diffusion库,它提供了简单方便的diffusion推理训练pipe,同时拥有一个模型和数据社区,代码可以像torchhub一样直接从指定的仓库去调用别人上传的数据集和pretrain checkpoint。除此之外,安装方便,代码结构清晰,注释齐全,二次开发会十分有效率。
# pip
pip install --upgrade diffusers[torch]
# conda
conda install -c conda-forge diffusers
4. 代码实现
主要测试代码:
文生图
from diffusers import DiffusionPipeline
import torch# load both base & refiner
# stabilityai/stable-diffusion-xl-base-1.0
base = DiffusionPipeline.from_pretrained("../data/data282269/",device_map=None,torch_dtype=torch.float16, variant="fp16", use_safetensors=True
)base.to("cuda")
refiner = DiffusionPipeline.from_pretrained("stabilityai/stable-diffusion-xl-refiner-1.0",text_encoder_2=base.text_encoder_2,vae=base.vae,torch_dtype=torch.float16,use_safetensors=True,variant="fp16",
)
refiner.to("cuda")# Define how many steps and what % of steps to be run on each experts (80/20) here
n_steps = 40
high_noise_frac = 0.8prompt = "A majestic lion jumping from a big stone at night"#"A majestic lion jumping from a big stone at night"
negative_prompt = "(worst quality:2),(low quality:2),(normal quality:2),(greyscale:2),watermark, lowres, bad anatomy, error, missing fingers, extra digit, fewer digits, cropped"
# run both experts
image = base(prompt=prompt,negative_prompt = negative_prompt,num_inference_steps=n_steps,#  denoising_end=high_noise_frac,output_type="latent",
).imagesimage = refiner(prompt=prompt,negative_prompt = negative_prompt,num_inference_steps=n_steps,denoising_start=high_noise_frac,image=image,
).images[0]image.save("output.png")
图生图
import torch
from diffusers import AutoPipelineForImage2Image
from diffusers.utils import make_image_grid, load_imagepipeline = AutoPipelineForImage2Image.from_pretrained("stabilityai/stable-diffusion-xl-refiner-1.0", torch_dtype=torch.float16, variant="fp16", use_safetensors=True
)
pipeline.enable_model_cpu_offload()
# remove following line if xFormers is not installed or you have PyTorch 2.0 or higher installed
pipeline.enable_xformers_memory_efficient_attention()# prepare image
url = "./work/in.jpg"
init_image = load_image(url)prompt = "A gril in a jungle, muted colors, detailed, 8k"# pass prompt and image to pipeline
image = pipeline(prompt, image=init_image, num_inference_steps=30,strength=0.8).images[0] #,strength表示重绘强度
#make_image_grid([init_image, image], rows=1, cols=2)image.save("img2img1.png")
附加Loral
加载多个loral,可用set_adapters设置不同权重
from diffusers import DiffusionPipeline
import torch# load both base & refiner
base = DiffusionPipeline.from_pretrained("stabilityai/stable-diffusion-xl-base-1.0", torch_dtype=torch.float16, variant="fp16", use_safetensors=True
)
base.to("cuda")base.load_lora_weights("/home/adam.wang/model/sd", weight_name="cute2.safetensors", adapter_name="cute")
base.load_lora_weights("/home/adam.wang/model/sd", weight_name="looking_at_viewer.safetensors", adapter_name="looking")base.set_adapters(["cute", "looking"], adapter_weights=[1.0, 0.8])
# Define how many steps and what % of steps to be run on each experts (80/20) here
n_steps = 35
high_noise_frac = 0.8prompt = "blind box,1girl,hanfu,brown eyes,blush,looking at viewer,outdoors,full body,solo,smile,chibi,<lora:blind_box:0.8>,best quality,Bokeh,ultra-fine painting,sharp focus,physically-based rendering,extreme detail description,(EOS R8,50mm,F1.2,8K,RAW photo"#"A majestic lion jumping from a big stone at night"  east dragon,
negative_prompt = "nsfw,logo,text,badhandv4,EasyNegative,ng_deepnegative_v1_75t,rev2-badprompt,verybadimagenegative_v1.3,negative_hand-neg,mutated hands and fingers,poorly drawn face,extra limb,missing limb,disconnected limbs,malformed hands,ugly,"
# run both experts
lora_scale = 0.6
image = base(prompt=prompt,cross_attention_kwargs={"scale": lora_scale},negative_prompt = negative_prompt,num_inference_steps=n_steps,# denoising_end=high_noise_frac,#output_type="latent",
).images[0]image.save("t8.png")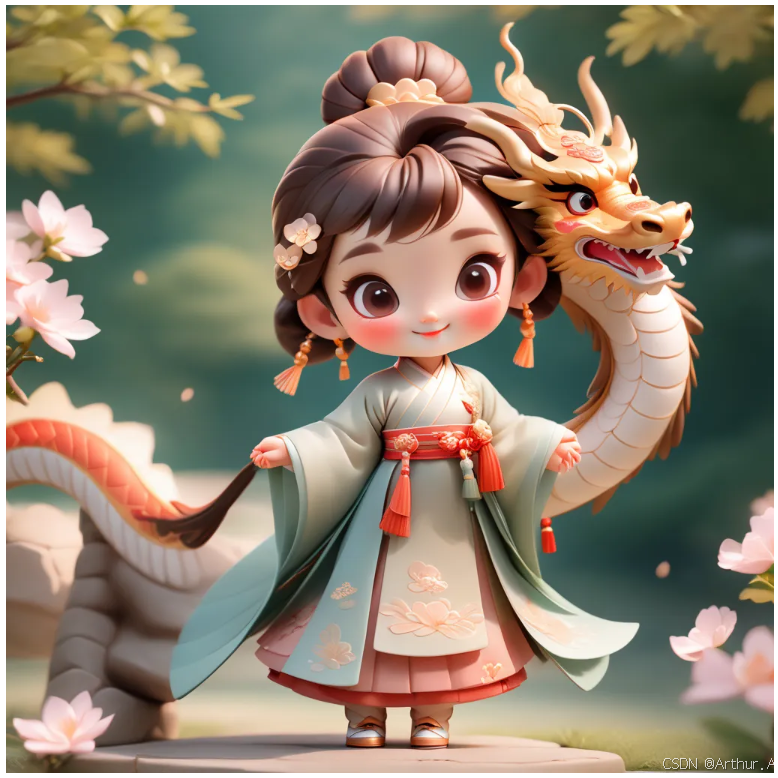
扩展:添加不同的lora可以产生不同的效果,比如我们添加一个龙的背景lora,来生成不同风格的写真
5. 资源链接
https://www.liblib.art/modelinfo/8345679083144158adb64b80c58e3afd