Qt示例3:用Qt画一个温度计
示例1
以下是用Qt绘制一个简单的温度计的示例代码:
#include <QPainter>
#include <QWidget>
#include <QApplication>
class Thermometer : public QWidget {
public:Thermometer(QWidget *parent = 0);
protected:void paintEvent(QPaintEvent *event);
private:int value;
};
Thermometer::Thermometer(QWidget *parent): QWidget(parent), value(50) {}
void Thermometer::paintEvent(QPaintEvent * /* event */) {QPainter painter(this);painter.setRenderHint(QPainter::Antialiasing);painter.setPen(Qt::NoPen);// 绘制温度计背景painter.setBrush(QColor("#f0f0f0"));painter.drawRect(0, 0, width(), height());// 绘制温度计外框painter.setBrush(QColor("#f5f5f5"));painter.drawRect(20, 20, width() - 40, height() - 40);// 绘制温度计刻度线painter.setPen(QColor("#999999"));for (int i = 0; i <= 100; i += 10) {painter.drawLine(40, height() - 40 - (i * (height() - 80) / 100),60, height() - 40 - (i * (height() - 80) / 100));}// 绘制温度计当前温度painter.setPen(QColor("#ff0000"));painter.setFont(QFont("Arial", 14));painter.drawText(80, height() , QString::number(value) + ".");// 绘制温度计水银柱painter.setBrush(QColor("#ff0000"));painter.drawRect(30, height() - 40 - (value * (height() - 80) / 100),width() - 60, value * (height() - 80) / 100);
}
int main(int argc, char *argv[]) {QApplication app(argc, argv);Thermometer thermometer;thermometer.setWindowTitle("thermometer");thermometer.resize(200, 400);thermometer.show();return app.exec();
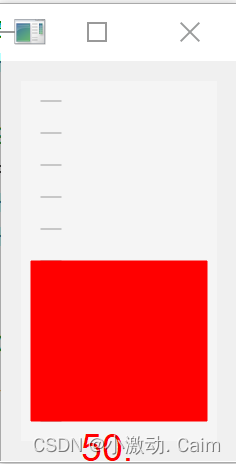
}运行结果
示例2
复杂的动态温度计,代码实现如下:
创建一个Qt项目,并添加一个主窗口。
新建Qt Widgets Application项目,添加MainWindow类。
在主窗口上添加一个QLabel控件,用于显示当前温度值。
在MainWindow类的构造函数中添加以下代码:
QLabel *tempLabel = new QLabel(this);
tempLabel->setText("Temp: 0℃");
tempLabel->setGeometry(20, 20, 100, 20);
在主窗口上添加一个QGraphicsView控件,用于绘制温度计。
在MainWindow类的构造函数中添加以下代码:
QGraphicsView *view = new QGraphicsView(this);
view->setGeometry(20, 50, 200, 200);
创建一个QGraphicsScene对象,并将其设置为QGraphicsView的场景。
在MainWindow类的构造函数中添加以下代码:
QGraphicsScene *scene = new QGraphicsScene(this);
view->setScene(scene);
在QGraphicsScene中添加一个QGraphicsRectItem对象,用于表示温度计的外框。
在MainWindow类的构造函数中添加以下代码:
QGraphicsRectItem *frame = new QGraphicsRectItem(0, 0, 200, 200);
frame->setPen(QPen(Qt::black));
frame->setBrush(QBrush(Qt::white));
scene->addItem(frame);
在QGraphicsScene中添加一个QGraphicsEllipseItem对象,用于表示温度计的中心点。
在MainWindow类的构造函数中添加以下代码:
QGraphicsEllipseItem *center = new QGraphicsEllipseItem(90, 90, 20, 20);
center->setPen(QPen(Qt::black));
center->setBrush(QBrush(Qt::black));
scene->addItem(center);
在QGraphicsScene中添加一些QGraphicsLineItem对象,用于表示温度计的刻度线。
在MainWindow类的构造函数中添加以下代码:
for (int i = -45; i <= 225; i += 45) {QLineF line(100 + 80 * cos(i * M_PI / 180),100 - 80 * sin(i * M_PI / 180),100 + 100 * cos(i * M_PI / 180),100 - 100 * sin(i * M_PI / 180));QGraphicsLineItem *tick = new QGraphicsLineItem(line);tick->setPen(QPen(Qt::black));scene->addItem(tick);
}
在QGraphicsScene中添加一个QGraphicsPolygonItem对象,用于表示温度计的指针。
在MainWindow类的构造函数中添加以下代码:
QPointF points[3] = { QPointF(100, 100),QPointF(95, 90),QPointF(105, 90) };
QGraphicsPolygonItem *pointer = new QGraphicsPolygonItem(QPolygonF(points, 3));
pointer->setPen(QPen(Qt::black));
pointer->setBrush(QBrush(Qt::red));
pointer->setTransformOriginPoint(100, 100);
scene->addItem(pointer);
通过QGraphicsTransform对象,将温度计的指针进行旋转,以显示当前温度值。
在MainWindow类中添加以下私有成员变量:
QGraphicsTransform *pointerTransform;
在MainWindow类的构造函数中添加以下代码:
pointerTransform = new QGraphicsTransform(pointer);
pointer->setTransform(pointerTransform);
在MainWindow类中添加以下槽函数:
void MainWindow::updateTemp(int temp) {ui->tempLabel->setText(QString("Temp: %1℃").arg(temp));pointerTransform->setRotation(-45 + temp * 270 / 100);
}
在主窗口的槽函数中更新温度值,并更新温度计的指针的旋转角度。
在MainWindow类中添加以下信号:
signals:void tempChanged(int temp);
在MainWindow类的构造函数中添加以下代码:
connect(this, SIGNAL(tempChanged(int)), this, SLOT(updateTemp(int)));
在MainWindow类中添加以下槽函数:
void MainWindow::on_tempSlider_valueChanged(int value)
{emit tempChanged(value);
}
在主窗口上添加一个QSlider控件,并将其范围设置为0-100,在MainWindow类中添加以下信号槽连接:
connect(ui->tempSlider, SIGNAL(valueChanged(int)), this, SLOT(on_tempSlider_valueChanged(int)));