Spring源码学习笔记之@Async源码
文章目录
- 一、简介
- 二、异步任务Async的使用方法
- 2.1、第一步、配置类上加@EnableAsync注解
- 2.2、第二步、自定义线程池
- 2.2.1、方法一、不配置自定义线程池使用默认线程池
- 2.2.2、方法二、使用AsyncConfigurer指定线程池
- 2.2.3、方法三、使用自定义的线程池Excutor
- 2.2.4、方法四、使用动态线程池来创建
- 2.3、第三步、在需要异步处理的方法上加@Async注解
- 三、源码解析
- 四、总结
一、简介
最近工作中接触到了 Spring 的 @Async 注解,有了了解其使用方法和源码的想法,所以有了这篇文章,本文源码来自Spring6.1.10
二、异步任务Async的使用方法
2.1、第一步、配置类上加@EnableAsync注解
在任意配置类上增加 @EnableAsync 注解,表示启用异步任务
@Configuration
@EnableAsync
public class MyConfig {
}
也可以加 SpringBoot 启动类上,因为 @SpringBootApplication 注解由 @Configuration 组成
2.2、第二步、自定义线程池
2.2.1、方法一、不配置自定义线程池使用默认线程池
如果不配置自定义的线程池,Spring会默认获取 TaskExecutor 类型的线程池,再获取不到,会获取名为 taskExecutor 的 Executor 类型的线程池,其实是由 TaskExecutionAutoConfiguration 自动注入的,可以通过 spring.task.execution.xxx 来更改其配置
2.2.2、方法二、使用AsyncConfigurer指定线程池
写一个类实现 AsyncConfigurer 接口,实现 getAsyncExecutor 和 getAsyncUncaughtExceptionHandler 方法,注意这个类要给 Spring 托管,所以要加上 @Component 注解
@Component
public class MyAsyncConfigurer implements AsyncConfigurer {@Overridepublic Executor getAsyncExecutor() {ThreadPoolTaskExecutor executor = new ThreadPoolTaskExecutor();//核心线程数executor.setCorePoolSize(5); //最大线程数executor.setMaxPoolSize(10); //队列容量executor.setQueueCapacity(200); //允许线程空闲时间(秒)executor.setKeepAliveSeconds(10);//线程名称前缀executor.setThreadNamePrefix("custom-"); executor.initialize();return executor;}@Overridepublic AsyncUncaughtExceptionHandler getAsyncUncaughtExceptionHandler() {//异步任务未被捕获时的处理return new SimpleAsyncUncaughtExceptionHandler();}
}
2.2.3、方法三、使用自定义的线程池Excutor
不论是方法一还是方法二都有一个弊端,那就是所有的异步任务都会使用同一个线程池,所以可以使用方法三来定义多个线程池,通过实例 Bean 的方式把 Excutor 注入 Spring,并指定 Bean 的名称
@Configuration
public class CustomThreadPoolConfig {@Bean(name = "customExecutor")public ThreadPoolTaskExecutor customExecutor() {ThreadPoolTaskExecutor executor = new ThreadPoolTaskExecutor();//核心线程数executor.setCorePoolSize(5); //最大线程数executor.setMaxPoolSize(10); //队列容量executor.setQueueCapacity(200); //允许线程空闲时间(秒)executor.setKeepAliveSeconds(10);//线程名称前缀executor.setThreadNamePrefix("custom-"); executor.initialize();return executor;}
}
2.2.4、方法四、使用动态线程池来创建
使用 dynamic-tp 动态线程池配置,这里就不展开了,有兴趣的可以去查阅资料,原理就是把 2.2.3 的 Bean 放到了配置文件里,并且可以动态改变参数
2.3、第三步、在需要异步处理的方法上加@Async注解
最后再需要异步处理的方法上增加 @Async 注解
@Service
public class MyServiceImpl implements MyService {@Asyncpublic void asyncMethod()  {log.info("test");}}
如果选用 2.2.3或者 2.2.4 的话,还需要在 @Async 上指定线程池的名称
@Service
public class MyServiceImpl implements MyService {@Async("customExecutor")public void asyncMethod()  {log.info("test");}}
三、源码解析
先从 @EnableAsync 注解开始
@Target(ElementType.TYPE)
@Retention(RetentionPolicy.RUNTIME)
@Documented
@Import(AsyncConfigurationSelector.class)
public @interface EnableAsync {
}
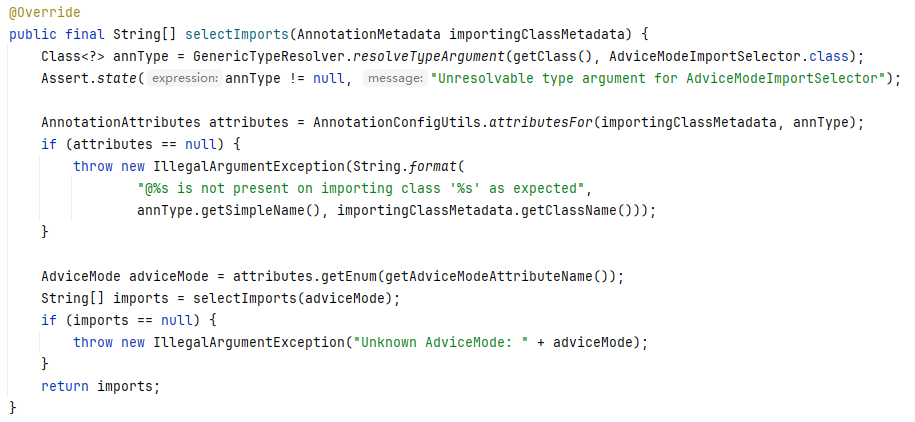
可以看到通过 @Import 注解导入了 AsyncConfigurationSelector 类,这里不展开讲 @Import 注解了(想了解@Import注解的可以看我的另一篇文章:@Import注解源码解析),只需要知道这个注解导入的类 AsyncConfigurationSelector 的 String[] selectImports(AnnotationMetadata importingClassMetadata); 方法会在容器启动时执行,这个方法在其抽象父类 AdviceModeImportSelector 里,我们看下这个方法
这里其实就是拿到 @EnableAsync 注解的 AdviceMode,再调用子类的 selectImports 方法,而 @EnableAsync 注解的 AdviceMode 的默认值是 AdviceMode.PROXY,再来看子类 AsyncConfigurationSelector 的 selectImports(AdviceMode adviceMode) 方法
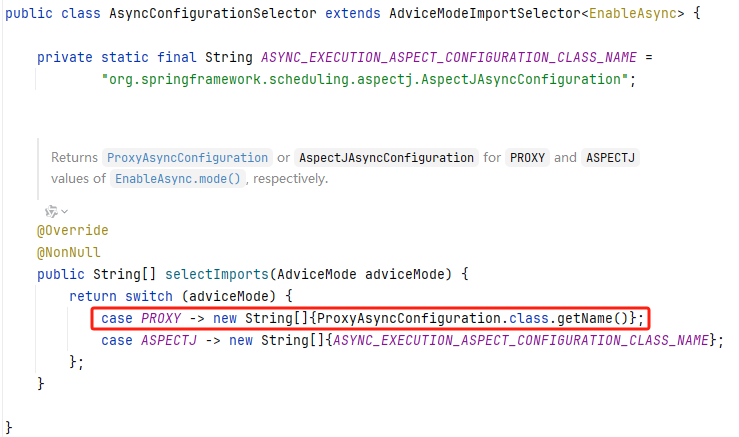
因为是 AdviceMode.PROXY,所以走的红框中的代码,我们继续看这个 ProxyAsyncConfiguration
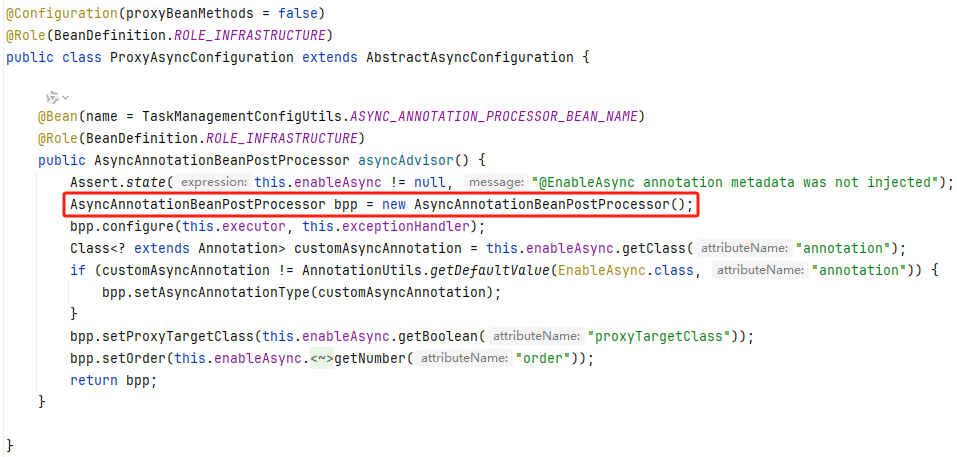
这个类里注册了一个 AsyncAnnotationBeanPostProcessor 类,并且调用了 configure 方法把 executor 和 exceptionHandler 传入,这个executor 和 exceptionHandler 是哪来的呢,在它的抽象父类 AbstractAsyncConfiguration 里赋的值,我们看下 AbstractAsyncConfiguration 的 setConfigurers 方法
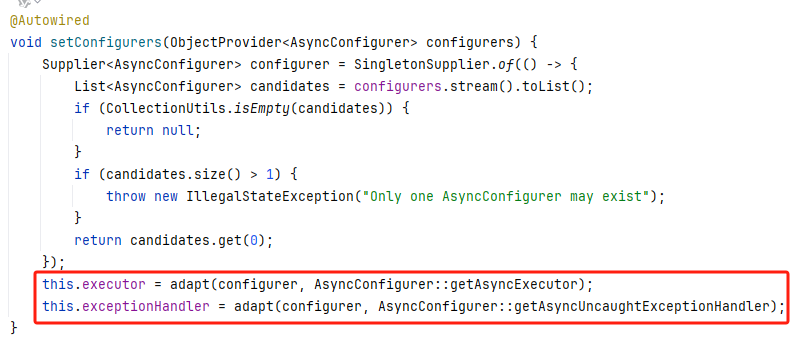
可以看到,就是我们之前 2.2.2 中用到的AsyncConfigurer,只要我们定义了实现了 AsyncConfigurer 接口的Bean,这里就把它的两个方法作为函数式接口赋值到 executor 和 exceptionHandler 里,后面会用上
现在我们再回头看下 AsyncAnnotationBeanPostProcessor 的类图
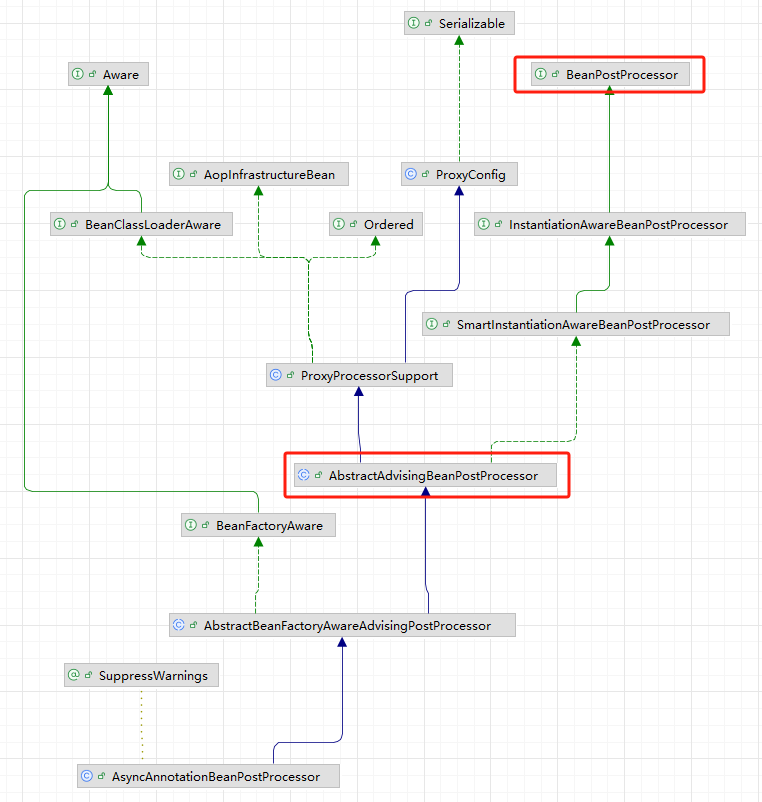
他是一个继承了 AbstractAdvisingBeanPostProcessor 抽象类的 BeanPostProcessor(想了解BeanPostProcessor的可以看我的另一篇文章:Spring后置处理器BeanFactoryPostProcessor与BeanPostProcessor源码解析),这个 AbstractAdvisingBeanPostProcessor 其实是 Spring AOP体系结构中非常重要的一个类,当我们想法实现一个切面的时候,可以扩展这个类,实现自己的Advisor,就可以在 postProcessAfterInitialization 方法里根据需要创建代理类,这里我们看看 AsyncAnnotationBeanPostProcessor 是如何实现这个 Advisor 的,可以在 AsyncAnnotationBeanPostProcessor 的 setBeanFactory 方法里找到,如下:
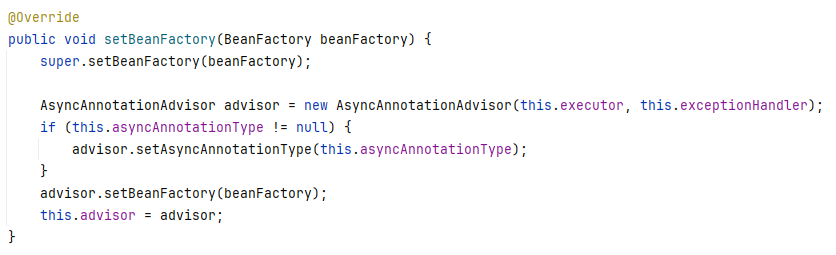
这个创建了一个 AsyncAnnotationAdvisor,并把上文提到的 executor 和 exceptionHandler 两个函数式接口传入 ,我们看下 AsyncAnnotationAdvisor 的这个构造函数
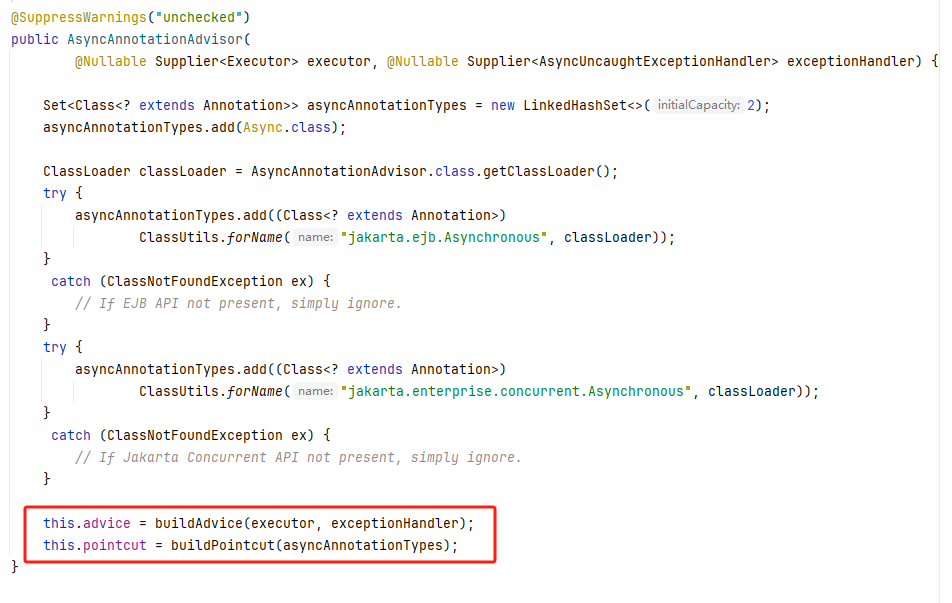
可以看到构建了 advice 和 pointcut,这两个可以简单理解为 advice 定义了要执行的代码,而pointcut 定义了在哪里执行这些代码,这个 pointcut 很简单,我们可以到传进去的 Annotation 集合就是 Async,表示带 @Async 注解的就是切点,下面重点看下 advice,跟进下 buildAdvice 方法

这里创建了 AnnotationAsyncExecutionInterceptor 并调用了 configure 方法,我们先看下 AnnotationAsyncExecutionInterceptor 的类图
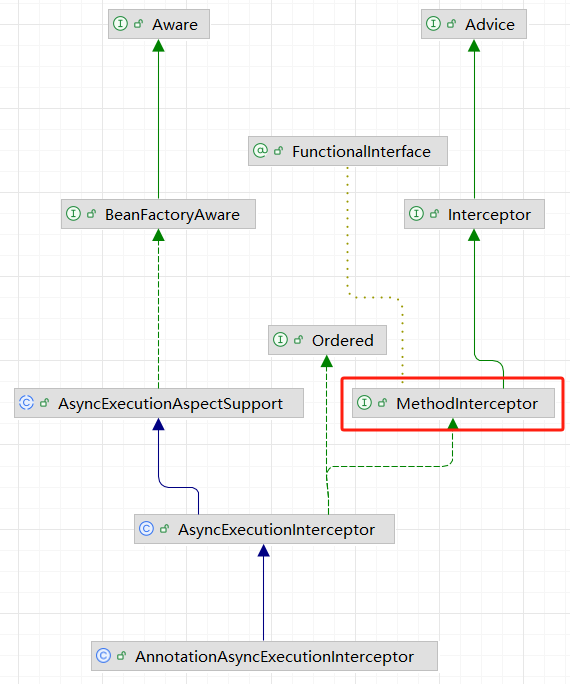
可以看到 AnnotationAsyncExecutionInterceptor 是实现了 MethodInterceptor 接口的,所以在调用被代理方法前,会先调用其 invoke 方法,我们在其父类 AsyncExecutionInterceptor 里找到这个 invoke 方法
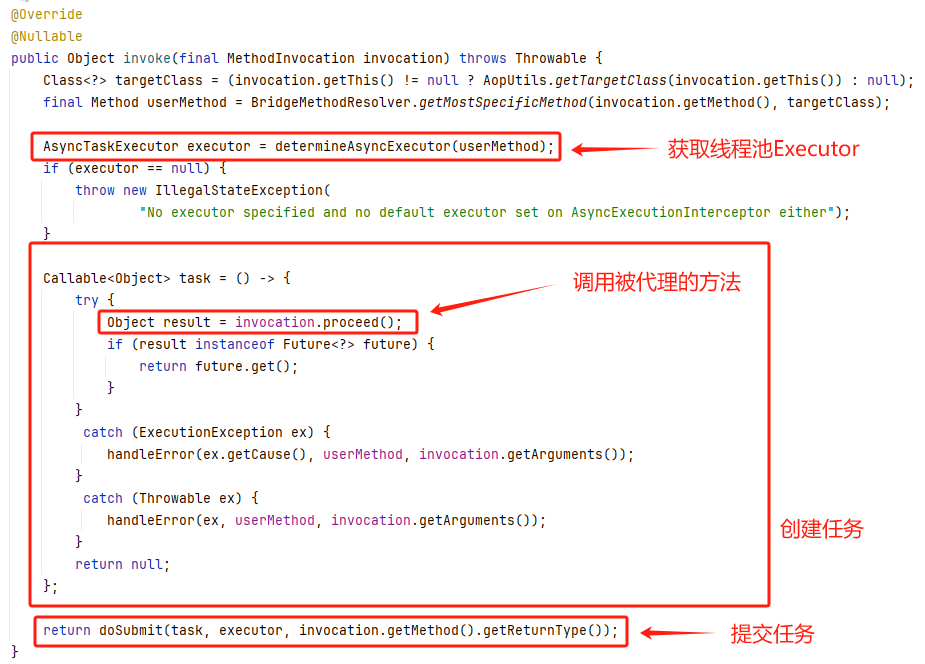
可以看到先获取 Executor,然后创线程任务,任务中调用了被代理的方法,最后把任务提交到线程池中,所以加上 @Async 注解的方法会在线程池中异步执行,下面我们重点看看这个 Executor 是怎么获取的,跟进 determineAsyncExecutor 方法
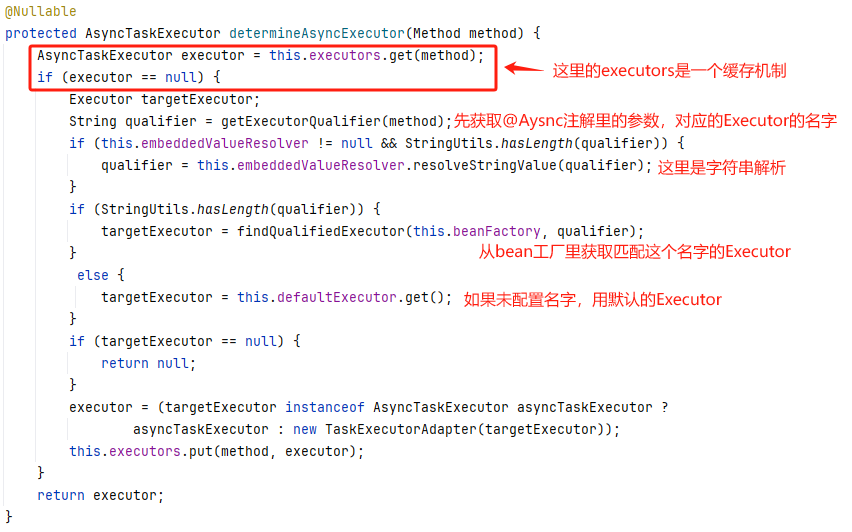
可以看到,如果 @Async 后配置了线程池的名字,会从bean工厂里找对应的 Executor 返回,否则返回默认的 Executor,我们再来看默认的 Executor 是什么,回头看 AnnotationAsyncExecutionInterceptor 的 configure 方法,在其父类 AsyncExecutionAspectSupport 里

传进来的 defaultExecutor 和 exceptionHandler 就是我们之前提到的 AsyncConfigurer 实现类的两个函数式接口,再贴个图,防止大家忘了
defaultExecutor 如果没有,会调用 getDefaultExecutor 方法,exceptionHandler 如果没有,会默认使用 SimpleAsyncUncaughtExceptionHandler ,我们看下 getDefaultExecutor 方法
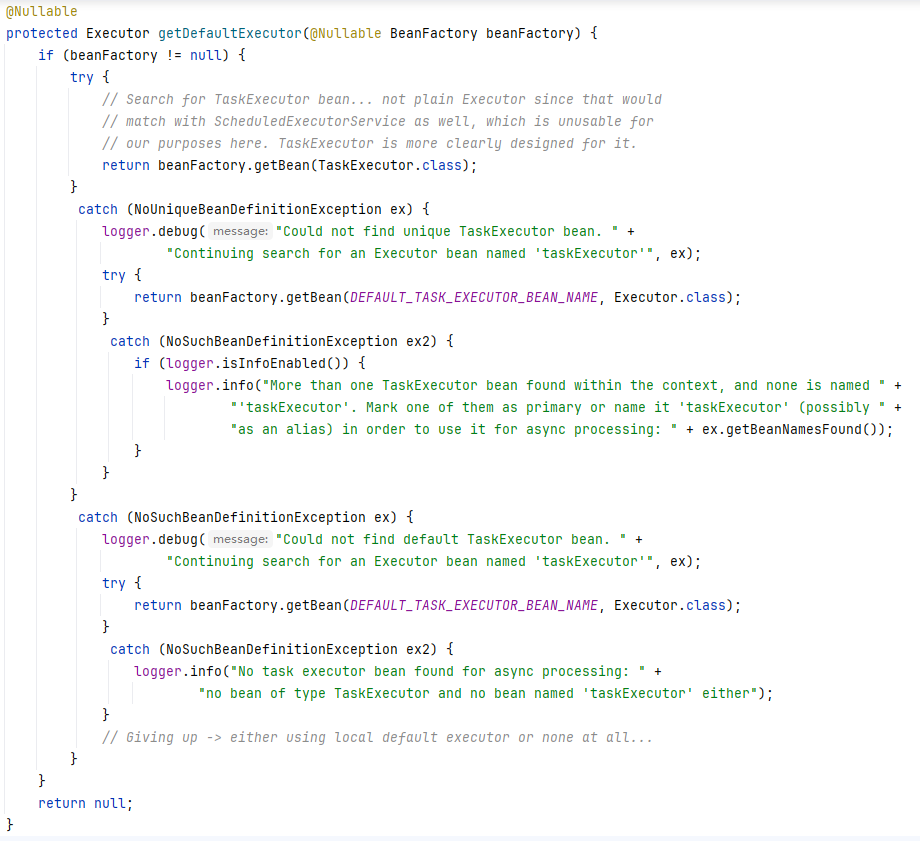
先获取 TaskExecutor 类型的线程池,如果获取不到,会获取名为 taskExecutor 的 Executor 类型的线程池(DEFAULT_TASK_EXECUTOR_BEAN_NAME = “taskExecutor”)
四、总结
其实 @Async 注解就是利用 Spring AOP 给类加了代理,当需要执行带 @Async 的方法时,会将其包装成 task 提交到线程池中异步执行,如果在 @Async 注解上定义线程池的名字,会用对应的线程池执行,否则使用 AsyncConfigurer 实现类中的 getAsyncExecutor 方法返回的 Executor 执行,如果未配置 AsyncConfigurer 实现类,则使用 TaskExecutionAutoConfiguration 配置类创建的 Executor 执行