Docker部署Elasticsearch8.6.0 Kibana8.6.0
(1)Docker部署Elasticsearch8.5.3(失败…)
为了匹配springboot3.0.x,安装Elasticsearch:8.5.3

拉取镜像,遇到问题!
[root@server01 ~]# docker pull elasticsearch:8.5.3
8.5.3: Pulling from library/elasticsearch
eaead16dc43b: Retrying in 1 second
a405acf5b7d4: Retrying in 1 second
3c517520ec4f: Retrying in 1 second
25929c7646b5: Waiting
c5536f643c70: Waiting
4d086f328ed5: Waiting
7ba5f6dc1b84: Waiting
f61b0936755b: Waiting
dbdbfbe00efb: Waiting
error pulling image configuration: download failed after attempts=6: dial tcp 103.240.182.55:443: connect: connection refused
原来很多国内镜像加速器都停止服务了…
https://gist.github.com/y0ngb1n/7e8f16af3242c7815e7ca2f0833d3ea6

https://segmentfault.com/q/1010000044951309

解决方案
修改镜像文件/etc/docker/daemon.json
{"registry-mirrors": ["https://ustc-edu-cn.mirror.aliyuncs.com/","https://ccr.ccs.tencentyun.com/","https://docker.m.daocloud.io/"]
}
//重启docker
sudo systemctl daemon-reload
sudo systemctl restart docker

https://dockerproxy.com/
2024.07.22更新:
(2)Docker部署Elasticsearch8.6.0
安装Elasticsearch:8.6.0
# (1)创建并运行一个名为 "es1" 的临时Elasticsearch容器
docker run -d --name es1  \
-e "ES_JAVA_OPTS=-Xms512m -Xmx512m"    \
-e "discovery.type=single-node"  \
--privileged   \
-p 9200:9200 \
-p 9300:9300  \
elasticsearch:8.6.0# (2)复制 Elasticsearch 容器的相关数据到本地持久化的文件夹(原来要这样。。。)
docker cp es1:/usr/share/elasticsearch/data/ /mountdata/elasticsearch8/
docker cp es1:/usr/share/elasticsearch/plugins/ /mountdata/elasticsearch8/
docker cp es1:/usr/share/elasticsearch/logs/ /mountdata/elasticsearch8/
docker cp es1:/usr/share/elasticsearch/config/ /mountdata/elasticsearch8/# (3)删除原 Elasticsearch 容器
docker rm -f es1# (4)利用本地持久化数据和配置创建新的 Elasticsearch 容器
docker run -d \
--name=elasticsearch8 \
-e "ES_JAVA_OPTS=-Xms512m -Xmx512m" \
-e "discovery.type=single-node" \
-v /mountdata/elasticsearch8/data:/usr/share/elasticsearch/data \
-v /mountdata/elasticsearch8/plugins:/usr/share/elasticsearch/plugins \
-v /mountdata/elasticsearch8/logs:/usr/share/elasticsearch/logs \
-v /mountdata/elasticsearch8/config:/usr/share/elasticsearch/config \
--privileged=true \
--network=hmall \
--restart=always \
-p 9200:9200 \
-p 9300:9300 \
elasticsearch:8.6.0//(5)修改权限
chmod 777 /mountdata/elasticsearch8/**# 进入到nginx容器内部
docker exec -it elasticsearch8 bash# 查看日志
docker logs -f  elasticsearch8
访问:http://192.168.200.131:9200/不成功
修改配置


改为false
cluster.name: "docker-cluster"
network.host: 0.0.0.0#----------------------- BEGIN SECURITY AUTO CONFIGURATION -----------------------
#
# The following settings, TLS certificates, and keys have been automatically
# generated to configure Elasticsearch security features on 21-07-2024 11:30:48
#
# --------------------------------------------------------------------------------# Enable security features
xpack.security.enabled: falsexpack.security.enrollment.enabled: false# Enable encryption for HTTP API client connections, such as Kibana, Logstash, and Agents
xpack.security.http.ssl:enabled: falsekeystore.path: certs/http.p12# Enable encryption and mutual authentication between cluster nodes
xpack.security.transport.ssl:enabled: falseverification_mode: certificatekeystore.path: certs/transport.p12truststore.path: certs/transport.p12
#----------------------- END SECURITY AUTO CONFIGURATION -------------------------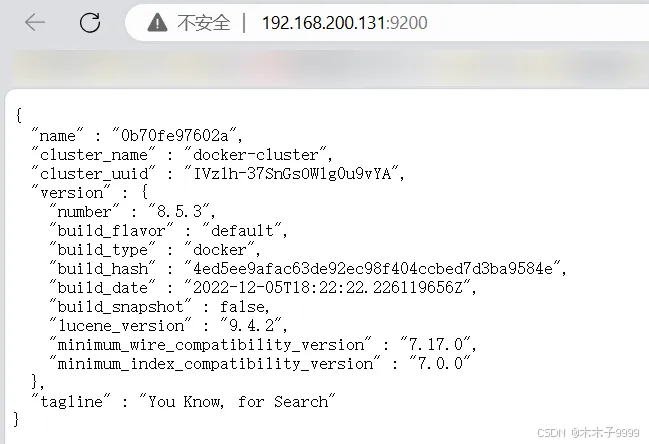
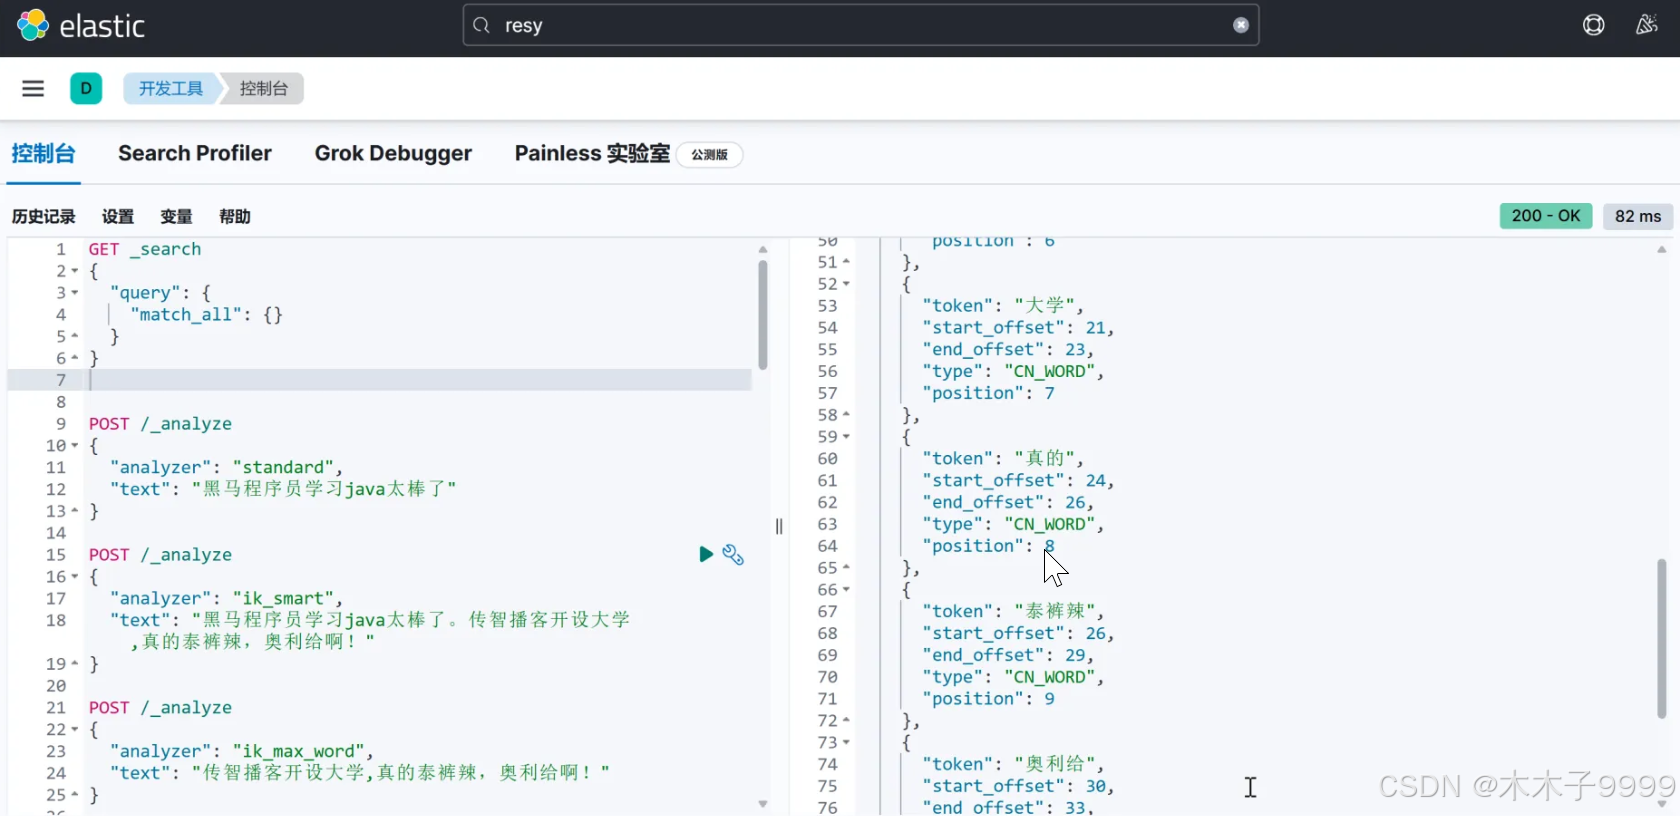
(3)安装ik分词器
到官网下载,解压(注意:要与es版本一致!!!!!!踩过坑…)

将其重命名为ik,并上传到如下目录:


ext.dic
传智播客
泰裤辣
奥利给
神金饼
蒜了
stopword.dic
a
an
and
are
as
at
be
but
by
for
if
in
into
is
it
no
not
of
on
or
such
that
the
their
then
there
these
they
this
to
was
will
with
啊
啦
呢
哦
IKAnalyzer.cfg.xml
<?xml version="1.0" encoding="UTF-8"?>
<!DOCTYPE properties SYSTEM "http://java.sun.com/dtd/properties.dtd">
<properties><comment>IK Analyzer 扩展配置</comment><!--用户可以在这里配置自己的扩展字典 --><entry key="ext_dict">ext.dic</entry><!--用户可以在这里配置自己的扩展停止词字典--><entry key="ext_stopwords">stopword.dic</entry><!--用户可以在这里配置远程扩展字典 --><!-- <entry key="remote_ext_dict">words_location</entry> --><!--用户可以在这里配置远程扩展停止词字典--><!-- <entry key="remote_ext_stopwords">words_location</entry> -->
</properties>
(4)Docker部署kibana:8.6.0
docker rmi kibana:8.6.0docker pull kibana:8.6.0[root@server01 ~]# docker pull kibana:8.6.0
8.6.0: Pulling from library/kibana
846c0b181fff: Already exists
d9d4723b53e8: Pull complete
3ce175049527: Pull complete
c5a9d626f54a: Pull complete
ce0bd3b890fe: Pull complete
4f4fb700ef54: Pull complete
1cb2fe49dd32: Pull complete
7cbec743e1ac: Pull complete
de07a2df0c3f: Pull complete
f138fef302e6: Pull complete
c6afac2b2f31: Pull complete
53c0672d0212: Pull complete
7522efaa8c9c: Pull complete
5e8db7e50c16: Pull complete
Digest: sha256:71d8a59d32b181c3b3c04a4fecf2197f00eb381659510d04261c2cd5d43a0225
Status: Downloaded newer image for kibana:8.6.0
docker.io/library/kibana:8.6.0
参考:https://blog.csdn.net/Jjs_Object/article/details/119873191
//(1)新建kibana临时容器
docker run -d \
--name kibana \
-e ELASTICSEARCH_HOSTS=http://elasticsearch8:9200 \
--network=hmall \
-p 5601:5601  \
kibana:8.6.0//(2)复制config文件夹中的文件到宿主机上
docker cp kibana:/usr/share/kibana/config/ /mountdata/kibana/config//
[root@server01 ~]# docker inspect elasticsearch8
"IPAddress": "172.18.0.4"//修改kibana.yml
server.name: kibana
server.host: "0.0.0.0"
elasticsearch.hosts: [ "http://172.18.0.4:9200" ]
monitoring.ui.container.elasticsearch.enabled: true
i18n.locale: zh-CN//(3)修改config目录访问权限
chmod 777 /mountdata/kibana/config/**//(4)删除临时容器
docker rm -f kibana//(5)新建kibana容器并启动docker run -d \
--name kibana \
--network=hmall \
-p 5601:5601  \
-v /mountdata/kibana/config:/usr/share/kibana/config \
kibana:8.6.0//(6)查看kibana容器日志
docker logs -f kibana
访问http://192.168.200.131:5601/,成功!


(5)安装elasticsearch-head插件
docker pull mobz/elasticsearch-head:5-alpinedocker run -d \
--name=elasticsearch-head \
-p 9100:9100 \
mobz/elasticsearch-head:5-alpinedocker exec -it elasticsearch-head /bin/sh
vim _site/vendor.js
http://192.168.200.131:9100/
连接:http://192.168.200.131:9200/

