内核实验(三):编写简单Linux内核模块,使用Qemu加载ko做测试
文章目录
- 一、篇头
- 二、QEMU:挂载虚拟分区
- 2.1 创建 sd.ext4.img 虚拟分区
- 2.2 启动 Qemu
- 2.3 手动挂载 sd.ext4.img
- 三、实现一个简单的KO
- 3.1 目录文件
- 3.2 Makefile
- 3.3 编译
- 3.3.1 编译打印
- 3.3.2 生成文件
- 3.4 检查:objdump
- 3.4.1 objdump -dS test\_1.ko
- 3.4.2 objdump -dS test\_2.ko
- 四、部署
- 五、加载并测试
- 5.1 启动 Qemu 并挂载
- 5.2 手动挂载 sd.ext4.img
- 5.3 加载 ko modules
一、篇头
为了学习Linux内核,限制于自己的编译服务器性能较弱,不便于使用Android源码进行编译;退而求其次,自己制作一个小型的linux系统,并通过Qemu来运行。使用Qemu模拟能获得更快的调试速度(只有kernel源码,编译自然比AOSP快N个倍啦!),甚至可以使用gdb进行断点调试,本文基于内核实验的前两篇文章,通过创建虚拟分区的笨方法进行测试,贵在简单。
二、QEMU:挂载虚拟分区
使用挂载虚拟分区的方式,可以和host交换文件,即作为共享分区,但缺点是不能实现文件同步。每次操作,需要host编辑好(将需要的文件放置到sd.ext4.img),再让Qemu虚拟机重新挂载sd.ext4.img。
2.1 创建 sd.ext4.img 虚拟分区
$dd if=/dev/zero of=./sd.ext4.img bs=1M count=32
$mkfs.ext4 sd.ext4.img
$mkdir sd_ext4
$sudo mount -o loop sd.ext4.img sd_ext4
$cd  sd_ext4
$sudo touch 123.txt
$umount sd_ext4
2.2 启动 Qemu
- 增加 -sd sd.ext4.img
szhou@bc01:~/works/qemu_linux/linux-stable$ qemu-system-arm -nographic -M vexpress-a9 -m 1024M -kernel arch/arm/boot/zImage -initrd ../busybox-stable/rootfs_ext4.img.gz -dtb arch/arm/boot/dts/vexpress-v2p-ca9.dtb -sd sd.ext4.img
2.3 手动挂载 sd.ext4.img
- 透过 -sd 参数挂载,即sd-card,默认的设备节点为/dev/mmcblk0
/ # mount -t ext4 /dev/mmcblk0 /mnt
- 查看
/mnt # ls
123.txt      lost+found
/mnt #
三、实现一个简单的KO
这一节,我们将同时实现两个简单的KO文件,并利用局部编译(模块编译)来编译他们。
3.1 目录文件
szhou@bc01:~/works/qemu_linux/linux-stable$ tree my_kmodules -L 2
my_kmodules
├── Makefile
├── test_1.c
└── test_2.c0 directories, 3 files
szhou@bc01:~/works/qemu_linux/linux-stable$
3.2 Makefile
KDIR := /home/szhou/works/qemu_linux/linux-stable
obj-m := test_1.o test_2.o
all :$(MAKE) -C $(KDIR) M=$(PWD) modules
clean:$(MAKE) -C $(KDIR) SUBDIRS=$(PWD) cleanrm -f *.ko
3.3 编译
3.3.1 编译打印
szhou@bc01:~/works/qemu_linux/linux-stable/my_kmodules$ make
make -C /home/szhou/works/qemu_linux/linux-stable M=/home/szhou/works/qemu_linux/linux-stable/my_kmodules modules
make[1]: Entering directory '/home/szhou/works/qemu_linux/linux-stable'CC [M]  /home/szhou/works/qemu_linux/linux-stable/my_kmodules/test_1.oCC [M]  /home/szhou/works/qemu_linux/linux-stable/my_kmodules/test_2.oMODPOST /home/szhou/works/qemu_linux/linux-stable/my_kmodules/Module.symversCC [M]  /home/szhou/works/qemu_linux/linux-stable/my_kmodules/test_1.mod.oLD [M]  /home/szhou/works/qemu_linux/linux-stable/my_kmodules/test_1.koCC [M]  /home/szhou/works/qemu_linux/linux-stable/my_kmodules/test_2.mod.oLD [M]  /home/szhou/works/qemu_linux/linux-stable/my_kmodules/test_2.ko
make[1]: Leaving directory '/home/szhou/works/qemu_linux/linux-stable'
szhou@bc01:~/works/qemu_linux/linux-stable/my_kmodules$
3.3.2 生成文件
szhou@bc01:~/works/qemu_linux/linux-stable$ tree my_kmodules -L 2
my_kmodules
├── Makefile
├── modules.order
├── Module.symvers
├── test_1.c
├── test_1.ko
├── test_1.mod
├── test_1.mod.c
├── test_1.mod.o
├── test_1.o
├── test_2.c
├── test_2.ko
├── test_2.mod
├── test_2.mod.c
├── test_2.mod.o
└── test_2.o0 directories, 15 files
szhou@bc01:~/works/qemu_linux/linux-stable$
3.4 检查:objdump
通过反编译ko文件,确认Makefile实现无问题,test_1.ko和test_2.ko使用各自源文件做了编译。
3.4.1 objdump -dS test_1.ko
szhou@bc01:~/works/qemu_linux/linux-stable/my_kmodules$ arm-linux-gnueabi-objdump -dS test_1.ko test_1.ko:     file format elf32-littlearmDisassembly of section .init.text:00000000 <init_module>:
#include <linux/module.h>static int __init test_1_init(void)
{0:   e92d4010        push    {r4, lr}printk(KERN_EMERG "test_1_init\n");4:   e3000000        movw    r0, #08:   e3400000        movt    r0, #0c:   ebfffffe        bl      0 <_printk>return 0;
}10:   e3a00000        mov     r0, #014:   e8bd8010        pop     {r4, pc}Disassembly of section .exit.text:00000000 <cleanup_module>:static void __exit test_1_exit(void)
{printk("test_1_exit\n");0:   e3000000        movw    r0, #04:   e3400000        movt    r0, #08:   eafffffe        b       0 <_printk>Disassembly of section .plt:0000000c <.plt>:...
szhou@bc01:~/works/qemu_linux/linux-stable/my_kmodules$
3.4.2 objdump -dS test_2.ko
szhou@bc01:~/works/qemu_linux/linux-stable/my_kmodules$ arm-linux-gnueabi-objdump -dS test_2.ko  test_2.ko:     file format elf32-littlearmDisassembly of section .init.text:00000000 <init_module>:
#include <linux/module.h>static int __init test_2_init(void)
{0:   e92d4010        push    {r4, lr}printk(KERN_EMERG "test_2_init\n");4:   e3000000        movw    r0, #08:   e3400000        movt    r0, #0c:   ebfffffe        bl      0 <_printk>return 0;
}10:   e3a00000        mov     r0, #014:   e8bd8010        pop     {r4, pc}Disassembly of section .exit.text:00000000 <cleanup_module>:static void __exit test_2_exit(void)
{printk("test_2_exit\n");0:   e3000000        movw    r0, #04:   e3400000        movt    r0, #08:   eafffffe        b       0 <_printk>Disassembly of section .plt:0000000c <.plt>:...
szhou@bc01:~/works/qemu_linux/linux-stable/my_kmodules$
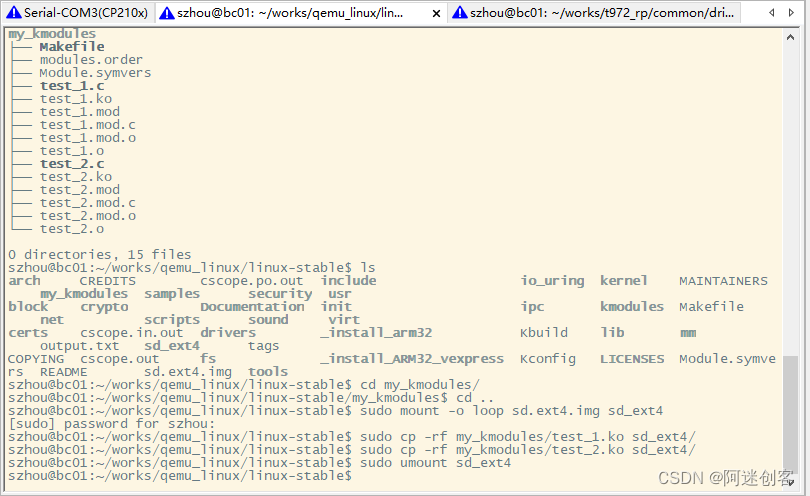
四、部署
如下在host机器上,挂载SD虚拟分区,并将KO文件复制到分区内。
#(1)返回linux kernel source code 根目录
szhou@bc01:~/works/qemu_linux/linux-stable/my_kmodules$ cd ..#(2)使用sudo权限,挂载 sd.ext4.img 虚拟分区到sd_ext4目录
szhou@bc01:~/works/qemu_linux/linux-stable$ sudo mount -o loop sd.ext4.img sd_ext4
[sudo] password for szhou: #(3)复制编译好的ko文件到虚拟分区中
szhou@bc01:~/works/qemu_linux/linux-stable$ sudo cp -rf my_kmodules/test_1.ko sd_ext4/
szhou@bc01:~/works/qemu_linux/linux-stable$ sudo cp -rf my_kmodules/test_2.ko sd_ext4/ #(4) 卸载
szhou@bc01:~/works/qemu_linux/linux-stable$ sudo umount sd_ext4
szhou@bc01:~/works/qemu_linux/linux-stable$
- 操作如下图所示
五、加载并测试
5.1 启动 Qemu 并挂载
- 增加 -sd sd.ext4.img
szhou@bc01:~/works/qemu_linux/linux-stable$ qemu-system-arm -nographic -M vexpress-a9 -m 1024M -kernel arch/arm/boot/zImage -initrd ../busybox-stable/rootfs_ext4.img.gz -dtb arch/arm/boot/dts/vexpress-v2p-ca9.dtb -sd sd.ext4.img / # mount -t ext4 /dev/mmcblk0 /mnt
5.2 手动挂载 sd.ext4.img
/ # mount -t ext4 /dev/mmcblk0  /mnt
EXT4-fs (mmcblk0): mounted filesystem with ordered data mode. Opts: (null). Quota mode: disabled.
/ # ls
bin         etc         lost+found  proc        sys         usr
dev         linuxrc     mnt         sbin        tmp
/ # cd /mnt/
/mnt # ls
111.txt     lost+found  test_1.ko   test_2.ko
/mnt #
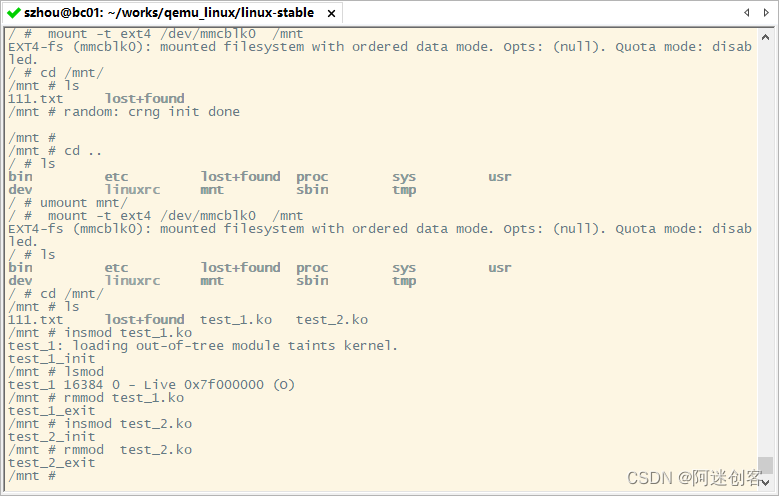
5.3 加载 ko modules
#(1)查看SD虚拟分区
/ # cd /mnt/
/mnt # ls
111.txt     lost+found  test_1.ko   test_2.ko#(2)测试 test_1.ko
/mnt # insmod test_1.ko
test_1: loading out-of-tree module taints kernel.
test_1_init
/mnt # lsmod
test_1 16384 0 - Live 0x7f000000 (O)
/mnt # rmmod test_1.ko
test_1_exit#(3)测试 test_2.ko
/mnt # insmod test_2.ko
test_2_init
/mnt # rmmod  test_2.ko
test_2_exit
/mnt #
- 运行效果下图所示