Face_recognition实现人脸识别
这里写自定义目录标题
- 欢迎使用Markdown编辑器
- 一、安装人脸识别库face_recognition
- 1.1 安装cmake
- 1.2 安装dlib库
- 1.3 安装face_recognition
- 二、3个常用的人脸识别案例
- 2.1 识别并绘制人脸框
- 2.2 提取并绘制人脸关键点
- 2.3 人脸匹配及标注
欢迎使用Markdown编辑器
本文基于face_recognition库实现图像人脸识别,下面将介绍如何安装face_recognition库,并细述3个常用的人脸识别案例。
一、安装人脸识别库face_recognition
Face_recognition的安装不同于其他package,它需要依赖dlib库(dlib库的安装又依赖于cmake库),所以装face_recognition之前需要先安装前二者,整个安装过程还是挺耗费时间精力的。我的python环境是python3.7+Anaconda。
1.1 安装cmake
pip install cmake -i https://pypi.tuna.tsinghua.edu.cn/simple/
借助清华源的资源安装,通常下载速度会比较快,且不会中断。
1.2 安装dlib库
dlib-19.17.99-cp37-cp37m-win_amd64.whl 密码 79rt
下载后直接安装该whl文件
pip install dlib-19.17.99-cp37-cp37m-win_amd64.whl
直接在线pip install dlib,不知为何会报错,所以从网站上下载好安装包进行离线安装。
1.3 安装face_recognition
pip install face_recognition -i https://pypi.tuna.tsinghua.edu.cn/simple/
二、3个常用的人脸识别案例
本章主要介绍face_recognition下3个常用的人脸识别方法及案例,它们所依赖的库函数如下:
import os
import face_recognition as fr
from PIL import Image, ImageDraw, ImageFont
import matplotlib.pyplot as plt
import dlib
import numpy as np
2.1 识别并绘制人脸框
 其中,face_locations(img, number_of_times_to_upsample=1, model=“hog”) 方法为实现该demo的关键,该方法用于提取图像img中的人脸特征并返回所有人脸框坐标list。
def draw_face_rect(self):self.img = fr.load_image_file(pic) # 读图#(1)识别人脸框所在坐标faces = fr.face_locations(self.img) # 也可使用cnn识别# faces = fr.face_locations(self.img, number_of_times_to_upsample=0, model="cnn")#(2)创建展示结果的图像pil_img = Image.fromarray(self.img)draw = ImageDraw.Draw(pil_img)#(3)依次绘制人脸框for face in faces:top, right, bottom, left = facedraw.rectangle(((left, top), (right, bottom)), outline=(0,255,0))del drawplt.imshow(pil_img)plt.axis('off')plt.show()
- 入参img,必填,输入要求为图像阵列形式(numpy array);
- 入参number_of_times_to_upsample,default为1,设定上采样检测人脸的次数,数值越大越便于检测到更小的人脸;
- 入参model,default为’hog’,选择人脸检测模型。‘hog’即Histogram of Oriented Gradient(方向梯度直方图),它通过计算和统计图像局部区域的梯度方向直方图来构成特征,该方法精度略低但性能更快(仅使用CPU时);也可选用’cnn’ 即(卷积神经网络),cnn作为深度学习模型具有更高的识别精度,当然如果有GPU或CUDA环境加速的话更好;
- 返回值,人脸框坐标list,表示为[face_1, face_2, …face_n],其中每张人脸框包含的元组信息face_i = (top, right, bottom, left),即依次是人脸框的上、右、下、左坐标。
注意: 图2中还有好些没能识别到的人脸,个人感觉有两个原因:其一,人脸占比太小,脸部特征不明显导致无法提取到,比如右上角的双胞胎;另一,脸部肤色、亮度、细节等不符合正常人脸特征导致算法不认为是人脸,比如绿巨人和左下角的独眼。
2.2 提取并绘制人脸关键点
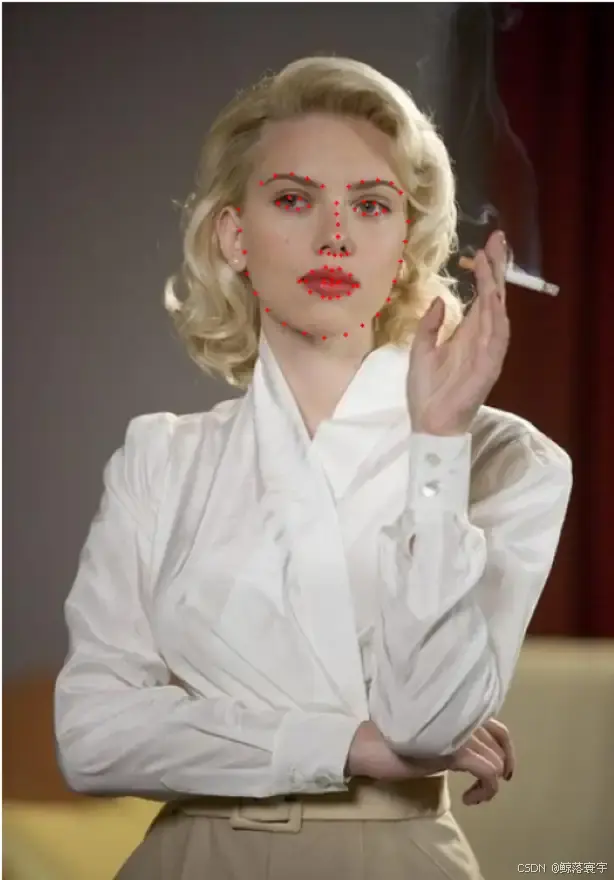
检测结果如上,其中红点代表face_recognition能提取到的人脸关键点(眼、眉、鼻、嘴、面部轮廓),实现代码如下
def draw_face_landmarks(self):face_marks = fr.face_landmarks(self.img)pil_img = Image.fromarray(self.img)draw = ImageDraw.Draw(pil_img)for face_mark in face_marks:for key in face_mark.keys():for pt in face_mark[key]:draw.ellipse(((pt[0]-4, pt[1]-4),(pt[0]+4, pt[1]+4)), outline=(255,0,0), width=6)del drawplt.imshow(pil_img)plt.axis('off')plt.show()
- 入参img,必填,输入要求为图像阵列形式(numpy array);
- 入参face_locations,default为None,表示可选择性的提供人脸坐标list用于check;
- 入参model,default为"large",用于选择"large"或"small"模型。其中"small"模型速度更快但是仅返回5个关键点;
- 返回值,所有人脸的关键点list。其中每张人脸landmarks为一个字典,具体键和值如下:
{"chin": points[0:17],
"left_eyebrow": points[17:22],
"right_eyebrow": points[22:27],
"nose_bridge": points[27:31],
"nose_tip": points[31:36],
"left_eye": points[36:42],
"right_eye": points[42:48],
"top_lip": points[48:55] + [points[64]] + [points[63]] + [points[62]] + [points[61]] + [points[60]],
"bottom_lip": points[54:60] + [points[48]] + [points[60]] + [points[67]] + [points[66]] + [points[65]] + [points[64]]}
其中face_landmarks(face_image, face_locations=None, model=“large”)方法为实现该demo的关键,该方法用于提取图像img中的人脸特征并返回所有人脸的关键点list.
2.3 人脸匹配及标注
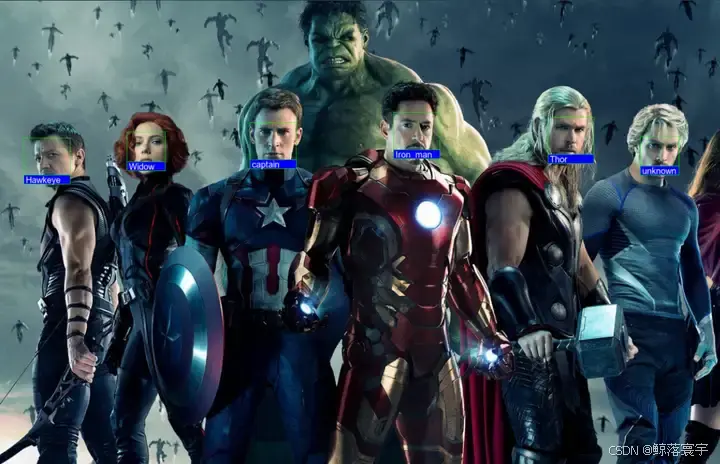
检测结果如上,其中绿框代表算法识别到的人脸,框底部还标注了每个人物的名称(绿巨人一如既往地没识别出来),实现代码如下
def match_faces(self):faces = fr.face_locations(self.img)face_encodings = fr.face_encodings(self.img, faces)self.load_known_faces()pil_img = Image.fromarray(self.img)draw = ImageDraw.Draw(pil_img)for (top, right, bottom, left), cur_encoding in zip(faces, face_encodings):# matches = fr.compare_faces(self.encoding_list, cur_encoding) name = 'unknown'# 计算已知人脸和未知人脸特征向量的距离,距离越小表示两张人脸为同一个人的可能性越大distances = fr.face_distance(self.encoding_list, cur_encoding)match_index = np.argmin(distances)if matches[match_index]:name = self.name_list[match_index]# 绘制匹配到的人脸信息draw.rectangle(((left, top), (right, bottom)), outline=(0, 255, 0))text_width, text_height = draw.textsize(name)font = ImageFont.truetype('arial.ttf', 20)draw.rectangle(((left, bottom - text_height - 10), (right, bottom)), fill=(0, 0, 255), outline=(0, 255, 0))draw.text((left + 5, bottom - text_height - 10), name, fill=(255, 255, 255, 255), font=font)del drawplt.imshow(pil_img)plt.axis('off')plt.show()
其中,face_encodings()、compare_faces()、face_distance()三个方法的释义如下:
(1) face_encodings()
完整形式为face_encodings(face_image, known_face_locations=None, num_jitters=1, model=“small”),用于提取图像face_image中的人脸特征,并返回每张人脸的128维人脸编码组成的list;
-
入参face_image,必填,输入要求为图像阵列形式(numpy array);
-
入参known_face_locations,default为None,表示可选择性的提供人脸坐标list用于check;
-
入参num_jitters,default为1,表示在计算人脸编码时需要重新采样计算的次数。数值越大采样次数越多、结果越精确,但是耗时越久;
-
返回值为所有人脸的128维人脸编码组成的list。
(2) compare_faces()
完整形式为compare_faces(known_face_encodings, face_encoding_to_check, tolerance=0.6),用于比较待确认的face_encoding与已知的known_face_encodings列表中各元素的匹配程度,并返回对应长度的布尔列表;
-
入参known_face_encodings,已知的人脸编码列表,本文在self.load_known_faces()方法中读取得到;
-
入参face_encoding_to_check,待check的人脸编码;
-
入参tolerance,default为0.6,定义两张人脸之间距离数值为多少时可用于表示图像匹配,通常数值越小表明匹配越严格,0.6为经验最优值;
-
返回值为待确认的face_encoding与已知的人脸编码列表中各元素的match结果列表,形式如[False, False, True, False, False]。
(3)face_distance()
完整形式为face_distance(face_encodings, face_to_compare),同compare_faces(),用于比较待比较的face_encoding与已知的face_encodings列表中各元素的匹配程度,并返回对应长度的数值列表;
-
入参face_encodings,已知的人脸编码列表;
-
入参face_to_compare,待check的人脸编码;
-
返回值为待确认的face_encoding与已知的人脸编码列表中各元素的match结果列表,形式如[0.79155519 0.74486473 0.45825189 0.78371348 0.99910555],各元素值范围为[0,1]。