基于opencv的斜光测距及python实现
1.前言
最近做了一个基于opencv的斜光测距的小项目,东西不多,但是很有意思,值得拿出来学一学。项目里面需要比较精确的定位功能,将前人matlab代码移植到python上,并且做了一些优化,简化逻辑(毕竟我是专业的程序员),也用了tkinter界面包装了一下,最后通过pyinstaller打包成程序给同事使用。
2.原理
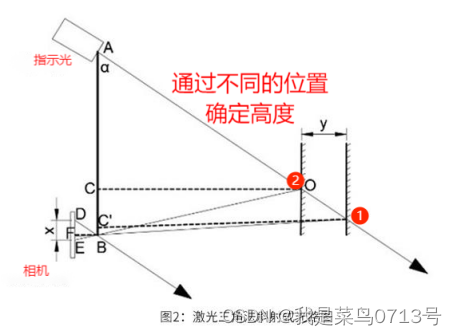
通过使用不同的亮点位置和对应的高度进行多元线性回归建模,再对新的亮点位置进行高度预测。
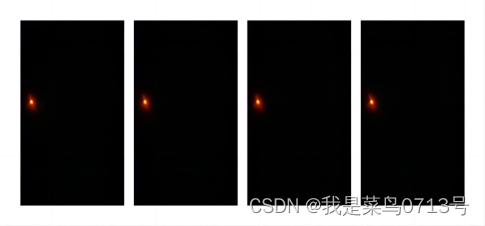
如图分别是14,14.5,15,15.5对应的四张光点位置图。
3.获取亮点位置
def get_box(image):# 将图像转换为灰度图像gray = cv2.cvtColor(image, cv2.COLOR_BGR2GRAY)# 应用高斯模糊来减少噪声blurred = cv2.GaussianBlur(gray, (5, 5), 0)max_val = np.max(blurred)_, binary = cv2.threshold(blurred, max_val/2, 255, cv2.THRESH_BINARY)# 形态学开运算去除噪声kernel = cv2.getStructuringElement(cv2.MORPH_ELLIPSE, (5, 5))opened = cv2.morphologyEx(binary, cv2.MORPH_OPEN, kernel)# 找到轮廓contours, _ = cv2.findContours(opened, cv2.RETR_EXTERNAL, cv2.CHAIN_APPROX_SIMPLE)# 如果找到轮廓,计算质心if contours:largest_contour = max(contours, key=cv2.contourArea)M = cv2.moments(largest_contour)if M["m00"] != 0:cx = int(M["m10"] / M["m00"])cy = int(M["m01"] / M["m00"])else:cx, cy = 0, 0centroid = (cx, cy)# 计算边界框x, y, w, h = cv2.boundingRect(largest_contour)p=10bbox = (x-p, y-p, w+2*p, h+2*p)# 在图像上绘制质心和边界框output_image = image.copy()cv2.circle(output_image, centroid, 5, (0, 255, 0), -1)x,y,w,h=bboxcv2.rectangle(output_image, (x, y), (x + w, y + h), (0, 255, 0), 2)print(f"亮点的中心位置: {centroid},亮点的边界框: {bbox}")return centroid,bbox,output_imageelse:return None
4.建模
不想再安装其它的python包了,就基于numpy写的LineRegression。
class LinearRegression:def __init__(self):self.theta = Nonedef fit(self, X, y):"""训练线性回归模型参数:X:自变量数据,形状为 (m, n),其中 m 是样本数量,n 是特征数量y:因变量数据,形状为 (m, 1)"""# 在 X 前面加一列1,以便于计算截距项X_b = np.c_[np.ones((X.shape[0], 1)), X]# 使用正规方程求解回归系数self.theta = np.linalg.inv(X_b.T @ X_b) @ X_b.T @ ydef predict(self, X):"""对新样本进行预测参数:X:自变量数据,形状为 (m, n),其中 m 是样本数量,n 是特征数量返回值:y_pred:预测的因变量数据,形状为 (m, 1)"""if self.theta is None:raise ValueError("模型未经过训练,请先调用 fit 方法")# 在 X 前面加一列1,以便于计算截距项X_b = np.c_[np.ones((X.shape[0], 1)), X]# 使用训练得到的回归系数进行预测y_pred = X_b @ self.thetareturn y_pred
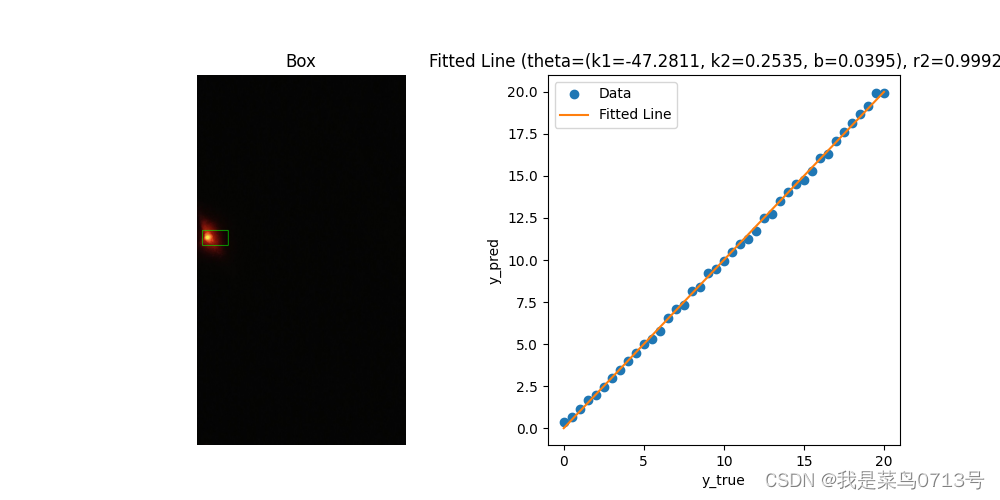
建模效果
5.全部代码
项目地址:https://gitee.com/zhang_jie_sc/auto-focus
import re
import cv2
import numpy as np
import osfrom matplotlib import pyplot as pltdef get_box(image):# 将图像转换为灰度图像gray = cv2.cvtColor(image, cv2.COLOR_BGR2GRAY)# 应用高斯模糊来减少噪声blurred = cv2.GaussianBlur(gray, (5, 5), 0)max_val = np.max(blurred)_, binary = cv2.threshold(blurred, max_val/2, 255, cv2.THRESH_BINARY)# 形态学开运算去除噪声kernel = cv2.getStructuringElement(cv2.MORPH_ELLIPSE, (5, 5))opened = cv2.morphologyEx(binary, cv2.MORPH_OPEN, kernel)# 找到轮廓contours, _ = cv2.findContours(opened, cv2.RETR_EXTERNAL, cv2.CHAIN_APPROX_SIMPLE)# 如果找到轮廓,计算质心if contours:largest_contour = max(contours, key=cv2.contourArea)M = cv2.moments(largest_contour)if M["m00"] != 0:cx = int(M["m10"] / M["m00"])cy = int(M["m01"] / M["m00"])else:cx, cy = 0, 0centroid = (cx, cy)# 计算边界框x, y, w, h = cv2.boundingRect(largest_contour)p=10bbox = (x-p, y-p, w+2*p, h+2*p)# 在图像上绘制质心和边界框output_image = image.copy()cv2.circle(output_image, centroid, 5, (0, 255, 0), -1)x,y,w,h=bboxcv2.rectangle(output_image, (x, y), (x + w, y + h), (0, 255, 0), 2)print(f"亮点的中心位置: {centroid},亮点的边界框: {bbox}")return centroid,bbox,output_imageelse:return Nonedef get_files(dir):img_path_list = [f for f in os.listdir(dir) iff.startswith('Point') and f.endswith('.jpg')]  # 获取该文件夹中所有jpg格式的图像val_list=[]for p in img_path_list:# 使用正则表达式匹配_后.前的0或0.5match = re.search(r'_(\d+(\.\d+)?)\.', p)if match:val=match.group(1)val_list.append(float(val))else:raise ValueError('{0}文件名错误,无法提取位置i学那些'.format(p))return img_path_list,val_listdef merge_intersecting_boxes(boxes):merged_boxes = []# 计算包含所有框的大框x_min = min(box[0] for box in boxes)y_min = min(box[1] for box in boxes)x_max = max(box[0] + box[2] for box in boxes)y_max = max(box[1] + box[3] for box in boxes)big_box = (x_min, y_min, x_max - x_min, y_max - y_min)# 返回大框和空的合并框列表return big_box, merged_boxesdef r2_score(y_true,y_pred):# 计算相关系数corr = np.corrcoef(y_true, y_pred)[0, 1]# 计算 R 方值r2 = corr ** 2return r2def plot_image_and_r2_zzz(image, x, y,r2,theta):# 将 BGR 格式转换为 RGB 格式image = cv2.cvtColor(image.copy(), cv2.COLOR_BGR2RGB)# 创建一个图形和两个子图fig, (ax1, ax2) = plt.subplots(1, 2, figsize=(10, 5), gridspec_kw={'top': 0.85})# 设置窗口标题方式二fig.canvas.manager.window.title("建模结果")# 在第一个子图中显示图片ax1.imshow(image)ax1.axis('off')ax1.set_title('Box')# 在第二个子图中显示拟合直线ax2.plot(x, y, 'o', label='Data')ax2.plot(x, x, label='Fitted Line')# 将每个数字转换为字符串,保留五位小数theta_str = "(k1={:.4f}, k2={:.4f}, b={:.4f})".format(*theta)ax2.set_title('Fitted Line (theta={}, r2={:.5f})'.format(theta_str,r2))# 添加轴标签ax2.set_xlabel('y_true')ax2.set_ylabel('y_pred')ax2.legend()# 显示图形plt.tight_layout()plt.show()class LinearRegression:def __init__(self):self.theta = Nonedef fit(self, X, y):"""训练线性回归模型参数:X:自变量数据,形状为 (m, n),其中 m 是样本数量,n 是特征数量y:因变量数据,形状为 (m, 1)"""# 在 X 前面加一列1,以便于计算截距项X_b = np.c_[np.ones((X.shape[0], 1)), X]# 使用正规方程求解回归系数self.theta = np.linalg.inv(X_b.T @ X_b) @ X_b.T @ ydef predict(self, X):"""对新样本进行预测参数:X:自变量数据,形状为 (m, n),其中 m 是样本数量,n 是特征数量返回值:y_pred:预测的因变量数据,形状为 (m, 1)"""if self.theta is None:raise ValueError("模型未经过训练,请先调用 fit 方法")# 在 X 前面加一列1,以便于计算截距项X_b = np.c_[np.ones((X.shape[0], 1)), X]# 使用训练得到的回归系数进行预测y_pred = X_b @ self.thetareturn y_predif __name__=='__main__':file_dir="./20240531_113524"img_path_list, locs = get_files(file_dir)coors = []boxs = []for i, image_name in enumerate(img_path_list):  # 逐一读取图像item = cv2.imread(os.path.join(file_dir, image_name))cneter, box, _ = get_box(item)coors.append(list(cneter))boxs.append(box)merge_box, _ = merge_intersecting_boxes(boxs)# 使用线性回归拟合数据matx = np.array(coors)arr_x = matx[:, 0]reg = LinearRegression()reg.fit(matx, locs)y_true = np.array(locs)y_pred = reg.predict(matx)r2 = r2_score(y_true, y_pred)# 输出 R^2 值draw_img = cv2.imread(os.path.join(file_dir, img_path_list[0]), cv2.IMREAD_COLOR)x, y, w, h = merge_boxcv2.rectangle(draw_img, (x, y), (x + w, y + h), (0, 255, 0), 2)plot_image_and_r2_zzz(draw_img, y_true, y_pred, r2, reg.theta)