nginx的配置文件
nginx.conf
1、全局模块
worker_processes 1;
工作进程数,设置成服务器内核数的2倍(一般不超过8个,超过8个反正会降低性能,4个 1-2个 )
处理进程的过程必然涉及配置文件和展示页面,也就是涉及打开文件的数量。
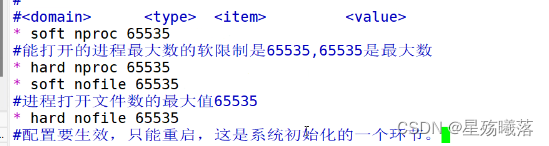
linux默认打开的文件数就是1024个
vim /etc/security/limits.conf
root和alias之间匹配工作目录的区别
root的匹配模式相当于拼接
root 的工作目录,访问的uri/xy102
location /xy102
/opt/test/
alias匹配nginx的工作目录,路径是绝对路径
location /xy102
/opt/test/xy102
alias只能写在http模块当中的server模块的location模块里面。
root可以写在server模块,也可以在http,也可以在location中
alias匹配工作目录,不能够使用重定向功能
全局模块
work_processes 1; 指定进程数
events模块决定了能够处理的练级数
stream 四层代理模块
http模块
转发和处理http请求,设置代理(正向代理,反向代理),缓存,定义日志格式,重定向配置。
在http模块当中,包含:
server块 http里面可以有多个server模块
在server模块当中包含:
location模块
在server当中可以有多个location。
实验1:
统计访问状态:
Active connections:1
server accepts handled requests
36 36 36
Reading:0 Writing:1 waiting:0
Active connections
当前活动的连接数
server accepts handled requests
三个数字,从左往右:已经处理的连接数,成功的建立连接的次数 已经处理的请求数
Reading:0 Writing:1 waiting:0
Reading 表示服务端正在从客户端读取请求的数据
Writing 表示服务端正在把响应数据发送给客户端
waiting 表示有连接处于空闲状态,等待新的请求。
1 #user nobody;2 #默认的程序用户就是nginx,这里可以保持注释无需修改3 worker_processes 1;4 5 #error_log logs/error.log;6 #error_log logs/error.log notice;7 #error_log logs/error.log info;8 9 pid /usr/local/nginx/run/nginx.pid;10 #pid文件的位置11 12 13 events {14 worker_connections 1024;15 } 16 #events模块,决定了nginx能够处理的连接数,连接数和worker_processes的数值相乘。17 18 #http 转发和处理http请求,设置代理(正向代理,反向代理),缓存,定义日志格式,重定向配置。19 http {20 include mime.types;21 #文件扩展名与文件类型的映射表。nginx能够打开的文件和支持的文件类型22 default_type application/octet-stream;23 #默认支持的文件类型.html .htm .jsp .js .php24 25 #log_format main '$remote_addr - $remote_user [$time_local] "$request" '26 # '$status $body_bytes_sent "$http_referer" '27 # '"$http_user_agent" "$http_x_forwarded_for"';28 #日志格式,默认的日志格式,记录了access.log,访问日志的格式,error.log也是一样的格式29 30 #access_log logs/access.log main;31 #默认的访问日志的存放路径32 33 sendfile on;34 #支持文件发送或者下载35 #tcp_nopush on;36 #默认就是异步非阻塞模式功能。38 #keepalive_timeout 0;39 keepalive_timeout 65;40 #连接保持的时间,单位是秒41 42 #gzip on;43 #gzip模块,设置是否开启页面压缩(没啥用)44 45 server {46 #开启web服务的模块47 listen 80;48 #nginx的默认监听端口49 server_name localhost;50 #配置站点的域名51 52 charset utf-8;53 #网页的默认字符集54 55 #access_log logs/host.access.log main;56 #网页匹配的工作目录的地址和支持打开页面的文件类型。57 58 location /xy102 {59 root /opt/test1;60 #root表示的是家目录。nginx工作目录的家目录 /usr/local/nginx/html61 #alias也是指匹配nginx,root是拼接,alias是绝对路径62 index index.html index.htm;63 }64 65 location /xy103 {66 root /opt/test1;67 index index.html index.htm;68 }69 70 location / {71 root /opt/test1;72 index index.html index.htm;73 74 }
1、进入nginx.conf的配置文件
[root@test2 nginx]# vim /usr/local/nginx/conf/nginx.conf
2、将nginx网页的根目录文件放到/opt/test1目录下
70 location / {71 root /opt/test1;72 index index.html index.htm;73 }
3、在opt目录下建一个test1目录,并写一个index.html文件
[root@test2 opt]# cd test1
[root@test2 opt]# echo "今天下雨!" > index.html
[root@test2 test1]# ls
index.html
实验2:
基于密码的授权进行访问控制
1、先安装工具
yum -y install httpd-tools
2、创建加密文件
[root@test2 ~]# cd /usr/local/nginx/
[root@test2 nginx]# chown nginx passwd.db
[root@test2 nginx]# chmod 400 passwd.db
[root@test2 nginx]# ll
-r--------. 1 nginx root    48 7月   2 10:36 passwd.db
3、将nginx根目录开启用户密码验证
70 location / {71 root /opt/test1;72 index index.html index.htm;73 auth_basic "secret";74 #开启用户密码验证75 auth_basic_user_file /usr/local/nginx/passwd.db;76 #使用指定的加密文件77 }
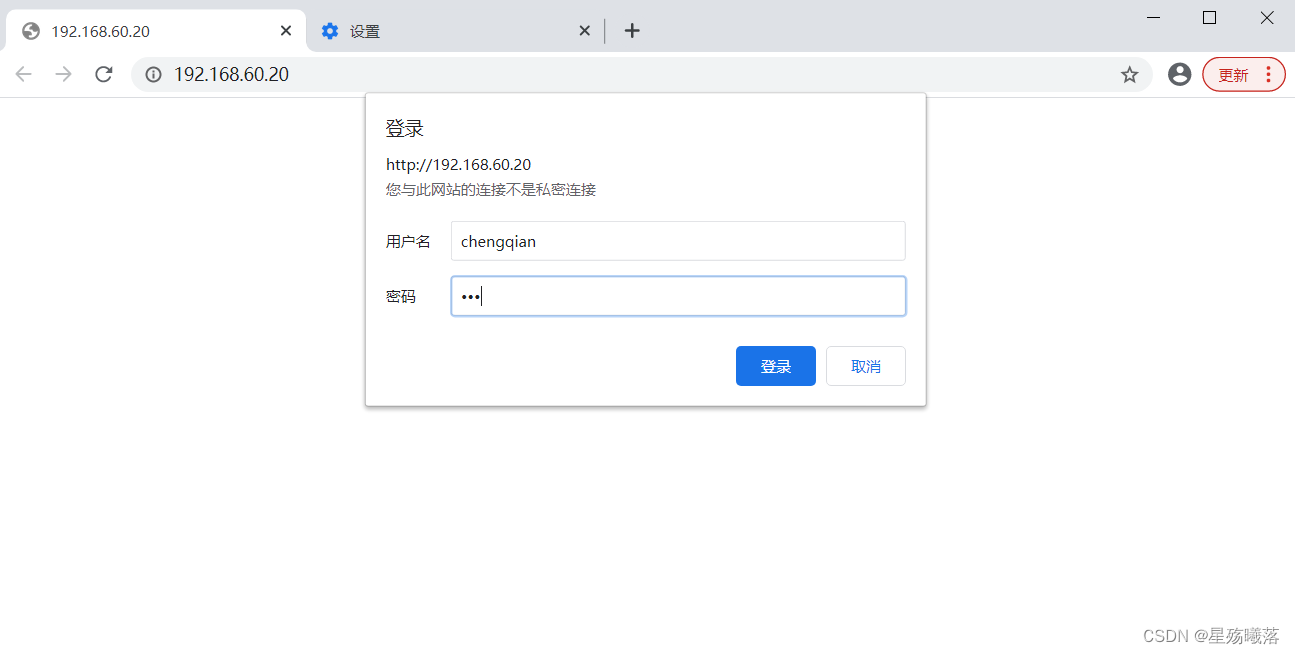
4、结果
实验3
基于客户端的访问控制 ip地址来进行控制
deny 就是拒绝
allow 就是允许
1、更改nginx.conf的配置文件
location / {root /opt/test1;index index.html index.htm;deny 192.168.60.30;allow all;}
2、test3访问
[root@test3 ~]# curl 192.168.60.20
<html>
<head><title>403 Forbidden</title></head>
<body>
<center><h1>403 Forbidden</h1></center>
<hr><center>nginx/1.22.0</center>
</body>
</html>
3、test4访问
[root@test4 ~]# curl 192.168.60.20
今天下雨!
实验4
基于域名的nginx主机
1、设置站点域名
[root@test2 core]# vim /usr/local/nginx/conf/nginx.confserver {#开启web服务的模块listen 80;#nginx的默认监听端口server_name www.xy102.com;#配置站点的域名charset utf-8;#网页的默认字符集access_log logs/www.xy102.com.access.log;#新增一个域名访问server {listen 80;server_name www.zxc.com;charset utf-8;access_log logs/www.zxc.com.access.log;location / {root /var/www/html/zxc;index index.html;}error_page 500 502 503 504 /50x.html;location = /50x.html {root html;}
}
2、将ip地址映射
[root@test2 xy102]# vim /etc/hosts #做网站的映射192.168.60.20 www.xy102.com www.zxc.com
3、在zxc目录下写一个index.html文件
[root@test2 zxc]# mkdir -p /var/www/html/zxc
[root@test2 core]# cd /var/www/html/zxc/
[root@test2 zxc]# ls
[root@test2 zxc]# echo "你好" > index.html
4、测试
[root@test2 zxc]# curl www.xy102.com
今天下雨!
[root@test2 zxc]# curl www.zxc.com
你好
实验5:
基于ip地址的虚拟主机
1、新增虚拟网卡
[root@test2 ~]# ifconfig ens 33:0 192.168.60.199/24
2、给每个服务设置对应的IP地址
server {#开启web服务的模块listen 192.168.60.20:80;#nginx的默认监听端口server_name www.xy102.com;#配置站点的域名charset utf-8;#网页的默认字符集access_log logs/www.xy102.com.access.log;#网页匹配的工作目录的地址和支持打开页面的文件类型。}server {listen 192.168.60.199:80;server_name www.zxc.com;charset utf-8;access_log logs/www.zxc.com.access.log;location / {root /var/www/html/zxc;index index.html;}
3、测试
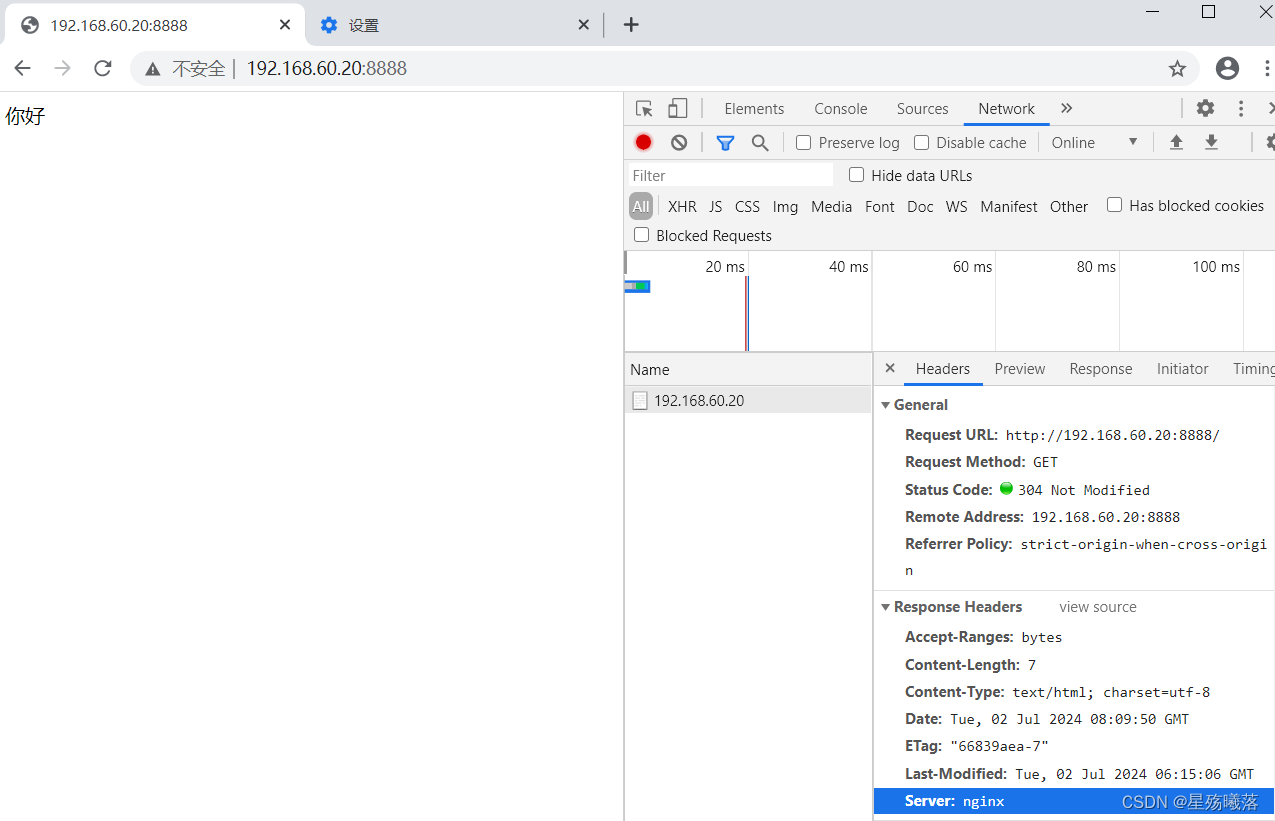
[root@test2 ~]# curl 192.168.60.20:80
今天下雨!
[root@test2 ~]# curl 192.168.60.199:80
你好
实验6:
基于端口实现多个虚拟主机
1、给每个服务设置对应的端口
server {#开启web服务的模块listen 192.168.60.20:8080;#nginx的默认监听端口server_name www.xy102.com;#配置站点的域名charset utf-8;#网页的默认字符集access_log logs/www.xy102.com.access.log;}server {listen 192.168.60.20:8888;server_name www.zxc.com;charset utf-8;access_log logs/www.zxc.com.access.log;location / {root /var/www/html/zxc;index index.html;}error_page 500 502 503 504 /50x.html;location = /50x.html {root html;}}
2、测试
[root@test2 ~]# curl 192.168.60.20:8080
今天下雨!
[root@test2 ~]# curl 192.168.60.20:8888
你好
实验7:
多个配置文件
1、nginx能够打开的文件
include /usr/local/nginx/conf.d/*.conf
#可以识别到conf.d下,只包含server模块的conf文件
2、创建一个conf.d目录
[root@test2 ~]# cd /usr/local/nginx/
[root@test2 nginx]# mkdir conf.d
[root@test2 nginx]# cd conf.d/
3、创建一个test1.conf文件
[root@test2 conf.d]# vim text1.conf
server {listen 8081;server_name localhost;location /test1 {root /opt/conf/index index.html
}
}
server {listen 8082;server_name localhost;location /test2 {root /opt/conf/index index.html
}
}
4、在opt目录下创建两个目录
[root@test2 conf.d]# cd /opt/
[root@test2 opt]# mkdir -p conf/test1
[root@test2 opt]# mkdir -p conf/test2
5、在test1和test2目录下写.html文件
[root@test2 opt]# cd conf/
[root@test2 conf]# echo "this is test1" > test1/index.html
[root@test2 conf]# echo "this is test2" > test2/index.html
6、测试
[root@test2 conf]# netstat -antp | grep nginx
tcp        0      0 192.168.60.20:8080      0.0.0.0:*               LISTEN      113233/nginx: maste
tcp        0      0 0.0.0.0:8081            0.0.0.0:*               LISTEN      113233/nginx: maste
tcp        0      0 0.0.0.0:8082            0.0.0.0:*               LISTEN      113233/nginx: maste
tcp        0      0 192.168.60.20:8888      0.0.0.0:*               LISTEN      113233/nginx: maste
nginx的优化与防盗链:
实验8:
隐藏版本号:server_tokens off;
1、在nginx.conf加一个关闭显示版本号
http {include mime.types;#文件扩展名与文件类型的映射表。nginx能够打开的文件和支持的文件类型include /usr/local/nginx/conf.d/*.conf;#可以识别到conf.d下,只包含server模块的conf文件default_type application/octet-stream;#默认支持的文件类型.html .htm .jsp .js .phpserver_tokens off;#关闭显示版本号
2、测试