如何将重量传感器 HX711 与 Arduino 一起使用
How to use a Weight Sensor / Load Cell + HX711 with an Arduino
原文
OVERVIEW
We’ve all used a scale to determine the weight of something at some point in our lives.
Using a Load Cell or Weight sensor you can add this capability to your Arduino projects.
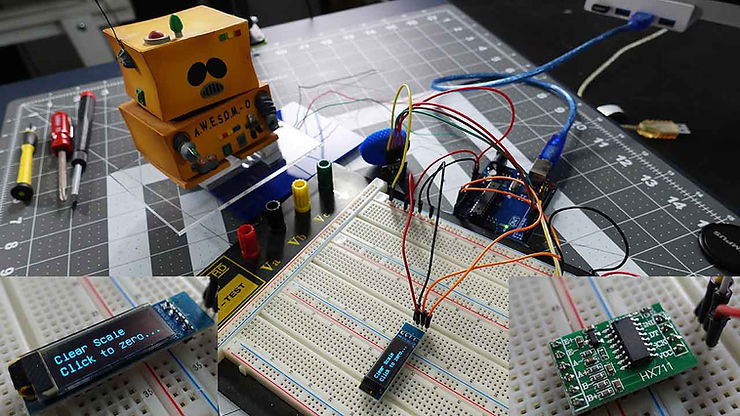
In this tutorial we will see how to connect, calibrate and display the weight on a small OLED display, and by using a rotary encoder we will be able to change the units from: grams, kg or pounds.
We will be using the HX711 ADC converter board to amplify the signal received from the weight sensor.
This amplifier enables the Arduino to detect the changes in resistance from the load cell.
PARTS USED
1KG Load Cell
Rotary Encoder Module
HX711 Module
LOAD CELL and HX711 INTRODUCTION

So what is a Load Cell?
They are many types of Load Cell, but today we will be using the straight bar type.
When pressure or a load is applied, the electrical resistance will change in response to this applied pressure and by taking this information and after some calibration we can determine the precise weight.
Load cell like this one come in different weight limits, the one we will be using today is rated up to 1KG, but you can get others that will support more weight if needed.
What about this HX711?
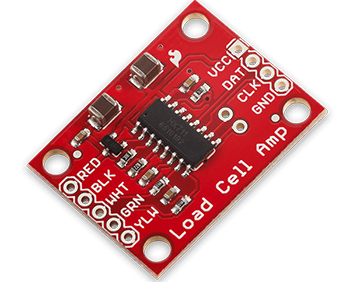
The changes in electrical resistance provided by the Load Cell need to be amplified so that they can be read by an Arduino.
That’s exactly what the HX711 board does.
It reads the information from the Load Cell, amplifies the signals and then sends it to the Arduino for processing.
Common Load cells have four-wire to connect the HX711 to a microcontroller like the Arduino.
- Red (VCC)
- Black (GND)
- Data
- Clock
To connect the HX711 to the Arduino you only need 2 pins (Clock and Data).
On the opposite side you can see the connection for the Load cell.
We will be using a simple Arduino library to communicate with the HX711 that provides a calibration and Tare (reset) feature to easily determine the weight of an object.
LOAD CELL SETUP
The bar type we are using has different screws holes on the bottom and the top.
To it up as a scale, you attach the bottom left or right screw holes to a table or stable object, and then attach a piece of platic or any other material to serve as the scale to put objects on, to the top opposite screw holes.
**Each bar type has an arrow that indicate the direction of deflection and should be positioned the correct way for your project.You can see a simple setup here:
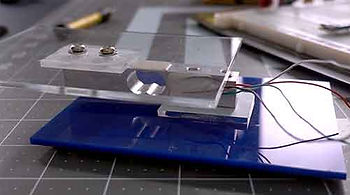
This setup is for using the Load Cell has a simple scale, but you could also connect it the detect deflection between two object if you wanted.
CONNECTIONS
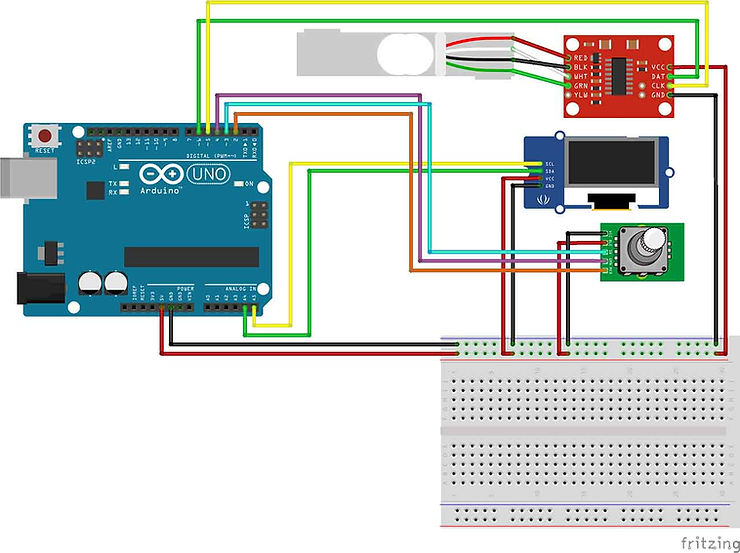
The connections for this tutorial are pretty straightforward:
The 5V and GND of the UNO is connected to each modules VCC and GND.
Since the OLED display uses I2C we are using pins A4 (SDA), A5 (SCL) on the UNO to connect it.
The rotary encoder is connected to these pins: CLK to pin 2, DT to pin 3 and SW to pin 4.The HX711 is connected to: DATA to pin 4 and CLOCK to pin 5.
Depending on the HX711 your purchase it may have different connections: If it has color designation, then connect the corrresponding wires from the Load Cell to the HX711.
In my case my HX711 had these connections:
E+ : Connected to RED of the Load Cell E- : Connected to BLACK
A- : Connected to GREEN A+ : Connected to WHITE
B- : no connections B+ : no connections
THE CODE
We are using a library written for the HX711 to communicate with the Arduino, you can find a link to download the library at the bottom of this page.
The first code is used to get the calibration factor for a particular Load cell, this will have to be run for each Load Cell you own, since each one is a little different.
The second code uses that calibration factor to print out the correct weight on the OLED display.
As always for more information please have a look at the tutorial video.
/* Calibration sketch for HX711 */#include "HX711.h"  // Library needed to communicate with HX711 https://github.com/bogde/HX711#define DOUT  6  // Arduino pin 6 connect to HX711 DOUT
#define CLK  5  //  Arduino pin 5 connect to HX711 CLKHX711 scale(DOUT, CLK);  // Init of libraryvoid setup() {Serial.begin(9600);scale.set_scale();  // Start scalescale.tare();       // Reset scale to zero
}void loop() {float current_weight=scale.get_units(20);  // get average of 20 scale readingsfloat scale_factor=(current_weight/0.145);  // divide the result by a known weightSerial.println(scale_factor);  // Print the scale factor to use
}
/* Arduino Scale using HX711 and Load CellCreated by Yvan / https://Brainy-Bits.comThis code is in the public domain...You can: copy it, use it, modify it, share it or just plain ignore it!
Thx!
*/#include "U8glib.h"   // Library for Oled display https://github.com/olikraus/u8glib/
#include "HX711.h"    // Library for Load Cell amplifier boardvolatile boolean TurnDetected;  // variable used to detect rotation of Rotary encoder
volatile int Rotary_Flag=0;     // flag to indicate rotation as occured// Rotary Encoder Module connections
#define RotaryCLK 2   // Rotary encoder CLK pin connected to pin 2 of Arduino
#define RotaryDT 3    // Rotary encoder DT pin connected to pin 3
#define RotarySW 4    // Rotary encoder Switch pin connected to pin 4// HX711 Module connections
#define CLK 5   // CLK of HX711 connected to pin 5 of Arduino
#define DOUT 6  // DOUT of HX711 connected to pin 6 of Arduinoint reset_screen_counter=0;      // Variable used to decide what to display on Oled
volatile int current_units=0;    // Used to select which measuring unit to use (KG,Grams,Pounds)
float unit_conversion;           // Used to convert between measuring units
int decimal_place;               // how many decimal number to displayHX711 scale(DOUT, CLK);  // Init of the HX711U8GLIB_SSD1306_128X32 u8g(U8G_I2C_OPT_FAST);	// Init of the OLED// Interrupt routine runs if Rotation detected from Rotary encoder
void rotarydetect ()  {
Rotary_Flag=1; // Set Rotary flag from 0 to 1
delay(500);
}// Used to change the measurement units (0=grams, 1=KG, 2=pounds)
void change_units ()  { if (current_units == 0) current_units=1;else if (current_units == 1) current_units=2;else if (current_units == 2) current_units=0;
}// Run at Startup and when Resetting with Rotary encoder switch
void startupscreen(void) {u8g.setFont(u8g_font_unifont);u8g.firstPage(); do {u8g.drawStr( 0, 10, "Clear Scale");u8g.drawStr( 0, 28, "Click to zero...");} while( u8g.nextPage() );
}// Reset Scale to zero
void tare_scale(void) {scale.set_scale(-1073000);  //Calibration Factor obtained from calibration sketchscale.tare();             //Reset the scale to 0
}// Start Displaying information on OLED
void start_scale(void) {char temp_current_units[15];  // Needed to store String to Char conversionString KG="KG";String GRAMS="GRAMS";String LBS="POUNDS";if (current_units == 0) {                     // 0 = gramsGRAMS.toCharArray(temp_current_units, 15);  // Convert String to Char for OLED displayunit_conversion=1000;                        // conversion value for gramsdecimal_place=0;                            // how many decimal place numbers to display} else if (current_units == 1) {              // 1 = KilogramsKG.toCharArray(temp_current_units, 15);unit_conversion=1;decimal_place=3;} else {                                      // else 2 = PoundsLBS.toCharArray(temp_current_units, 15);unit_conversion=2.2046226218;decimal_place=3;}u8g.setFont(u8g_font_unifont);u8g.firstPage(); do {u8g.drawStr( 0, 10, temp_current_units);  // Display the current measurement unitu8g.setPrintPos(38, 28);u8g.print(scale.get_units(3)*unit_conversion, decimal_place);  // Display the average of 3 scale value reading} while( u8g.nextPage() );
}void setup(void) {// Set pinmode for Rotary encoder pinspinMode(RotarySW,INPUT_PULLUP);pinMode(RotaryCLK,INPUT_PULLUP);pinMode(RotaryDT,INPUT_PULLUP);  // Attach interrupt 0 (Pin 2 on UNO) to the Rotary EncoderattachInterrupt (0,rotarydetect,RISING);   // interrupt 0 always connected to pin 2 on Arduino UNO// Rotate screen 180 degrees on OLED, if requiredu8g.setRot180();// Set color of OLED to Monochromeu8g.setColorIndex(1);// Select font to useu8g.setFont(u8g_font_unifont);String start_count_string="Starting up....";  // Message to display at Startupchar start_count[15];  // Used to String to Char conversion// Loop to display counting dotsfor (int x=12; x < 16; x++) {  // Select the first 12 to 16 character of Stringstart_count_string.toCharArray(start_count, x);u8g.firstPage(); do {u8g.drawStr( 0, 10, "ARDUINO SCALE");u8g.drawStr( 0, 28, start_count);} while( u8g.nextPage() );delay(500);  // Delay between dots}
}void loop(void) {// If Switch is pressed on Rotary Encoderif (!digitalRead(RotarySW)) {       // Check to see which action to takeif(reset_screen_counter == 1) {   tare_scale();                   // 1 = zero and start scalereset_screen_counter=2;delay(500);} else {if(reset_screen_counter == 2) { // 2 = Scale already started so restart from beginingreset_screen_counter=0;delay(500); }}}// If Rotation was detectedif (Rotary_Flag == 1) {change_units();  // change the measuring unitsRotary_Flag=0;   // reset flag to zero}// If system was just started display intro screen  if (reset_screen_counter == 0) {    startupscreen();reset_screen_counter=1;  // set to 1 and wait for Rotary click to zero scale}// if zero (tare) of scale as occured start display of weightif (reset_screen_counter == 2) {start_scale();}
}
TUTORIAL VIDEO
DOWNLOAD
Copy and Paste the above code/sketch in your Arduino IDE software.
Donwload the HX711 library here:
https://github.com/bogde/HX711