Spring-事件
Java 事件/监听器编程模型
设计模式-观察者模式的拓展
- 可观察者对象(消息发送者) Java.util.Observalbe
- 观察者 java.util.Observer
标准化接口(标记接口)
- 事件对象 java.util.EventObject
- 事件监听器 java.util.EventListener
public class ObserverDemo {public static void main(String[] args) {Observable observable = new EventObservable();observable.addObserver(new EventObserver());observable.notifyObservers("hello");}/*** 因为我们要调用 change 监听者这个方法才能生效 但是这个方法是个protected 所以我们进行拓展* */static class EventObservable extends Observable {public void setChanged(){super.setChanged();}public void notifyObservers(Object args) {setChanged();super.notifyObservers(new EventObject(args));clearChanged();}}static class EventObserver implements Observer, EventListener {@Overridepublic void update(Observable o, Object event) {EventObject eventObject = (EventObject) event;System.out.println("收到消息:" + eventObject);}}
}
理解:
发布事件的是被监听的对向,里面会注册监听器,也就是需要感知当前对象变化的对象。
JDKEventListener提供了这个标记接口,算是一种规范,表名这个是事件的监听器。
EventObject 这个也算是一个标准,这个对象是方便数据在事件发布的时候进行传递。
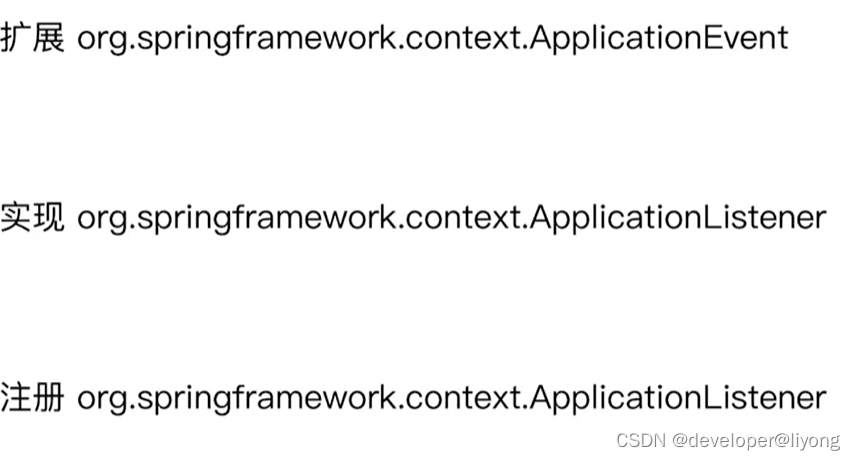
面向接口的事件/监听器设计模式
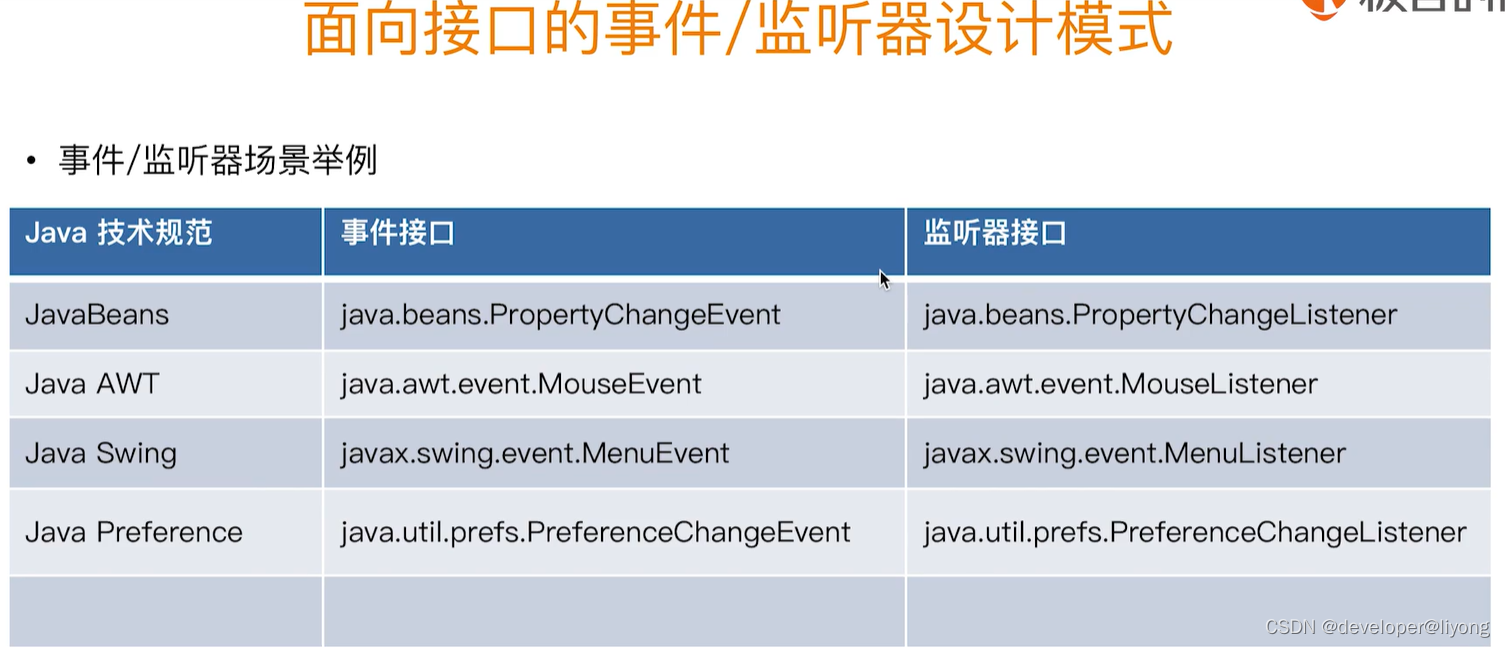
基本模式:
一般监听器会继承EventListener
一般事件会继承EventObject
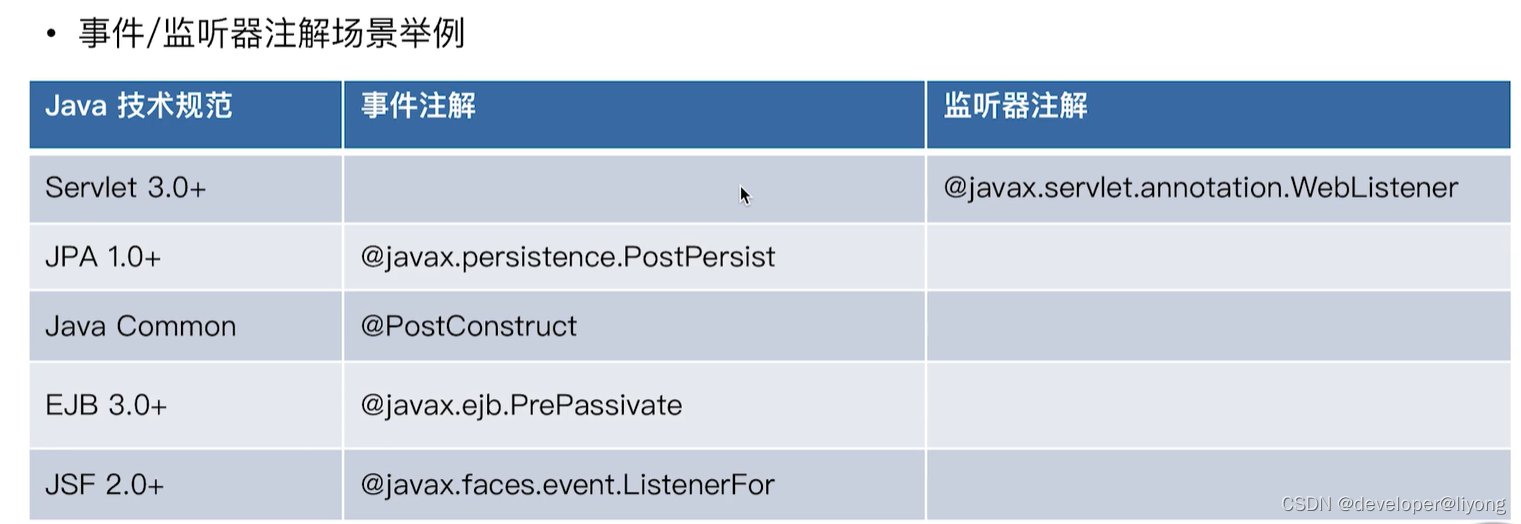
面向注解的事件/监听器设计模式
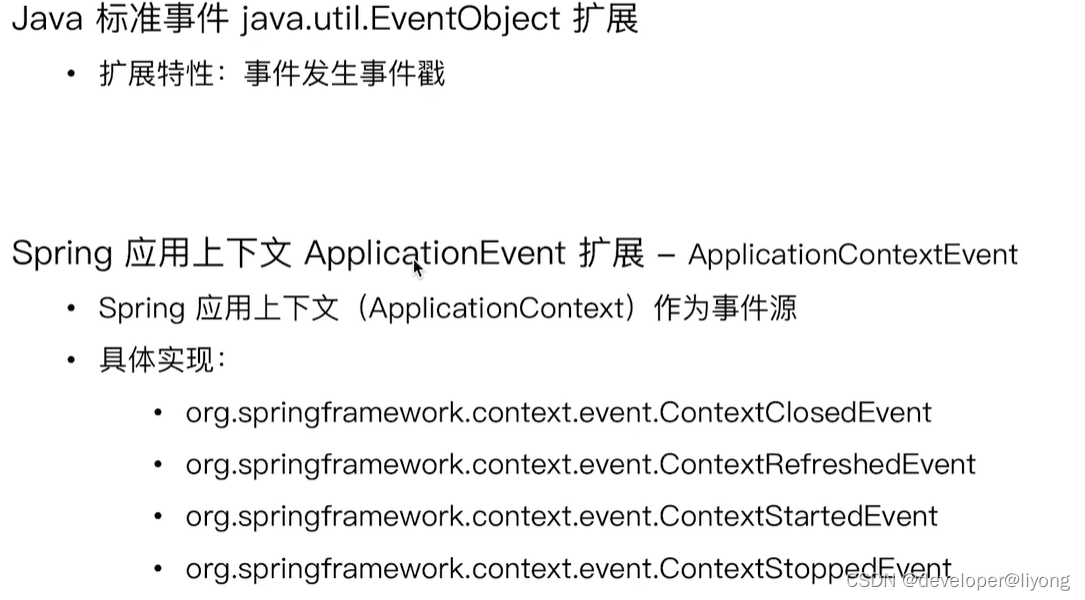
Spirng 标准事件 ApplicationEvent
基于接口的事件监听器

public static void main(String[] args) {GenericApplicationContext context = new GenericApplicationContext();// 注册一个事件监听context.addApplicationListener(new ApplicationListener<ApplicationEvent>() {@Overridepublic void onApplicationEvent(ApplicationEvent event) {System.out.println(event.getTimestamp() + "接收到事件 : " + event);}});context.refresh();context.close();
}
可以看到这里收到了两个事件,那么事件从哪里发布的呢?请看事件发布器。

基于注解的事件监听器
public static void main(String[] args) {AnnotationConfigApplicationContext context = new AnnotationConfigApplicationContext();context.register(ApplicatonListenrDemo.class);context.refresh();context.close();
}
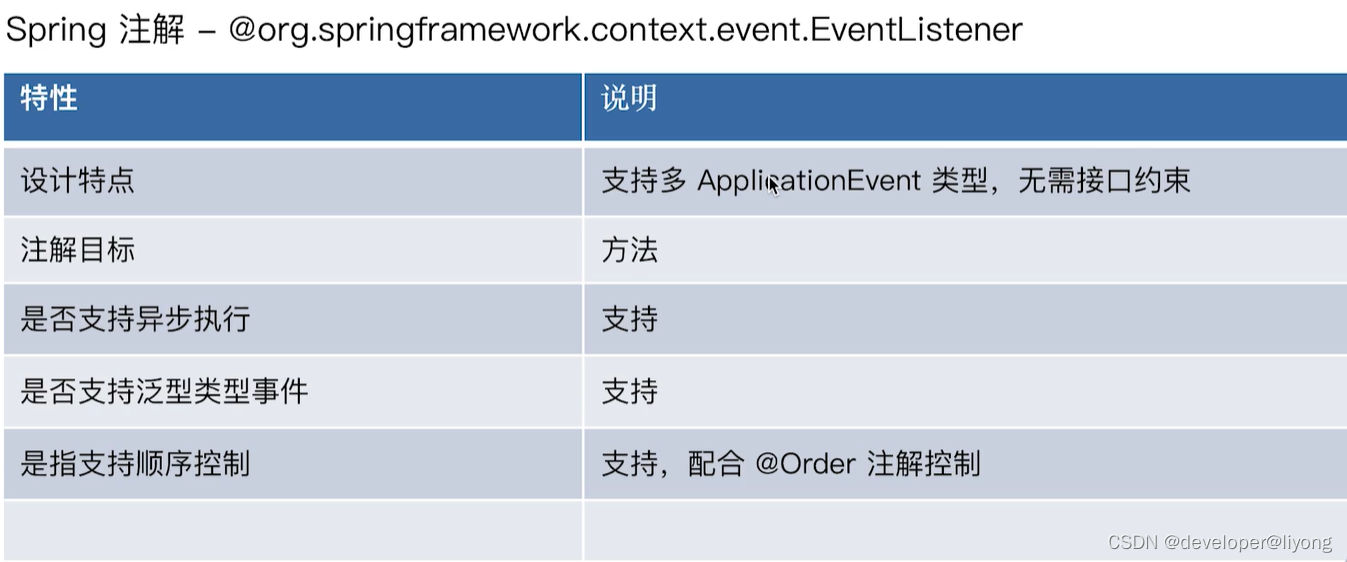
@EventListener
public void onApplicationEvent(ApplicationEvent applicationEvent) {System.out.println(applicationEvent);
}
// 这样的话就会分类别来处理
@EventListener
public void onApplicationEvent(ContextRefreshedEvent applicationEvent) {System.out.println(applicationEvent + "re");
}
// 异步处理
@EnableAsync
public class ApplicatonListenrDemo {public static void main(String[] args) {AnnotationConfigApplicationContext context = new AnnotationConfigApplicationContext();context.register(ApplicatonListenrDemo.class);context.refresh();context.close();}@EventListenerpublic void onApplicationEvent(ApplicationEvent applicationEvent) {System.out.println(applicationEvent);}@EventListenerpublic void onApplicationEvent(ContextRefreshedEvent applicationEvent) {System.out.println(applicationEvent + "re");}@EventListener@Asyncpublic void onApplicationEvent(ContextClosedEvent applicationEvent) {System.out.println(applicationEvent);System.out.println(Thread.currentThread().getId());}
}
// 控制顺序
public class ApplicatonListenrDemo {public static void main(String[] args) {AnnotationConfigApplicationContext context = new AnnotationConfigApplicationContext();context.register(ApplicatonListenrDemo.class);context.refresh();context.close();}@EventListener@Order(2)public void onApplicationEvent2(ContextRefreshedEvent applicationEvent) {System.out.println("=======");}@EventListener@Order(1)public void onApplicationEvent1(ContextRefreshedEvent applicationEvent) {System.out.println("****");}
}
注册Spirng ApplicationListenner
方法一: ApplicationListener 作为SpirngBean注册
context.register(MyEventListener.class);
static class MyEventListener implements ApplicationListener<ApplicationEvent> {@Overridepublic void onApplicationEvent(ApplicationEvent event) {System.out.println("=====>");}
}
方法二:通过ConfigrableApplicationContextAPI 注册
context.addApplicationListener(new ApplicationListener<ApplicationEvent>() {@Overridepublic void onApplicationEvent(ApplicationEvent event) {System.out.println(event.getTimestamp() + "接收到事件 : " + event);}
});
事件发布器
public class ApplicatonListenrDemo implements ApplicationEventPublisherAware {public static void main(String[] args) {AnnotationConfigApplicationContext context = new AnnotationConfigApplicationContext();context.register(ApplicatonListenrDemo.class);context.refresh();context.start();context.close();}@EventListenerpublic void onApplicationEvent(ApplicationEvent event) {System.out.println(event);}@Overridepublic void setApplicationEventPublisher(ApplicationEventPublisher applicationEventPublisher) {applicationEventPublisher.publishEvent(new ApplicationEvent("hello") {});// 发布任意对象 重载方法applicationEventPublisher.publishEvent("yes");}
}
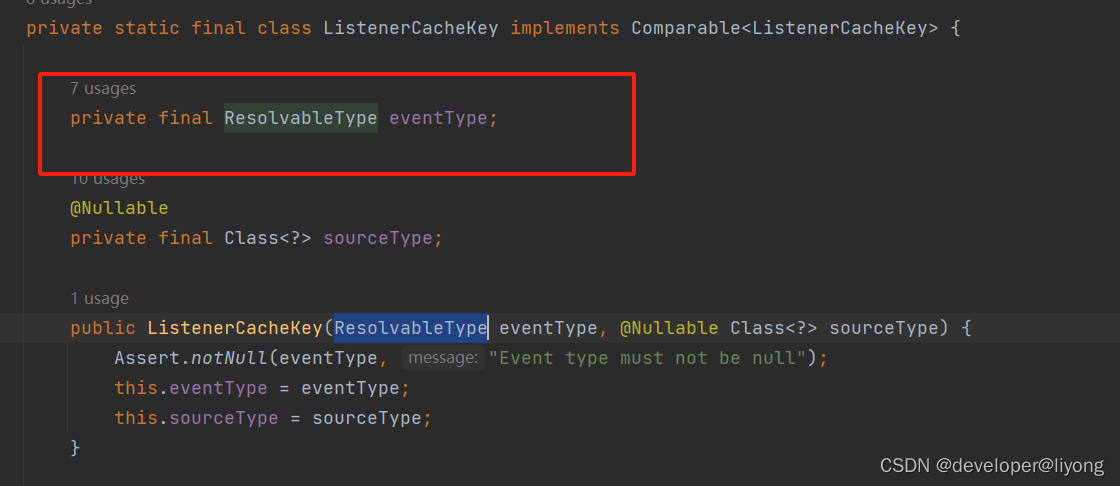
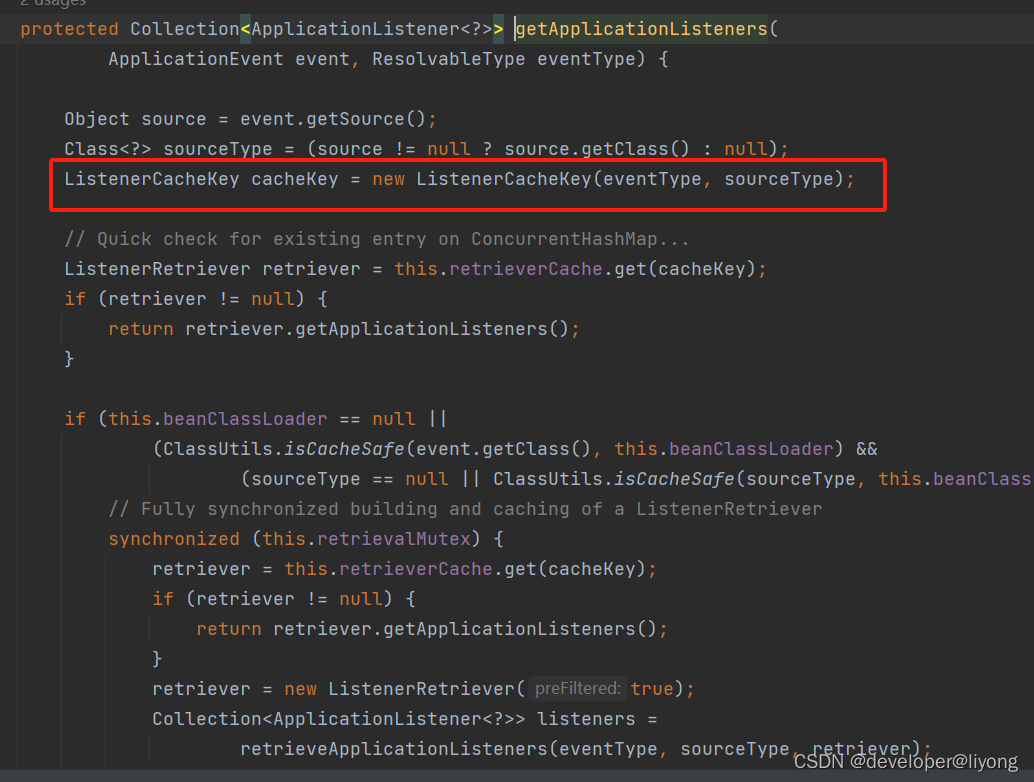
事件发布器如何找到对应的监听器进行实事件的发布呢? 在发布时间的时候会查缓存,缓存如果没有对应的监听器,则会更具事件泛型类型进行判断。
根据事件的泛型类型进行判断,如果类型符合加入监听器数组。

Spring 事件传播

public static void main(String[] args) {// 1 创建 parent Spring 应用上下文AnnotationConfigApplicationContext parent = new AnnotationConfigApplicationContext();parent.setId("parent");parent.register(Mylistener.class);// 创建current spring 应用上下文AnnotationConfigApplicationContext current = new AnnotationConfigApplicationContext();current.setId("current");current.register(Mylistener.class);current.setParent(parent);// current parentparent.refresh();current.refresh();parent.close();current.close();}
static class Mylistener implements ApplicationListener<ContextRefreshedEvent> {@Overridepublic void onApplicationEvent(ContextRefreshedEvent event) {System.out.printf("监听到应用上下文[ID %s]\n", event.getApplicationContext().getId());}
}
第一个事件触发是parent,第二,三个由于事件传播子和父都触发了这个事件:

原理就是,源码会在父也发布事件:
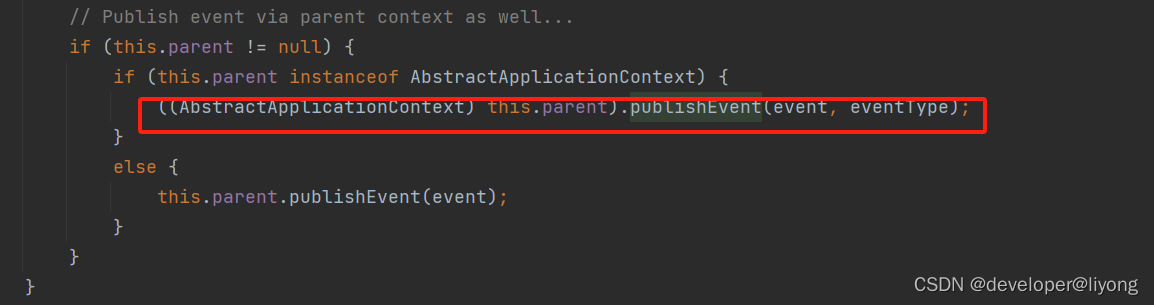
如何避免:
public class HierachicalEventDemo {public static void main(String[] args) {// 1 创建 parent Spring 应用上下文AnnotationConfigApplicationContext parent = new AnnotationConfigApplicationContext();parent.setId("parent");parent.register(Mylistener.class);// 创建current spring 应用上下文AnnotationConfigApplicationContext current = new AnnotationConfigApplicationContext();current.setId("current");current.register(Mylistener.class);current.setParent(parent);// current parentparent.refresh();current.refresh();parent.close();current.close();}static class Mylistener implements ApplicationListener<ContextRefreshedEvent> {/*** 这里之所以要静态是因为我们在 parent 和 current 是不是一样的对象 也就是有两对象* 但是静态字段就是类共用的* 如果时间发布过不再重新发布*/private static Set<ApplicationEvent> processedEvents = new LinkedHashSet();@Overridepublic void onApplicationEvent(ContextRefreshedEvent event) {if (processedEvents.add(event)) {System.out.printf("监听到应用上下文[ID %s] %s\n ", event.getApplicationContext().getId(), event);}}}
}
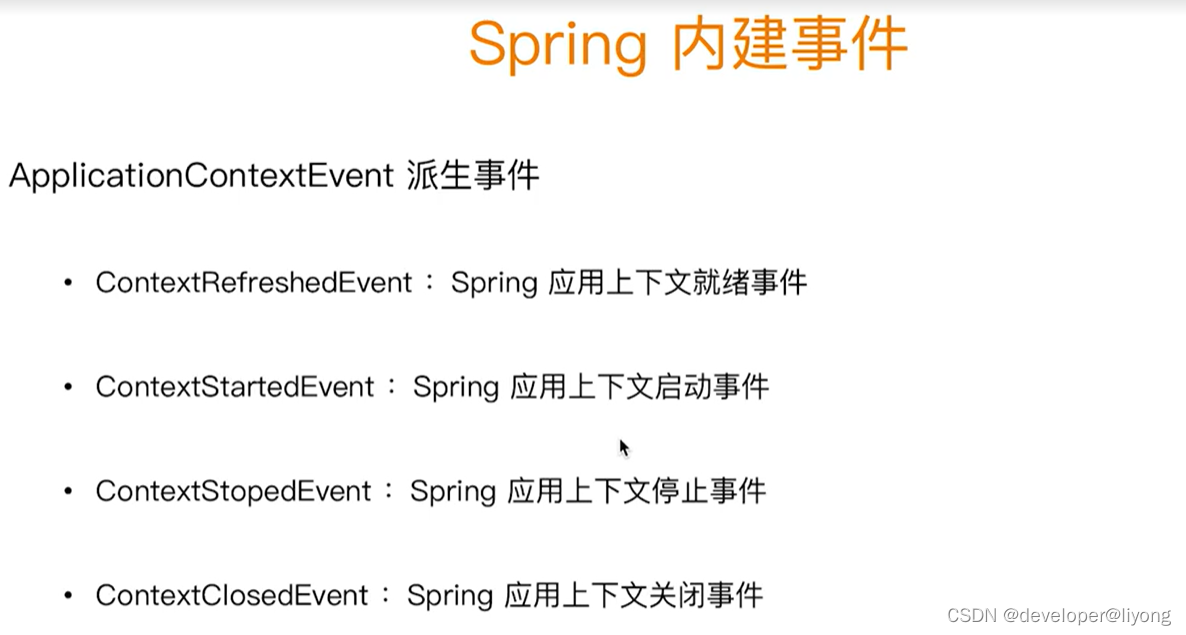
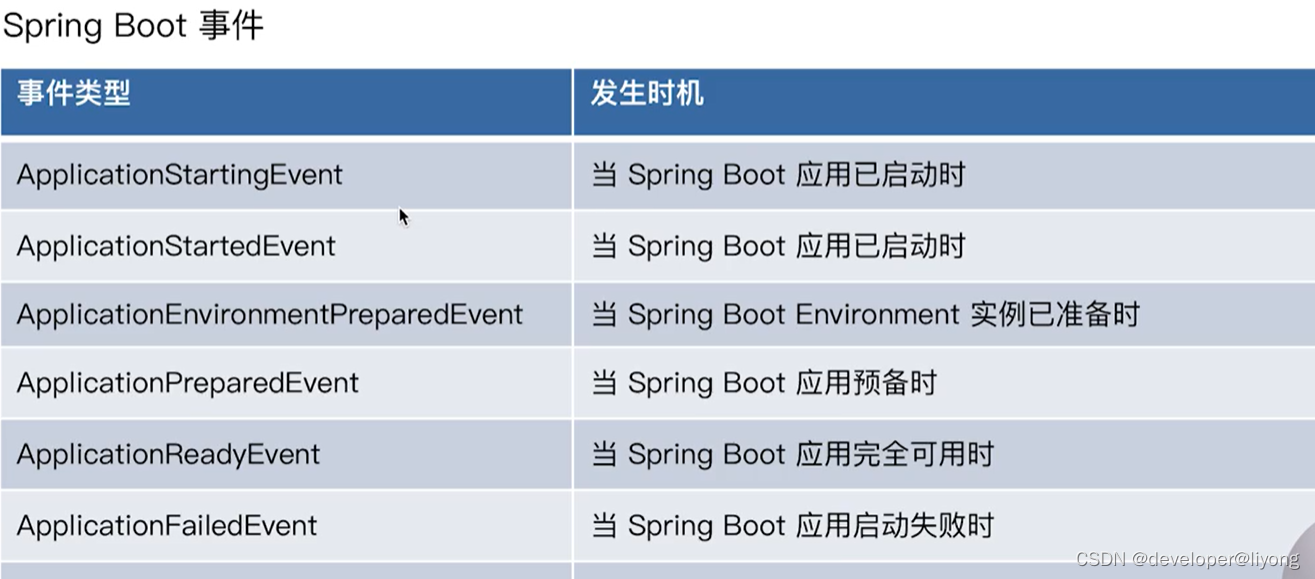
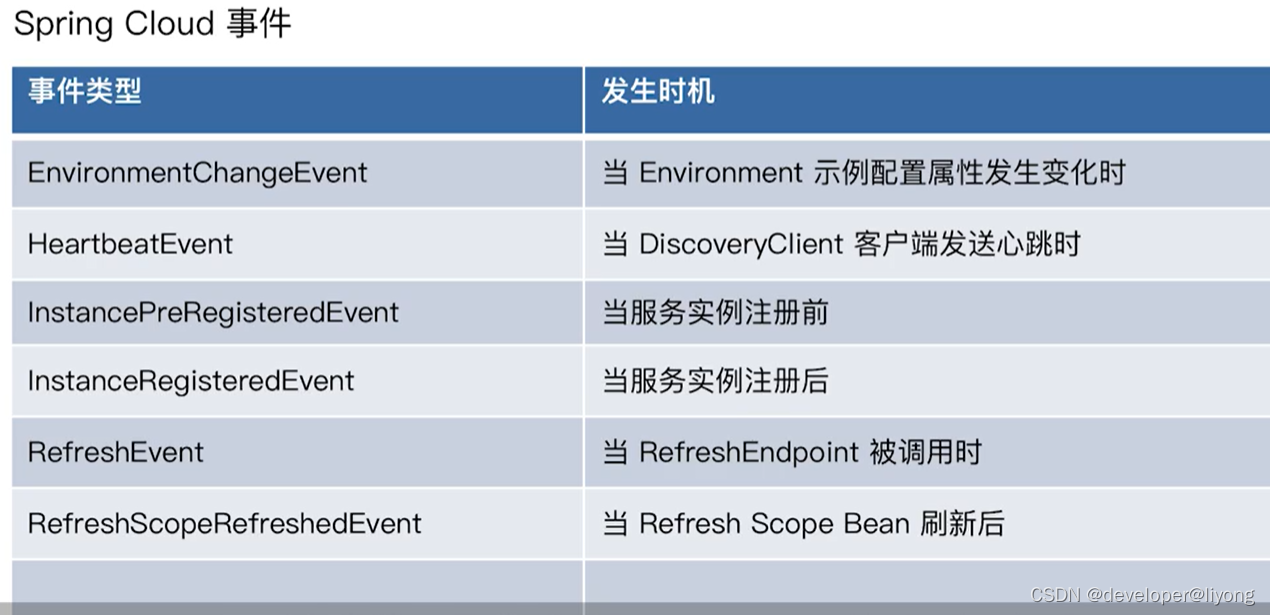
Spirng 内建事件
Spring Payload 事件
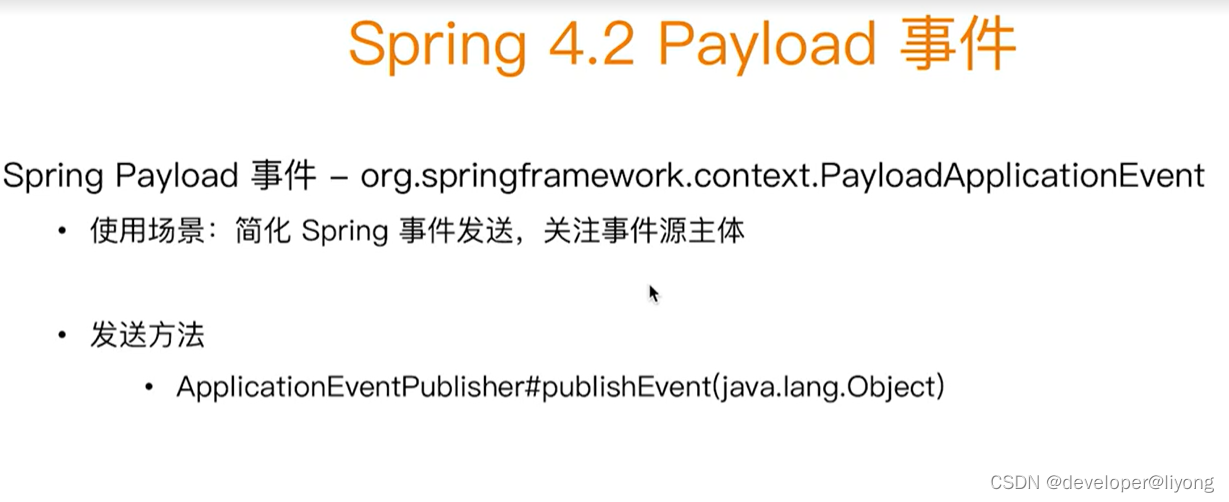 使用的时候不能简单继承使用,发送方法最好是用object这个方法。
自定义Spirng事件
public class MyEvent extends ApplicationEvent {public MyEvent(String msg) {super(msg);}@Overridepublic String getSource() {return (String) super.getSource();}public String getMessage() {return getSource();}
}
public class MyListener implements ApplicationListener<MyEvent> {@Overridepublic void onApplicationEvent(MyEvent event) {System.out.println(event.getMessage());}
}
public class Demo {public static void main(String[] args) {AnnotationConfigApplicationContext context = new AnnotationConfigApplicationContext();context.register(Mylistener.class);context.refresh();context.publishEvent(new MyEvent("test event"));context.close();}
}
事件发布注入
ApplicationEventPublisherAwae 回调接口
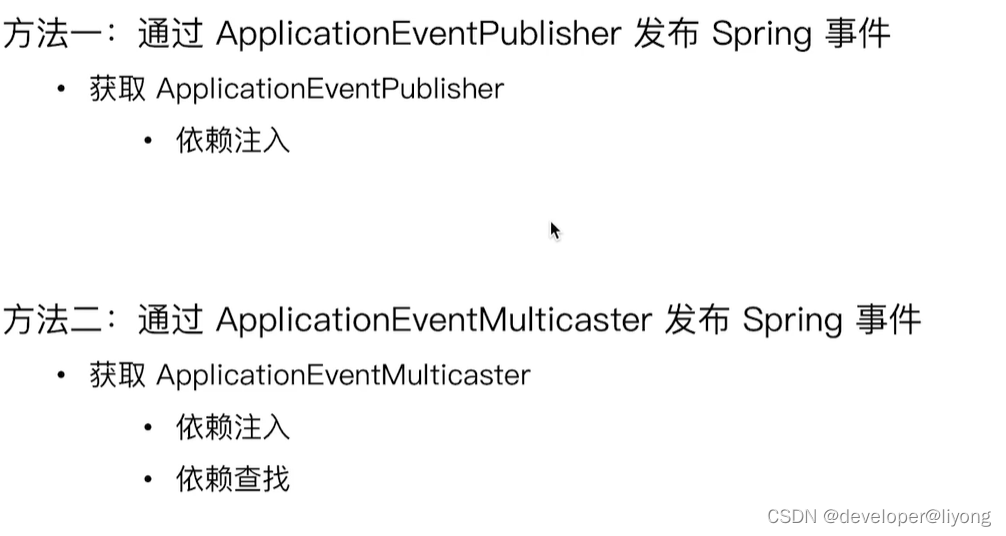
通过@Autowired ApplicationEventPublisher
依赖查找
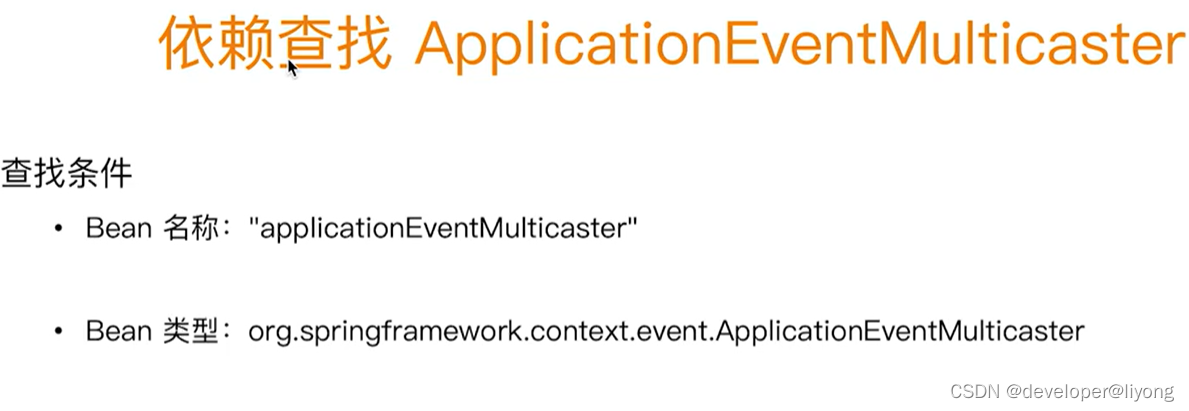
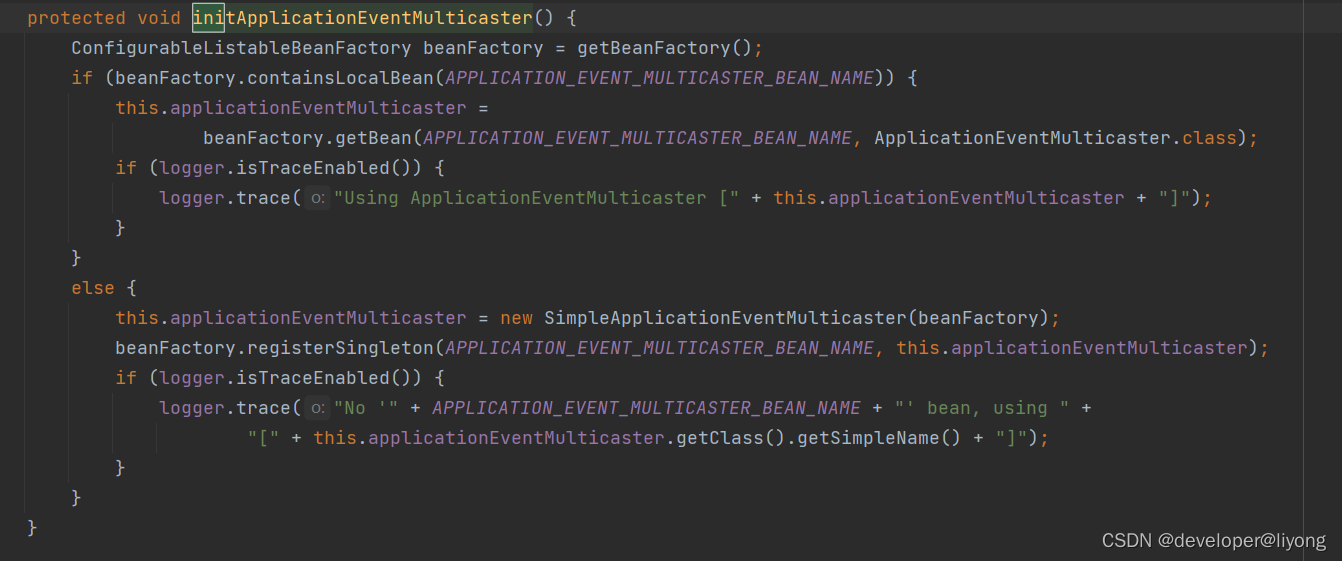
ApplicationEventMulticaster的底层实现

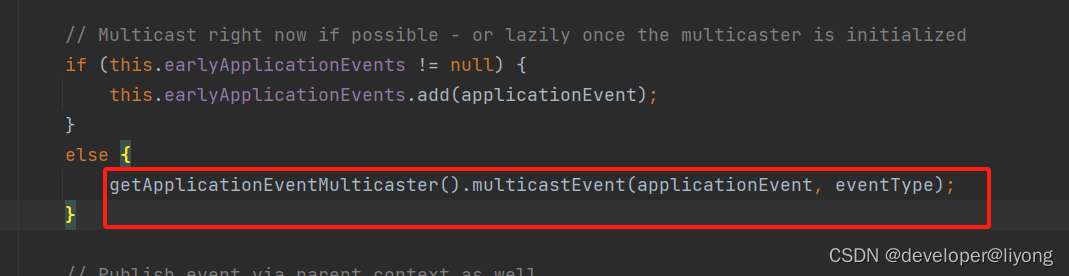
AbstractContext事件分发布是通过ApplicationEventMulticaster来实现的:
同步和异步Spirng事件广播
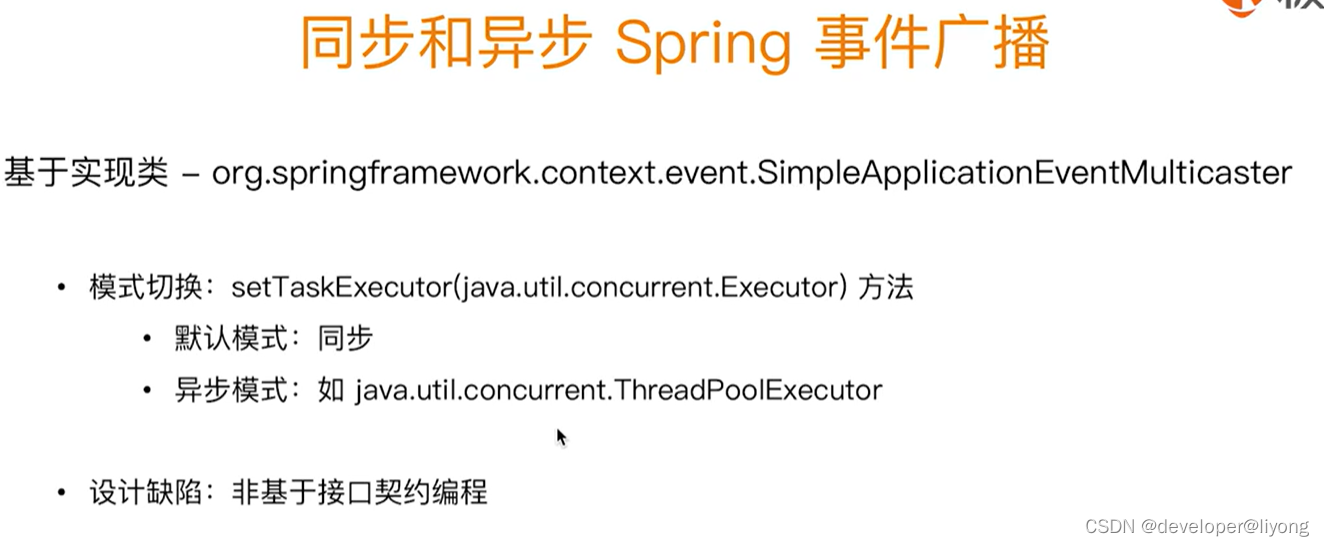
如果是异步如果要设置Executeor 是需要类型转换的,不是基于接口的编程方式。
public class Demo {public static void main(String[] args) {AnnotationConfigApplicationContext context = new AnnotationConfigApplicationContext();context.register(Mylistener.class);context.refresh();ApplicationEventMulticaster multicaster = context.getBean(ApplicationEventMulticaster.class);if (multicaster instanceof SimpleApplicationEventMulticaster) {ExecutorService executor = newSingleThreadExecutor();SimpleApplicationEventMulticaster simpleApplicationEventMulticaster = (SimpleApplicationEventMulticaster) multicaster;simpleApplicationEventMulticaster.setTaskExecutor(executor);// 优雅的关闭线程池simpleApplicationEventMulticaster.addApplicationListener(new ApplicationListener<ContextClosedEvent>() {@Overridepublic void onApplicationEvent(ContextClosedEvent event) {if (!executor.isShutdown()) {executor.shutdown();}}});}context.publishEvent(new MyEvent("test event"));context.close();}
}
通过注解的方式实现:
@EnableAsync
public class Demo {public static void main(String[] args) {AnnotationConfigApplicationContext context = new AnnotationConfigApplicationContext();context.register(Demo.class);context.refresh();context.publishEvent(new MyEvent("test event"));context.close();}@EventListener@Asyncpublic void onApplicationContext(ApplicationEvent event) {System.out.println(Thread.currentThread().getName() +  event);}// 这是自定义我们的线程池@BeanExecutor taskExecutor() {return Executors.newSingleThreadExecutor();}
}
事件的异常情况
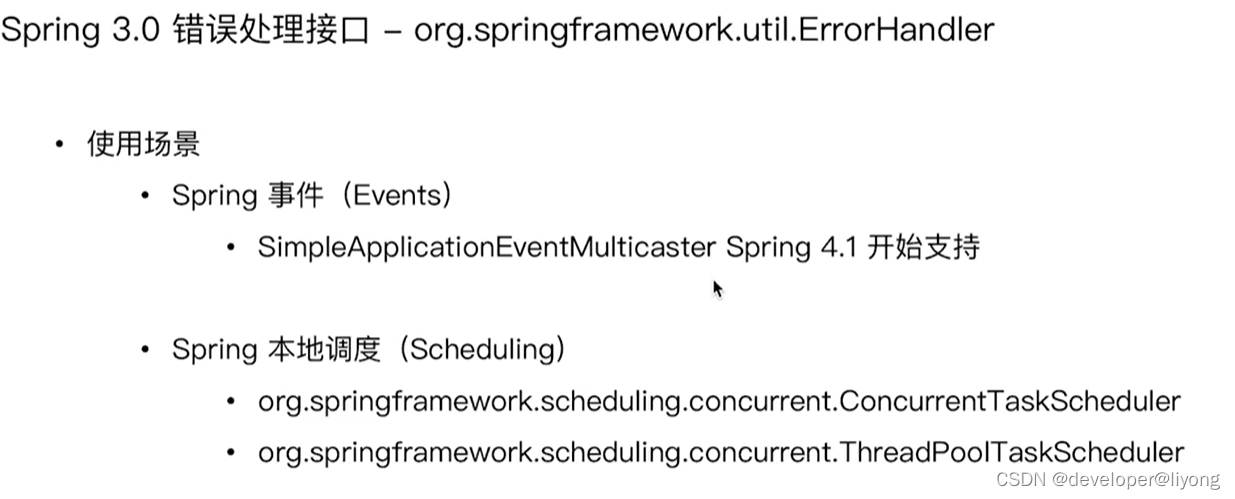
public class Demo {public static void main(String[] args) {AnnotationConfigApplicationContext context = new AnnotationConfigApplicationContext();context.register(Demo.class);context.refresh();ApplicationEventMulticaster multicaster = context.getBean(ApplicationEventMulticaster.class);if (multicaster instanceof SimpleApplicationEventMulticaster) {SimpleApplicationEventMulticaster simpleApplicationEventMulticaster = (SimpleApplicationEventMulticaster) multicaster;simpleApplicationEventMulticaster.setErrorHandler((t) ->{System.out.printf("发生了异常" );});}context.publishEvent(new MyEvent("test event"));context.close();}@EventListenerpublic void onApplicationContext(ContextClosedEvent event) {System.out.println(Thread.currentThread().getName() +  event);throw new RuntimeException("制造异常");}@BeanExecutor taskExecutor() {return Executors.newSingleThreadExecutor();}
}
Spirng 事件/监听实现原理

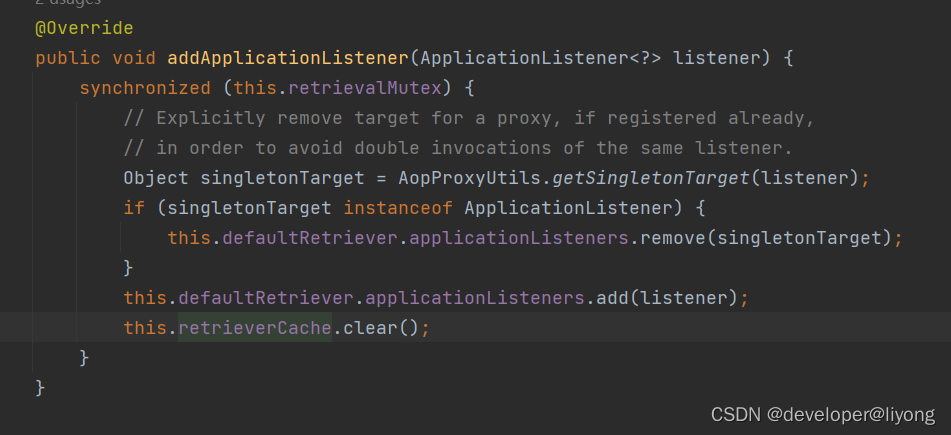
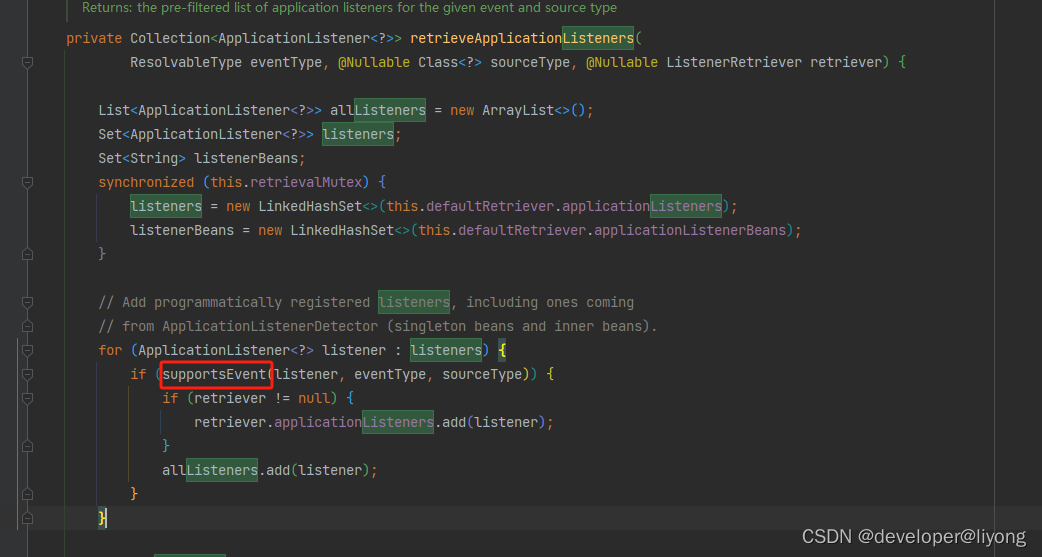
ListenerRetriever 会过滤对应的ApplicationListener Event实例 这个Event实例包括它本身及它的孙子类

处理泛型并过滤:
在处理事件的时候就会去获取对应的监听器:
参考资料:小马哥核心编程思想。