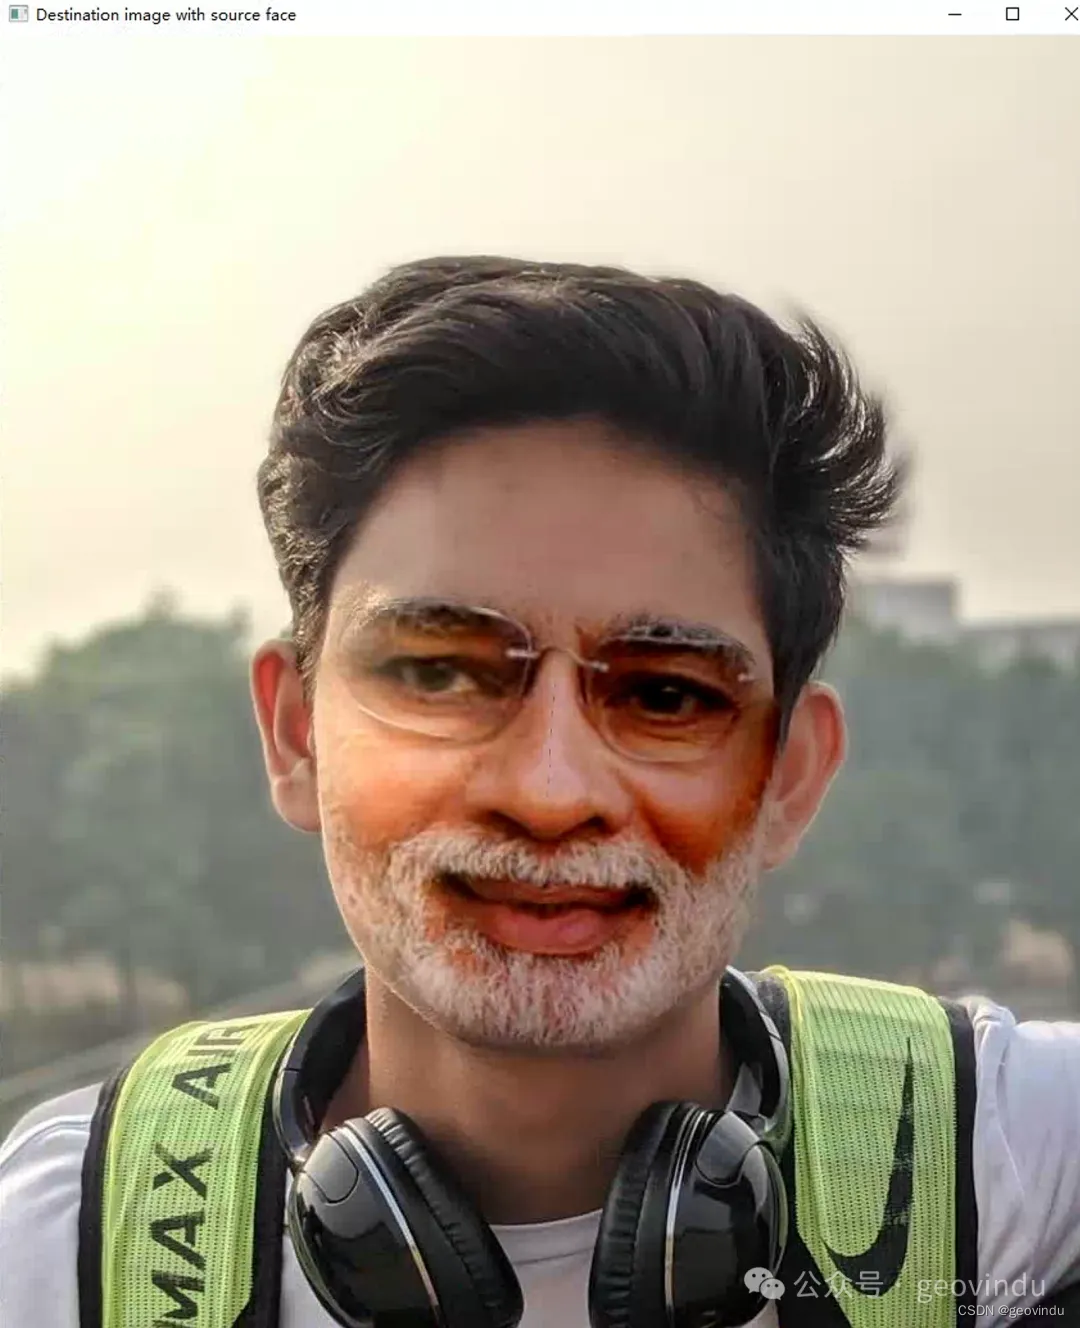
python:faces swap
# encoding: utf-8
# 版权所有 2024 ©涂聚文有限公司
# 许可信息查看: 两个头像图片之间换脸
# 描述: https://stackoverflow.com/questions/902761/saving-a-numpy-array-as-an-image?answertab=votes
# Author    : geovindu,Geovin Du 涂聚文.
# IDE       : PyCharm 2023.1 python 311
# Datetime  : 2024/6/13 10:25
# User      : geovindu
# Product   : PyCharm
# Project   : EssentialAlgorithms
# File      : imageFaceSwapFun.py
# explain   : 学习
import cv2
import numpy as np
import dlib
from PIL import Image as imclass FaceSwaFun(object):"""换脸类"""def __init__(self,SOURCEPATH,DESTPATH):"""实例化:param SOURCEPATH: 需要用脸的图片:param DESTPATH: 用脸目标图片"""self.SOURCE_PATH=SOURCEPATHself.DEST_PATH=DESTPATHdef index_from_array(self,numpyarray):""":param numpyarray::return:"""index = Nonefor n in numpyarray[0]:index = nbreakreturn indexdef getImage(self)-> tuple:""":return: 返回 (图片的数组,保存的文件名)"""frontal_face_detector = dlib.get_frontal_face_detector()frontal_face_predictor = dlib.shape_predictor("dataset/shape_predictor_68_face_landmarks.dat")source_image = cv2.imread(self.SOURCE_PATH)source_image_grayscale = cv2.cvtColor(source_image, cv2.COLOR_BGR2GRAY)#destination_image = cv2.imread(self.DEST_PATH)destination_image_grayscale = cv2.cvtColor(destination_image, cv2.COLOR_BGR2GRAY)source_image_canvas = np.zeros_like(source_image_grayscale)height, width, no_of_channels = destination_image.shapedestination_image_canvas = np.zeros((height, width, no_of_channels), np.uint8)source_faces = frontal_face_detector(source_image_grayscale)# Obtaining source face landmark points, convex hull, creating mask and also getting delaunay triangle face landmark indices for every facefor source_face in source_faces:source_face_landmarks = frontal_face_predictor(source_image_grayscale, source_face)source_face_landmark_points = []for landmark_no in range(68):x_point = source_face_landmarks.part(landmark_no).xy_point = source_face_landmarks.part(landmark_no).ysource_face_landmark_points.append((x_point, y_point))source_face_landmark_points_array = np.array(source_face_landmark_points, np.int32)source_face_convexhull = cv2.convexHull(source_face_landmark_points_array)cv2.fillConvexPoly(source_image_canvas, source_face_convexhull, 255)source_face_image = cv2.bitwise_and(source_image, source_image, mask=source_image_canvas)# DELAUNAY TRIANGULATIONbounding_rectangle = cv2.boundingRect(source_face_convexhull)subdivisions = cv2.Subdiv2D(bounding_rectangle)subdivisions.insert(source_face_landmark_points)triangles_vector = subdivisions.getTriangleList()triangles_array = np.array(triangles_vector, dtype=np.int32)triangle_landmark_points_list = []source_face_image_copy = source_face_image.copy()for triangle in triangles_array:index_point_1 = (triangle[0], triangle[1])index_point_2 = (triangle[2], triangle[3])index_point_3 = (triangle[4], triangle[5])index_1 = np.where((source_face_landmark_points_array == index_point_1).all(axis=1))index_1 = self.index_from_array(index_1)index_2 = np.where((source_face_landmark_points_array == index_point_2).all(axis=1))index_2 = self.index_from_array(index_2)index_3 = np.where((source_face_landmark_points_array == index_point_3).all(axis=1))index_3 = self.index_from_array(index_3)triangle = [index_1, index_2, index_3]triangle_landmark_points_list.append(triangle)destination_faces = frontal_face_detector(destination_image_grayscale)# Obtaining destination face landmark points and also convex hull for every facefor destination_face in destination_faces:destination_face_landmarks = frontal_face_predictor(destination_image_grayscale, destination_face)destination_face_landmark_points = []for landmark_no in range(68):x_point = destination_face_landmarks.part(landmark_no).xy_point = destination_face_landmarks.part(landmark_no).ydestination_face_landmark_points.append((x_point, y_point))destination_face_landmark_points_array = np.array(destination_face_landmark_points, np.int32)destination_face_convexhull = cv2.convexHull(destination_face_landmark_points_array)# Iterating through all source delaunay triangle and superimposing source triangles in empty destination canvas after warping to same size as destination triangles' shapefor i, triangle_index_points in enumerate(triangle_landmark_points_list):# Cropping source triangle's bounding rectanglesource_triangle_point_1 = source_face_landmark_points[triangle_index_points[0]]source_triangle_point_2 = source_face_landmark_points[triangle_index_points[1]]source_triangle_point_3 = source_face_landmark_points[triangle_index_points[2]]source_triangle = np.array([source_triangle_point_1, source_triangle_point_2, source_triangle_point_3],np.int32)source_rectangle = cv2.boundingRect(source_triangle)(x, y, w, h) = source_rectanglecropped_source_rectangle = source_image[y:y + h, x:x + w]source_triangle_points = np.array([[source_triangle_point_1[0] - x, source_triangle_point_1[1] - y],[source_triangle_point_2[0] - x, source_triangle_point_2[1] - y],[source_triangle_point_3[0] - x, source_triangle_point_3[1] - y]],np.int32)# Create a mask using cropped destination triangle's bounding rectangle(for same landmark points as used for source triangle)destination_triangle_point_1 = destination_face_landmark_points[triangle_index_points[0]]destination_triangle_point_2 = destination_face_landmark_points[triangle_index_points[1]]destination_triangle_point_3 = destination_face_landmark_points[triangle_index_points[2]]destination_triangle = np.array([destination_triangle_point_1, destination_triangle_point_2, destination_triangle_point_3], np.int32)destination_rectangle = cv2.boundingRect(destination_triangle)(x, y, w, h) = destination_rectanglecropped_destination_rectangle_mask = np.zeros((h, w), np.uint8)destination_triangle_points = np.array([[destination_triangle_point_1[0] - x, destination_triangle_point_1[1] - y],[destination_triangle_point_2[0] - x, destination_triangle_point_2[1] - y],[destination_triangle_point_3[0] - x, destination_triangle_point_3[1] - y]],np.int32)cv2.fillConvexPoly(cropped_destination_rectangle_mask, destination_triangle_points, 255)# Warp source triangle to match shape of destination triangle and put it over destination triangle masksource_triangle_points = np.float32(source_triangle_points)destination_triangle_points = np.float32(destination_triangle_points)matrix = cv2.getAffineTransform(source_triangle_points, destination_triangle_points)warped_rectangle = cv2.warpAffine(cropped_source_rectangle, matrix, (w, h))warped_triangle = cv2.bitwise_and(warped_rectangle, warped_rectangle,mask=cropped_destination_rectangle_mask)# Reconstructing destination face in empty canvas of destination image# removing white lines in triangle using maskingnew_dest_face_canvas_area = destination_image_canvas[y:y + h, x:x + w]new_dest_face_canvas_area_gray = cv2.cvtColor(new_dest_face_canvas_area, cv2.COLOR_BGR2GRAY)_, mask_created_triangle = cv2.threshold(new_dest_face_canvas_area_gray, 1, 255, cv2.THRESH_BINARY_INV)warped_triangle = cv2.bitwise_and(warped_triangle, warped_triangle, mask=mask_created_triangle)new_dest_face_canvas_area = cv2.add(new_dest_face_canvas_area, warped_triangle)destination_image_canvas[y:y + h, x:x + w] = new_dest_face_canvas_area# Put reconstructed face on the destination imagefinal_destination_canvas = np.zeros_like(destination_image_grayscale)final_destination_face_mask = cv2.fillConvexPoly(final_destination_canvas, destination_face_convexhull, 255)final_destination_canvas = cv2.bitwise_not(final_destination_face_mask)destination_face_masked = cv2.bitwise_and(destination_image, destination_image, mask=final_destination_canvas)destination_with_face = cv2.add(destination_face_masked, destination_image_canvas)# Seamless cloning to make attachment blend with surrounding pixels# we have to find center point of reconstructed convex hull to pass into seamlessClone()(x, y, w, h) = cv2.boundingRect(destination_face_convexhull)destination_face_center_point = (int((x + x + w) / 2), int((y + y + h) / 2))seamless_cloned_face = cv2.seamlessClone(destination_with_face, destination_image, final_destination_face_mask,destination_face_center_point, cv2.NORMAL_CLONE)data = im.fromarray(seamless_cloned_face)# saving the final output# as a PNG filefile='geovindu.png'data.save(file)#cv2.imshow("Destination image with source face 2", seamless_cloned_face)#cv2.waitKey(0)#cv2.destroyAllWindows()print(type(seamless_cloned_face))return (seamless_cloned_face,file)'''1.import cv2cv2.imwrite("geovindu.jpg", seamless_cloned_face)2.from PIL import Imageim = Image.fromarray(seamless_cloned_face)im.save("geovindu.jpg")3.import scipy.miscscipy.misc.imsave('geovindu.jpg', seamless_cloned_face)4.import scipy.miscscipy.misc.toimage(seamless_cloned_face, cmin=0.0, cmax=...).save('geovindu.jpg')5.import matplotlibmatplotlib.image.imsave('geovindu.png', seamless_cloned_face)'''
調用:
# 调用du= BLL.imageFaceSwapFun.FaceSwaFun("media/images/modi.jpg","media/images/viplav.jpeg")#du.SOURCE_PATH="media/images/modi.jpg"# du.DEST_PATH="media/images/viplav.jpeg"geovindu=du.getImage()print(geovindu)cv2.imwrite("geovindu20.png", geovindu[0])